Brown Leaves on Aloe Vera: Causes, Checks & Fixes
Quick answer
Brown leaves on Aloe vera usually mean overwatered mushy tissue, drought-stressed crispy margins, sun scorch on exposed blades, or normal aging of the oldest outer leaves. First step: squeeze a lower leaf and probe soil two inches down—mushy brown on wet mix means stop watering; crispy brown on bone-dry soil means one deep soak; brown patches only on the sun-facing side after a light move means shade and acclimate.
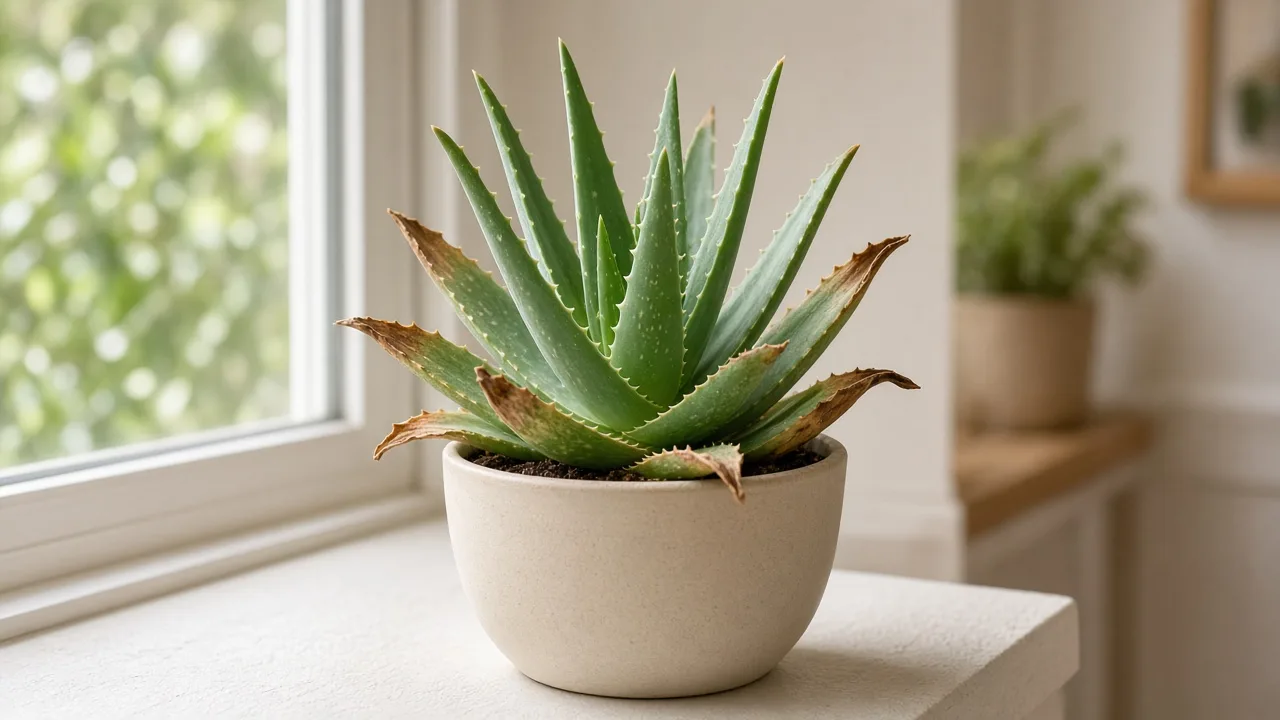
Brown Leaves on Aloe Vera: Causes, Checks & Fixes
This guide covers brown leaves on Aloe Vera. See also the general Brown Leaves guide, watering, and light pages for this plant.
Brown Leaves on Aloe Vera: Causes, Checks & Fixes
Quick answer
Brown leaves on Aloe Vera (Aloe vera) are a late-stage stress signal—the thick, gel-filled blades are telling you something about water, light, or age has gone wrong long enough for tissue to die. Unlike small brown tips, whole-leaf browning or spreading patches usually needs a real diagnosis, not another splash from the watering can.
For how broad leaf browning works across houseplants, see our brown leaves guide. On aloe, the squeeze-and-soil test separates opposite fixes in under a minute: mushy brown tissue on wet mix is rot risk; crispy brown on bone-dry mix is drought; directional brown patches after a light change is scorch; one papery brown outer leaf on a firm rosette is often normal turnover.
First step: press a lower outer leaf between your fingers and push a skewer two inches into the mix. Mushy brown with damp soil → stop watering and see overwatering. Crispy brown with dusty dry soil → one thorough soak per the watering guide. Brown only on the sun-facing blade after a window or patio move → shade and acclimate. One dry papery bottom leaf, firm center → trim when fully dead; no emergency.
Make one correction at a time so you can read the plant’s response over the next week. Brown tissue will not re-green; watch new center growth and pups for proof the fix worked.
What brown leaves look like on Aloe Vera
On aloe, browning shows up in distinct patterns tied to how this succulent stores water in thick, serrated rosette leaves. Match what you see before you treat:
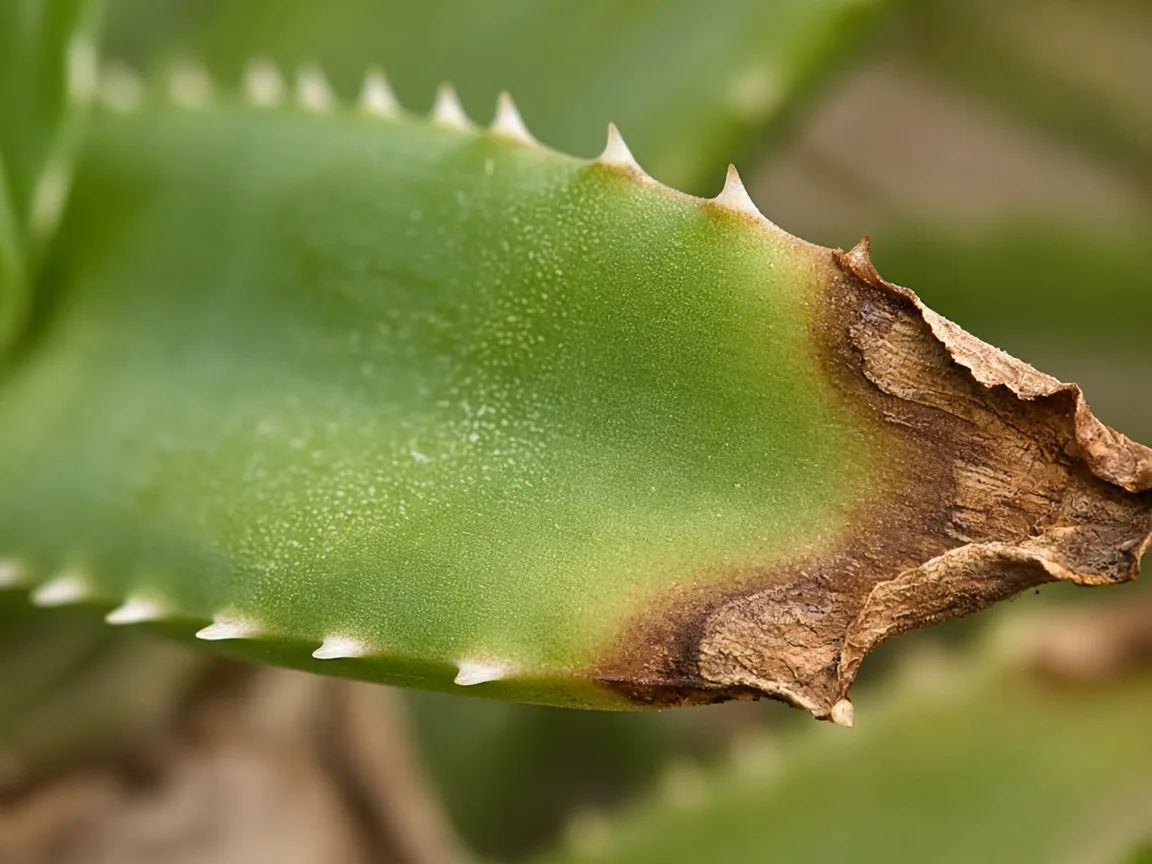
Brown leaf tissue on Aloe Vera - compare texture with firm green blades on the same rosette.
Overwatering and rot pattern:
- Soft, water-soaked brown starting at the base of outer leaves, sometimes with yellow translucent tissue underneath
- Lower stem or crown feels squishy when pressed; pot feels heavy for days
- Soil wet or damp two inches down for more than a week; sour smell from drainage holes
- Brown may spread from base upward while center leaves still look green—then collapse if roots fail
- Often follows calendar watering in winter, saucers left full, or dense peat mix in a dim room
Drought-stress pattern:
- Crispy dry brown at tips or margins of outer leaves that still feel firm, not mushy
- Leaves may look slightly thin or concave before edges bronze
- Very light pot; mix dusty dry two to three inches down
- Browning progresses slowly over weeks of missed water—center rosette stays upright longer than outer blades
Sun scorch pattern:
- Dry brown or bleached patches on the side that faced intense sun—often after moving outdoors or to a south sill in summer
- Leaves may show reddish stress tint on margins before cells die
- Damage is directional; shaded side of the same leaf often stays green and firm
- Common when a dim indoor plant jumps to full afternoon sun without acclimation
Normal senescence pattern:
- One or two lowest outer leaves fade from green to yellow-brown to dry papery brown over months
- Firm center growth and active pups stay fully green
- No wet soil, no base mush, no sour smell—just slow cosmetic aging as new leaves emerge from the crown
- Common on mature plants with offsets crowding the pot rim
Salt and fluoride pattern:
- Tan to brown margins on otherwise firm leaves; sometimes white crust on pot rim
- Soil may dry on a correct schedule—browning is chemical, not thirst
- Overlaps with brown tips more than whole-leaf death unless feeding was heavy
Cold or shock pattern:
- Brown water-soaked patches after a plant sat against a cold window or was left outdoors below ~40°F (4°C)
- Tissue may darken within days of a chill; differs from slow drought crisping
A few dry brown outer leaves on an otherwise firm rosette with soil drying on schedule may simply be old leaf turnover. Concern rises when brown moves into new center growth, pairs with wet soil for weeks, or spreads across many leaves within days.
Reading the gel squeeze—aloe’s fastest brown-leaf test
Aloe’s water-storage leaves make texture the fastest clue. Press a lower outer blade between thumb and finger:
- Squishy, cold, waterlogged feel → cells are rupturing from excess moisture; roots are not keeping up. Pair with a soil probe—if damp, treat as wet-root stress before you add anything else.
- Firm but thin, with crispy brown edges → the plant pulled water from expendable outer tissue; soil is likely too dry.
- Firm and plump with one papery brown lowest leaf → senescence; the rosette is reallocating resources to center growth and pups.
- Firm body with dry brown patches on one face only → sun or heat scorch on that exposed surface.
This test works because aloe does not wilt like a fern—it changes leaf turgor and color while staying upright. Do not rely on leaf color alone; mushy versus crispy tells you which watering direction to move.
Why Aloe Vera gets brown leaves
Aloe evolved across dry regions of the Arabian Peninsula, storing water in thick leaves and tolerating long dry spells. Brown leaves almost always mean the water–light rhythm or tissue age is out of sync with that biology—not that the plant needs fertilizer on day one.
Overwatering and root failure
Overwatering should be avoided on aloe because wet soil suffocates fine roots and invites rot. When roots fail, outer leaves brown from the base up—tissue turns soft, water-soaked, then necrotic brown while the mix stays damp. This is the most common indoor killer; owners water on a summer schedule through winter or let pots sit in drained saucer water.
Plastic pots, dense potting mix, and low winter light compound the problem: soil stays damp for weeks while growth nearly stops. Full rot mechanics live on the root rot and overwatering pages.
Underwatering during active growth
Aloe is drought-tolerant, but during spring and summer in a bright window it still drinks steadily. When the root zone stays dry too long, the plant sacrifices outer leaf margins—crispy brown tips and edges spread slowly inward on firm tissue. Fear of overwatering after a past rot scare is a common trigger.
Sun scorch and light shock
Aloe wants bright light and tolerates direct sun when acclimated—but a sudden move from a dim corner to harsh afternoon sun burns the thick leaves. UV stress can produce protective pigments that read reddish before cells die brown on the exposed face. See light requirements for placement that avoids scorch while preventing leggy stretch.
Normal outer-leaf senescence
Maturing aloe producing pups at the base naturally sheds the lowest leaves. They fade green → yellow → dry brown over months while the center stays firm. This is turnover, not rot—unless many leaves brown at once or the base softens on wet soil.
Winter slowdown and wet soil
Reduce watering to the minimum in winter because aloe growth slows when light drops. Continuing a summer rhythm in December keeps soil wet while the plant is not using moisture—brown mushy bases often follow. Pair with the watering guide seasonal notes.
Salt, fluoride, and over-fertilization
Hard tap water and heavy feeding leave mineral salts that brown leaf margins on an otherwise well-watered schedule. Fix water quality before reaching for more fertilizer.
How to confirm the cause
Work through this checklist in order. Each step narrows the list without stacking treatments:
- Gel squeeze — Mushy = wet roots. Crispy firm = drought. Firm with one papery bottom leaf = senescence.
- Soil moisture at depth — Push a finger or skewer two to three inches into the mix. Soggy for a week confirms overwatering. Dusty dry throughout confirms drought.
- Pot weight — Heavy with limp brown lower leaves = too much water. Feather-light with crispy margins = too little.
- Which leaves and which face — Bottom outer only, slowly = aging. Base-up mush on many leaves = rot. Patches on sun-facing side after a move = scorch.
- Season and recent care — Winter calendar watering, repotting last week, patio move, or heavy rain outdoors? Timing that matches browning is diagnostic.
- Smell and base check — Sour soil or soft crown = escalate to root inspection. Dry papery lowest leaf with firm crown = wait and trim.
Lookalike symptoms
| What you see | Likely cause | How to tell apart |
|---|---|---|
| Mushy brown base, wet soil, heavy pot | Overwatering / root rot | Squeeze fails—tissue squishy; see root rot |
| Crispy brown tips or margins, dry soil, light pot | Underwatering | Improves within days after one deep soak; see underwatering |
| One or two bottom leaves papery brown over months, firm center | Normal senescence | No wet soil, no base mush |
| Dry brown patches on sun-facing side only | Sun scorch | Sudden onset after light increase; firm leaf body elsewhere |
| Tan margins, white pot crust, soil dry on schedule | Salt / fluoride | Base hard; switch water before feeding |
| Fine stippling with webbing on undersides | Spider mites | Tap test over white paper—not a watering problem |
First fix for Aloe Vera—squeeze the leaf and probe the soil
Before you fertilize, repot, mist, or soak, press a lower leaf and check soil two inches down.
That single check prevents the two most common mistakes: watering brown leaves that are already drowning, and soaking a plant that only needs its oldest outer leaf trimmed. If tissue is mushy and soil is wet, stop watering—do not add more water hoping to “revive” the plant. If leaves are thin and soil is bone dry, one thorough soak is the right move—not daily drinks.
If brown patches appeared after a sudden sun increase, move the pot to bright indirect light and acclimate over one to two weeks before returning to direct sun.
Only after this pause should you unpot for root inspection—if soil stayed wet for weeks, the base is softening, or brown spread to many leaves within days. One correction today beats repotting, pruning, feeding, and moving windows on the same afternoon.
Step-by-step recovery by cause
After the first check, follow the path that matches your diagnosis—one at a time:
If overwatering or wet soil is the cause
- Stop watering until the mix is completely dry two inches down—this may take two to four weeks in winter.
- Empty saucers; confirm drainage holes are open.
- If the base stays mushy after the mix dries, unpot, trim dark slimy roots with a sterile blade, and let the plant air-dry two to five days.
- Repot into fresh fast-draining cactus mix per the soil guide—slightly undersized terracotta dries faster than oversized plastic.
- Resume watering only when new growth appears and soil dries fully between drinks.
If underwatering is the cause
- Give one thorough soak until water runs from drainage holes; let the pot drain fully.
- Do not water again until the mix is completely dry two inches down.
- Remove fully dried brown outer leaves at the base for cosmetic cleanup.
- Expect margins to stop spreading within days; dead brown tissue will not re-green.
If sun scorch is the cause
- Move to bright indirect light or morning sun only—remove from harsh afternoon exposure.
- Acclimate over one to two weeks if you need more direct sun later.
- Do not mist scorched leaves; keep normal soak-and-dry watering when soil is fully dry.
If normal senescence is the cause
- Trim fully brown or papery-dry outer leaves at the base with a clean knife when they are mostly dead tissue.
- Keep your normal soak-and-dry rhythm—no extra water or fertilizer needed.
- Watch center pups; as long as new growth stays green and firm, the plant is healthy.
Recovery timeline—what success looks like
Overwatering (caught early): Lower brown leaves may dry in place over two to four weeks after soil dries. Expect firm new center leaves or pups within three to six weeks once roots recover—old brown tissue does not re-green.
Overwatering (with rot trimmed): After repot and a five- to seven-day dry rest, new green growth may take four to eight weeks in cool winter light. A firm crown after trim is a good sign even when outer leaves look rough.
Underwatering: Outer leaves often firm within 24–72 hours after a proper soak. Crispy brown edges on old leaves stay brown; judge by plumper tissue and clean new pups.
Sun scorch: New growth emerging after relocation should look unblemished within three to six weeks. Scorched patches on old leaves remain until shed.
Senescence: No recovery timeline needed—trim spent leaves when papery dry and continue normal care.
When to worry: Crown softening, black mushy roots, sour smell, or brown spreading to every new leaf while soil stays wet—treat as urgent rot per root rot guidance.
What not to do
- Do not increase watering when leaves are brown and mushy on wet soil—overwatering kills more aloes than drought.
- Do not fertilize a browning aloe to “green it up” on day one; salts worsen stress.
- Do not mist leaves hoping to fix browning—aloe tolerates dry indoor air and wet crowns invite rot.
- Do not repot on day one unless roots are mushy or soil has failed—many cases resolve with watering or light correction only.
- Do not stack repotting, heavy pruning, fertilizer, and a new window position the same week.
- Do not assume every brown outer leaf is an emergency—one papery bottom leaf on a firm plant is often normal turnover.
How to prevent brown leaves next time
- Water by soil, not calendar — Allow soil to dry between waterings, then soak deeply; roughly every two to three weeks in summer and every four to six weeks in winter for most indoor pots.
- Match winter to summer rhythm — Water less frequently in winter when growth slows.
- Acclimate to direct sun — Move gradually from dim indoors to outdoor or south-window sun over one to two weeks.
- Use fast-draining mix and terracotta — Per the soil guide; avoid oversized containers that hold wet soil for weeks.
- Empty saucers within 30 minutes of every watering.
- Trim spent lower leaves promptly — Lets you see new problems at the base early.
- Use filtered water if brown margins keep returning on an otherwise correct schedule.
Pet safety when trimming brown Aloe leaves
Aloe vera is toxic to cats and dogs—the latex just beneath the leaf skin can cause vomiting and diarrhea if pets chew trimmed pieces. Discard brown leaf clippings in a closed bin and wash hands after cutting. Place pots out of reach if cats bat leaves off windowsills.
Related Aloe Vera guides
Brown leaves overlap with several other stress signals on the same plant:
- Aloe Vera watering guide — soak-and-dry method and winter slowdown
- Overwatering on Aloe Vera — mushy base, wet mix, sour soil
- Underwatering on Aloe Vera — crispy margins, bone-dry soil
- Brown tips on Aloe Vera — margin-only browning vs whole-leaf death
- Root rot on Aloe Vera — trim, callous, and repot protocol
- Aloe Vera light requirements — bright light without scorch
- Aloe Vera overview — full care hub
Most aloes recover from brown leaves once water and light match this succulent’s rhythm. Dead brown tissue is gone for good; a firm center rosette and green new pups mean you corrected the right problem.
When to use this page vs other Aloe Vera guides
- Brown tips on Aloe Vera — Use when only margins are tan or brown while the leaf body stays mostly green.
- Yellow leaves on Aloe Vera — Use when yellowing appears before tissue turns fully brown.
- Aloe Vera problems hub — Browse all common issues on this species.
- Overwatering on Aloe Vera — Use when mushy translucent tissue and wet soil are the main clues.
- Underwatering on Aloe Vera — Use when crispy firm leaves and dry soil dominate.