Orchid Keiki Care: Identification, Removal, and Potting
An orchid keiki can grow into a second plant. See how to distinguish it from a flower spike, when to leave it attached, and how to pot it safely.
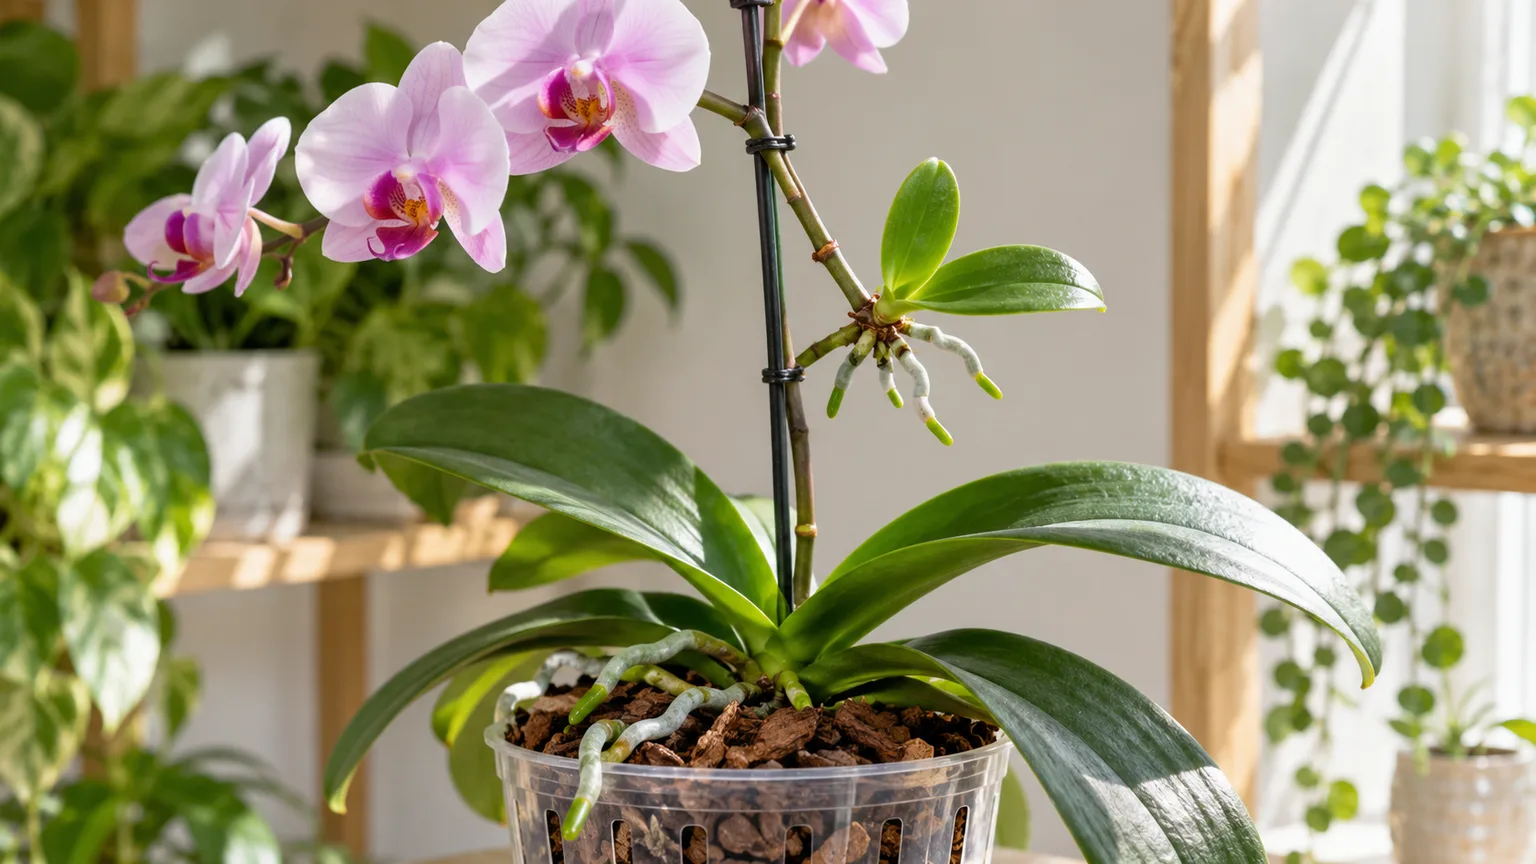
An orchid keiki is a baby plant that grows directly on a mature orchid, usually from a flower-spike node or a cane. It is a natural way for certain orchids to make a new plant without seed. The important decision is not whether to “save” every keiki; it is whether the plantlet has enough roots to live separately, whether its parent is healthy, and whether you want a second orchid or a larger clump.
A keiki can stay attached while it develops, and there is rarely a need to rush it into a pot. Wait for several sturdy roots and a few leaves, then use a sterile blade and a small, airy orchid pot. If the plantlet is still tiny, a firm green parent stem is supporting it, or you are unsure what you are seeing, leave it in place and observe new growth before making a cut.
What an Orchid Keiki Is and Where It Forms
“Keiki” is a Hawaiian word for child or baby. In orchid growing, it means a vegetative plantlet produced by the parent plant. The American Orchid Society notes that a keiki can appear on an orchid’s flower spike, or inflorescence, and can be removed once it has grown several leaves and roots a couple of inches long. Its keiki guidance also emphasizes using a sterile tool because orchids can carry viruses.
On a moth orchid (Phalaenopsis), a keiki commonly forms at a node along a living flower spike. The first sign may be a small pair of leaves; roots usually emerge around the base afterward. In some orchids, including certain Dendrobium and Vanda, plantlets develop from a cane or stem rather than the same kind of flower spike that a Phalaenopsis owner sees.
A keiki is genetically derived from its parent, so it is a practical way to multiply a named hybrid or favorite plant. It should generally retain the parent’s genetic traits, including its expected flower type, although the timing and quality of growth depend on the keiki’s maturity and growing conditions. It is not a seedling, a parasite, or a separate orchid species.
Keiki, Flower Spike, or Root? How to Tell
New orchid growth can be difficult to identify when it is only a few millimeters long. A flower spike on Phalaenopsis tends to have a flattened, mitten-like tip and emerges from between the leaves; a root usually has a rounded tip, often green, and then develops a silvery outer covering as it matures. A keiki becomes easier to recognize once it makes two distinct leaves and then roots from the little plantlet.
Use the pattern of growth, not just color. A single pointed or rounded nub is not enough to call a keiki, and the same plant can grow a root and a flower spike close together. If there are no leaves yet, give it time; cutting a new spike or a healthy root because it “looks like a baby” can cost the plant flowers or useful root growth.
On a cane-type orchid, look for a small leafy plant with its own roots at a node on the cane. A bud without leaves and roots may be a flower or dormant growth instead. When identification is uncertain, photograph the growth from several angles and compare it with a reliable species or genus guide before taking a knife to the plant.
Which Orchids Grow Keikis and Why
Keikis are most familiar on Phalaenopsis and Dendrobium, but the American Orchid Society also lists Vanda and Catasetum among genera that can produce them. Its orchid propagation overview describes keikis as small, individual offshoots that can be potted separately. Not every orchid will make one, and two plants of the same genus may behave differently.
Where a keiki appears depends partly on the orchid’s growth pattern. A monopodial orchid such as Phalaenopsis grows upward from one main stem and may form an offshoot at a stem or flower-spike node. Many sympodial orchids grow through a sequence of canes or pseudobulbs; a baby plant on a cane is different from a new cane emerging from the rhizome, so do not divide the whole plant just because you see a new shoot.
There is no single reliable cause that explains every keiki. Plant variety, age, growing conditions, and the location of dormant buds can all be relevant, but the appearance of a keiki alone does not diagnose neglect or distress. Check the mother plant’s leaves, crown, roots, and potting medium separately instead of trying to “fix” it by removing the baby.
Leave It Attached or Separate It?
If the keiki and parent are both healthy, leaving the plantlet attached is often the simplest choice until the keiki has a usable root system. The parent can continue supporting its growth, and you avoid disturbing roots before they can anchor in a pot. A mature keiki can remain attached longer and grow into a fuller, multi-stemmed orchid.
The American Orchid Society’s answer about Vanda keikis notes that a grower may leave plantlets attached so the parent develops into a clump. That option can be especially sensible for orchids grown in baskets or with exposed roots, where separating and potting each small offset may create more work without improving the plant’s health.
Reasons to wait
Wait if the keiki has no roots, only one very short root, or leaves that are still tiny. Also wait if the parent has a healthy green spike and is flowering unless there is a specific reason to interrupt it; simply seeing a baby is not an emergency. If the parent’s spike starts to dry, watch whether the keiki still looks firm and whether its own roots are growing before choosing a cut.
Keeping the keiki attached does not mean you need to give it a different watering schedule. Care for the parent according to its orchid type, pot, and medium; do not keep the whole pot wet just because the keiki has aerial roots. If roots on the keiki are exposed, they can be moistened during normal watering, but daily misting is not a substitute for a healthy root zone and good airflow.
When separation may make sense sooner
A keiki may need to be separated when it is mature enough and you want an independent plant, when a crowded clump needs space, or when the parent is declining and the plantlet already has viable roots. But cutting a baby from a sick orchid will not repair the parent. First identify the parent’s problem—such as root loss, crown damage, or a decomposing medium—and decide whether moving the keiki away reduces a real risk.
If rot is advancing into the exact stem or cane that holds a keiki, a grower may have to prioritize saving the viable plantlet before it reaches the roots. That is a rescue decision, not a normal propagation shortcut, and success is less predictable when the keiki is underdeveloped. Keep as much healthy tissue and root as possible, isolate it from decaying material, and avoid applying unverified household treatments to the cut.
When an Orchid Keiki Is Ready to Remove
A useful home benchmark is at least two or three firm roots about 2 to 3 inches long, plus several leaves. Sources phrase the threshold somewhat differently: the University of Washington’s Elisabeth C. Miller Library relays advice to remove a Phalaenopsis keiki when it has two or three roots, while the American Orchid Society says to wait until the roots are a couple of inches long. Gardening Know How adds the practical check of several leaves and healthy roots.
Treat those measurements as a readiness guide rather than a pass/fail rule for every genus. Two long, firm roots may anchor a small keiki better than three short, shriveled ones; roots that are actively growing are more useful than roots that are damaged or hollow. A plantlet with a few leaves and no roots is still dependent on the parent, so cutting it off and hoping it will root later is a gamble.
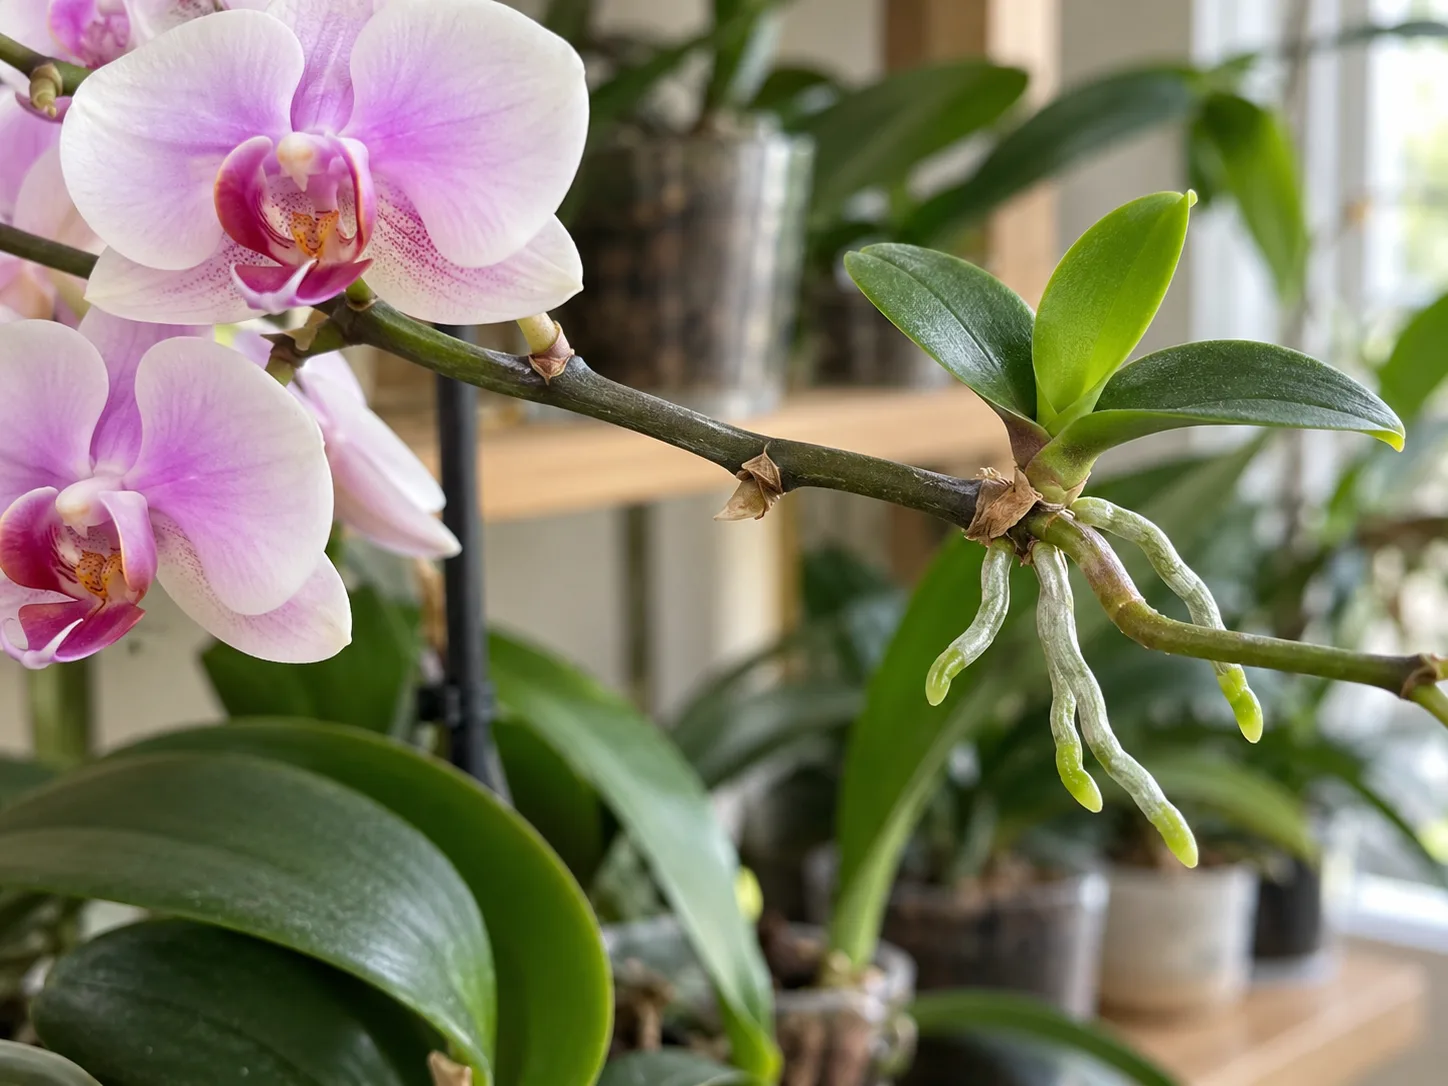
Before cutting, confirm the parent and keiki are hydrated but not sitting in soggy medium. Have the small pot ready first so the roots do not dry while you improvise. If flowers are still opening on the parent, you can usually let them finish; the decision depends on plant health and the keiki’s roots, not a calendar date.
Tools and Potting Media to Prepare
Use a sharp, clean blade or fine pruning snips that can make one controlled cut. Sterilize the cutting surface before use and again before cutting another orchid; this matters more than treating the wound with cinnamon or a random powder. Keep a small ventilated pot, fresh orchid medium, and a label nearby so you can finish the job without leaving a delicate keiki exposed for long.
The pot should be only large enough to hold the keiki’s roots with a little room for new growth. A pot that is much larger than the root mass stays wet longer and makes it difficult to judge moisture. A clear orchid pot is convenient because it lets you observe root condition and medium drying, but a small slotted pot or basket can work when it matches the parent’s growing style.
Choose fine-grade orchid bark, a small amount of loosely packed sphagnum, or a blend that matches how often you can check moisture. Bark generally gives more air and dries faster; sphagnum retains water longer and can help in a dry home, but tightly packed moss around tiny roots can stay wet and airless. Avoid garden soil and dense houseplant potting mix, which are not substitutes for an airy orchid medium.
How to Separate a Keiki by Orchid Type
Do the cut when the keiki meets the root-readiness test and when you can pot it immediately. Support the spike or cane so it does not flex as you work, and avoid tugging the plantlet away by hand. Orchid stems can split unpredictably, and a torn base can damage both the baby and the parent.
Phalaenopsis keiki on a flower spike
The University of Washington library’s Phalaenopsis propagation answer describes two approaches: slice cleanly between the plantlet and stem, or cut the spike above and below the attachment point. If roots curl around the spike, keeping a short piece of spike attached may be easier than trying to unwind or sever roots. Use the option that preserves the most healthy root tissue and does not crush the keiki’s base.
- Stabilize the flower spike and identify where the keiki joins it.
- With a sterilized blade, make a clean cut so the plantlet comes free without bending its leaves or roots.
- If the roots are wrapped around the spike, keep a small segment of spike above and below the attachment rather than pulling the roots loose.
- Inspect the keiki and parent cut surfaces. If either is crushed or split, make a clean finishing cut with the sterile blade.
- Set the keiki into its prepared pot promptly, keeping its leaves and crown above the medium.
Do not automatically cut the entire green flower spike after removing one keiki. It may still hold flowers or viable nodes, and Phalaenopsis spike pruning depends on the plant’s condition and the grower’s bloom goals. Likewise, do not assume that cutting a spent spike will reliably make it produce a keiki; the growth response is not guaranteed.
Dendrobium and Vanda keikis
A Dendrobium keiki may form along a cane, where its own roots emerge near the plantlet. Gardener’s Path’s orchid propagation guide describes removing a short piece of stem beneath a rooted keiki and securing it in sphagnum while new roots take hold. Cut below the lowest roots and above the keiki if a short piece of cane helps support them, but do not remove an entire firm, green cane that is still part of the parent simply to make a cleaner-looking pot. Old canes can store resources or flower again in some Dendrobiums, so identify the orchid and its cane habit first.
Vanda keikis often grow as offsets on the main stem. They may be left attached as a clump or removed when roots are long enough to establish in a basket or other suitable setup. A basket-grown Vanda should not automatically be forced into the same bark-filled pot used for a Phalaenopsis; preserve the airy growing style that suits the parent.
The general rule for every genus is to cut through the connecting stem cleanly while preserving the plantlet’s roots. If the keiki is attached to a cane, distinguish the plantlet from a new cane arising at the plant’s base before cutting. When a species-specific culture note conflicts with generic instructions, follow the guidance for the identified orchid.
Pot the Keiki Without Burying Its Crown
Position the roots into the small pot and add the medium around them without forcing a root to bend sharply. Keep the leaf base and growing point above the medium; burying the crown can trap moisture where new leaves emerge and invite rot. The short bit of flower spike or cane can rest at the surface or be secured to a stake if it helps the keiki stay upright.
If you use sphagnum, moisten it first and keep it springy rather than pressing it into a solid plug. With bark, choose pieces small enough to sit around the roots, but do not pack them so tightly that water and air cannot move through. The keiki should be stable in the pot, not held upright by a buried stem or by compacting the mix around the crown.
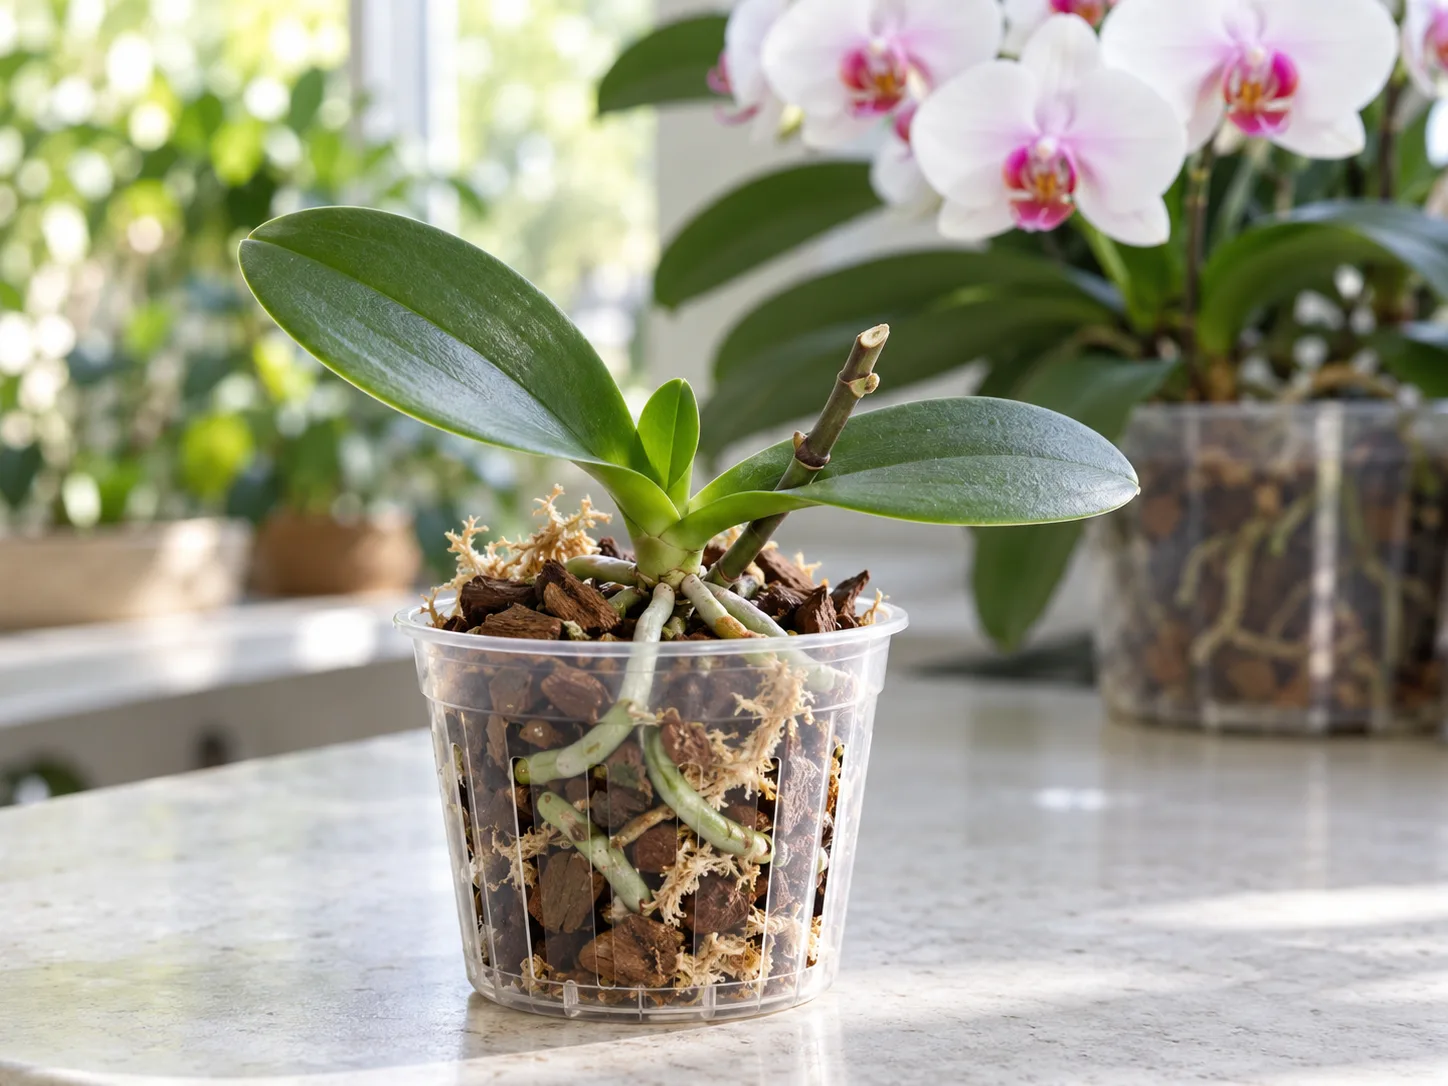
Water the medium thoroughly enough to wet it, then let excess water drain away. Do not leave the pot standing in water, and do not pour water into the keiki’s leaf crown. A tiny plant has a small root system, so check the medium more often than you would for a large orchid, but water according to how quickly it dries rather than on a fixed weekly schedule.
Aftercare for the First Weeks
Place the new keiki in the same general temperature range and bright, indirect light that suits its parent. Avoid a sudden move into intense direct sun, a cold window, a heating vent, or a dark corner. It may pause briefly after separation while it adjusts; stability and good root contact with the medium matter more than extra fertilizer or repeated handling.
Keep the medium slightly moist between waterings, not continuously wet. The right interval depends on bark size, moss content, pot ventilation, room temperature, and humidity. A clear pot can help you see whether roots are firm and whether condensation or wet medium is lingering, but it does not remove the need to check the mix itself.
Do not mist the leaves several times a day or seal the plant in a bag by default. High humidity may slow drying but stagnant air and water trapped between leaves can cause trouble. If your room is exceptionally dry and you choose to use a small humidity enclosure, make sure it can ventilate and that the potting medium does not remain saturated.
Hold fertilizer until the keiki is stable and begins making new roots or leaves. Then use an orchid fertilizer according to its label, at a conservative concentration suitable for the product and your water. Extra feeding cannot compensate for damaged roots, poor light, an oversized pot, or a medium that stays wet.
Expect the keiki to grow at its own pace. The American Orchid Society notes that a well-cared-for keiki may flower in about a year, while a small one may take two or three years to reach flowering size. That is a broad expectation, not a promise; plant type, initial size, root health, light, temperature, and general care all affect the timeline.
Common Keiki Problems and What to Check
A newly separated keiki can look unchanged for a while because it is building roots before adding leaves. Do not repot it repeatedly to “check” the roots; repeated disturbance breaks new tips and makes establishment slower. Instead, look through a clear pot or inspect the exposed roots gently during routine watering, and change one growing condition at a time.
Wrinkled leaves or stalled growth
Wrinkling can indicate that a small root system is not replacing water lost from the leaves, but it does not always mean “water more.” Check whether roots are firm and whether the medium is bone dry, tightly packed and wet, or drying unevenly around the pot. If healthy roots are dry and the medium has fully dried, water it thoroughly and improve the checking interval; if roots are soft or the medium remains wet, more water can worsen the problem.
A stalled keiki may also be adjusting after separation or receiving too little suitable light. Keep it in bright, filtered light and away from temperature swings, then allow several weeks for a response. If the parent orchid is still healthy and the keiki has a living spike segment, leaving it attached longer may have been the lower-risk option; that is useful information for the next plantlet, not a reason to keep disturbing this one.
Soft or rotting roots
Roots that are mushy, hollow, brown-black, or losing their outer layer suggest that the medium is staying too wet or has too little air. Remove the keiki from standing water, check that the pot drains freely, and let the medium approach its appropriate drying point before watering again. If only a few roots are dead, do not trim healthy roots to make the plantlet fit a smaller pot.
If the base of the keiki or the point where its leaves meet has turned soft, keep water out of the crown and improve airflow. A fast-moving rot problem may require removing clearly dead material with a sterile tool, but aggressive cutting can leave a tiny orchid with too few roots to recover. When the damage is advancing beyond what you can identify, ask an orchid society or experienced grower to assess the plant before applying a fungicide or other treatment.
Does Keiki Paste Help?
Keiki paste is a product used on dormant nodes to encourage vegetative growth, but it is optional. A node can respond differently depending on the orchid and its condition, and a new plantlet is not guaranteed. If your orchid has already produced a keiki, the useful work is to grow its roots and decide whether to keep it attached; paste cannot replace either step.
Do not use paste as a rescue treatment for a weak orchid or as a substitute for proper light and root care. If you experiment on a healthy, established Phalaenopsis, follow the product directions precisely and apply it only where directed. Do not smear hormone product over the crown, roots, or leaves, and do not lower the plant’s light to try to force a baby; depriving an orchid of the conditions it needs can weaken it without producing the result you want.
Conclusion
An orchid keiki is a natural plantlet, not an emergency and not automatically a sign that the mother plant is failing. Identify it by its leaves and roots, let it mature until it has several firm roots a few inches long, and decide whether you want a separate orchid or a larger attached clump. When you do remove it, use a sterile blade, preserve the roots, and pot it in a small container with airy orchid medium while keeping its crown above the surface.
After separation, steady light, appropriate moisture, and patience are more useful than daily misting or heavy feeding. A keiki may take a year or several years to flower, and some never thrive if removed too early. Waiting for the roots to do their job gives the little orchid the best practical start.



