Black Spots on Pilea Peperomioides: Causes & Fixes
Quick answer
Black spots on Pilea peperomioides are a symptom, not a diagnosis. First move the plant away from nearby houseplants, then check whether marks are embedded lesions that spread or surface residue, and inspect the undersides for pests. Keep the leaves dry while you investigate; do not apply a pesticide or fungicide until the pattern supports that choice.
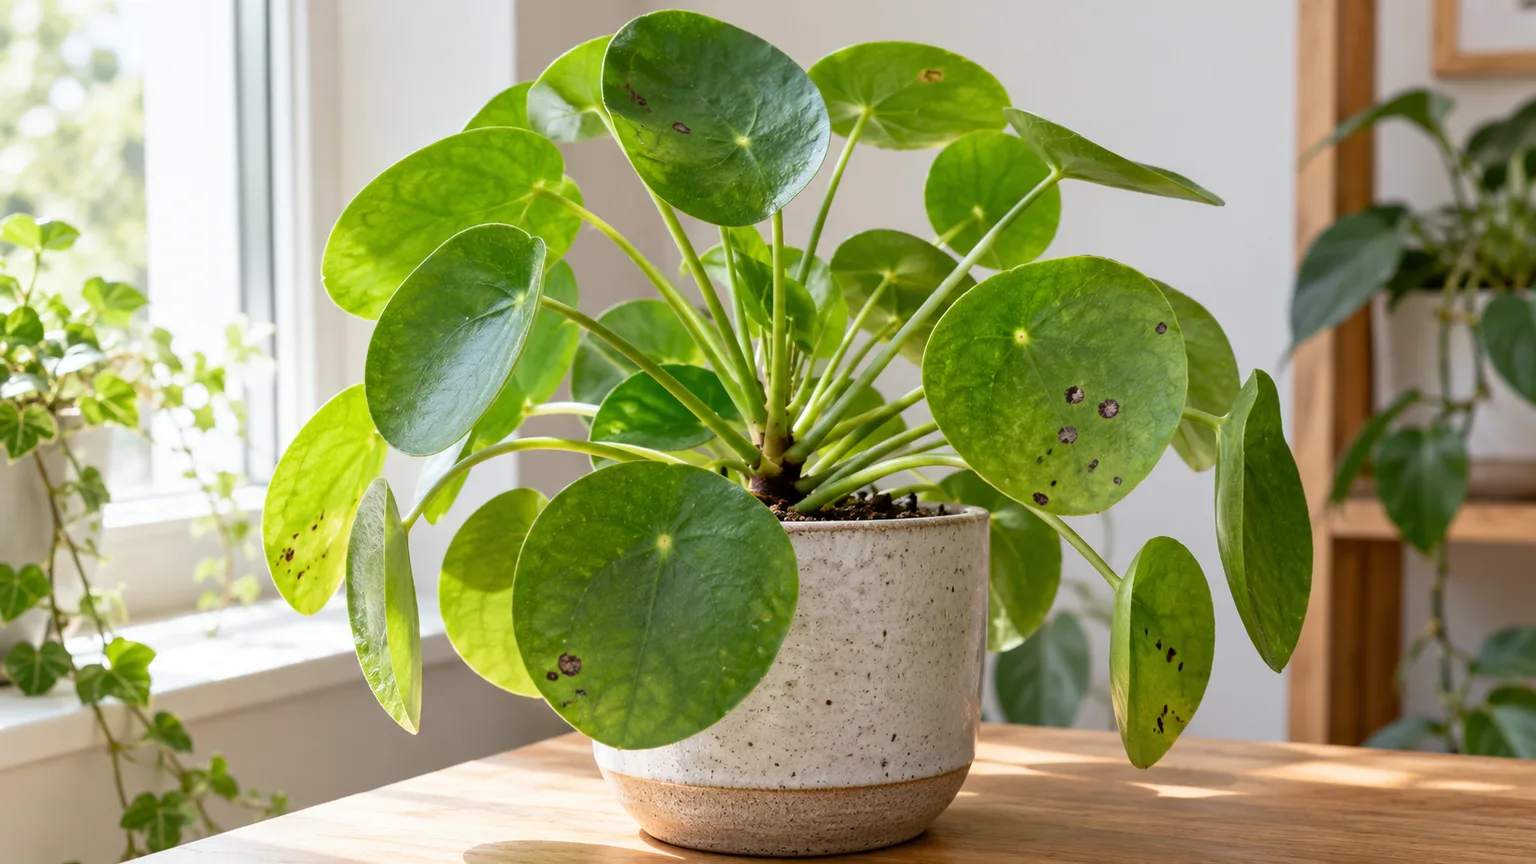
Black Spots on Pilea Peperomioides: Causes, Checks & Fixes
This guide covers black spots on Pilea Peperomioides. See also the general Black Spots guide, watering, and light pages for this plant.
Black Spots on Pilea Peperomioides: Causes, Checks & Fixes
Quick answer
Black spots on a Pilea peperomioides are a symptom, not a diagnosis. A dark mark may be a leaf-spot lesion, but it can also be a pest mark, sun injury, surface residue, or damage on one aging leaf. The safest first action is to move the whole pot away from other plants while you check the pattern. Do not spray, prune the whole canopy, or unpot the plant just because one leaf has a spot.
Pilea’s round coin leaves make a useful comparison set: look for marks on more than one leaf, whether they are spreading, and whether the newest leaves at the top are affected. If you want a broader visual comparison, the black spots on leaves guide covers the general symptom; this page narrows the checks to Pilea’s growth and care. For an overview of its normal shape and routine, start with the Pilea peperomioides care guide.
What black spots look like on Pilea
A true lesion is part of the leaf: it stays in place when you gently touch it, and the green tissue may look water-soaked, brown, or black around it. A lesion that grows, appears on other leaves, or develops a yellow margin deserves more attention than one stable mark on a single older leaf. Take a clear photograph today so you can compare the same leaf in a few days instead of relying on memory.
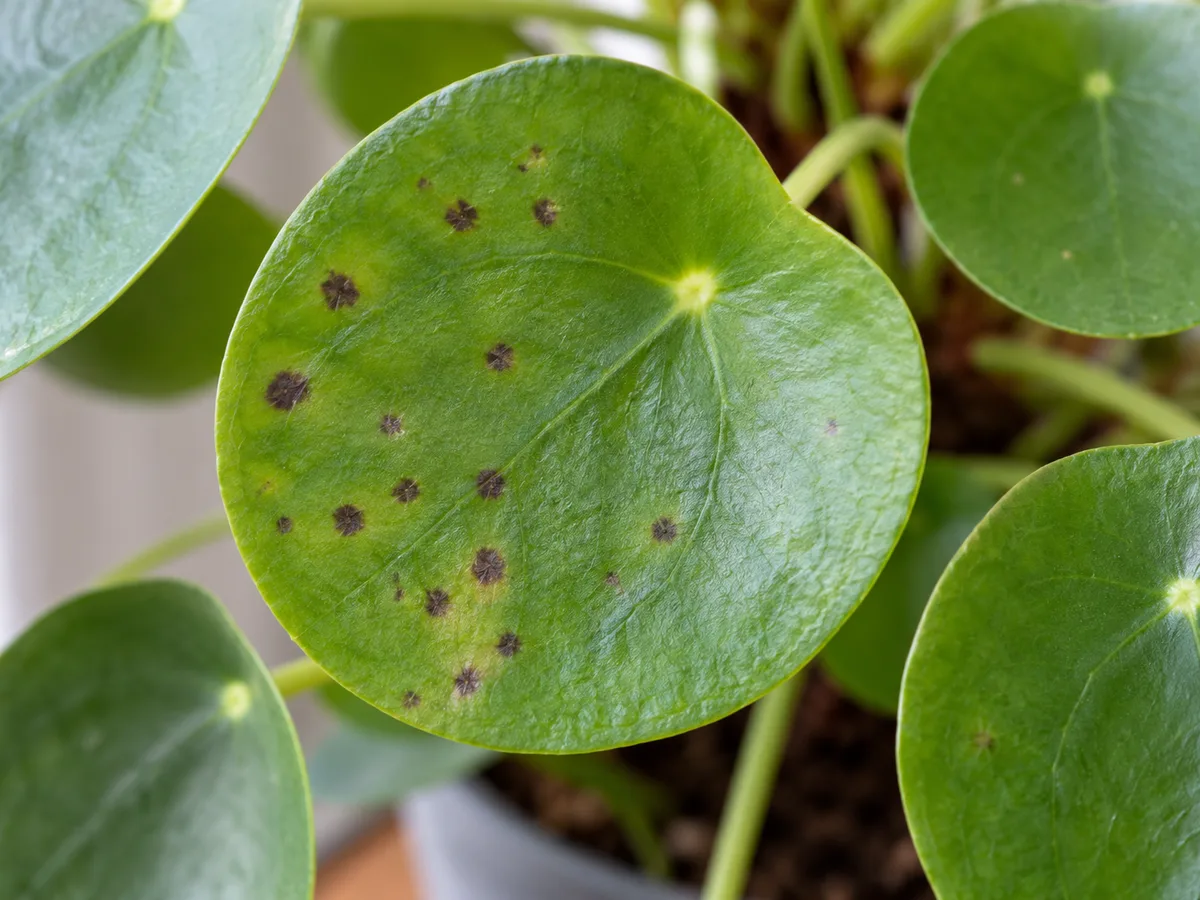
Small embedded spots on Pilea’s round leaf are a reason to inspect the pattern; appearance alone cannot identify the pathogen.
Pilea peperomioides is recognized by its round, coin-shaped leaves carried on long petioles. That broad surface makes the distribution easy to read: note whether lesions sit near the edge, cross the blade, or cluster where water may remain after the leaf was splashed. Do not scrape or rub a dark area hard; bruising a healthy leaf makes the result harder to interpret.
Read the pattern across Pilea’s coin leaves
Count affected leaves and compare their ages. One isolated spot on an old lower leaf, with a firm petiole and clean growth above, is less alarming than several new marks appearing across the canopy. Pilea can shed one or two older leaves as it grows, but normal leaf turnover is usually a gradual color change and loss, not a fast-moving series of embedded dark lesions (The Spruce’s Pilea profile).
Look at both sides of each marked blade in bright, indirect light. Spots may be easier to see with light behind the leaf, and a yellow margin can be subtle. Also inspect the long petiole and the point where it joins the central stem. If a lesion reaches the petiole or the stem becomes soft, treat that as more serious than cosmetic damage confined to a mature leaf.
On this plant, a healthy top matters more than a perfect old leaf. New leaves emerge at the growing tip, while offsets may appear near the base. Mark which leaves are affected and check the newest leaf again in several days; a stable old blemish and a new lesion appearing at the crown call for different responses.
When leaf-spot disease is plausible
Black or brown spots can be consistent with a bacterial or fungal leaf spot, especially when lesions are embedded, expanding, and accompanied by a water-soaked edge or yellow halo. University of Illinois Extension describes those features and moisture-assisted spread in its discussion of leaf spot on English ivy; that is useful general pattern evidence, not proof that the same pathogen is affecting a Pilea (Illinois Extension’s ivy diagnosis). A separate horticulture overview also describes dark-edged or haloed bacterial lesions and recommends prevention and mechanical control rather than assuming a spray will cure every case (Gardening Know How’s bacterial leaf spot guide).
There is no reliable home test that names a bacterium or fungus from a phone photo. Bacterial and fungal spots can overlap in color and shape, and leaf age, light, handling, and watering history can change how damage looks. The Pilea care profile does not identify one Pilea-specific disease as the default explanation for black spots; it notes common houseplant pests and emphasizes checking the growing conditions. Treat “leaf spot” as a working description until you have evidence for a cause.
Moist foliage is one clue, not a diagnosis. If the leaves were repeatedly splashed, misted, crowded together while wet, or left damp in still air, reduce those conditions while you investigate. Keep watering at the soil line and let the foliage dry; do not keep the plant in a humid enclosure in an attempt to repair spots.
Separate leaf spots from Pilea lookalikes
Use the whole pattern rather than color alone. These clues help decide what to inspect next:
| What you see | More likely explanation | Next check |
|---|---|---|
| Dark mark is embedded, enlarges, or has a wet-looking edge or yellow margin | Possible leaf-spot disease; not confirmed by appearance | Isolate the plant and watch whether new leaves develop lesions |
| Fine pale stippling, tiny moving specks, or delicate webbing under leaves | Spider mites may be present | Inspect the undersides and petioles with a bright light |
| Raised, shell-like bumps on a petiole or stem, sometimes with sticky residue | Scale insects are more plausible than a flat leaf lesion | Check the central stem and leaf joints before treating |
| A broad pale-brown patch on the window-facing side after a move into direct sun | Sun injury may fit better than a spreading spot disease | Review the recent placement change and return to indirect light |
| A mark or film lifts with a damp, soft cloth and no tissue beneath it is damaged | Surface residue or water deposits are possible | Test one small area gently; do not scrub the leaf |
| One lower leaf slowly yellows while the rest of the plant and new growth remain firm | Normal aging or a broader care issue may be involved | Compare with the Pilea yellow-leaves guide |
Pilea can host spider mites, and a Pilea-specific care profile describes webbing beneath leaves and visible spotting among the signs to check; look for the mites before concluding that every mark is a disease lesion (The Spruce’s Pilea pest notes). Raised scale, sticky honeydew, or clustered insects call for a pest-specific diagnosis; these are recognized scale clues in houseplants (Gardening Know How’s scale-identification guide). A flat spot that cannot be wiped away is not scale simply because it is dark.
Direct sun is another useful timeline check. Pilea prefers bright indirect light; if a plant was moved from shade into strong direct sun, broad bleached or brown scorch patches are more consistent with that exposure than with an infection that keeps appearing on sheltered leaves (Bob Vila’s Pilea care guidance). Recheck the Pilea light guide before changing the watering routine to compensate for a placement problem.
Check the plant before disturbing its roots
Start with the leaf surface and the plant’s recent history. Look for small moving insects, webbing, raised bumps, sticky residue, a recent move closer to a hot window, or repeated splashing during watering. Penn State Extension’s diagnostic framework likewise begins with site conditions and plant-management history, then weighs those against observed symptoms rather than naming a cause from one mark (Penn State’s plant-health diagnosis steps).
Next check the pot without unpotting the plant. Feel the top inch of mix, lift the pot to compare its weight with a dry pot, confirm that water can drain, and empty any collected runoff. Pilea’s water use changes with light, pot size, mix, and season, so use the Pilea watering guide as a care reference rather than following a fixed calendar. A Pilea in standard mix amended with perlite needs air around its roots; use the Pilea soil guide if the mix stays heavy or drains poorly.
Do not unpot a Pilea for a few leaf spots alone. Unpotting is justified when the central stem is soft at the soil line, the pot remains wet for an unusually long time, the mix smells sour, or the plant wilts despite wet soil. Those findings point toward a root-zone problem; compare them with the Pilea root-rot guide before deciding whether fresh mix is needed.
First response: isolate the whole Pilea
Move the entire pot out of reach of nearby plants and keep it there while you observe the leaves. This single, reversible step limits contact if a pest or infectious problem is involved, and it does not harm a Pilea whose mark turns out to be sun damage or residue. If the pot contains mother plant and offsets together, move them as one unit rather than separating the pups before you know what is happening.
After isolation, photograph the plant and note the date, which leaves are affected, and what changed in the last few weeks. Include a photo of the top, undersides, petioles, and central stem. Compare the same leaves again after several days. A lesion that remains the same on one old blade suggests a different level of urgency from a new lesion appearing on a young leaf.
Until you have a stronger clue, do not mist, wet the foliage during watering, fertilize, or apply a general-purpose spray. These actions either add moisture, stress the plant, or make it harder to see whether the spots are progressing. The goal is to preserve a readable diagnosis while preventing avoidable spread.
Choose the next step from the confirmed pattern
If a few embedded lesions are growing or new lesions are appearing, remove only leaves that are badly affected or clearly deteriorating. Use clean scissors, cut the petiole near its base without nicking the central stem, and bag fallen or removed foliage. Keep the leaves dry, give the plant space around its circular canopy, and avoid splashing water from one leaf to another. If more leaves continue to develop lesions despite those changes, ask a local extension diagnostic service about a sample; a laboratory can distinguish causes that visual inspection cannot.
If you find webbing or moving mites, continue the isolation and follow a treatment plan that is labeled for indoor plants and the identified pest. Check every coin leaf, including its underside and the narrow junction with the petiole, because treating only the visible upper surface can miss the infestation. Do not combine oils, soaps, alcohol, and other sprays; test any labeled treatment on a small area first and follow its label. If the evidence is raised scale rather than webbing, follow a pest-specific diagnosis rather than treating a flat leaf lesion.
If the marks line up with a recent change to harsh direct sun, move the Pilea to bright indirect light and let it acclimate there. Do not move it into a dark corner to prevent scorch: a light-starved Pilea may stretch and lose its compact, balanced shape. Keep the existing leaves unless they are mostly damaged; the brown tissue will not regain its green color.
If the mark wipes away and the leaf underneath is intact, stop handling that leaf and check whether the mark returns. If you find sticky residue, inspect for scale or other sap-feeding insects before cleaning the whole plant. If the pot is wet and the lower stem is soft, stop treating the leaf as the main problem and investigate the root zone. Black leaf spots alone are not evidence that the roots are rotting, and an unnecessary repot can add stress.
Protect the upright stem and healthy offsets
Pilea is usually grown for its upright central stem and even crown of round leaves. When the stem is firm and only a few leaves carry cosmetic spots, preserve healthy foliage; removing many leaves at once reduces the plant’s working canopy without removing a confirmed cause. Trim a leaf only when it is heavily affected, continuing to deteriorate, or likely to contact neighboring plants.
If the central stem or the base becomes soft and collapses, the mother plant may not recover. Pilea often forms offsets near the base, but an offset is useful for salvage only if it has its own healthy roots and firm tissue. Do not cut pups from a plant with suspected spreading disease just to save them; first inspect each offset and its base, and use a clean pot and fresh, free-draining mix for any healthy division.
What recovery looks like
A blackened or necrotic area will not turn green again. Improvement means that existing lesions stop enlarging, no new spots appear on leaves that were clean, and the central stem and petioles stay firm. The clearest sign is a new leaf emerging at the top without a lesion, not a faded old leaf returning to its original color.
Recovery time depends on whether the cause was a one-time sun or handling injury, an ongoing pest, or a pathogen. A stable cosmetic mark may never change; a healthy Pilea can still grow around it. For suspected disease, keep the plant separate until several weeks of observation show no new lesions. In cooler or darker months, new growth may be slow, so judge the pattern across more than one inspection rather than expecting a quick replacement leaf.
Seek more help if spots move onto several new leaves, reach the petioles or central stem, or appear on neighboring plants. Also escalate if the plant declines while the mix stays wet, since simultaneous leaf spots and root trouble can require different actions. If disease identification would change whether you prune or treat, send sharp close-ups and recent care history to a plant clinic or local extension service rather than spraying speculatively.
Avoid these Pilea spot-treatment mistakes
Do not apply fungicide because a lesion is black, and do not assume that a copper product will solve a bacterial problem. Bacterial and fungal leaf spots can look alike, and treatment labels differ by plant, pathogen, and use site. A household spray can scorch Pilea leaves or expose people and pets unnecessarily. Use a pesticide only after you identify the target and confirm that the label permits its use on indoor ornamentals.
Do not keep the foliage wet to “raise humidity.” Pilea grows well in ordinary indoor conditions, and misting does not diagnose or reverse a leaf lesion. Do not water on a weekly schedule just because the top looks dry from above; check the mix and drainage, then water the root ball thoroughly when it needs it. If you are unsure how to gauge that on this plant, use the watering guide and adjust to the pot’s actual dry-down.
Do not fertilize a Pilea with damaged leaves in hopes of replacing them faster. Fertilizer cannot remove lesions, reverse sun scorch, or confirm disease, and adding it while roots are stressed can create another variable. Do not strip every marked leaf either: keep sound foliage unless a leaf is worsening or a confirmed sanitation step calls for removal.
Prevent another round of spots
Set the Pilea where it receives bright, indirect light through most of the day. Avoid a sudden move from a shaded shelf to intense direct sun, especially through glass. Turn the pot periodically for an even crown, but make placement changes gradually and watch how the leaves respond. If the plant leans or the newest leaves become smaller, reassess light with the Pilea light guide before compensating with extra water.
Water the mix, not the leaves. Let the top inch dry before watering again, then let excess water drain completely; do not leave the pot sitting in runoff. A free-draining mix and a pot with an open drainage hole help the root zone dry at a rate the Pilea can use. Adjust watering when the season, window exposure, or pot changes rather than copying the same interval year-round.
Keep enough space around the Pilea’s coin-shaped leaves that they are not pressed together against a cold window or another plant. After pruning, clean the shears before using them on another plant. Inspect the undersides and petioles when you rotate the pot, and keep a new plant separate while you learn its condition. These small checks make it easier to catch mites, scale, or a spreading lesion before it reaches the central stem or offsets.
When a Pilea may not be salvageable
A plant with a firm central stem, healthy roots, or separate rooted offsets has a better path forward than one whose base is soft and collapsing. If only one mature leaf is marked, focus on preventing new damage rather than trying to perfect the old blade. If most of the canopy is affected but the stem and roots remain firm, remove only the leaves needed for sanitation and keep monitoring clean growth.
If the mother stem is rotting through the base and no offset has independent healthy roots, recovery may not be realistic. Isolate the pot, discard the failing material, and clean the container before reusing it. If one or more offsets are firm and rooted, they may be kept separately after careful inspection; do not propagate obviously diseased or pest-infested tissue.
Related Pilea Peperomioides guides
Use the Pilea overview for the plant’s normal growth and care. The soil guide helps when the mix stays heavy or drains unevenly. Use the Pilea problems hub when symptoms overlap, and the root-rot guide when the central stem or roots are soft rather than the leaves alone being marked.
For a second visual check before choosing a treatment, open the black-spots-on-leaves checker. It can help organize what you observe; it cannot identify a pathogen from a photo.