Holes in Pilea Leaves: Pest Signs and What to Check
Quick answer
A hole on Pilea peperomioides is a symptom, not a diagnosis. First, move the pot away from other plants while you inspect the leaf and nearby stem; treat only after you find evidence of an active cause.
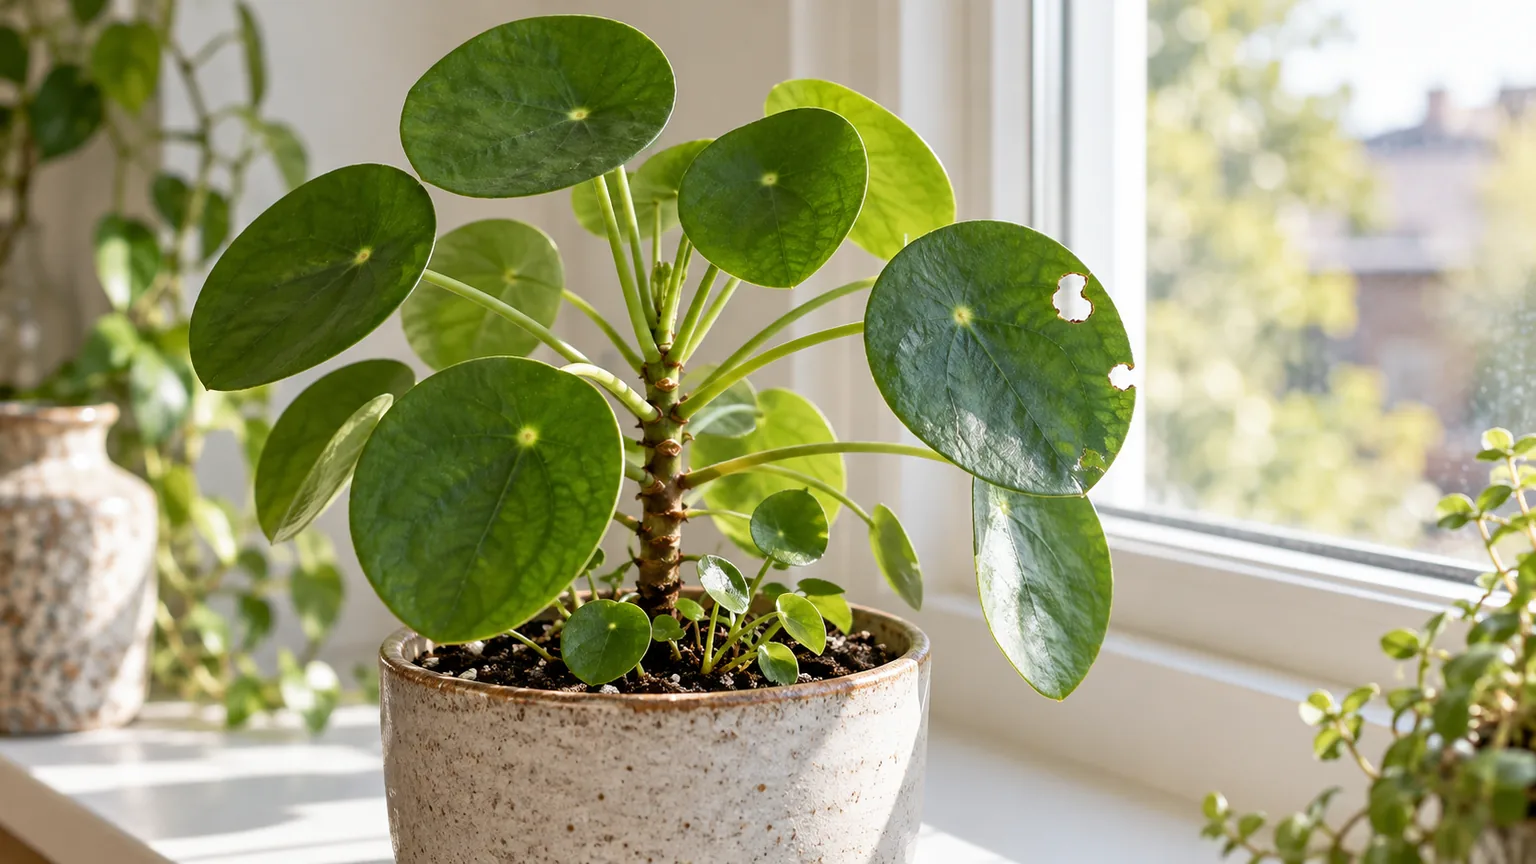
Holes in Pilea Peperomioides Leaves: What to Check First
This guide covers holes in leaves on Pilea Peperomioides. See also the general Holes in Leaves guide, watering, and light pages for this plant.
Holes in Pilea Peperomioides Leaves: What to Check First
Quick answer
A hole on Pilea is a symptom, not a diagnosis. First, move the pot away from neighboring plants while you inspect the leaf and nearby stem. Do not spray, prune several leaves, or repot just because one coin-shaped leaf has a hole. For a broader comparison of hole patterns across houseplants, use our holes in leaves symptom guide; this page focuses on what changes the diagnosis for Pilea’s round blades, long petioles, and basal pups.
Look for a fresh ragged edge, dark droppings, a silvery trail, or a small insect before calling the damage chewing. If a brown or water-soaked spot formed first, follow the spot pattern instead. If the hole is a single clean split and no new damage appears, contact during moving or handling may be more likely than an active pest.
What holes look like on Pilea’s coin leaves
The Chinese money plant is recognizable by its round, coin-like leaves. NC State describes its blades as circular and peltate, with each long petiole joining near the center of the blade; it also lists spider mites, mealybugs, fungus gnats, and scale among the pests to monitor. The normal Pilea leaf is a continuous disk, not a perforated one. Some houseplants, including Monstera, develop natural fenestrations, but that is a different growth pattern (NC State Extension’s Pilea profile; Gardening Know How’s examples of fenestrated plants).
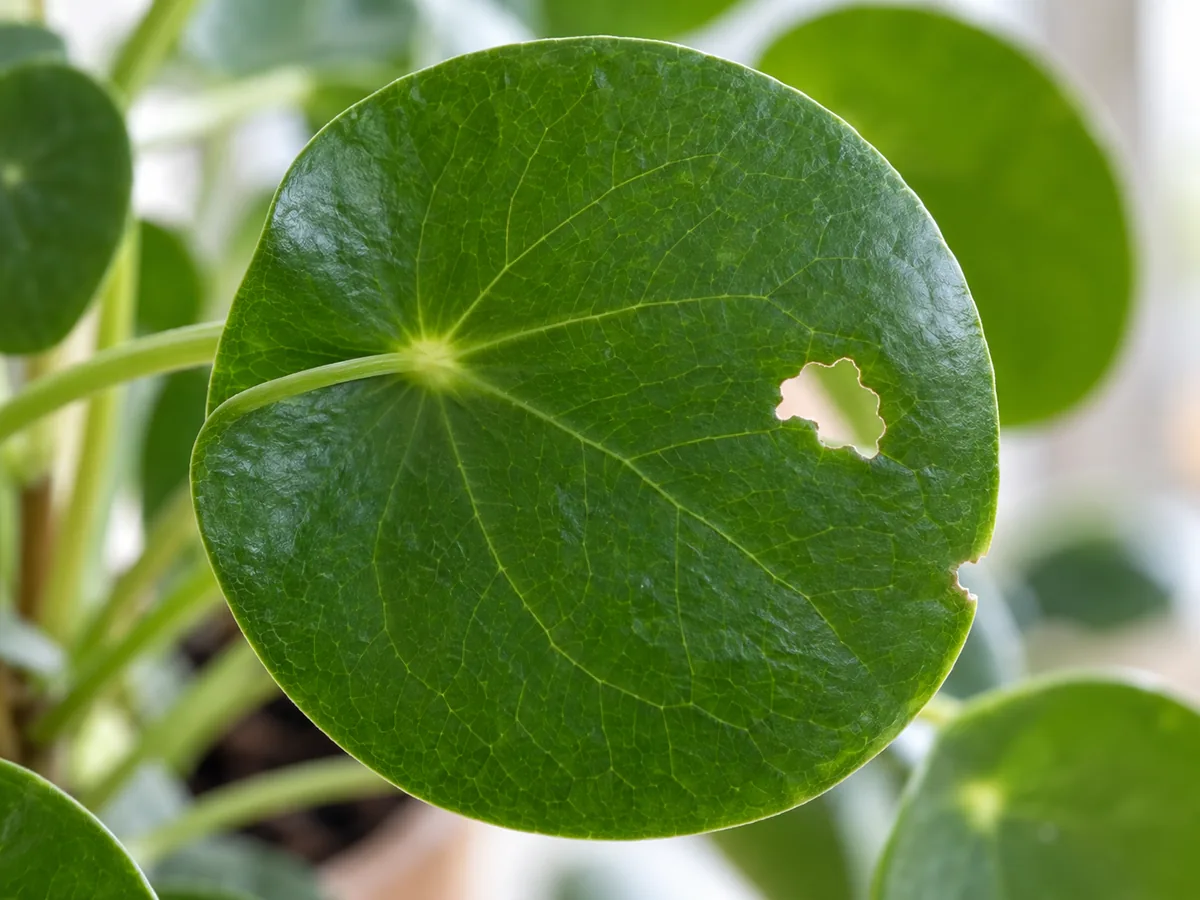
One small opening on a coin-shaped Pilea leaf is damage to the blade; the hole itself does not reveal what caused it.
Describe the opening before treating it. A bite often removes a piece of tissue and leaves an uneven edge; a scrape or split may have a sharper line; a spot-related hole usually has discoloration around it because the tissue changed before it dropped away (Pennington’s damage-pattern guide). A smooth hole is not proof of slugs, and a rough one is not proof of caterpillars. Shape narrows the search, but the clues around the leaf matter more than the hole alone.
Pilea’s petioles radiate from the upright stem, and small offsets can crowd around the soil line. That architecture creates several places to check without pulling leaves off: the central attachment on each blade, the petiole where it meets the stem, and the narrow spaces between pups. A hole on an older lower leaf with no new marks is a different situation from fresh openings appearing on several upper leaves over a few days.
Why a Pilea leaf may have a hole
Chewing damage is possible, but not the default Pilea pest pattern
Chewing insects remove leaf tissue. Connecticut Agricultural Experiment Station guidance distinguishes this from sucking insects, which remove sap or cell contents, and from leaf miners, which feed inside the blade. That difference matters on Pilea: a hole alone is not a positive identification of a sap-feeding pest. Look for a visible chewer or fresh bite marks before choosing that diagnosis (Connecticut Agricultural Experiment Station on insect injury).
A chewing insect becomes more plausible if the hole edge is newly damaged, several different leaves show bites, or dark frass is caught in the crown or on the potting mix. Caterpillar feeding can leave holes of varied sizes and nearby droppings; slugs and snails can leave irregular openings and silvery slime trails. Those are clues rather than a species-level identification, and they matter more if the Pilea spent time outdoors, arrived with other plants, or sits beside an open window (Pennington’s hole-pattern guide).
Check a Pilea leaf miner for a trail, not a bite
Leaf miners feed within a leaf rather than cutting a chunk from its outer edge. Utah State University Extension describes the larval damage as winding, pale tunnels between the upper and lower leaf surfaces. On a Pilea, hold a suspect blade against a bright window and look for a track that turns or widens; do not confuse the mark with a clean opening. If a trail is present, photograph the blade and identify the miner before choosing a treatment; the response differs from removing a visible caterpillar (USU Extension’s leaf-miner description).
A spot can leave a hole after damaged tissue drops out
Sometimes the hole is the last stage of a lesion, not the first sign of an animal feeding. Look for a yellow, brown, or water-soaked area that was present before the center became dry and fell away, especially if several spots are spreading on leaves that stay wet. NC State cautions that wetting Pilea foliage can contribute to leaf spots; general hole-pattern guidance also describes diseased spots whose dead centers drop out. That pattern warrants a leaf-spot check, not a caterpillar treatment (NC State Extension; Pennington’s leaf-spot clues).
If the mark began as a discoloration or continues to expand, compare it with black spots on Pilea. Keep the leaves dry while you assess it, avoid misting, and do not remove every marked leaf at once. A few old dry marks without spread do not by themselves confirm an active disease.
A clean tear can be a one-time accident
A sharp split, a crescent-shaped nick, or a smooth torn margin with no droppings, slime, tracks, or surrounding discoloration may fit physical damage. A Pilea’s long petioles let its round blades move when the pot is carried, bumped, or turned; the leaf can catch on a shelf edge, another plant, or a curious pet. This is a working explanation only when the timing and position fit. If fresh holes continue after the pot is moved to a protected place, return to the pest and lesion checks rather than assuming that the first tear explains everything.
Inspect the central attachment, stem, and Pilea pups
Start with the affected leaf still attached. Turn the blade gently so you can examine its underside and the petiole’s central attachment point; Pilea’s peltate structure places the stem connection near the middle of the coin, not at the blade’s edge. Look for a small body, eggs, webbing, sticky deposits, fresh scrape marks, or a trail leading away from the hole. A hand lens helps with tiny details, but a phone flashlight can reveal larger larvae and debris. Avoid pinching the blade: a second tear would make the original evidence harder to read.
Next follow that petiole back toward the plant’s upright central stem. Check the junctions where petioles meet the stem, then inspect the youngest leaves and the compact cluster of pups around the base. Pilea is an upright, clumping plant that can produce offsets; those pups are not automatically a problem, but their small leaves and the soil line can be partly hidden by the mother plant’s lower foliage. Look for active insects, repeated fresh bites, or a pattern that begins in one crowded section and spreads to the next.
If you suspect a slug or snail, inspect the pot rim, saucer, outer wall of the pot, and nearby surfaces after dark with a flashlight; these animals often feed at night (Pennington’s night-feeding clue). A slime trail or the animal itself is stronger evidence than a hole’s shape. If the plant has recently been outside, also check the underside of the nursery pot and the drainage openings. Do not flood the mix or dismantle the root ball in response to a single hole; first establish whether the animal is actually present.
Record what you find before removing anything. Take one photo of the whole plant and one close image of each affected leaf, then note whether the mark is on an older lower coin, a new expanding leaf, or the side facing a wall or walkway. Compare those photos after several days. A fixed old hole with no new marks points toward a completed injury; a fresh hole or spreading lesion means the investigation is still open.
Read the pattern before choosing a fix
| What you see on the Pilea | More useful first explanation | What to check next |
|---|---|---|
| One sharp tear or edge nick, with no other signs | Handling, brushing, or pet contact | Move the pot away from contact and see whether a new leaf stays intact. |
| Fresh irregular gaps, rough edges, or several new bites | A chewing visitor | Check the leaf undersides, central stem, pup line, and nearby surfaces for a culprit or frass. |
| Silvery trail near the pot or irregular holes after the plant was outdoors | Slug or snail activity is possible | Inspect the pot rim and saucer after dark; do not use an insecticide as a substitute for identifying it. |
| Pale winding marks under the blade surface | Leaf-miner activity is more plausible | Photograph the trail and identify the miner before choosing a treatment. |
| Brown or yellow spot before tissue disappeared, sometimes with a halo | Leaf-spot injury is possible | Keep foliage dry and compare the spread pattern with the Pilea black-spots guide. |
| Old isolated hole, firm green blade, no new damage | Completed physical or feeding injury | Leave the leaf in place if most of it is healthy and monitor the next growth. |
These patterns help prioritize checks; they are not lab diagnoses. A single leaf can have more than one kind of damage, and an old hole can remain after its cause is gone. If the clues conflict, photograph the leaf and wait briefly for a new mark rather than stacking treatments.
First fix: isolate the Pilea while you identify the evidence
If you cannot yet tell whether the hole is fresh chewing, a spot, or a tear, move the pot a short distance away from neighboring plants and inspect it before spraying. This temporary separation is a cautious first step, not a claim that the plant has an infectious disease or a pest outbreak. It also makes it easier to see whether new marks appear on the Pilea alone. Keep the plant in its usual bright, indirect light while you check it; do not move it into harsh sun or leave it in a dark corner to dry out.
Once you have a clue, use the smallest response that matches it:
- If you find a caterpillar or other visible chewer, remove that individual by hand with a tissue or tweezers and dispose of it. Recheck the same leaf, neighboring coins, the central stem, and the pup line over the next several inspections. A pesticide is not the first step for one identifiable insect on one indoor plant.
- If you find a slug or snail, pick it off and check the pot, saucer, and the place where the plant stood. Look again after dark if a fresh slime trail remains. Keep the Pilea away from outdoor plant debris and standing water until you know the visitor is gone.
- If the damage starts as an expanding spot, keep foliage dry and remove only a leaf that is mostly affected or actively deteriorating. Use clean scissors and wipe them before moving to another plant. If spots keep appearing, diagnose the leaf-spot pattern instead of treating for a chewing insect.
- If you find a winding mine, avoid cutting away several coin leaves while you are still deciding what the line is. Compare it with the Pilea leaf-miner guide and track whether new trails appear.
- If the tear matches a bump or rub, move the pot out of the traffic path and give its petioles room to clear the wall, window, or neighboring pots. Check the next leaf before trimming the old one.
Do not apply neem, horticultural oil, soap, or a broad-spectrum insecticide to an unidentified hole. Wait for visible pest evidence and identify the cause before choosing a response; a spray aimed at the wrong problem adds treatment without answering what made the opening.
Use Pilea care as a cross-check, not as the hole diagnosis
The plant’s root zone and light help explain whether it is generally stressed, but they do not identify what removed tissue. The Royal Horticultural Society recommends bright indirect light, free-draining compost, and letting the top inch of compost start to dry before watering; it also cautions that pilea roots can rot if the plant is overwatered (RHS Pilea guide). Use those care checks to keep the plant stable while you investigate, not as a substitute for examining the leaf.
Feel the top layer of mix and lift the pot if you already know its usual weight. If the mix is still wet, do not add water to heal a hole. If it is dry, water according to the plant’s normal dry-down rather than soaking it because an animal may have chewed a leaf. The Pilea watering guide explains the plant-specific dry-down cues; the light guide helps if the plant was recently moved into direct sun or a dim corner. Neither care change should be made abruptly on the assumption that water or light created missing tissue.
Also check the potting mix and drainage only if the plant’s other symptoms point that way. A hole with a firm stem and stable leaves is not a reason to repot. If the soil smells sour, stays wet for an unusually long time, or the central stem softens, use the Pilea soil guide and the root-rot route as a separate diagnosis. Keep the questions separate: leaf damage tells you to inspect the blade, while root-zone warning signs tell you to inspect the mix and roots.
Recovery: old holes stay, new leaves show progress
Missing leaf tissue does not grow back; insecticides cannot replace holes already eaten from a leaf. A Pilea leaf with one small opening can still remain green and attached, so there is no need to remove it for appearance alone. If more than half of a leaf is dead, soft, or actively deteriorating, remove it with clean scissors; otherwise, keep it while you correct the cause and use it as a record of whether the injury is spreading (Connecticut Agricultural Experiment Station on plant injury).
Watch the next leaf from the growing tip and the next leaves on any pups. Clean, complete blades and no new bite marks are better evidence of recovery than the original hole getting smaller. The exact wait depends on whether the plant is actively producing growth in its current light and season, so compare new leaves rather than promise a fixed number of days. If you see no new leaves for a while but the stem is firm and the existing leaves remain stable, the holes alone do not mean the plant is failing.
Escalate the diagnosis if new holes keep appearing on several leaves, if you find multiple pests or repeated frass, if a discolored patch expands, or if the central stem or base becomes soft. Rapid decline across the plant is not explained by one old hole; review the Pilea problems hub and check the root zone. If the main stem is firm and at least one pup is clean and growing, the plant still has a reasonable path forward. If the base has turned soft and the growing point is gone, recovery may be limited; do not keep a collapsing plant beside healthy Pileas while you wait for an answer.
Prevent repeat holes on a Pilea
Make the next inspection fit the way this plant grows. When you rotate the pot, look at the underside of the round blades, their central petiole attachments, the upright stem, and the pup cluster. The inspection is quick, but it catches fresh damage while you can still find the source. Keep the pot clear of tight shelf edges and spots where people brush past; Pilea leaves can swing on their petioles and a small repeated snag can mark the same side of the plant each time.
When a new Pilea arrives or comes back indoors after time outside, keep it separate from the rest of the collection while you look for insects, trails, and fresh damage. That gives you a chance to see whether the hole was already present or whether it is continuing. If the plant spends time outdoors, record that exposure and check both leaf surfaces, the pot rim, and the soil surface before placing it beside other houseplants again.
Keep light bright but indirect, let the surface of the mix begin to dry between waterings, and use a mix that drains freely. These choices support normal Pilea growth; they do not replace pest inspection. Avoid misting the leaves when spots are present, and do not add fertilizer as a response to a hole. A round, intact new leaf is the goal, not a cosmetic repair of old damage.
Related tool
If you cannot tell whether the pattern is a pest, leaf spot, or care issue, use the Plant Problem Diagnosis Tool to organize the other symptoms you observe. Treat its result as a shortlist to check against the plant, not as a substitute for finding the pest or lesion.
Related Pilea Peperomioides guides
- Pilea peperomioides overview — Use this for the plant’s normal coin-leaf shape and baseline care before comparing a damaged leaf.
- Pilea peperomioides problems hub — Start here if several symptoms are present and holes are only one part of the decline.
- Caterpillars on Pilea — Use this when you find a visible larva, fresh bites, or droppings; a hole alone is not enough to choose this guide.
- Black spots on Pilea — Use this when discoloration or a halo appeared before tissue dropped out.
- Root rot on Pilea — Use this when a persistently wet mix, sour smell, or soft stem accompanies leaf decline.