Alocasia Stingray Plant Care: Complete Growing Guide
Learn Alocasia Stingray care with clear light, watering, soil, humidity, and winter guidance, plus corm propagation, pet safety, and symptom-by-symptom fixes.
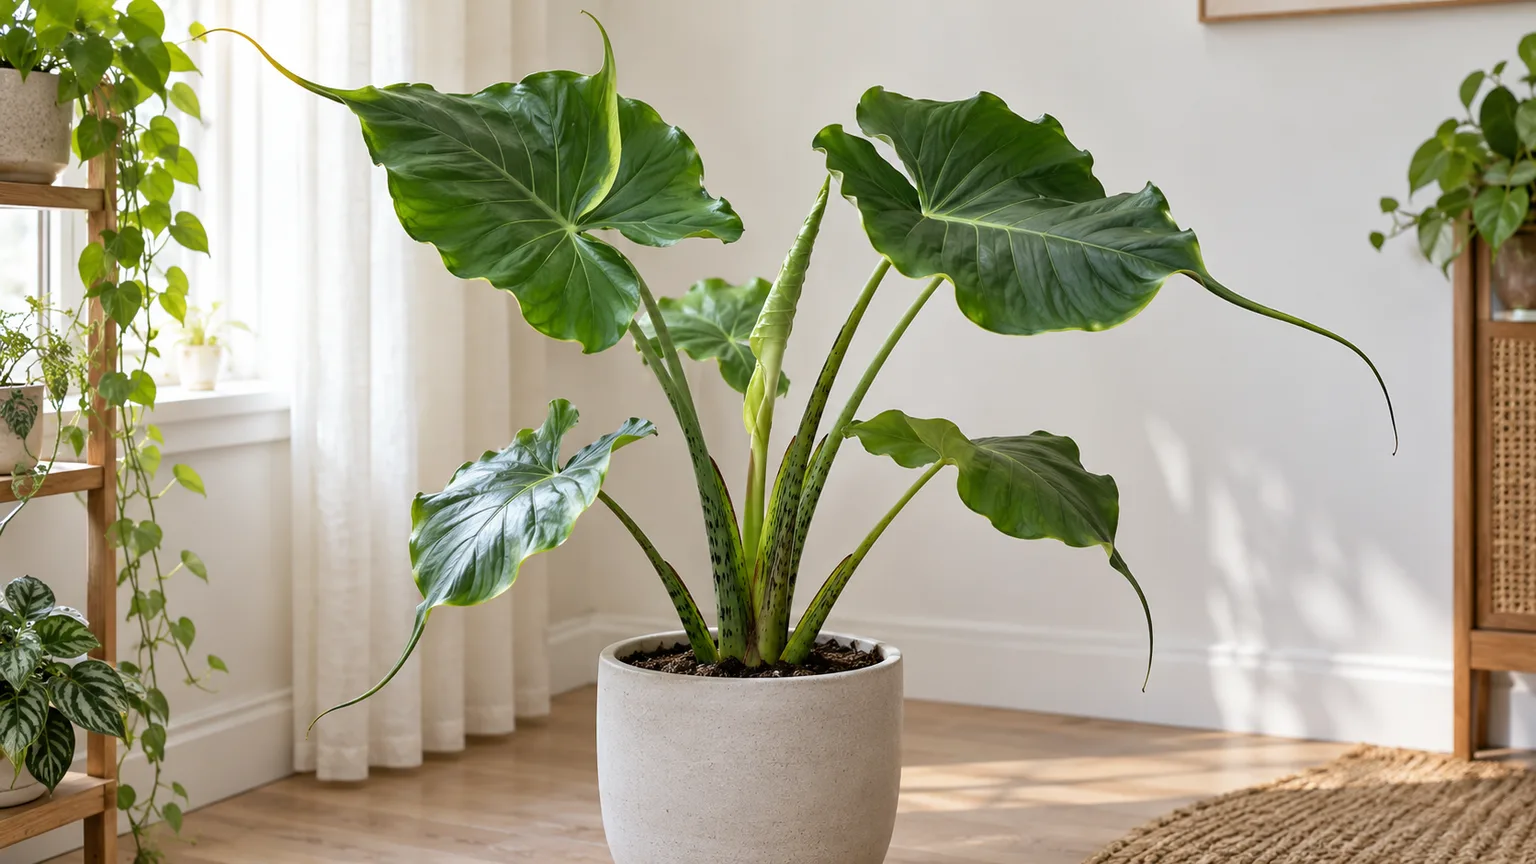
Alocasia ‘Stingray’ is grown for its broad green leaves that taper into long, tail-like tips and its upright, often speckled stems. Indoors it can make a dramatic floor plant, but it responds quickly when light, warmth, or root conditions change. The dependable approach is to give it bright filtered light, an airy mix that holds some moisture, and watering decisions based on how quickly the pot is drying—not on a fixed weekday schedule.
You may see it labeled Alocasia macrorrhiza ‘Stingray’ or by the broader common name elephant ear. The cultivar’s history and naming are not consistently documented, so treat the name as a useful horticultural label rather than proof that every plant sold under it has identical size or growth; a specialist Stingray profile likewise notes uncertainty about its origin (UK Houseplants’ Stingray guide). Advice for the genus is a useful starting point, but the plant’s actual leaves, pot, room, and season should guide your care. NC State Extension describes Alocasia as tropical, moisture-loving foliage plants that vary in size by species and cultivar; container specimens remain much smaller than outdoor plants in suitable climates (NC State Extension Plant Toolbox).
Quick care profile and how to recognize ‘Stingray’
| Care factor | Practical starting point | What to watch |
|---|---|---|
| Light | Bright, indirect or filtered; gentle early sun only after acclimation | Long petioles leaning toward a window often mean the spot is too dim |
| Water | Thoroughly water when the upper layer begins to dry, then empty the saucer | A pot that stays heavy and wet needs a drainage, mix, or light check |
| Soil | Moisture-retentive but chunky and quick to drain | Fine, compacted mix stays oxygen-poor around roots |
| Temperature | Warm room conditions; protect from cold drafts and sudden drops | Growth slowing in a cool room is a cue to reduce watering |
| Humidity | Moderate-to-high humidity helps keep edges from crisping | Brown tips have several possible causes, so check roots and light too |
| Feeding | Balanced houseplant fertilizer during active growth | Pause feeding when the plant has stopped growing or is resting |
| Safety | Keep leaves and sap away from pets and small children | Alocasia contains insoluble calcium oxalates |
The easiest identification clue is the leaf tip: a mature blade has an elongated, narrow extension that reads like a stingray’s tail. The leaves are carried on upright petioles, often with subtle dark mottling. Young foliage can look less dramatic before it expands, and leaf shape varies, so use the overall combination rather than rejecting a young plant because its first leaf is not an exact silhouette.
This is a foliage plant, not a dependable flowering houseplant. A healthy specimen may eventually produce the spathe-and-spadix inflorescence common to the arum family, but leaves and roots are the better day-to-day indicators of whether it is thriving. Start with a stable warm spot and change one care variable at a time; moving a stressed plant repeatedly makes it harder to identify the real cause.
Choose bright, filtered light
Give the plant a bright place where sunlight reaches the room but does not bake the foliage for hours. An east-facing window often gives a useful balance; a south- or west-facing exposure can work farther back from the glass or behind a sheer curtain. If the only available window is dim, a grow light can support active growth, but it should be close enough to provide useful light without heating the leaves.
Watch the plant’s response rather than relying only on compass direction. New leaves that arrive smaller, stems that stretch and lean, or growth that stalls despite warm conditions suggest too little light. Pale, washed-out patches or dry scorched areas on the window-facing side point toward too much direct sun. Rotate the pot a quarter-turn every week or two if growth consistently bends toward the window, but avoid frequent repositioning while it is acclimating.
A plant purchased in a shaded greenhouse needs time to adjust to a brighter home. Move it gradually over a week or more, especially if the destination includes direct morning sun. Outdoor summer placement is possible in reliably warm climates, but choose open shade or bright dappled light, shelter the leaves from wind, and bring the pot back in before cool nights. NC State notes that outdoor Alocasia should be protected from strong wind and that these tropical plants are sensitive to cold (NC State Extension Plant Toolbox).
Water by checking the root zone, not the calendar
During active growth, Alocasia Stingray prefers an evenly moist root zone, but “moist” does not mean permanently saturated. Water when the top inch or two of the mix has begun to dry and the pot feels noticeably lighter than it did after watering. In a warm bright room that may be several days; in a cool, dim room it can take much longer. Pot size, root density, soil texture, and airflow all change the interval.
When it is time to water, pour slowly over the surface until water runs from the drainage holes. Let the pot finish draining, then empty its saucer or cachepot. This wets the whole root ball without leaving roots standing in stagnant runoff. If water races down the sides and the center remains dry, rehydrate the mix gradually in two passes rather than leaving the plant in a full sink or decorative pot.
The goal is not to keep the plant thirsty. Repeatedly allowing the mix to become bone-dry can cause drooping, stalled growth, and leaf loss. But watering again while the center is still cold and soggy removes the air roots need and invites rot. A simple finger check works in a small pot; for a large floor pot, use a clean wooden skewer or learn the weight of the container just after watering and as it dries. Recheck the plant after a room-temperature change, repot, or seasonal light shift because its water use will change too.
Reduce watering when growth slows in fall or winter, but do not switch to a long, rigid monthly schedule. Wait for the mix to dry farther down than it would in summer, then water thoroughly and let it drain. A plant beside a heater may dry faster even in winter; one in a cool low-light corner may remain wet for weeks. The state of the root ball, not the season’s name, is the final check.
Use an airy mix that stays lightly moist
A good mix balances two jobs: it holds enough water for the roots to use between checks, and it leaves open spaces so excess water can drain and air can return. A dense, peat-heavy potting soil may stay wet too long in a cool home. A very coarse bark-only mix may dry so fast that the plant wilts between waterings. The right texture depends on your room and habits, not on a single branded recipe.
A practical starting mix is two parts quality indoor potting mix, one part orchid bark, and one part perlite or pumice. The potting mix stores moisture and nutrients; bark and mineral pieces keep the structure open. If your home is warm and the pot dries in a day or two, use a little more moisture-retentive mix. If the plant is in lower light or you tend to water generously, increase the chunky portion so water does not linger around the roots. Get Busy Gardening similarly recommends a loose, aerated, well-draining medium for Alocasia rather than a dense soil (Get Busy Gardening’s Alocasia care guide).
Use a container with drainage holes. A decorative outer pot is fine if you lift the nursery pot out to water and discard the runoff. Choose a pot only modestly wider than the root ball; a much larger volume of mix can remain wet around a small root system long after the plant has used the water near its center. Skip gravel in the bottom of the pot: it does not replace drainage holes or correct compacted media.
Keep the plant warm and raise humidity steadily
Alocasia grows best in warm, stable conditions. Aim for an ordinary comfortable room rather than a cold windowsill, drafty doorway, or spot directly under an air-conditioning vent. General Alocasia guidance places active growth in warm indoor temperatures, roughly the mid-60s to mid-80s°F; leaves may slow or decline as conditions become chilly (Get Busy Gardening). Avoid sudden temperature swings even when the average room temperature seems acceptable.
Humidity can help reduce crispy margins, but it is not a substitute for healthy roots and appropriate light. If the air is consistently dry, group plants or use a room humidifier and keep gentle air movement around the foliage. A bathroom helps only when it is bright enough and the humidity actually stays higher; a dark bathroom can trade one stress for another. Misting briefly wets the leaves but does not hold room humidity at a stable level, so it is a poor long-term fix for recurring brown edges.
Do not place the pot over a tray in a way that leaves its drainage holes submerged. A correctly made pebble tray may add a small local humidity buffer, but the pot must rest above the waterline; it cannot replace proper watering or a humidifier in a very dry room. Wipe dust from the broad leaves with a damp soft cloth so the surface stays clean, and dry any water trapped in the crown rather than repeatedly soaking the foliage.
Feed only while new growth is active
Use a balanced liquid houseplant fertilizer during the months when the plant is producing leaves. Start with the label’s lower indoor-plant rate or a half-strength application every four to six weeks, then watch how the plant responds. This is a cautious baseline, not a demand to feed every calendar month: a plant that is not growing cannot use fertilizer as a substitute for warmth, light, or functioning roots.
Apply fertilizer to already moist soil rather than to a dry root ball. Do not combine frequent liquid feeding with slow-release granules unless you have accounted for both products’ rates. A crust of salts on the soil, brown leaf edges that began after feeding, or roots that are stressed are reasons to pause and flush the mix with clean water. Resume lightly only after active growth returns. General Alocasia care sources differ on whether monthly or more frequent feeding is best; for an indoor Stingray, a modest dose tied to growth is safer than a fixed high-frequency routine.
Adjust care through winter slowdown and dormancy
Some Alocasias slow markedly when days shorten or indoor temperatures dip. An older leaf may yellow as the plant redirects resources, and a plant that previously pushed leaves may pause. A true seasonal rest can range from slower growth to substantial leaf loss, but do not assume every bare stem or yellow leaf is harmless dormancy. The plant’s base and corm should remain firm, and the pot should not smell sour or stay swampy.
When growth slows, move the plant to the brightest warm location available, stop fertilizing, and let the mix dry more between waterings. Do not keep watering at summer frequency just because a leaf remains. If the leaves disappear, keep the pot warm and barely moist rather than wet; inspect the base gently for softness or rot, then wait for warmth and longer days. A firm, living corm can rest and resprout, while a mushy or foul-smelling base needs immediate attention.
If the plant loses leaves after arriving home, first consider the transition: a change in light, temperature, and watering routine can trigger temporary decline. Keep it stable, check the pot before watering, and avoid repotting or feeding simply because one leaf has fallen. Give it several weeks to settle unless you find evidence of pests or rotting roots.
Repot when the root ball gives you a reason
There is no benefit to repotting every year by the calendar. Check for roots circling densely, emerging from drainage holes, or a root ball that dries unusually fast despite reasonable light. Those clues suggest the plant has filled its container. Repot in spring or early summer when it is actively growing if possible; a serious drainage problem or root rot can require action sooner.
Choose a pot one size larger, with drainage holes, and refresh the mix around the root ball without burying the stem deeper than it was before. Loosen only roots that are tightly circling or clearly dead; unnecessary root stripping adds stress. Water the new mix through, drain it fully, and return the plant to bright indirect light. Expect a short pause after repotting, but persistent limpness, a sour smell, or a soft stem base calls for a root inspection rather than more water.
If the plant is healthy but only slightly root-bound, leave it in place. A pot that is a little snug is easier to manage than an oversized container that stays damp for too long. This tradeoff matters especially in winter, when a root ball uses water more slowly.
Propagate from offsets or corms
The most reliable home propagation routes are separating a rooted offset or growing a viable corm. A leaf or petiole cutting alone does not contain the growing point needed to make a new plant. The least stressful moment to look for offsets and corms is during a spring or early-summer repot, when the mother plant is actively growing and can recover more readily.
Wear gloves if you have sensitive skin, and use a clean work surface and disinfected knife or shears. Alocasia sap and tissue can irritate, and the plant is not edible in its raw form. Ease the root ball from its pot and brush away enough mix to see where an offset connects. Separate only a division that has its own roots and growing point; if it resists, stop and tease away more mix rather than tearing it from the mother plant.
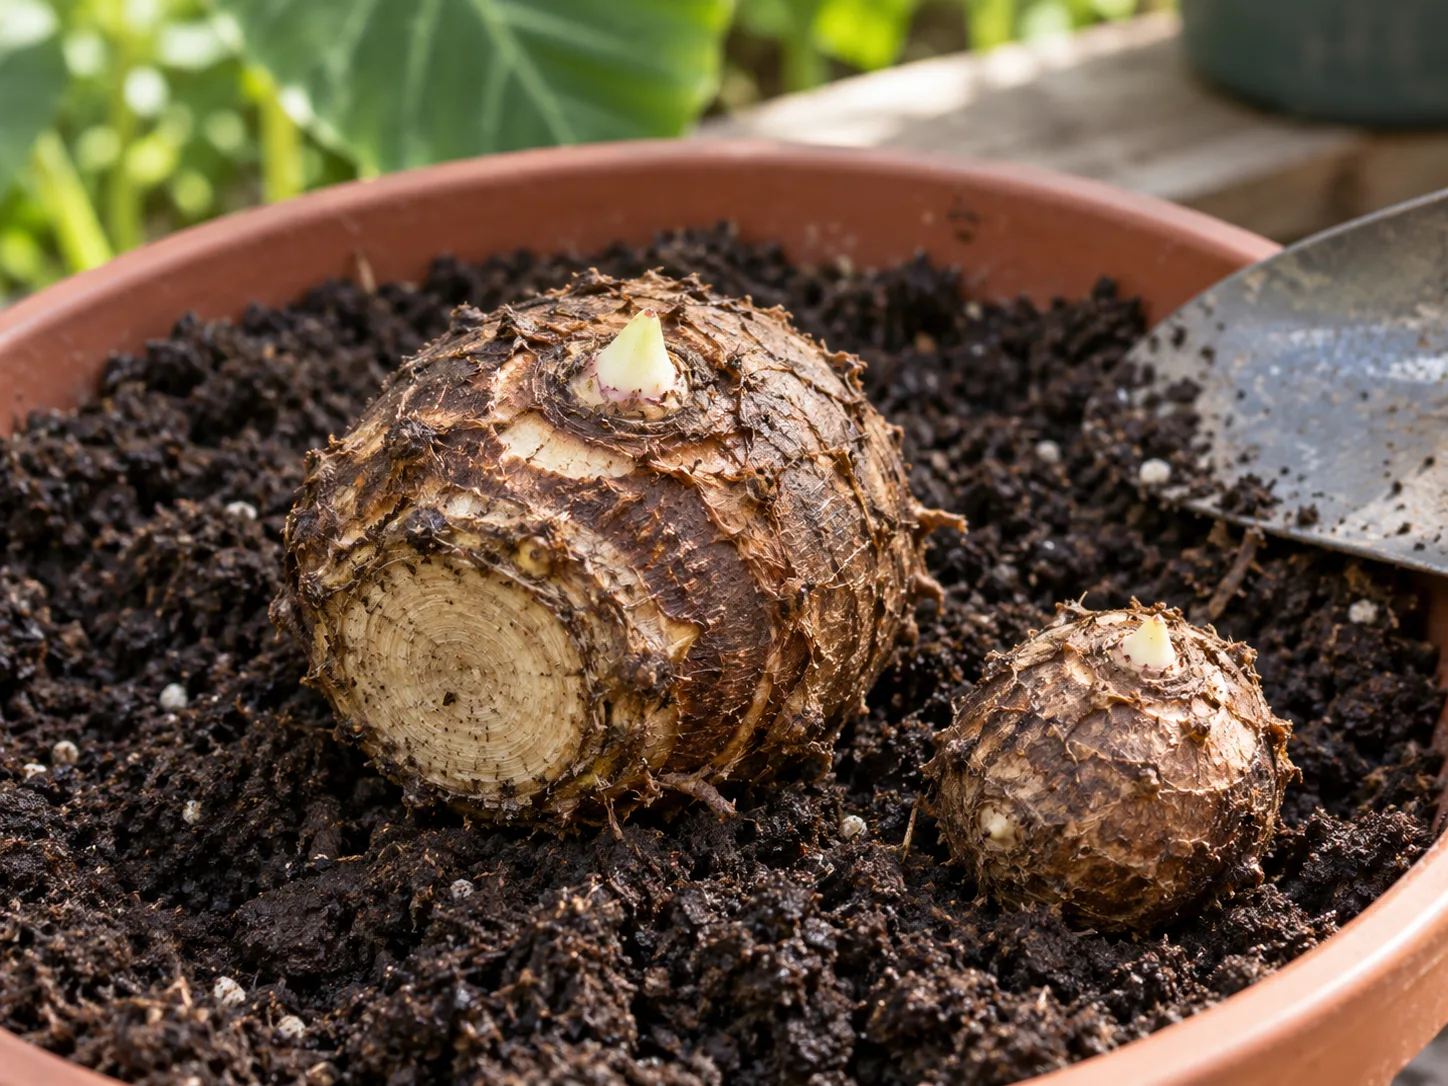
Small corms may be tucked among the roots. Choose firm corms with no mushy areas, severe shriveling, or unpleasant odor. Some will already show a pointed growth tip; if orientation is unclear, lay the corm on its side in a warm propagation medium so the emerging shoot can find its direction. Do not peel or cut the corm aggressively just to expose a green interior; damaging the growing point can make it rot.
To start a corm, place it partly embedded in lightly moist sphagnum, perlite, or a similarly airy medium, then cover the container loosely to hold humidity while still allowing some air exchange. Keep it warm in bright indirect light. Check weekly: the medium should feel damp, never waterlogged, and any condensation should not be dripping constantly. A corm may take several weeks to root or sprout, and a dormant corm can take longer; softness or a spreading dark wet patch is a failure sign, not a cue to add more water.
Pot up rooted corms without keeping them soggy
Once a corm has roots and a visible shoot, move it into a small pot with the same airy mix used for a mature plant. Keep the corm near the surface, with the shoot and leaves above the soil, and water enough to settle the mix. A tiny start in a large pot is an easy way to leave unused soil wet, so size the container to the new root system and increase it only as the plant grows.
For the first few weeks, keep the young plant warm and in bright indirect light. Maintain light moisture, but let the surface begin to dry before watering again. A newly rooted corm has little capacity to recover from rot, so check the pot weight and drainage carefully. Keep it separate from other plants until it is growing reliably and you have ruled out pests.
What flowering means—and what to do with a bloom
Alocasia flowers are made of a small spadix surrounded by a hood-like spathe, rather than showy petals. They can be easy to miss among the foliage and may last only a short time. Flowering is possible but is not a useful target for most indoor growers; consistent leaf and root health matter more than trying to force a bloom.
If a bloom appears, keep the usual conditions steady. After the inflorescence fades, cut its stalk close to the base with clean snips, taking care not to nick nearby petioles. There is no need to remove a healthy flower before it opens. If the plant is weak or its root system is compromised, correct that issue first rather than changing fertilizer to chase flowering.
Troubleshoot symptoms in the right order
When leaves change, check three things before reaching for a product: how wet the center of the pot is, how much light the plant gets, and whether pests are visible on leaf undersides or stems. Several problems produce similar yellowing or drooping, so changing water, humidity, fertilizer, and location all at once can make the diagnosis harder. Start with the condition most directly suggested by the evidence.
Yellow leaves, drooping, or a plant that will not stand upright
One old lower leaf yellowing while fresh growth appears can be normal turnover. Several leaves yellowing quickly suggests a broader issue. If the mix is wet and the pot remains heavy, stop watering and check drainage, smell, and root firmness. Healthy roots are firm; roots that are dark, soft, or foul-smelling point toward rot. Remove only clearly dead tissue with clean tools and repot into fresh airy mix if the root ball is failing.
If the mix is dry well below the surface, water thoroughly and drain the pot; an extremely dry mix may need two slow passes to wet evenly. If moisture is appropriate but stems stretch or tilt, improve light gradually. A plant that has lost most leaves can still recover if the corm and stem base remain firm, but recovery is slower in a cold, dim location. Avoid fertilizer until you see healthy new growth.
Drooping alone does not tell you whether the plant needs more water. Wet soil plus drooping points to damaged roots or a lack of oxygen; dry soil plus drooping is more consistent with thirst. That simple comparison is more useful than watering automatically at the first sign of a limp leaf.
Brown tips, spots, and pests
Brown tips may follow dry air, inconsistent watering, fertilizer salts, direct sun, or root damage. Look at the pattern: crisp edges on several leaves with a dry room suggest checking humidity and watering; a bleached patch on the window side suggests sun scorch; tips that worsened after a feed suggest pausing fertilizer and flushing accumulated salts. Existing brown tissue will not turn green again, so judge the fix by whether new leaves emerge clean.

Dark, soft tissue at the base is more urgent than a dry tip. If a plant has persistently wet media, sour odor, or a collapsing petiole, slide it from the pot and check the roots. Root rot is a root-zone problem; simply trimming the damaged leaf does not fix it. Remove mushy roots with a clean tool, discard saturated old mix, and repot in a clean container with drainage. If most of the corm has turned soft, propagation from that material is unlikely to succeed.

Inspect leaf undersides, midribs, and petiole joints when leaves stipple, curl, or become distorted. Fine webbing and tiny pale specks suggest spider mites; silvery scars and dark specks may indicate thrips; cottony clusters suggest mealybugs. Isolate an affected plant, rinse accessible pests from the foliage, and identify the insect before using a treatment. If you use an insecticidal product, follow its label exactly and test a small area first; do not spray a stressed plant in strong light.
Keep Alocasia Stingray away from pets and children
The ASPCA lists Alocasia as toxic to cats, dogs, and horses because it contains insoluble calcium oxalates. Chewing can cause oral irritation, pain and swelling of the mouth or tongue, drooling, vomiting, and difficulty swallowing (ASPCA Animal Poison Control’s Alocasia listing). Put the plant where animals and young children cannot reach leaves or fallen pieces, and wash hands after pruning or handling sap.
Do not induce vomiting or improvise a home treatment after a pet chews the plant. Contact a veterinarian or an animal poison-control service and describe what was eaten and when. The plant’s dramatic leaves are a reason to place it thoughtfully, not to assume that an indoor specimen is harmless because it is not producing fruit or flowers.
For outdoor growing, check local guidance before planting a large elephant-ear relative in the ground. UF/IFAS has assessed Alocasia macrorrhizos as not a problem species in its Florida zones, while classifications are location-specific and reviewed over time; that assessment should not be generalized to every Alocasia or every region (UF/IFAS Assessment). A movable pot is the simpler choice in climates with cold winters or where local planting recommendations are uncertain.
Conclusion
Alocasia Stingray is easiest to manage when its roots stay lightly moist but well aerated, its leaves receive bright filtered light, and its surroundings remain warm and stable. Check the pot before watering, use a modestly sized container with drainage, and let growth—not the calendar—set the pace for feeding and repotting.
When the plant struggles, compare wet versus dry soil before assuming that drooping means thirst; when it rests seasonally, confirm that the base is firm before treating leaf loss as dormancy. With that distinction, careful corm handling, and a safe location away from pets, you can enjoy the Stingray’s unusual foliage without guessing at every change.