Red Tip Photinia Care: Growing and Pruning Guide
Grow red tip photinia with the right light, drainage, spacing, pruning schedule, and leaf-spot plan for a healthy hedge or specimen shrub.
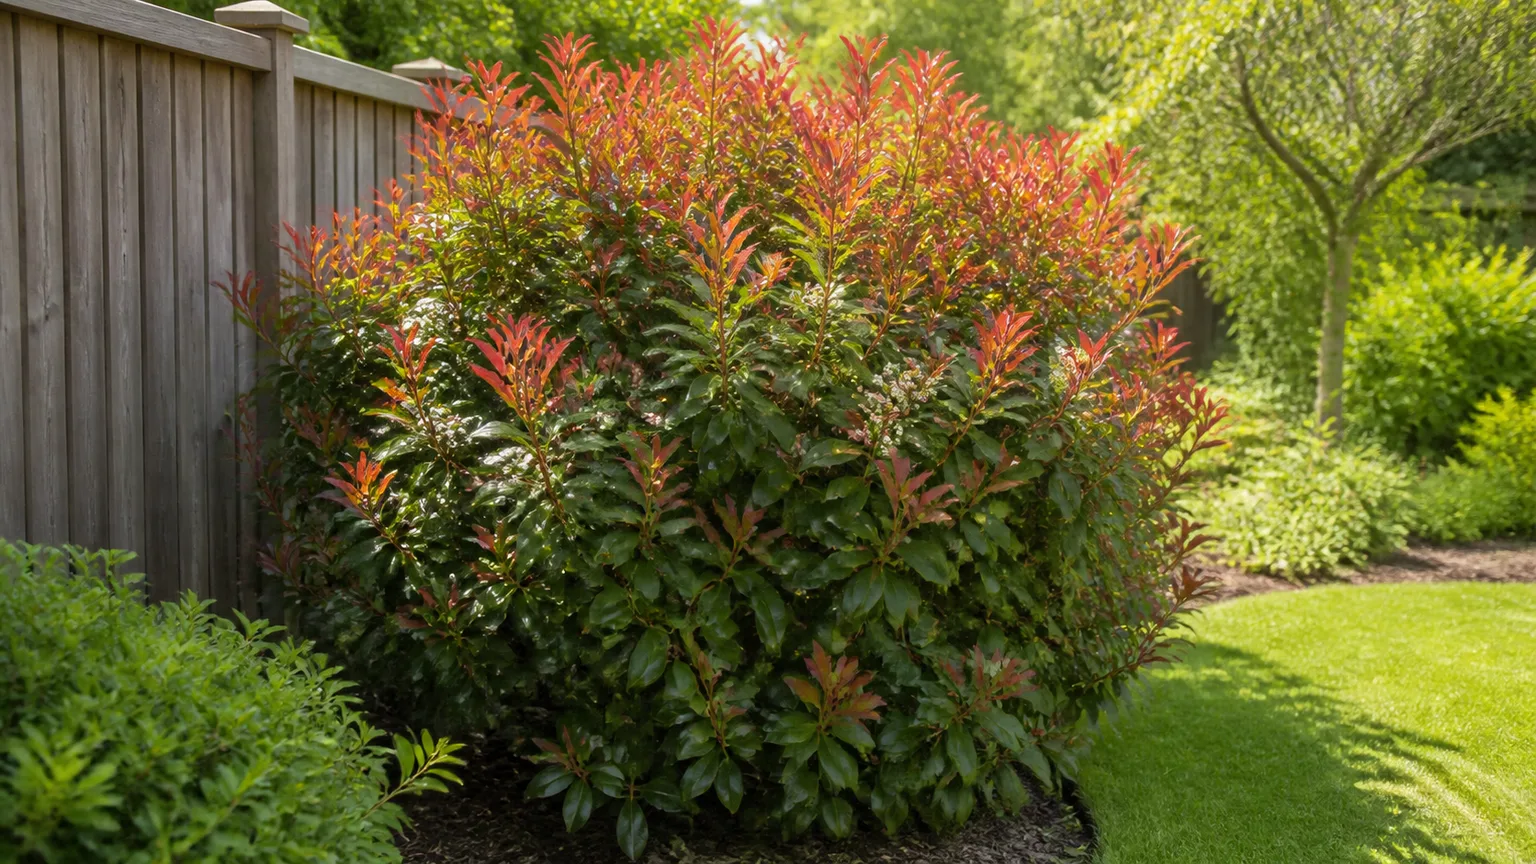
Red tip photinia (Photinia × fraseri) is a fast-growing broadleaf evergreen that can be either a brilliant privacy hedge or a recurring maintenance headache. Its spring leaves emerge coppery red, mature to glossy green, and are followed by clusters of white flowers if you do not prune away the buds. The same vigorous flush that creates the color also creates tender foliage that is vulnerable to leaf spot in damp, crowded landscapes.
The best red tip photinia care plan is therefore less about feeding a hungry shrub and more about choosing a dry, airy site, giving it room, watering at the soil line, and pruning with a purpose. Use the guide below to decide whether yours should be a clipped hedge, an informal screen, or a small tree—and when a diseased hedge is better replaced than rescued.
Red Tip Photinia at a Glance
| Detail | What to expect |
|---|---|
| Botanical name | Photinia × fraseri (Fraser photinia) |
| Mature size | Roughly 10–20 feet tall and 5–10 feet wide, depending on cultivar and pruning |
| Evergreen habit | Broadleaf evergreen; leaves can bronze or redden after harsh cold |
| Best light | Full sun for the strongest red flush; partial shade is tolerated |
| Soil | Average soil is fine if it drains well; avoid saturated ground |
| Hardiness | Commonly listed for USDA zones 7–8; Missouri Botanical Garden notes zone 6 is possible with protection |
| Flowers and fruit | White spring flower clusters, followed by small red pomes that may persist into winter |
| Main risk | Entomosporium leaf spot in humid, wet, poorly ventilated conditions |
The plant is a hybrid of Photinia glabra and Photinia serratifolia. NC State Extension describes it as a rapid-growing shrub or small tree with an upright to oval habit, while the Missouri Botanical Garden gives a typical mature range of 10–15 feet and notes that additional pruning can trigger later red flushes. Nursery tags vary, so measure for the mature spread rather than trusting a hedge will stay at its initial pot size. NC State Extension
Choose the Right Site Before You Plant
Photinia is forgiving about several details, but it is not forgiving about a site that stays wet and still. Before digging, look for a place where air can move through the canopy after rain and where the roots will not sit in a low pocket, downspout outlet, or compacted foundation trench.
Sunlight and airflow
Give red tip photinia at least six hours of direct sun when you want the most vivid new leaves and reliable flowering. It can grow in partial shade, but the red flush is usually less dramatic, the shrub may flower less, and a dense canopy dries more slowly. The Missouri Botanical Garden specifically cautions that full shade increases susceptibility to leaf spot, so shade is a tolerance—not the ideal.
In hot, dry climates, light afternoon shade can protect foliage from scorch, especially beside reflective walls. In humid climates, prioritize open sky and moving air over a sheltered corner that traps moisture. A fence can buffer cold wind, but a tight corridor between a wall and another hedge often creates the dampness that leaf spot prefers.
Soil drainage and spacing
Photinia tolerates average loam, clay, and alkaline soil if water drains away from the root zone. Test drainage by filling the planting hole with water before planting; if it remains full for hours, correct the site with a raised mound or choose another location. Do not bury the root flare or assume a deep layer of gravel under the hole will fix compacted soil.
Space a hedge according to the plant’s mature width and the amount of pruning you are willing to do. A row planted about 5–8 feet on center can close sooner but needs regular thinning and is more vulnerable to shared disease pressure. Wider spacing—often 8–10 feet for a looser screen—takes longer to knit together but gives each canopy more sun and air. The right distance is the one that leaves room for the mature branches without forcing you to shear both sides every few weeks.
If you are planting near a walkway, window, or utility line, remember that a fast-growing photinia can become a 10- to 20-foot shrub. A compact cultivar may reduce the burden, but it does not erase the need to check the plant’s mature dimensions.
Planting and First-Season Establishment
Plant in fall or early spring when the soil is workable and the weather is not extreme. Set the shrub so the top of the root ball is level with, or just slightly above, the surrounding soil. Break up circling roots on a container-grown plant, backfill with the soil you removed, and water slowly enough to settle air pockets without leaving the bed muddy.
For the first growing season, check the soil a few inches below the surface rather than watering by calendar alone. A newly planted shrub usually needs a deep soak when that zone begins to dry—often once or twice a week in dry weather, less after meaningful rainfall. Water around the root ball and the surrounding soil where new roots are moving; do not rely on a shallow sprinkle that wets only the mulch.
Once established, photinia tolerates short dry periods, but drought tolerance does not mean permanent neglect. During extended heat, water deeply at the soil line before the leaves wilt. Avoid overhead irrigation, especially in a hedge, because splashing water can move leaf-spot spores from leaf litter or one plant to the next. Missouri Botanical Garden UC IPM
Fertilizer and Mulch: Less Is More
A healthy photinia growing in decent soil usually does not need a routine fertilizer program. If growth is weak or leaves are unusually pale, start with a soil test and inspect light, drainage, and root damage before adding nitrogen. Extra fertilizer can create a flush of soft new leaves without fixing a waterlogged root zone or a shaded, stagnant canopy.
If a test shows a deficiency, apply a slow-release product at the labeled rate in early spring as growth starts. Avoid pushing new growth late in the season, particularly where autumn frosts arrive or leaf spot is a recurring problem. Feed the roots, not the disease: a vigorous but crowded hedge can be harder to keep healthy than a moderately growing one.
Apply about 2–3 inches of organic mulch over the root zone, leaving a clear ring around the stems. Mulch evens out moisture and temperature, but a wet mulch volcano against the trunk keeps bark damp and can hide decay. Renew the layer as it thins rather than piling fresh material higher each year.
Pruning Red Tip Photinia Without Losing Color
Pruning does three useful jobs: it stimulates new red shoots, keeps a hedge within its space, and opens the canopy so leaves dry faster. It can also remove flower buds, stimulate disease-prone soft growth, or expose a plant to frost if the timing is wrong. Decide what you want before you make the first cut.
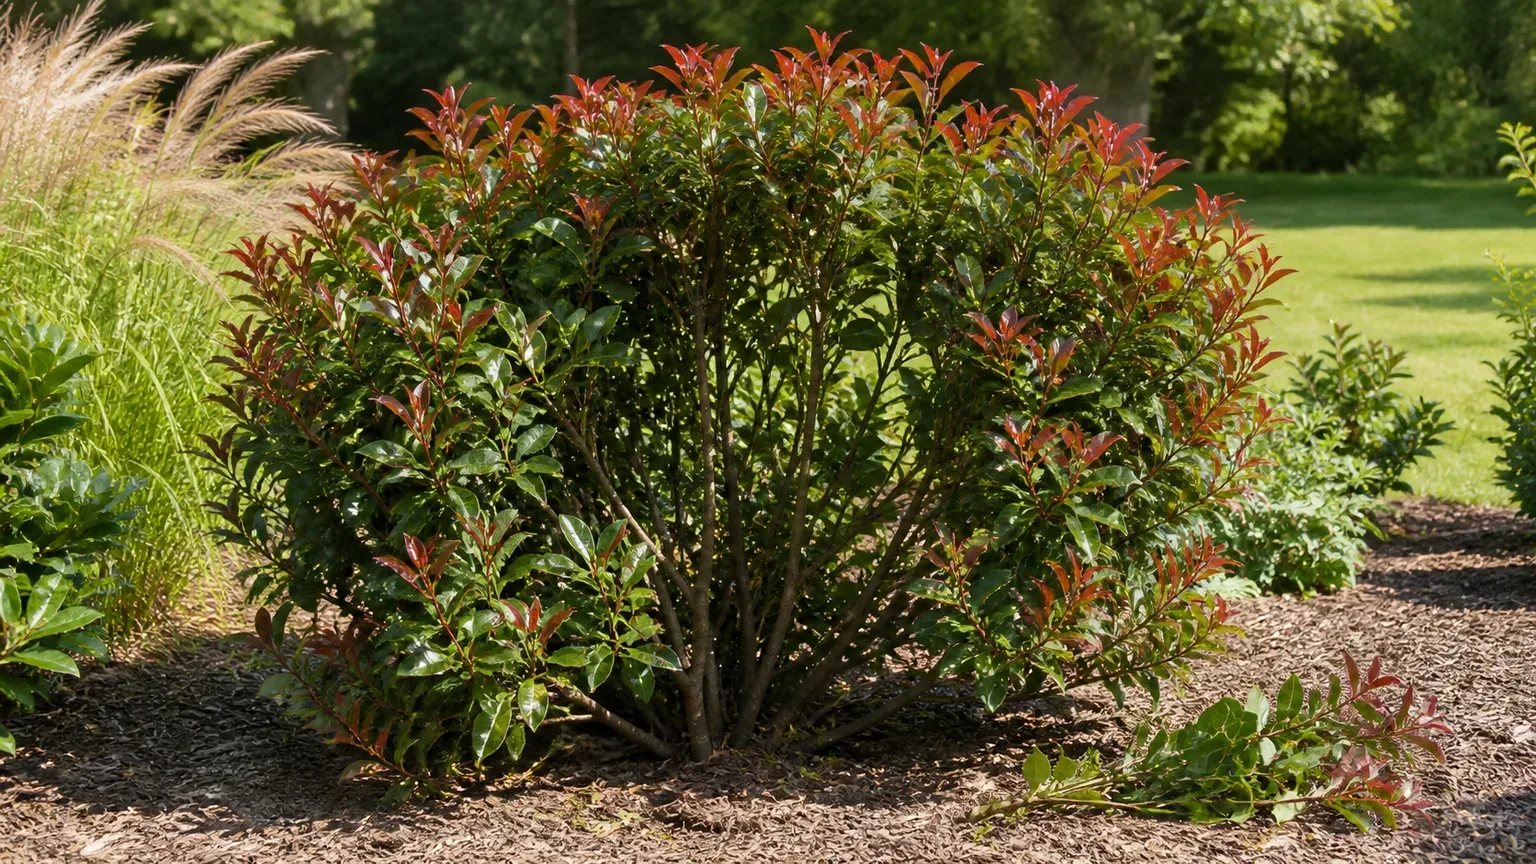
Prune by goal and season
For structure and airflow, make selective thinning cuts during a dry, mild dormant window in winter where that timing fits your climate. Remove a few entire stems from the center or base rather than shaving every branch to the same height. The Missouri Botanical Garden recommends winter thinning for better air circulation and spring pruning after the red growth begins to fade when you want another flush of red leaves. Missouri Botanical Garden
For a shape adjustment or a controlled red flush, prune after the main spring growth has expanded and begun to mature. Shorten a portion of long shoots, not every tip, and leave enough foliage to support recovery. In climates with a second growing flush, a light early-summer trim can produce more red growth, but it is optional—not a reason to shear a healthy shrub repeatedly.
Stop heavy pruning well before your local first frost. Gardening Know How advises avoiding pruning after mid-August in areas with freezing temperatures because tender regrowth may not harden in time. In a humid area where leaf spot is active, choose a dry dormant window and avoid creating a large flush just before a wet period. Garden Ninja’s twice-yearly schedule is practical for its UK climate, but the principle travels better than the exact months: prune when the plant can harden new growth and the foliage can dry. Gardening Know How Garden Ninja
Pruning before spring bloom is a choice with a visible cost. Photinia flowers on the growth that carries the spring flower clusters, so a hard pre-bloom cut may give you red leaves but few or no flowers. If the odor of the blooms is a problem, that trade-off may be worthwhile; if you want flowers and berries, wait until after bloom to shape the plant.
Use a simple cut-by-cut method
Start by standing back and identifying the plant’s outline, the crowded center, and any branches that cross or rub. Then work through the three Ds—dead, damaged, and diseased wood—before reducing healthy growth. Remove spotted material from the garden and clean your tools before moving to healthy stems.
Use sharp bypass pruners for young shoots, loppers for thicker branches, and a pruning saw rather than forcing a tool beyond its capacity. Make each cut just outside a branch collar or just above a healthy, outward-facing bud. An outward-facing bud directs the next shoot away from the center; random heading cuts at the top of the hedge create a dense shell that shades and weakens the interior.
Thin by removing selected stems all the way back to a main branch or the ground. This is more effective for airflow than shortening every branch at the same height. For routine shaping, remove no more than about one-third of the current growth in one session. If the shrub is severely overgrown, renovate it in stages over two seasons rather than stripping most of its leaves at once.
Clean up immediately. Do not leave diseased leaves or prunings under the hedge, and do not move from an infected plant to a healthy plant without disinfecting blades. UC IPM identifies fallen leaves and evergreen foliage as sources that can carry the leaf-spot fungus and recommends removing infected tissue and using irrigation that does not splash leaves. UC IPM
Shape a hedge, specimen, or tree form
For a formal hedge, keep the base slightly wider than the top. That small trapezoid lets light reach lower branches and reduces the bare-bottom look that develops when the top shades the sides. Hand-pruning the outer shoots preserves more natural leaves than repeatedly running a hedge trimmer across the canopy; if you use powered equipment for a large hedge, follow with selective cuts to remove torn or crowded growth.
An informal screen can be easier to maintain. Allow different stems to reach slightly different heights, thin the center once a year, and accept that the hedge will have a softer outline. The shrub will still provide evergreen structure without turning every red flush into a deadline.
To train a photinia as a small tree, choose one or several strong upright stems and gradually remove competing shoots and the lowest branches over multiple seasons. Do not strip the trunk all at once on a young plant. A multi-stem form is often more forgiving and still creates a tree-like silhouette while preserving screening lower down.
Cultivars and Landscape Uses
‘Red Robin’ is the familiar red-tip hedge plant, selected for its vivid scarlet new growth and vigorous habit. ‘Pink Marble’ offers pink new leaves with variegated margins and usually works best where its foliage can be seen close up rather than lost in a long hedge. NC State lists both ‘Red Tip’ and ‘Pink Marble’ among cultivars of P. × fraseri. NC State Extension
Use the standard form as a specimen, an informal or clipped hedge, a privacy screen, or a small multi-trunk tree. It is most useful where you have enough width to accept mature growth and enough access to prune from the outside and inside. It is a poor choice for a narrow foundation strip, a permanently wet corner, or a landscape where you need a plant to stay at four feet without frequent cutting.
Regional fit matters. Texas Invasives includes P. × fraseri in its invasive-plant database, so Texas gardeners should check local recommendations before adding it and consider listed native alternatives such as evergreen sumac or yaupon holly. A plant that is dependable in one region may create management or ecological concerns in another. Texas Invasives
If horses can browse the planting, get current advice from a veterinarian or local extension service before planting. Toxicity references are not interchangeable: Merck emphasizes that dose and accurate plant identification matter, while ASPCA notes that its plant list is not all-inclusive and that any plant material can cause gastrointestinal upset in dogs and cats. Keep fallen prunings away from grazing animals and treat an animal exposure as a veterinary question, not a gardening guess. Merck Veterinary Manual ASPCA
Red Growth, Flowers, and Berries
The red color is young foliage, not a permanent leaf color. A flush usually opens bronze, copper, or red and then turns glossy green over a few weeks. If your shrub is green in summer, that is normal; what matters is whether it produces healthy new growth at the next flush.
Full sun and purposeful pruning give you the most visible red tips. Deep shade, severe disease, drought, root stress, or pruning only the tallest top branches can leave the color sparse and high in the plant. A spring cut made after the first flush begins to fade can encourage another wave, but repeated shearing is not automatically better—every new flush is a period when tender leaves need good airflow and dry conditions.
Unpruned plants can produce small white flowers in spring, often with a strong odor that some gardeners find unpleasant. Flowers may be followed by small red pomes that persist into winter. Prune before bloom if you prefer foliage and no flowers; prune after bloom if the flowers and fruit are part of the appeal. NC State Extension Missouri Botanical Garden
Prevent and Treat Photinia Leaf Spot
Photinia leaf spot, also called Entomosporium leaf spot, is the problem that determines whether this shrub is a good long-term choice in a particular yard. It is caused by a fungus in the Entomosporium group that also affects several other members of the rose family, including apple, pear, hawthorn, pyracantha, and quince.
Diagnose the first spots and choose an action
Early symptoms are tiny reddish spots, sometimes with a darker red, purple, or yellow halo. As leaves mature, the spots enlarge and darken; pale or glossy spore-forming centers may develop, and affected leaves can drop early. That pattern is different from the normal red color of fresh leaves, which is generally even across new growth and changes to green rather than forming discrete lesions. UC IPM
When you see a few suspicious leaves, inspect the whole hedge before spraying. Check whether spots are concentrated on tender new growth, whether fallen leaves are accumulating below, whether irrigation hits the foliage, and whether branches are packed tightly together. Photograph the symptoms and take a sample to a local extension service if the diagnosis is uncertain; black marks can also follow frost, scorch, physical damage, or another disease.
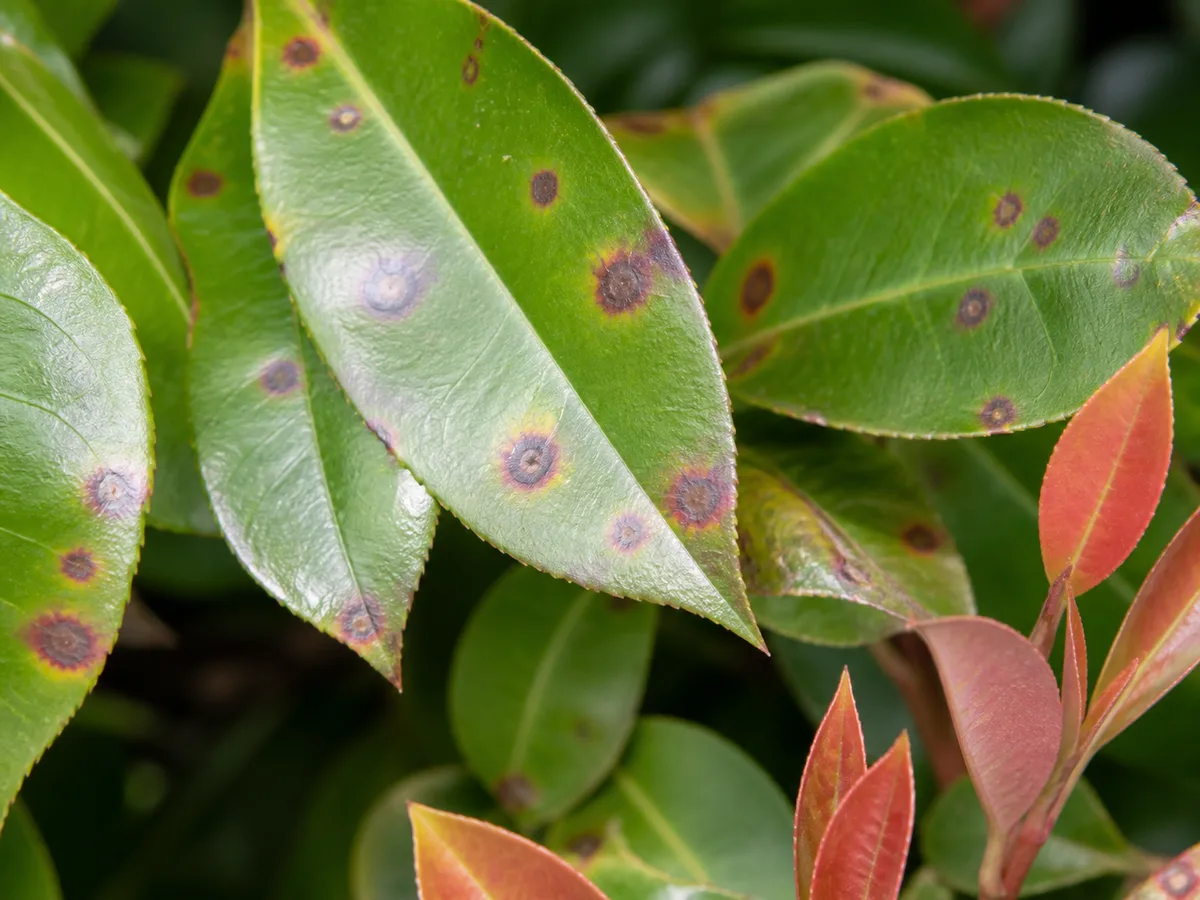
Reddish-brown lesions with darker centers and pale halos are consistent with Entomosporium leaf spot; confirm uncertain symptoms locally.
Build a prevention and treatment sequence
Use this order:
- Remove the source. Pick up spotted leaves and remove badly affected shoots. Bag them for disposal rather than leaving them under the plant.
- Dry the canopy. Switch to drip, soaker, or low-volume watering at the soil line. Water early enough that the root zone is replenished without wetting the leaves.
- Open the plant. During a dry pruning window, thin crowded interior stems and remove low branches that keep foliage close to damp soil. Disinfect blades between plants and after diseased cuts.
- Reduce the next infection window. Avoid summer shearing that produces a dense flush just as humid or rainy weather arrives. Keep surrounding plants from forming a wall around the hedge.
- Escalate carefully. If several seasons of severe defoliation continue, ask a local extension professional about a fungicide labeled for ornamental shrubs in your area. UC IPM notes that copper or chlorothalonil can reduce damage when applied before infection becomes severe, but product labels, availability, and applicator rules change. Follow the current label exactly and do not spray a product simply because it worked on another plant. UC IPM
The cultural steps are not optional extras. A fungicide cannot compensate for wet leaves, leaf litter, and a hedge planted so tightly that the center never dries. If the plant loses most of its leaves every year despite improved spacing, irrigation, sanitation, and airflow, replacement may be the more honest solution—especially in warm, humid regions where disease pressure is high.
Pests and Other Problems
Photinia can host aphids, scale, mites, and caterpillars, and it may also encounter fireblight, powdery mildew, or root rot. Start with a close inspection: look under leaves for mites or scale, check whether chewing damage is localized, and examine the soil and roots if the entire plant is declining. NC State notes that the hybrid is intolerant of wet conditions and has pest and disease problems; soggy roots can mimic a fertilizer deficiency or drought stress. NC State Extension
Do not treat every insect with a broad-spectrum spray. Remove a small caterpillar infestation by hand, prune out a badly infested shoot, or ask an extension service to identify an insect before choosing a control. For root problems, correct drainage first; feeding a plant whose roots are suffocating usually makes the diagnosis harder.
Brown leaves after a hard freeze do not always mean the shrub is dead. Wait until the weather warms, scratch a small section of stem to check for living green tissue, and prune confirmed dead wood back to healthy growth after new buds begin to show. A plant that repeatedly suffers winter dieback may need a more sheltered position or a hardier replacement.
Propagate Red Tip Photinia from Cuttings
Because Photinia × fraseri is a hybrid, seed-grown plants may not reproduce the exact traits you want. Stem cuttings are the practical route when you want a duplicate of a healthy parent plant.
Take several semi-hardwood cuttings in summer, before frost threatens. Choose firm current-season stems, cut sections about 4–6 inches long just below a node, remove the lower leaves, and leave only a small set of leaves at the tip. Insert the cuttings into a clean, moist, free-draining rooting mix and cover them loosely with a clear bag or propagation cover to hold humidity without sealing in stagnant, soaking air.
Keep the pot warm and bright but out of harsh direct sun. The mix should remain lightly moist, never waterlogged. Check for resistance after several weeks rather than pulling every few days; once roots have formed, pot the cuttings separately and grow them on until they have a strong root system. Acclimate young plants gradually before planting outdoors, and choose cuttings only from a vigorous, spot-free parent so you do not start a new hedge with infected material. NC State lists stem cuttings as a recommended propagation strategy. NC State Extension
Winter Protection and Cold Damage
The hybrid is commonly recommended for USDA zones 7–8, with some protected zone 6 sites possible. In the coldest part of its range, plant on a sheltered south- or west-facing side of a building, mulch the root zone after the ground cools, and protect exposed young stems from drying wind. A breathable burlap screen can reduce wind stress; do not wrap the shrub airtight in plastic.
Avoid late-season pruning because it encourages soft shoots just as cold weather approaches. If leaves turn brown after a freeze, leave them in place until you can distinguish dead wood from live wood. Pruning too early can remove buds that would have pushed new growth in spring. The Missouri Botanical Garden specifically recommends protected locations for zone 6 and notes that the plant is drought tolerant once established but intolerant of wet soil. Missouri Botanical Garden
Conclusion
Red tip photinia is worth growing when its strengths match the site: fast evergreen growth, brilliant new foliage, and flexible hedge or tree form. Give it sun, drainage, mature-width space, and root-zone watering; then prune selectively to open the canopy and time new red growth instead of repeatedly shearing a wet, crowded wall.
The most important decision is made before planting. If your yard is humid, poorly ventilated, persistently wet, or inside a region that flags the plant as invasive, choose a better-adapted screen. If the site is bright and airy, start with clean stock, watch the first red flush for leaf spot, and treat airflow and sanitation as part of ordinary red tip photinia care—not as a last-minute rescue.



