How to Unclog a Kitchen Sink With a Snake
Learn how to snake a kitchen sink through the right access point, remove a clog without forcing the cable, reassemble the trap, and know when to call a plumber.
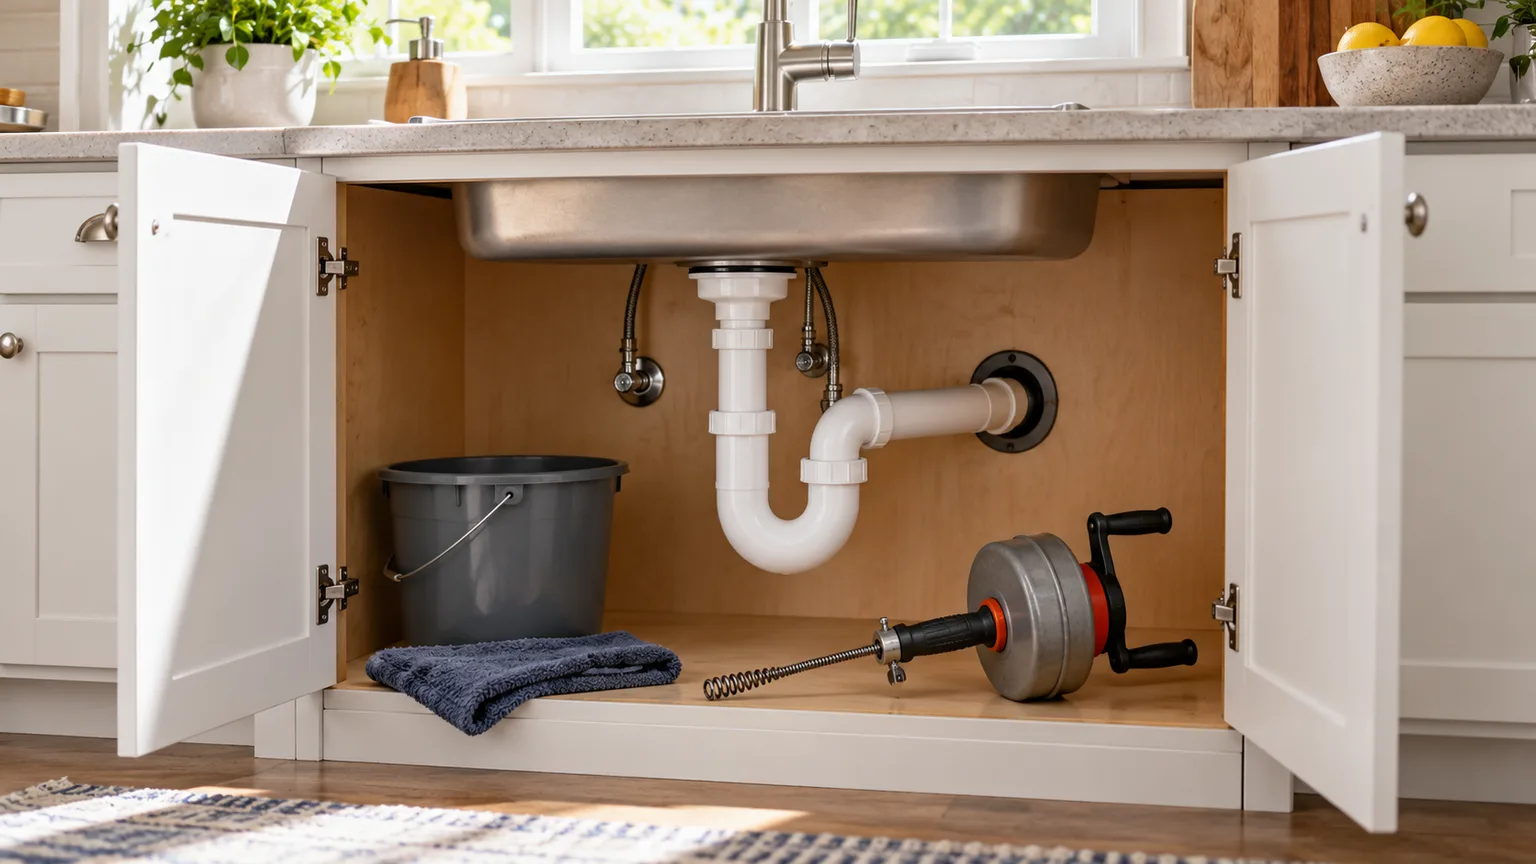
A hand-crank drain snake can clear a kitchen sink when a clog sits beyond the strainer or P-trap, but the access point matters. In many under-sink layouts, the safest route is to remove an accessible slip-joint trap, inspect it, then feed a small sink auger into the wall branch. Forcing a cable down the sink opening can send it into the wrong side of a double-bowl fitting, snag a disposal connection, or simply stop at the trap.
Before touching the pipe, check whether the problem affects one sink or several fixtures and whether chemical drain cleaner may still be in the line. A local, slow kitchen sink is a reasonable hand-snake project if the pipework is accessible and the cable moves gently. A stuck cable, wastewater backup, chemical residue, or multiple affected drains is a stop signal, not a reason to use a bigger machine.
Is a drain snake right for this kitchen sink clog?
A compact manual auger is most useful when one kitchen sink drains slowly or has stopped, while the rest of the home’s drains work normally. Food scraps, grease, and other debris can lodge in the trap or the nearby branch line. A snake may hook a soft blockage or break a narrow path through it, but it cannot repair a crushed pipe, remove a hard object safely in every case, or prove that the entire line is clean.
If water stands in one bowl, start with a visible strainer basket or disposer opening and remove only debris you can reach without putting fingers into the disposal. If both bowls back up together, the clog may be in their shared outlet or downstream of the trap. That still may be a local branch clog, but you will need to identify where both bowl drains join before choosing an entry point.
One sink, both bowls, or several fixtures?
The pattern helps locate the likely problem. A single basin that drains slowly while nearby fixtures behave normally points toward its strainer, trap, or immediate branch. If both kitchen bowls fill, check the shared trap and branch. If a toilet, tub, laundry standpipe, or floor drain also gurgles or backs up, the blockage may be in a shared line beyond the kitchen branch; a short sink auger is unlikely to be the right tool.
Stop and call a plumber or building maintenance if sewage-colored water appears, water backs up at a lower drain, several fixtures are affected at once, or the sink refills while another fixture runs. Those symptoms can indicate a downstream blockage that needs an appropriate cleanout and larger equipment. Avoid continuing to run water while you assess it, since additional flow can worsen a backup.
Choose a sink auger and the right access point
For a typical kitchen branch, use a manual sink auger or small hand-crank drum auger whose cable and head are rated by its maker for the pipe size and fixture. Do not choose by cable length alone. As one model-specific example, RIDGID lists its EZ SPIN drain snake for sinks, tubs, and showers and gives a pipe capacity of three-quarters to two inches with a quarter-inch cable; that is the specification for that tool, not a universal sizing rule. Check the RIDGID EZ SPIN specifications and instruction sheet for the exact model you use.
An ordinary sink auger is different from a toilet auger, which has a protective guide shaped for a toilet trapway. A thin plastic hair strip is also not the same as a drum auger: it may reach debris near the opening but is not a substitute for a cable designed to pass through a sink branch. Avoid a powered sewer machine for a routine under-sink clog. Larger equipment adds torque and cable mass that may be unsuitable for small fixture piping.
Why the trap and wall branch matter
The sink tailpiece drops into the P-trap, whose bend holds a water seal that blocks sewer gases. From there, a trap arm runs toward the wall branch drain. The bend and, in a double sink, the baffle tee complicate cable travel. A snake inserted through the strainer must pass the stopper or disposal area, navigate the trap, and find the branch; it may be difficult to tell which direction it has taken.
If your cabinet has an accessible cleanout intended for drain service, its instructions may offer a direct entry. Otherwise, a removable slip-joint trap can provide a clear route to the branch after you inspect it. Do not remove glued fittings, corroded metal nuts, the disposer, or an unfamiliar assembly just to gain access. A plumber can choose a proper entry point without risking damage to the fixture or cabinet.
Gather tools and make the cabinet safe
Set out the auger, a bucket or shallow pan, towels, eye protection, durable gloves suited to the tool, a flashlight, and pliers only if a metal slip nut needs them. Put the bucket directly below the trap before loosening anything: even a drained sink trap holds water and food residue. Keep a trash bag nearby for debris. Photograph the pipe arrangement first so you can return the trap and washers to their original orientation.
Clear cleaning products and stored items from under the cabinet. If a garbage disposal is present, switch it off and keep hands out of its throat; never rely on the wall switch if you are servicing or touching the unit itself—disconnect power as its manufacturer directs. Wear closed shoes and avoid loose sleeves, jewelry, or clothing near a moving cable. Follow the auger’s manual for its cable lock, crank direction, and retrieval method; designs differ.
Check for chemicals before opening the drain
If you recently poured a liquid drain opener into the blocked sink, do not plunge, snake, remove the trap, or add another cleaner while product could remain pooled in the pipe. A cable can bring liquid back toward your face or hands, and opening the trap can release it into the cabinet. Poison Control explains that some drain cleaners contain concentrated corrosive acids or alkalis and can burn skin and eyes if they splash. (Poison Control’s drain-cleaner guidance)
Follow the product label and contact a plumber before disturbing the drain; tell them the product name and when it was used. Never mix cleaners or try to neutralize one with vinegar, baking soda, bleach, or another household product. If anyone has an exposure, contact Poison Control at 1-800-222-1222 in the United States or use the local poison service for your region. Keep children and pets away from the sink and cabinet until the hazard is resolved.
Step 1: Inspect the trap and clear an easy clog
Stop the water and look into the sink strainer or disposer opening with a flashlight. Remove only loose, visible scraps with a tool such as tongs while the disposal is off; do not reach into its grinding chamber. If the blockage is a removable strainer basket full of food, clean the basket and test a small amount of water before taking apart the drain. Do not use a snake through a disposal opening or press the cable against its blades or internal parts.
Look under the sink for wetness, a corroded trap, glued joints, a disposal, a dishwasher hose, and any cleanout cap. If the trap and connections are intact, accessible slip joints, you can consider removing the trap in the next step. If you see active leakage, cracked plastic, corrosion, swelling in the cabinet floor, or pipework you do not recognize, stop. A clog is frustrating, but a broken joint or sewage spill creates a larger problem.
Step 2: Remove only an accessible slip-joint P-trap
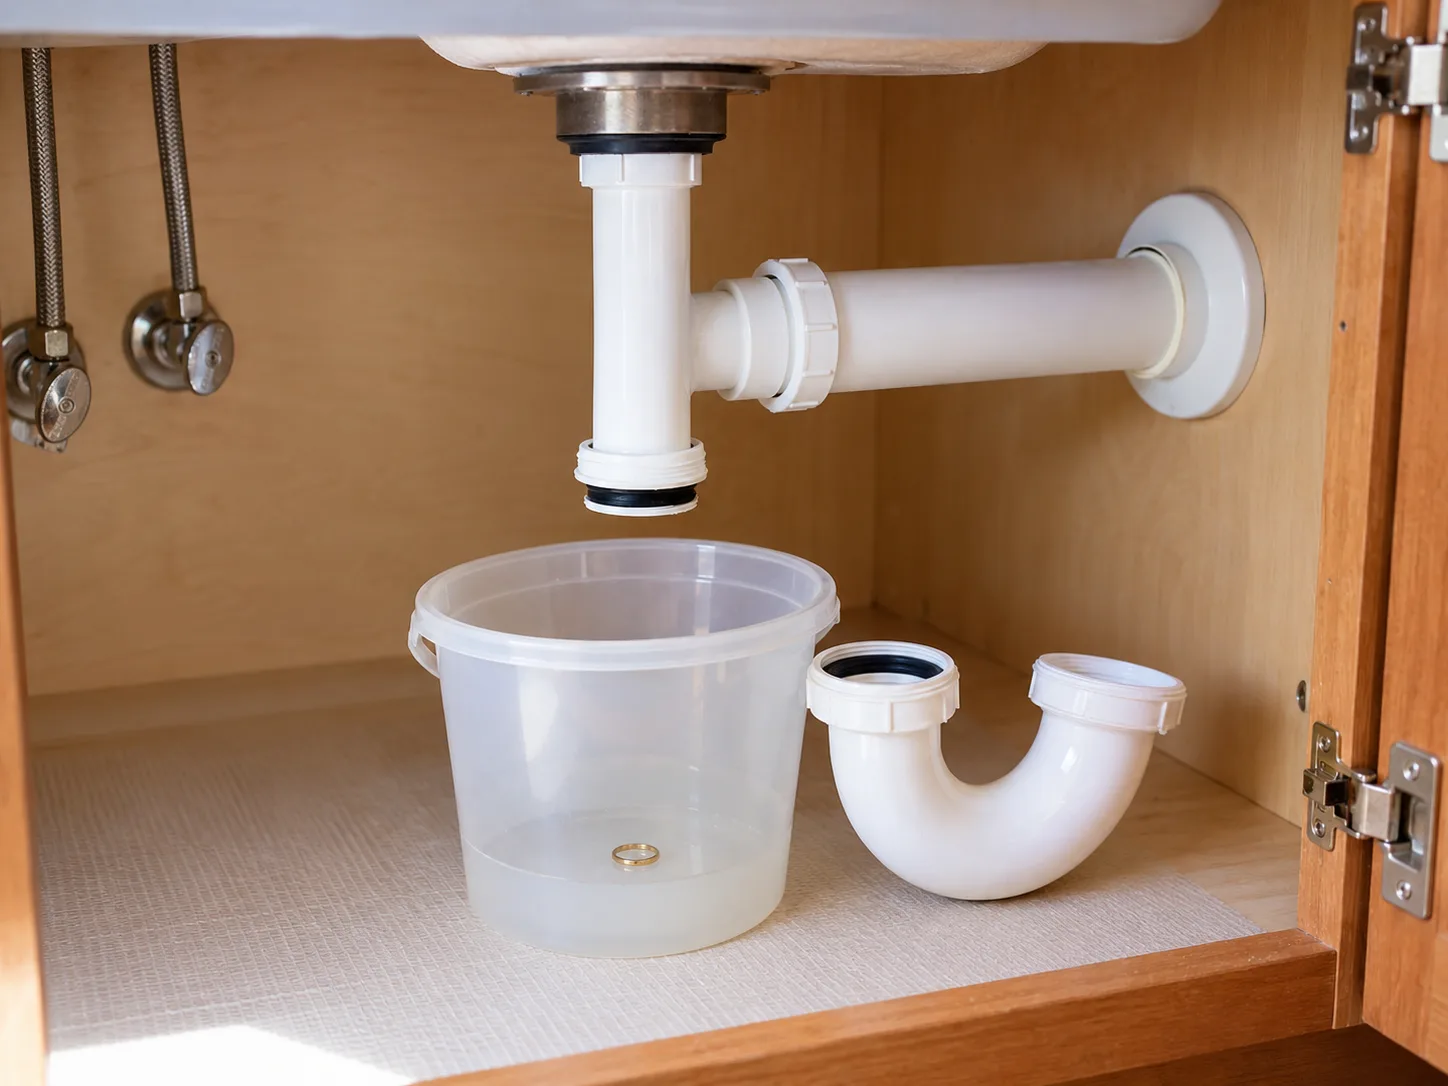
Put on gloves and eye protection, then position the bucket under the trap. Support the curved section with one hand and loosen the slip nuts slowly. Plastic nuts often turn by hand; use correctly sized pliers only if needed, with light pressure so you do not crush or twist the pipe. If a nut is seized, the pipe flexes, or the joint begins to crack, stop rather than increasing leverage. Glued, threaded, corroded, or sealed connections are not the same as a removable slip-joint trap.
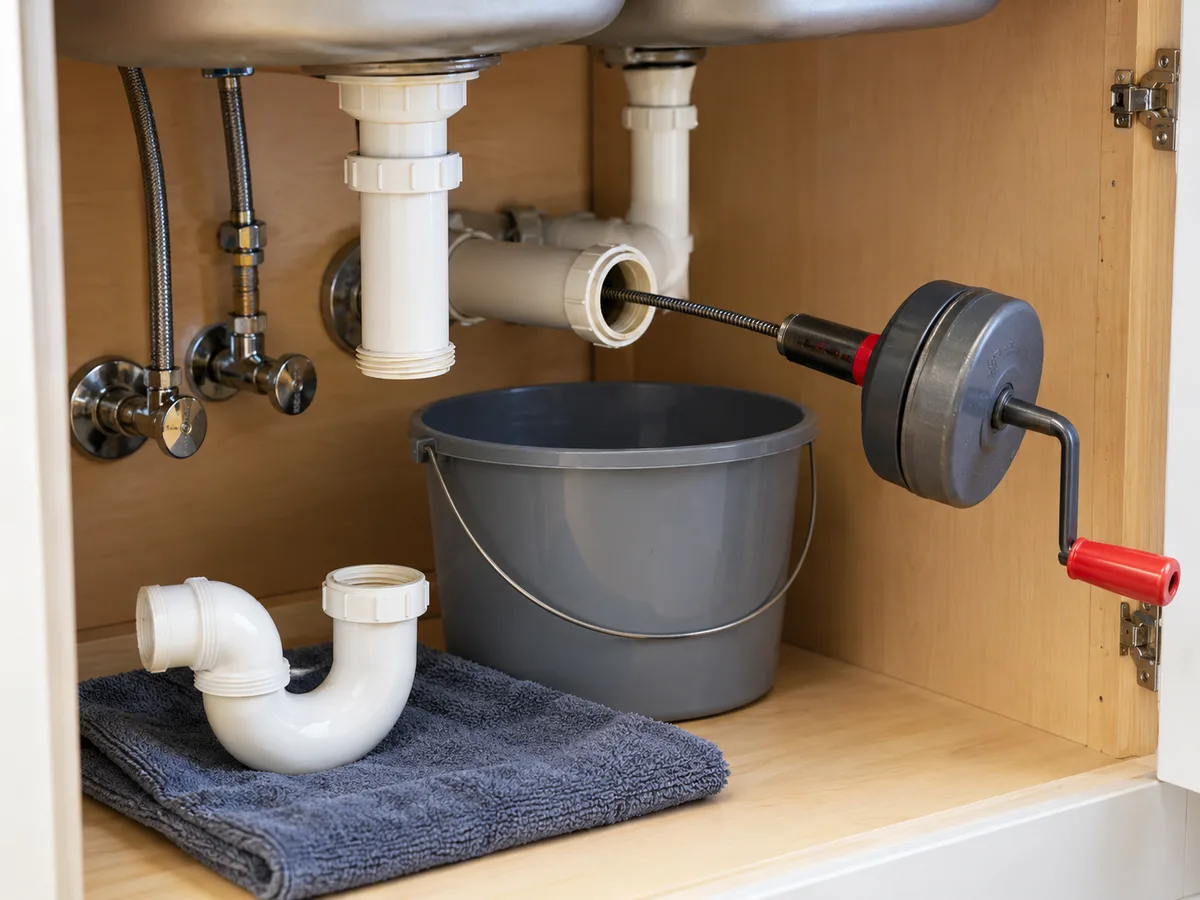
Lower the trap carefully and empty it into the bucket. Check the bend for a nearby plug of food or grease and clean it over the bucket, not into another drain. If the trap is clear, inspect the horizontal trap arm leading to the wall. Keep track of washers and note which direction their tapered ends face; a washer installed backward can leak after reassembly. Do not push the auger into the sink tailpiece after removing the trap. The open wall-side arm is the more direct access to the branch line.
Step 3: Feed the cable into the branch drain
Place the auger drum close to the wall-side opening and feed only the short length of cable needed to guide the tip into the pipe. Lock the cable using the mechanism described in its manual. Keep the exposed cable controlled; do not let a long loose section whip, buckle, or scrape the cabinet. Begin with gentle hand pressure and slow rotation, advancing a few inches at a time.
When the cable meets resistance, pause rather than leaning on it. Slowly turn the handle and let the tip work around the line’s bends. Some augers specify clockwise rotation during feeding or retrieval; others use different controls, so use the tool maker’s directions instead of assuming one direction fits all. Do not attach a drill unless the exact auger is designed for it and its instructions explain the setup.
Tell a bend from a blockage without forcing it
A cable can meet the turn at a fitting, the branch’s direction change, a baffle tee, or the clog itself. You usually cannot diagnose the obstruction by feel alone. A cable that advances with gentle rotation may have navigated a bend; one that buckles, kinks, springs back, or refuses to turn is telling you to stop. Pull back a little and reset the angle only if the tool and pipe remain stable.
Do not drive the cable until resistance disappears, and do not confuse a sudden drop in resistance with proof that the drain is clear. The tip may have entered a larger line, passed through soft material, or shifted into a different branch. The useful check comes later: retrieve the cable, inspect what it brought back, reassemble carefully, and test the sink under controlled flow.
Step 4: Work the clog and retrieve debris
If the tip catches a soft blockage and the cable continues to turn smoothly, advance a small amount while maintaining gentle rotation. The head may break a narrow passage through grease and food residue or catch material that can be pulled back. Do not ram, hammer, yank, or crank rapidly. If you meet a hard stop or feel the cable twisting under load, back off and stop if gentle movement does not free it.
Retract slowly according to the tool’s manual, keeping the drum near the opening and the cable controlled. A corkscrew tip may bring back scraps; remove them over the bucket or bag and clean the head before another pass. Do not reverse the crank direction unless the instructions call for it. Repeated aggressive back-and-forth movement can wedge debris deeper, kink the cable, or damage a fitting.
One careful second pass can be reasonable if the first retrieves material and the cable still moves freely. If you have made one or two controlled attempts with no improvement, stop. A long cable is not a reason to continue blindly: the clog may be deeper, may not be something the tip can grab, or may involve pipe scale or a damaged line that needs professional assessment.
Step 5: Reassemble the trap and test for leaks
When the cable is fully out, wipe it and clean it as the manufacturer directs before storing it. Check the trap and washers for debris or damage. Reassemble the parts in the order and orientation shown in your photo, ensuring each pipe is seated squarely. Hand-tighten plastic slip nuts and follow the fitting maker’s guidance; excessive force can distort plastic or damage threads. Do not use thread tape or sealant on a slip joint unless its manufacturer specifies it.
Before running much water, place a dry towel beneath the joints and run a small stream into the sink. Watch the trap, wall arm, and tailpiece for drips. Then fill the basin a few inches and release the water so a stronger flow passes through the reassembled drain while you continue checking. For a double-bowl sink, test each bowl and then both together. If a joint leaks, stop the flow, empty the trap into the bucket, and reseat the connection; if it still leaks or the fitting is damaged, call a plumber.
Only increase the flow after the joints stay dry and water drains normally. Do not use boiling water as a final flush. Warm tap water is enough for a controlled test, and it does not replace removing grease or debris from the line. If the sink immediately slows again, avoid repeated cable passes and reassess whether the blockage is beyond the accessible branch.
What changes with a disposal or double-bowl sink?
A disposer adds a bulky connection between one sink bowl and the shared drain. Do not snake down through the disposer throat; the cable can strike internal parts and the route is indirect. The disposer should be off, and you should never put a hand inside it. If the clog is on the shared downstream side, access through the trap arm or an intended cleanout is usually easier to control, but the fittings vary by installation.
In a double-bowl sink, the two tailpieces commonly meet at a tee before the P-trap. A cable inserted through one bowl can be deflected toward the other bowl or snag at the tee. Removing a suitable trap may let you inspect the shared section and feed the cable downstream from the junction. If both bowls are full and the layout is complex, do not guess which opening the cable has entered; stop and use a plumber’s help if it does not move freely.
When to use a cleanout—or leave it alone
Some traps or branch lines have a cleanout cap designed to provide service access. If it is clearly a cleanout for this sink, the line is not under backup pressure, no chemical product is present, and you can identify how to reseal it, follow its manufacturer’s directions with a bucket below. Loosen it slowly while standing to the side; backed-up water can spill when the cap comes free.
Do not open a cleanout if water is standing high in the sink, wastewater may be trapped behind it, the fitting is corroded or painted over, or you cannot tell whether it serves a larger shared line. In an apartment or condo, contact building maintenance before opening any shared plumbing. A cleanout can be an excellent access point for a plumber but a poor DIY experiment when the amount of wastewater behind it is unknown.
Troubleshoot a snake that stops or brings back nothing
If the cable will not enter, confirm the trap is removed or that the cleanout you chose is actually open. Check that the tip is not catching on a sharp edge or strainer crossbar. If it stops after entering the branch, ease back slightly and try gentle rotation with a short exposed length. If it repeatedly hits the same hard point, kinks, or pushes the wall pipe out of position, stop. A fitting or obstruction may be outside the range of your tool.
If the snake comes back clean and the sink still drains slowly, the tip may have passed through a soft clog without collecting it, or the problem may not be a discrete wad. Clear the head, inspect the trap again, and consider a single careful pass only if the cable has remained stable. Do not keep feeding cable just to reach the full length printed on the drum.
If a cable becomes stuck, stop turning and do not add leverage. Follow the tool’s release procedure and try only gentle movement that keeps the cable aligned. Pulling hard can damage the pipe or leave part of the snake inside. If the cable will not come free easily, leave it in place and call a plumber; tell them how much cable is exposed, where it entered, and whether any drain cleaner was used.
When to stop and call a plumber
Call a professional when more than one fixture backs up, wastewater rises from another drain, the sink clogs again immediately after a careful pass, or there is a persistent gurgle or sewage odor. These conditions can point to a shared branch, main drain, venting issue, or another fault that a small manual auger cannot diagnose. A plumber can select the correct access and machine for the line.
Stop DIY work if the cable kinks or sticks, the trap is glued or badly corroded, the wall fitting moves, the cabinet plumbing is leaking, a hard object is lodged, or a chemical cleaner may remain in the pipe. Do not escalate from a hand snake to a drill-powered or large motorized machine just because the first tool did not work. This Old House advises starting gently on a drain and using a hand snake for sink clogs, while its broader drain guidance distinguishes fixture tools from equipment for larger lines. (This Old House’s sink-clearing guide) Bob Vila’s drain-snaking guide also recommends professional help when the drain remains blocked after careful attempts. (Bob Vila’s guide to snaking drains)
If chemical drain cleaner was poured into the sink, disclose it before anyone opens the pipe. Poison Control notes that splashing can expose skin to corrosive drain-cleaner ingredients. (Poison Control’s drain-cleaner safety information) This is a good point to leave the drain alone and arrange a service call rather than trying to scoop, plunge, snake, or neutralize what may still be in the line.
Keep the kitchen drain flowing
Use a strainer basket to catch scraps before they reach the trap, and empty it into the trash or compost rather than rinsing the contents down the sink. Wipe greasy cookware into the trash before washing; fats and cooking oils can collect in drain plumbing. A disposer can handle only the materials and amounts allowed by its manufacturer, and it does not make every food scrap suitable for the drain.
Clean the strainer and visible disposer baffle regularly, and pay attention to the first change in drainage. A sink that slows early is easier to inspect than one that is completely backed up. Avoid routine chemical drain-opener use as preventive maintenance; it does not replace removing collected debris, and corrosive products create additional handling hazards. If the same sink repeatedly clogs despite sensible use, ask a plumber to check the branch line and pipe condition.
Conclusion
To unclog a kitchen sink with a snake, first confirm that the problem is limited to that sink and that no chemical cleaner is sitting in the pipe. Choose a manual sink auger rated for the line, inspect an accessible P-trap, and—when the fittings are sound slip joints—remove the trap to feed the cable into the wall branch. Work in short, controlled increments, retrieve debris gently, and stop when the cable kinks, sticks, or meets a hard obstruction.
Reassemble the trap with its washers correctly seated, test with a small stream, and check every joint before using the sink normally. A disposer, double-bowl tee, cleanout, or shared drain can change the route and the risk. If several fixtures back up, wastewater appears, chemical residue may remain, or a careful attempt does not restore flow, leave the line to a plumber.