Leaf Miners on Pilea Peperomioides: How to Confirm and Stop
Quick answer
First isolate the Pilea peperomioides from nearby plants. Then confirm that a pale trail is a true mine inside the leaf, not a surface spot. Remove only leaves with active or extensive mines, bag them, and monitor the next leaves for fresh trails.
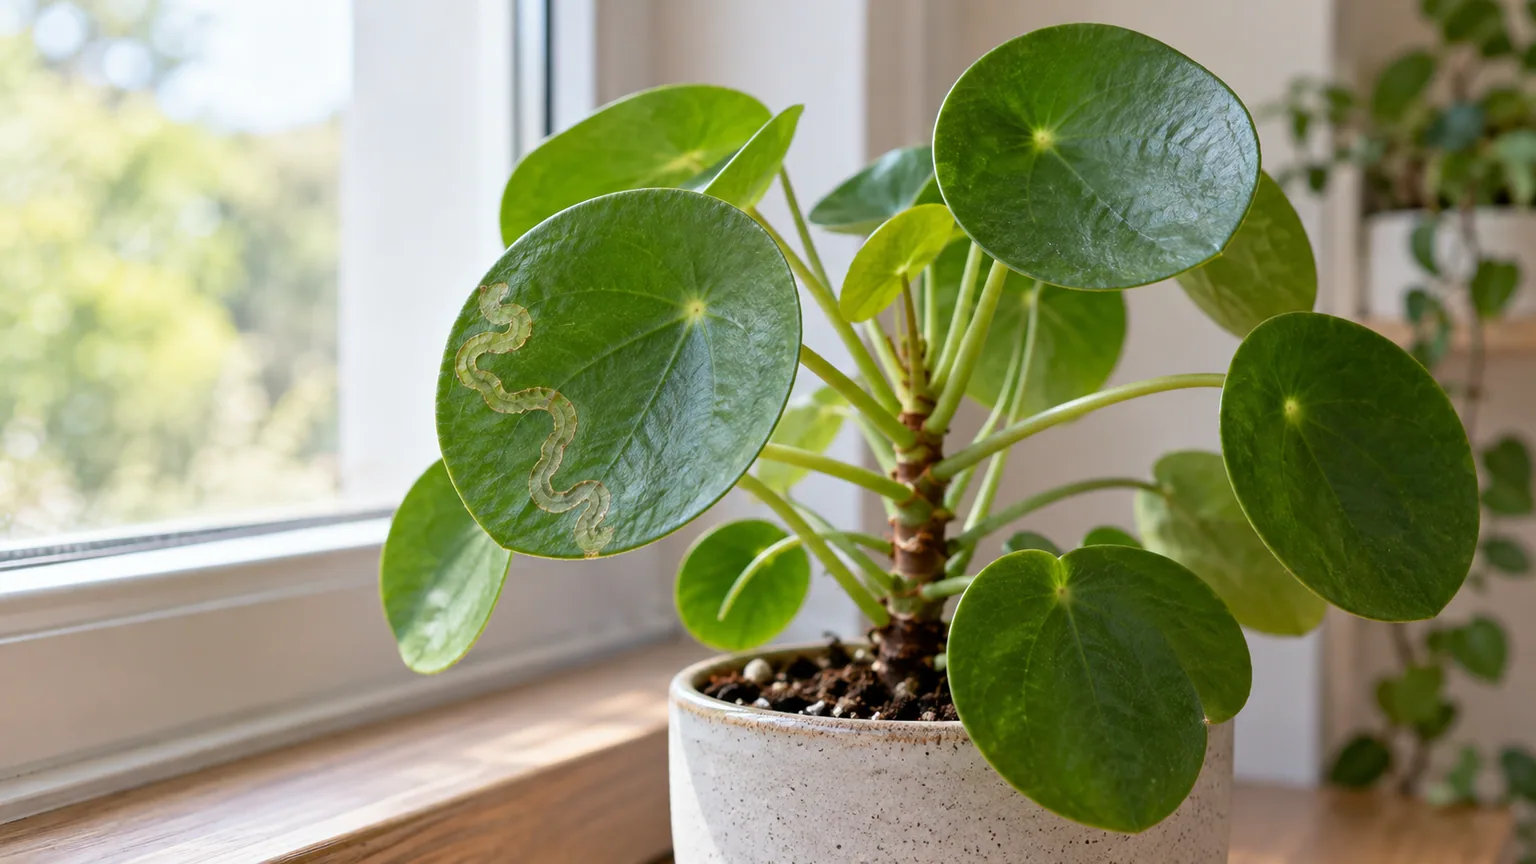
Leaf Miners on Pilea Peperomioides: Confirm the Trails and Stop Spread
This guide covers leaf miners on Pilea Peperomioides. See also the general Leaf Miners guide, watering, and light pages for this plant.
Leaf Miners on Pilea Peperomioides: Confirm the Trails and Stop Spread
Quick answer
First, move your Pilea peperomioides away from nearby plants while you check the leaf. A leaf miner is a larva feeding inside a leaf; larvae feed within the blade, so the key clue is a pale winding trail or blotch within the tissue—not a mark sitting on the surface. Backlight the coin-shaped leaf and look for a papery gallery, dark frass, or a larva. If the mine is confirmed, remove only leaves with active or extensive injury, seal them in household waste, and watch the next leaves for fresh trails. Do not respond by changing watering, repotting, or spraying every leaf: none of those actions removes a larva already protected inside a gallery.
For the broader signs and biology across houseplants, see the general leaf-miners guide. This page focuses on how to read the marks on Pilea’s round foliage and how to protect its upright stem and basal offsets. If you need the plant’s full care baseline, start with the Pilea peperomioides overview.
What leaf-miner damage looks like on Pilea’s coin leaves
Pilea’s nearly circular leaves make a mine unusually easy to notice: a narrow pale track can sweep across a broad green disc, while a blotch may look like a translucent, dry window. Its fleshy circular leaves are peltate, with the long petiole attached near the blade’s center, as NC State Extension’s plant profile describes. That central attachment is a useful visual landmark when you inspect a suspicious trail; keep the petiole attached during the first check so you can compare the whole disc without damaging it.
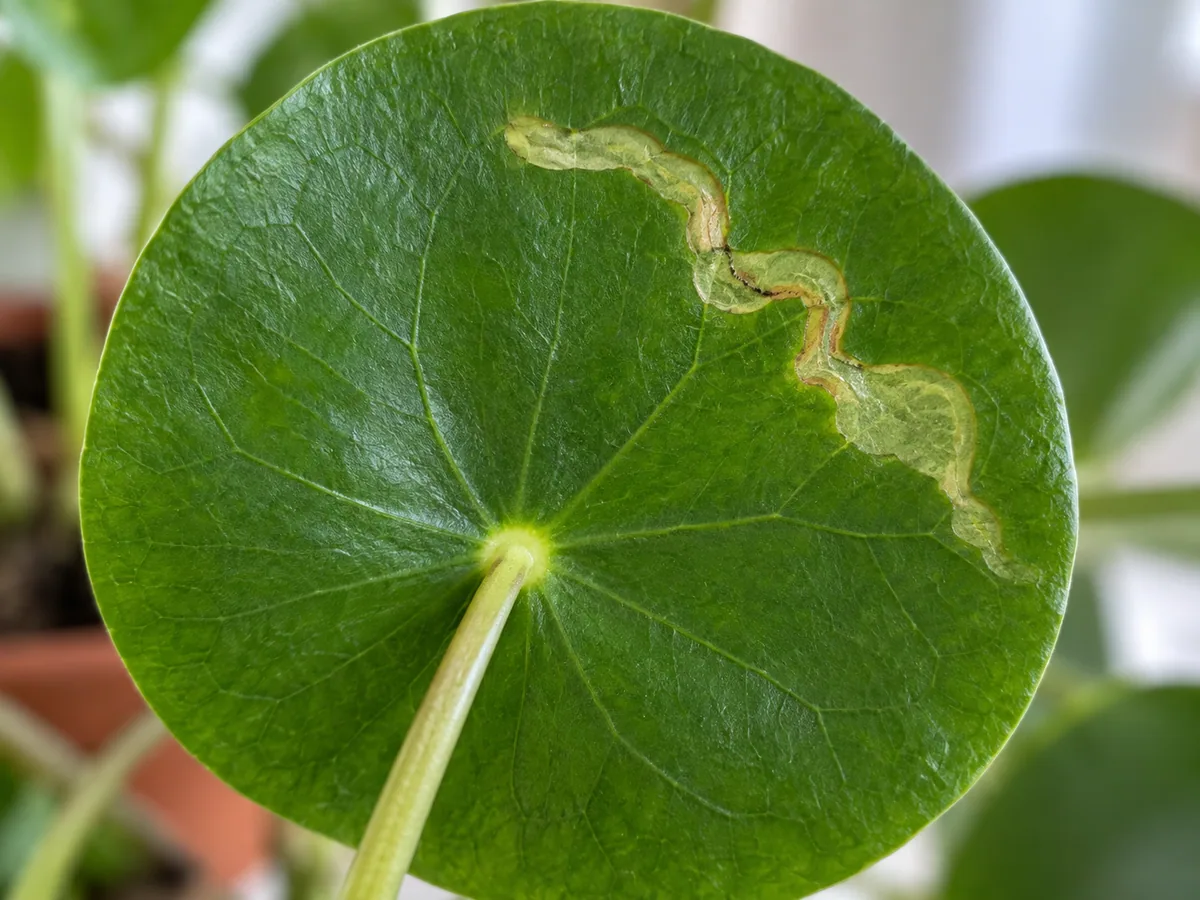
Look for an internal, winding gallery on the round leaf; a mine is damage inside the blade, not dust or residue on its glossy surface.
Leaf miners are not one single insect. Different moths, flies, sawflies, beetles, and weevils can have larvae that feed between the upper and lower leaf surfaces. Several insect groups produce mines with different patterns: the serpentine and blotch forms may appear as a thin winding track, a wider patch, or a mix of both. Some mines widen as the larva feeds.
A fresh gallery may look pale, glassy, or whitish against Pilea’s dark green blade. Older mined tissue can dry, turn tan or brown, and become papery; WSU Hortsense describes pale or papery mined tissue. The upper and lower skin of a leaf can remain over the eaten interior, so a mark may look like a surface stain until you hold the blade to a bright window. If the track is only a few millimeters long, use a phone light behind the leaf and a hand lens rather than tearing the tissue open.
Why a new mine is a pest clue, not a Pilea care diagnosis
Watering stress, low light, and root trouble can change how Pilea leaves look, but they do not make a larva tunnel through the inside of a leaf. A confirmed gallery points to a leaf-mining insect. That distinction matters because the stubby trail is not a signal to water more, fertilize, or shift the plant into direct sun. Keep the usual care conditions steady while you diagnose; use the Pilea watering guide to decide when the mix needs water and the Pilea light guide to check placement.
The likely route into an indoor collection is exposure to an adult or infested plant material, not an internal failure of the Pilea’s potting mix. Extension accounts describe eggs laid on suitable leaves, followed by larvae feeding within the blade. A plant that spent time on a balcony, a recently added plant, or nearby foliage that was moved indoors is therefore worth checking—but none of those details alone proves where a mine began. If your Pilea has been indoors continuously, do not assume a care change caused it; first establish whether the mark is a true gallery and whether new mines are still appearing.
There is also a limit to what a trail can tell you. Leaf miners include multiple insect groups, and the Washington State University guide notes that many are fairly host-specific. A mine on Pilea supports a leaf-mining diagnosis, but it does not identify the species from a photo or prove that a leaf miner normally targets this plant. Keep identification conservative unless you can see the larva or receive a local diagnostic confirmation.
How to confirm a mine without sacrificing a whole Pilea leaf
Check the leaf before you cut it. Pilea peperomioides carries broad, round blades on long petioles from an upright central stem, so keep the leaf attached during the first inspection. You need to distinguish an internal tunnel from a spot on the surface, then decide whether the larva is active or the mark is old.
- Look at both sides in bright, indirect light. Turn the leaf gently and check whether the mark is visible from both sides. A true mine usually appears as a path or blotch within the blade; dust, dried spray, and residue sit on the surface and may wipe away. Gardening Know How describes winding yellow trails as a common leaf-miner sign, while extension sources note that species can make narrow mines or blotches. This is a practical visual cross-check, not a Pilea-specific insect record.
- Backlight the blade. Hold the disc between the room light and your eye. A gallery may look thin and translucent, with the leaf surface still spanning the damaged tissue. An opaque circular mark without an internal trail needs a separate diagnosis. Avoid pinching hard; look through the leaf before deciding to cut it.
- Follow the line to its end. A mine can widen as the larva grows. Look for dark frass along the gallery or a small larva if the tissue is already open. Colorado State Extension says an opened mine can reveal a hollow area, frass, or an insect, and describes mine-versus-spot checks for ambiguous blotches; do not cut into a healthy Pilea leaf just to force that proof.
- Check whether the mark is still advancing. Photograph the leaf next to a ruler or a fixed background, then compare it after several days. An old mine may remain visible without expanding; it will not turn green again. A longer or widening gallery, especially with a larva or frass, is stronger evidence that feeding is current than a static brown patch.
- Inspect the rest of the plant and nearby plants. Turn other Pilea discs without bending their petioles, then inspect leaf undersides, the stem junctions, and any neighboring plants that recently came indoors. Look for additional internal trails, not just for any tiny insect. Leaf miners have different life stages and their larvae may pupate in the leaf or elsewhere, depending on the insect; Utah State Extension describes these variable life cycles, so a clean soil surface does not rule out an active mine.
If you find only a round surface lesion, a wet-looking spot, or a mark that does not have a tunnel, pause before pruning. Pilea can also develop leaf spots; route that pattern to black spots on Pilea rather than treating it as a miner. If you see insects on the leaf surface but no internal gallery, use the diagnostic tool below or ask for identification; do not infer a leaf miner from a visible insect alone.
First fix: isolate the Pilea while you confirm the diagnosis
Move the pot away from neighboring plants first. That is the single first action because it gives you time to inspect the leaves without leaving a possible pest beside a collection. Keep the plant in a normal bright, indirect spot during this check; isolation does not mean putting it in a dark closet or changing its watering routine.
If the plant is on a windowsill, place it on a separate shelf or table where leaves from nearby plants do not touch. Keep the saucer and any dropped leaves with the isolated pot. Do not move it outdoors to “air out” the problem, and do not cluster it with other plants after a quick visual check. The point is containment while you find out whether you have a growing mine or an old mark.
After isolation, check every Pilea disc, including the small leaves at the top and those around any basal offsets. The central stem and petiole joints are also useful places to inspect for additional pests, but an insect sitting on a stem is not proof that it made a mine. If the trail is not internal, keep the plant isolated until you identify the actual issue; if it is a clear gallery, move on to selective removal.
Remove mined leaves without stripping the Pilea’s central stem
A leaf with active larval feeding cannot be repaired, and an old brown mine does not become healthy again. Remove the leaf only when the gallery is active, extensive, or repeatedly spreading. If one lower leaf has a small, dry, stable mark and the rest of the plant is clean, you can leave it in place and monitor; indiscriminate cutting costs the Pilea working leaf area without proving that the insect is still present.
When removal is justified, follow the leaf’s long petiole down to where it joins the central stem. Use clean scissors to cut the petiole near its base, without nicking the upright stem or the tight new growth at the top. Pilea’s coin-shaped leaves attach on individual petioles, so you can remove one affected disc without chopping back the growth point. North Carolina State Extension describes the plant as upright and clumping; Penn State Extension confirms it produces offsets or pups. Those traits make selective leaf removal safer than broad pruning.
Put the cut leaf in a sealed bag and discard it with household waste. Do not leave it on the soil surface, in a nearby open compost bin, or on the balcony beside the Pilea. Extension management advice includes removing infested leaves; GrowVeg likewise recommends removing mined foliage and warns that sprays have little effect on larvae already protected inside a leaf. That is an outdoor-garden source, so apply the manual-removal principle to a potted Pilea without importing crop pesticide recommendations.
Clean the scissors after the cut and check the remaining leaves again. If several leaves are mined, remove only those with clear active or heavy damage in one pass, then reassess the plant rather than cutting every leaf with a faint scar. A Pilea with just a few clean leaves can still look lopsided because each blade is a round disc on a long petiole; use a quarter turn over time to restore balance rather than removing more healthy foliage for symmetry.
Avoid treatments that cannot reach a larva inside the leaf
Do not start with neem oil, soap, or a general-purpose contact spray. Those products sit on the leaf surface, while a feeding larva is sheltered between leaf layers. University extension guidance distinguishes treatments aimed at egg-laying adults from products that penetrate leaf tissue; those are not interchangeable strategies. Colorado State Extension warns that ordinary contact sprays do not affect active larvae already inside mines and that broad insecticide use can disrupt natural controls; its treatment notes are a reason to avoid an improvised spray, not a recommendation to apply a systemic pesticide to a houseplant. If new mines keep appearing, ask a local extension service to identify the pest before choosing a treatment.
Do not peel apart a healthy Pilea disc to look for a larva. The diagnostic benefit is small if the trail is visible in backlight, while a torn leaf will remain damaged even after the insect is gone. Do not repot solely because a mine is present: the insect is feeding in leaf tissue, so fresh mix does not remove it. Use the Pilea soil guide only if the mix itself is staying wet, compacted, or otherwise failing.
Do not change several care variables at once. A mine does not prove overwatering, poor drainage, or dim light. Moving a Pilea into harsh direct sun, watering on a new schedule, fertilizing, and pruning together can create extra stress while making it harder to learn whether new mines are still appearing. For comparison, use the plant’s existing watering and light guidance; keep those conditions steady while you monitor the pest.
A yellow sticky card near the plant can help reveal small flying adults, but it cannot identify them as leaf miners or remove larvae already inside the leaves. Treat it as a monitoring aid only, not as proof or a cure. If you catch flies but see no internal galleries, ask for identification before spraying. Utah State’s ornamental guide recommends sticky-card monitoring for adult activity in landscape situations; a home Pilea still needs leaf inspection to confirm that the adult is connected to the damage.
Tell a mine apart from Pilea spots and other leaf marks
The most useful differential is internal versus surface injury. Colorado State Extension notes that leaf-miner injury can resemble fungal spotting or abiotic damage, but an opened mine has a hollow area that may contain an insect or frass; a fungal spot collapses rather than forming a tunnel. On Pilea, backlighting the round blade is a gentler first test than tearing it open. North Carolina State Extension also notes that wet foliage can result in Pilea leaf spots. If the mark is round, fixed, and not connected to a winding gallery, do not label it a leaf miner from color alone.
A leaf that yellows evenly or dries from its edge has a different pattern from a localized tunnel. Check whether only one old lower disc is declining or whether new leaves have internal trails. A single old leaf change alongside otherwise clean new growth does not confirm a pest; a fresh expanding gallery does. For a broader comparison of yellowing patterns, see yellow leaves on Pilea. If there are silvery surface scars or insects you can see moving on the leaf, compare with thrips on Pilea rather than assuming the damage is internal.
Pilea is also vulnerable to spider mites, mealybugs, and scale, according to North Carolina State Extension, but those pests are not leaf miners. If you find a surface pest instead of an internal gallery, use the Pilea problems hub to compare the signs and choose the matching diagnosis before treating.
Protect the upright stem and basal offsets during recovery
Pilea peperomioides grows as a compact, upright clump with round leaves on long petioles and can produce small offsets near the base. This changes the recovery decision: if mines are limited to one or two leaf discs, preserve the clean leaves and the central growing tip. Removing the whole top or separating every pup is unnecessary for a leaf problem and can leave the parent with fewer healthy leaves while it is still recovering. NC State Extension’s plant description and Penn State’s propagation notes document the upright form and offset habit.
Check pups without pulling them out of the soil. If an attached offset has clean leaves, leave it in place while you isolate and monitor the whole container. Do not divide the plant just because the parent has one mined leaf. If the infestation spreads across several leaves or the stem is soft, address the active problem first and consider separation only after the plant is stable and the offset can be handled cleanly.
The central stem is the structure that keeps the plant upright; a long petiole can be cut at its attachment point, but the stem tip should remain intact. Keep the plant in its usual bright indirect light and turn the pot gradually after the pest is under control. Do not move it into a harsh, direct-sun window to “strengthen” it; North Carolina State Extension recommends bright indirect light for Pilea. If the stem has already leaned, correct placement gradually and use the Pilea overview for the normal care baseline instead of tying or burying the stem.
Recovery: judge new Pilea leaves, not the old mine
The mined part of a leaf will not heal. Colorado State Extension explains that mined tissue dies and dries; the outline may remain visible even when the larva has left. A Pilea can therefore have a permanently blemished coin leaf while the pest is no longer active. Do not keep cutting that leaf merely because the mark is still there.
For the next few weeks, inspect each new disc and the underside of older leaves at the same time each week. A stable plant has no expanding gallery, no new mined leaf, and firm clean growth at the top. New growth is more useful than the color of an old scar because it shows whether the plant can continue producing healthy foliage after the affected leaf is removed. Continue keeping the plant separate while new mines are appearing; if no fresh marks develop, return it to the collection gradually and keep checking nearby plants.
Recovery speed varies with the insect’s life stage and the plant’s growth conditions, so a fixed “healed in seven days” promise would be misleading. Utah State Extension describes leaf-miner life cycles as variable, with larvae and pupae occurring in different places depending on the species. That is why one clean inspection is not enough to declare the problem over. Keep the care conditions steady and use repeated clean leaves, not a calendar date, as the sign that the Pilea is recovering.
If most of the plant’s leaves are mined, focus on preserving the central stem and any clean foliage rather than trying to restore the old discs. A Pilea that retains firm stem tissue and healthy leaves may continue growing, but severe leaf-miner injury can weaken plants. If the stem softens, the top growth collapses, or mines keep appearing across several plants despite isolation and removal, take clear photos of both sides of the leaf and ask a local extension service or plant clinic to identify the insect. A photograph can support the diagnosis, but it may not be enough to name the species.
Prevent another round of mines on Pilea
Inspect new plants before placing them beside the Pilea, and check the undersides of its newest coin leaves after time outdoors or near an open window. This is more useful than changing its standard watering interval: female leaf-mining insects lay eggs on or in suitable foliage, so monitoring the leaf surface and recent exposure is the relevant prevention step. Keep any new plant separated while you observe it, and do not set cut or dropped leaves next to the Pilea.
Continue to give the plant bright indirect light, a freely draining mix, and watering based on how the pot dries. Those conditions support normal Pilea care, but they are not a leaf-miner treatment and should not be framed as a way to make a plant immune. If the soil remains wet, smells sour, or the stem is soft, diagnose that separately through the Pilea soil guide or root rot on Pilea. Avoid broad insecticide use around the plant; Colorado State Extension notes that natural enemies often regulate leaf miners and that poorly timed insecticide can miss larvae already protected within the leaf.
During routine care, scan both faces of the round blades, paying special attention to any pale trail that grows between checks. A phone photo makes it easier to compare whether a mark is static or expanding. Remove clearly mined leaves promptly when the damage is active, seal them before disposal, and clean the scissors before using them on the next plant. This small inspection routine gives you an early signal without turning ordinary care into repeated spraying or unnecessary repotting.
When to ask for a closer identification
Ask an extension office or plant clinic when you cannot tell whether a mark is a gallery, when multiple plants develop similar trails, or when new mines continue after you isolate the Pilea and remove actively affected leaves. Send a sharp photo in natural light, one close-up with the leaf backlit, and one image showing the whole plant. Include when the plant was outdoors, whether a new plant recently joined the room, and whether the trail has expanded since the first photo. Those details help distinguish an active mine from an old injury or a lookalike spot.
A few old mines on a firm Pilea do not automatically make the plant unsalvageable. Consider discarding it only if most foliage and the central stem are already failing and you cannot keep it separate from other plants—not because a single marked leaf looks unattractive. If you are still unsure, take clear photos of the leaf and ask for local identification.
Related tool
Use the plant-problem diagnosis tool to organize the symptoms and care changes you observe. It can help route a surface mark or visible pest to the right guide, but a leaf-miner species may still need local identification.
Related Pilea peperomioides guides
Use this guide when you can see a winding or blotchy gallery inside a Pilea leaf and want to confirm or contain a leaf-mining insect. Use black spots on Pilea for a fixed lesion without a tunnel, thrips on Pilea for visible surface-feeding signs, and yellow leaves on Pilea when an entire old leaf is fading without a mine. For routine care rather than pest identification, return to the Pilea overview, watering, light, and soil guides. The Pilea problems hub routes to the other plant-specific diagnoses.