Thrips on Pilea Peperomioides: Signs, Checks, and Safe Next
Quick answer
If a Pilea has silvery scarring or dark specks, first isolate it from nearby plants. Check the newest leaves and undersides, then tap foliage over white paper to confirm moving thrips before treating; old scars will not turn green again.
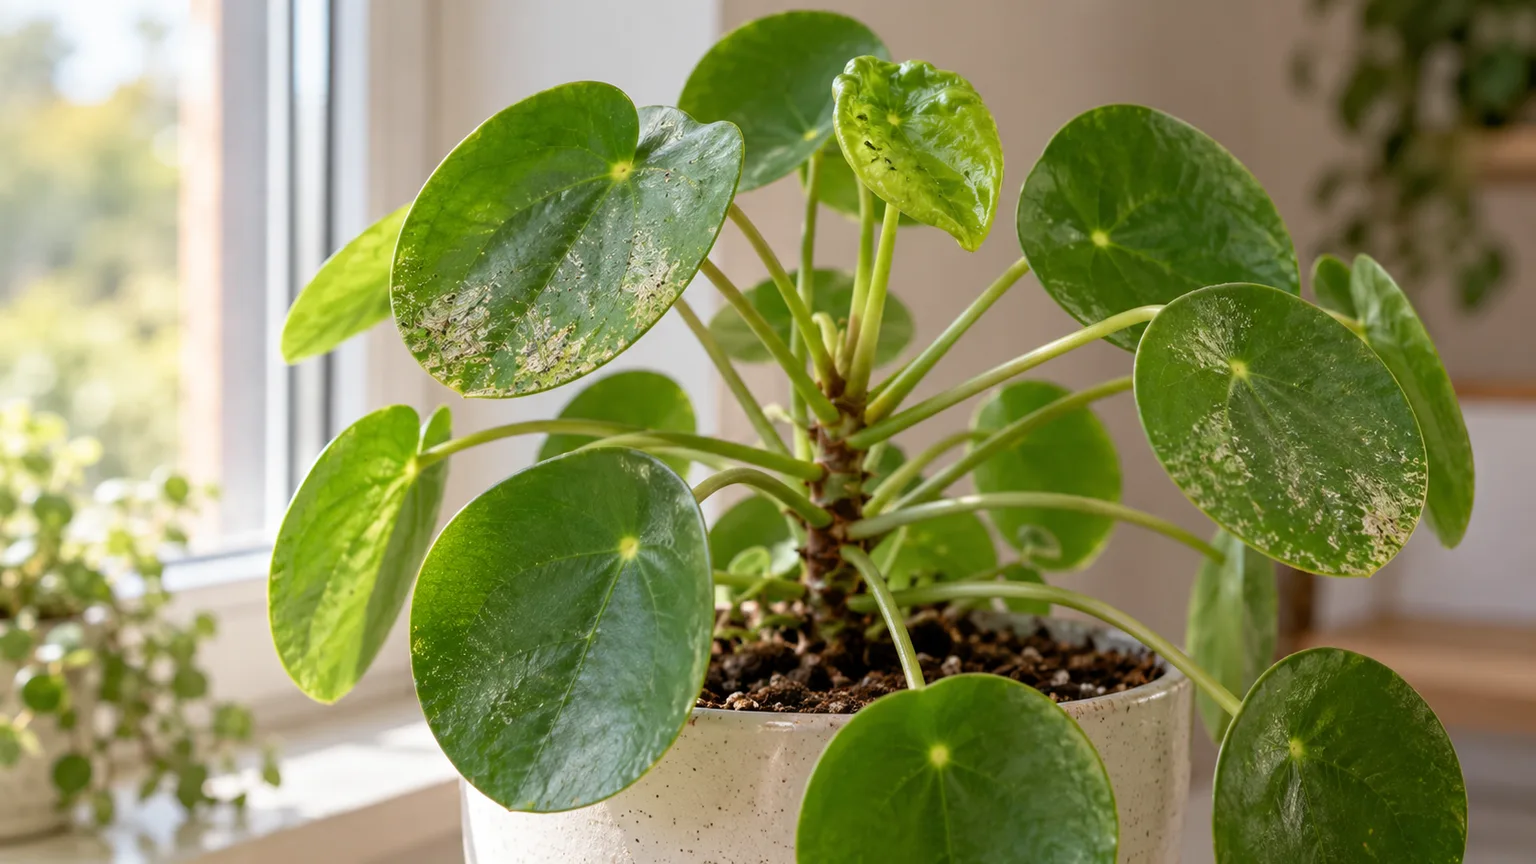
Thrips on Pilea Peperomioides: How to Confirm and Treat Them
This guide covers thrips on Pilea Peperomioides. See also the general Thrips guide, watering, and light pages for this plant.
Thrips on Pilea Peperomioides: How to Confirm and Treat Them
Quick answer
If a Pilea peperomioides has new silvery scuffs, distorted leaves, or pepper-like dark specks, first isolate it from nearby plants. Then inspect the newest leaves and undersides and tap a leaf over white paper to look for live, slender insects. Treat only after you have found a live pest rather than assuming every pale patch is thrips damage.
For pest identification and control methods that apply across many plant species, see the general thrips guide. The checks below focus on where to look on Pilea’s coin-shaped leaves and crown.
What thrips damage looks like on Pilea peperomioides
Thrips feeding can leave pale or silvery flecks, dark specks of excrement, and distorted or curled growth. On a Pilea’s round coin leaves, look for irregular scraped-looking patches rather than assuming that any faded spot is an insect. UC IPM describes this combination of scarring, stippling, frass, and distortion in its thrips damage guide.
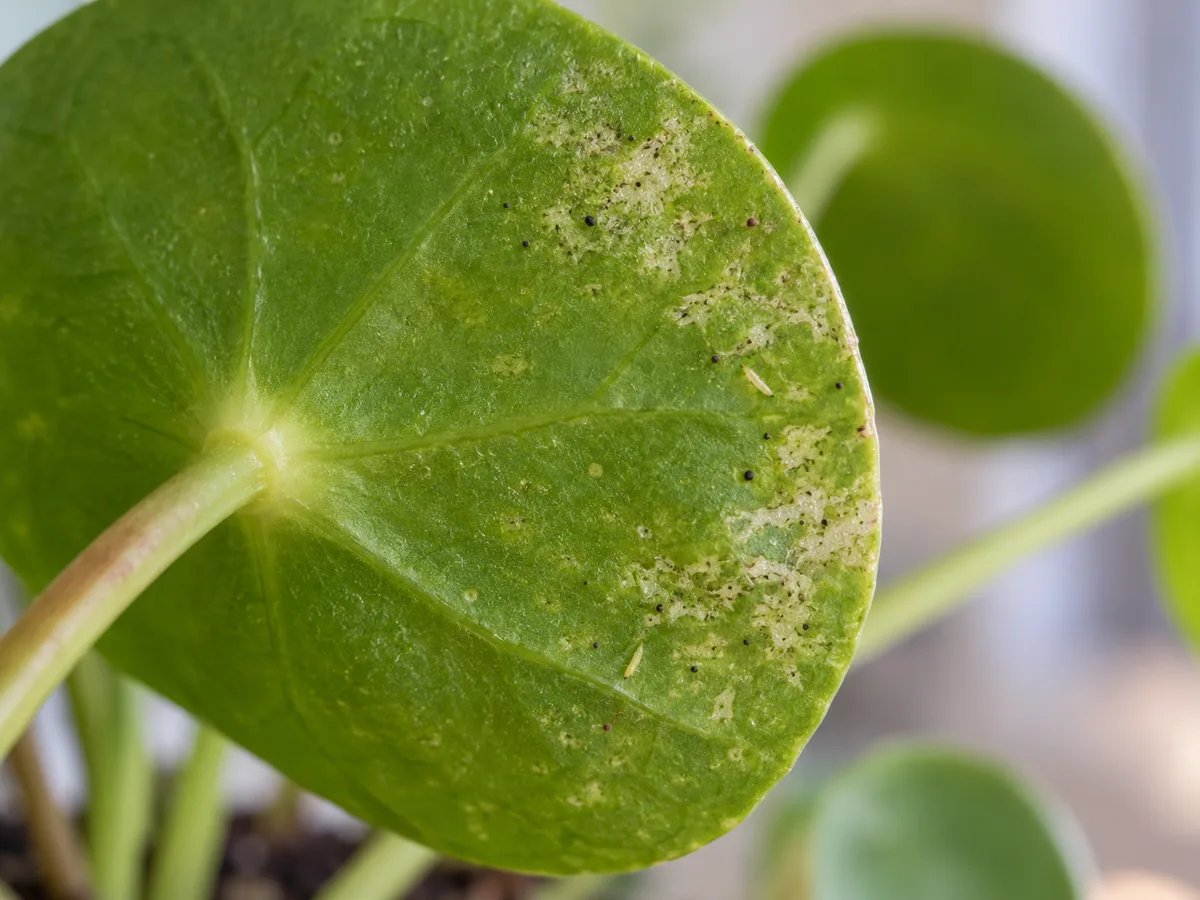
Silvery scarring and dark specks are clues to inspect for live thrips; confirm the pest before treatment.
Pilea peperomioides is recognizable by its round, coin-like leaf blades carried on long petioles, as shown in The Spruce’s Pilea profile. That broad leaf surface makes feeding marks easy to notice, but it does not prove which pest caused them. A plant may show damage before you see an insect because thrips often feed while hidden in buds and shoot tips; check the central crown as well as fully opened leaves (UC IPM’s identification notes).
The pattern can become easier to read as the plant grows. Thrips may feed on tissue before it unfolds, so a mark that was hidden inside a new leaf can appear after that leaf opens. UC IPM notes that thrips injury may become apparent only after plant tissue expands. On Pilea, compare an expanding central leaf with older round leaves instead of treating every patch of fading as a fresh attack.
Where to inspect on a Pilea’s coin-leaf crown
Start with the newest leaves near the growing tip. Turn each blade over and inspect along its main veins, then look where the petiole joins the leaf and where folded growth emerges from the crown. Thrips can shelter in protected new growth, so a quick look at the upper surface of one mature leaf can miss them.
Check the lower leaves and any small pups at the soil line too. Pilea produces basal offshoots, as described in The Spruce’s propagation notes; while the mother plant is isolated, treat those pups as part of the same infested plant rather than moving them to another pot or sharing them. You can use the Pilea overview to compare the normal leaf and growth pattern before judging a misshapen new leaf as pest damage.
Use a consistent top-to-bottom pass so you can compare findings from one inspection with the next:
- Look first at the newest leaf and any folded growth at the crown. Do not pull an unfolding leaf apart; inspect the visible seams and return to it later if a mark appears as it opens.
- Turn over the round middle leaves one by one. The long petioles make it possible to angle the blade toward the light and examine the underside without bending the central stem.
- Check the lower circle of leaves and the spaces between basal pups. If several pups share one pot, inspect each one before moving the pot back among other plants.
The point is to locate a pattern, not to find one suspicious speck and assume the entire plant is infested. If marks are confined to one old leaf and repeated checks of the central growth show no insects or new scarring, keep monitoring before escalating treatment. If fresh scars appear on several leaves or new growth, sample those exact areas on white paper.
Confirm thrips before choosing a treatment
Hold a sheet of white paper under a suspect leaf and tap the leaf stalk gently. Look for tiny narrow insects that move across the paper; adults may be dark while immature stages can be pale, as illustrated in this houseplant thrips guide. A blue or yellow sticky card near the plant may reveal flying adults, but it is a monitoring aid, not proof that every thrips has been caught. UC IPM recommends shaking foliage over white paper and using sticky traps to detect flying thrips.
Repeat the tap test over a light surface rather than relying on a single glance. Thrips are small and slender, and their color varies by species and life stage; color alone is not a reliable diagnosis. A magnifier can help you see whether a speck is moving and elongated or is simply soil, dried residue, or an old mark. Avoid scraping the blade to test it, since mechanical damage would add a new mark that complicates the comparison.
There is another reason to confirm before using a pesticide: “thrips” includes species that are not feeding on the plant. UC IPM notes that some thrips are beneficial predators or feed on pollen and fungal spores rather than plant tissue. If you find an insect but cannot match it to fresh feeding scars, take a clear close-up or a sample to a local extension service for identification instead of treating every thrips-like insect as a pest (UC IPM’s thrips overview).
If you see only fixed pale marks and no insects after repeated checks, pause before spraying. Fixed bumps on a petiole fit the scale-insects guide better; leaf distortion without live pests can be compared with the curling-leaves guide. If the leaves are simply losing color or leaning toward a window without scarring or live pests, compare the plant’s placement with its light guide.
Read the pattern across Pilea’s leaves
Pilea holds a compact group of round blades on individual petioles, so the position of a scar is useful evidence. Note whether the newest central leaves are affected, whether damage is limited to one side of the plant, and whether marks appear on leaves of different ages. The pattern will not name a thrips species, but it helps you decide which leaves to sample and whether the problem is continuing.
| What you notice | What to check next |
|---|---|
| Silvery scarring with dark specks and a slender insect on the white-paper test | Treat as a likely active thrips infestation and keep the Pilea isolated while you choose a targeted response. |
| One damaged older leaf, with clean central leaves and no insects after repeated checks | Leave it isolated for observation and compare the same leaves again before using a pesticide. The old scar itself will not identify the cause. |
| A new leaf opens distorted but no insect is found | Inspect the underside and crown again as it opens; if the pattern continues without live pests, compare it with a leaf-curl problem. |
| Fixed raised bumps on petioles rather than mobile slender insects | Compare the bumps with a scale problem before choosing a pest treatment. |
The table is a decision aid, not a diagnosis by photograph. Weather injury, poor care, pathogens, and other invertebrates can create similar-looking damage, so the useful confirmation is the combination of fresh feeding marks and the pest itself. If that evidence is missing, hold off on a treatment that could damage the Pilea without addressing the cause.
First fix: isolate the Pilea
Move the suspect pot away from other plants before handling it. Keep it separated while you inspect neighboring foliage, because thrips can move between plants, and an apparently clean nearby plant may still need checking. Do not move the Pilea’s pups or use its potting tools on another plant during this period.
Set the isolated pot where you can reach all sides of the crown and see the undersides of its leaves. If other plants shared a shelf or touched this Pilea, inspect those plants too and keep them from contacting it until the checks are clear. The purpose is to contain a possible moving pest while you confirm it; it is not a reason to spray the whole collection without evidence.
Once you have confirmed live thrips, gently rinse the leaf surfaces and stalks, especially undersides and folded growth, while keeping the pot from staying waterlogged. Prune only leaves that are badly injured or carry a dense colony; do not strip every marked leaf in one pass. Wiping off visible insects can lower what is exposed, but a clean rinse is not a reliable all-clear because some thrips stages are protected in plant tissue or debris (UC IPM life-cycle notes).
For a small Pilea, support the main stem with one hand while you turn the pot or angle a leaf for rinsing. Direct water across both sides of the blade and along the petiole, then let the foliage drain in a bright, ventilated place out of harsh direct sun. Do not leave water standing in a cachepot or saturate the mix just to wash the leaves. If a leaf is badly scarred but still firm and supporting the plant, it can remain while you monitor; remove it only when it is mostly damaged, carries a colony you cannot reach, or is declining.
Use a targeted product only if thrips remain active
After washing, keep inspecting new leaves and repeat the white-paper check. If you still find live thrips or fresh scarring, ask a local extension service to help identify the pest and choose a product suitable for indoor ornamentals. UC IPM notes that insecticidal soaps and horticultural oils can provide temporary control for some thrips, especially greenhouse thrips, and recommends a selective integrated approach rather than relying on pesticides alone (management guidance).
Use only a pesticide whose label names both the pest and indoor ornamental use. Follow that label exactly, including application interval and precautions, and test the product on one leaf before treating the whole plant. Avoid improvised detergent or oil mixtures and never exceed the product’s labeled rate or interval. Keep the plant isolated while treatment and monitoring continue.
The label matters especially on a Pilea because treatment has to reach the leaf surfaces where insects are found without turning routine care into repeated, unspecific spraying. Before each application, confirm that live pests are still present and check whether the label permits use on indoor ornamentals. Apply only where the label directs, including its advice on ventilation, protective equipment, and keeping people or pets away during application. If you cannot find a product labeled for that use, ask an extension specialist rather than adapting an outdoor product or mixing household soap.
Contact products also have a practical limitation: they reach insects on the surfaces actually covered. UC IPM’s greenhouse-thrips management notes recommend thorough application to infested leaf undersides and note that repeat applications may be necessary. Thrips eggs and nonfeeding stages can be protected in tissue or nearby debris (life-cycle details), which is why one spray or one rinse is not an all-clear. Use cleaning and continued inspection alongside any labeled product; do not infer success from fewer adults on a sticky card alone.
If repeated checks continue to find live insects after you have followed a product label, revisit the identification before increasing the dose or switching products. Sample a fresh mark, review the label’s interval, and check the mother plant, lower leaves, and pups again. A local extension office can help distinguish pest thrips from other species and suggest an approach suited to the plant and setting.
Judge recovery by the next Pilea leaves
Existing silvered patches, black specks, and distorted leaf areas will remain visible until the injured leaf is pruned or naturally drops. UC IPM notes that pesticides cannot restore injured tissue; new growth is the sign that the plant is recovering. On Pilea, watch the next coin-shaped leaves at the crown: they should emerge without fresh scarring, while white-paper checks stop finding live insects.
Keep checking the crown, petioles, and leaf undersides through the treatment period rather than stopping after one clean-looking leaf. Recovery is more convincing when new growth stays unscarred and repeat paper checks no longer turn up live insects.
Thrips develop through feeding larval stages and nonfeeding prepupa and pupa stages; some species place eggs on or inside leaves, while other stages may be in soil, leaf litter, or plant crevices. In warm weather, UC IPM reports that a life cycle from egg to adult can be as short as two weeks. That timing explains why a Pilea can look quieter after a rinse and then show new activity later; continue the inspection routine through several rounds rather than declaring success immediately (UC IPM life-cycle guidance).
Keep a simple note of which leaves were marked, when you found live insects, and what you did. Compare new central leaves with that baseline. Do not judge the result by whether a previously scarred round blade looks polished again: use the number of newly affected leaves, live insects found on the paper test, and condition of the next leaves as your measures.
Prevent another thrips cycle on Pilea
Inspect the undersides and new growth of incoming plants before placing them by the Pilea. Keep new plants separate while you watch for fresh feeding scars, and make that check part of routine care rather than relying on a sticky card alone.
Keep the Pilea’s care steady while it replaces damaged foliage. A plant that is already losing leaves should not be pushed with extra fertilizer or moved abruptly into harsh direct sun. Use the watering guide to match watering to the pot’s dry-down, and review the Pilea problems hub if new damage continues without live thrips.
Avoid responding to thrips by keeping the mix constantly wet or adding nitrogen fertilizer to force a quick flush. UC IPM cautions against overwatering or excess nitrogen because these practices can increase thrips populations. This is general pest guidance, not a claim that Pilea peperomioides is unusually susceptible. Keep the plant’s established watering and feeding routine steady and use the Pilea light guide if the leaves are stretching or leaning, rather than changing several care conditions at once.
When bringing another plant home, inspect its new growth and leaf undersides before it joins the Pilea collection. If you find suspicious marks, keep it separate and repeat the same white-paper check before placing it near the mother plant or sharing one of its basal pups. A short inspection at arrival is easier to interpret than treating every plant in the room after a single uncertain spot appears.
Related tool
Use the Pest Identifier to compare the insects you find before choosing a treatment.
Related Pilea peperomioides guides
Use this guide when you find slender insects and fresh silvery feeding scars or dark specks. For fixed bumps on petioles, use the scale-insects guide; for leaf distortion with no live insects, compare the pattern with the curling-leaves guide. The Pilea overview covers general care, while the problems hub helps route symptoms that do not match an active pest.