How to Dry Flowers: 3 Methods for Long-Lasting Decor
Learn how to dry flowers by hanging, using silica gel, or pressing. Match blooms to a method, prevent mold, and turn the finished flowers into lasting decor.
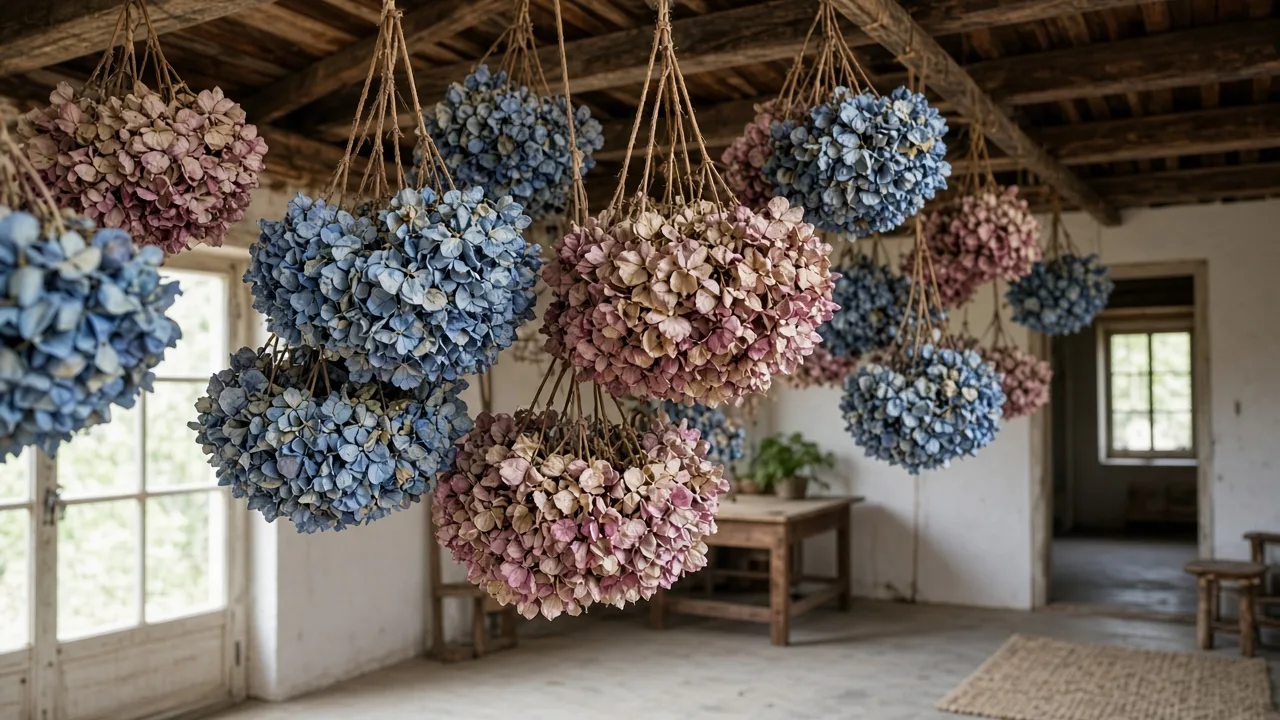
The right way to dry a flower depends on the shape you want to keep. Hang sturdy stems for a relaxed bouquet, surround a full flower head with silica gel when you want to preserve its three-dimensional form, or press thin blooms flat for a frame or card. Matching the flower to the finish is the simplest way to avoid a limp bunch or a crushed keepsake.
Drying does change flowers. Petals can darken, pale, or become more brittle as they lose moisture, so no home method freezes a bouquet at its fresh-cut appearance. What you can control is the flower’s starting condition, how quickly moisture leaves it, and the light and humidity it sees afterward.
Pick a method by the flower and the finished display
Start with the object you want at the end, then choose the method that naturally makes that shape. These techniques are not interchangeable: pressing deliberately flattens the bloom, while silica gel supports it in a rounded form. Air drying sits between those outcomes, keeping stems and heads together but letting gravity and shrinkage change their silhouette.
| Method | Best result | Good starting choices | Typical time | Main trade-off |
|---|---|---|---|---|
| Hang upside down | Stems and small bouquets | Lavender, statice, strawflower, baby’s-breath, grasses | About 1–3 weeks | Inexpensive, but flowers may shrink and colors may shift |
| Silica gel | Full, three-dimensional flower heads | Roses, peonies, hellebores, and other delicate or rounded blooms | Several days; thick flowers take longer | Preserves shape well, but requires desiccant and careful handling |
| Press | Flat art, cards, and labels | Pansies, primroses, daisies, small single blooms, and leaves | Roughly 1–3 weeks | Simple and compact, but the flower cannot remain three-dimensional |
The table gives a starting point, not a guarantee. A small lavender stem in a dry, airy room can finish sooner than a dense bunch; a thick flower head needs longer in a desiccant than a thin petal. For every method, inspect the flower itself before calling it done.
If you are preserving a meaningful bouquet, make a small trial with one or two stems first. That quick test shows how the particular variety responds and helps you adjust the bundle size, drying medium, or paper before you commit the flowers you most want to keep.
Prepare fresh flowers before drying
Begin with flowers that are clean, dry, and in good condition. Avoid blooms with bruised petals, brown edges, insect damage, or soft spots; drying will not repair them. Pick after surface dew has evaporated and before hot weather leaves the stems limp. Purdue Extension recommends harvesting many flowers before they reach full bloom because some continue opening as they dry, while UF/IFAS Extension advises selecting flowers in excellent condition at early maturity. Taken together, the practical rule is to avoid both tight buds and overripe, shedding heads: choose a fresh bloom whose shape is close to the one you want to preserve.
Use clean, sharp snips and handle the flower by its stem rather than pinching the petals. If you cannot start drying immediately, place the cut stems in water briefly to prevent wilting, then dry their surfaces before using silica gel or a press. Moisture on petals or trapped between layers of paper can undo the advantage of a careful method.
Remove leaves that would sit inside an air-drying bundle or below the waterline of the chosen setup. Decide whether you want long stems for a vase, short stems for a wreath, or only the flower heads for pressing or silica gel. That choice affects where to cut: leave enough stem for handling, but do not keep a thick, leafy length that takes longer to dry than the bloom.
Do not gather flowers from protected areas or strip a wild patch to make a display. For garden flowers, take only what you can use and leave enough plants to keep the planting healthy. If the flowers came from a purchased bouquet, remove wire, plastic picks, ribbon, and floral foam before storing or crafting with them.
1. Hang flowers upside down for a natural bouquet
Air drying is the easiest method when the stems matter as much as the petals. It needs no special desiccant and works particularly well for flowers and seed heads that hold their shape as they lose moisture. The finished result is usually a little more relaxed and muted than a fresh bouquet, which suits wreaths, vases, and loose arrangements.
The Royal Horticultural Society recommends low light and good ventilation for hanging flowers, and both UF/IFAS Extension and Purdue Extension give roughly one to three weeks as a useful drying window for many materials. Those sources also make the condition of the room part of the method: airflow helps moisture leave the bunch instead of lingering around the stems.
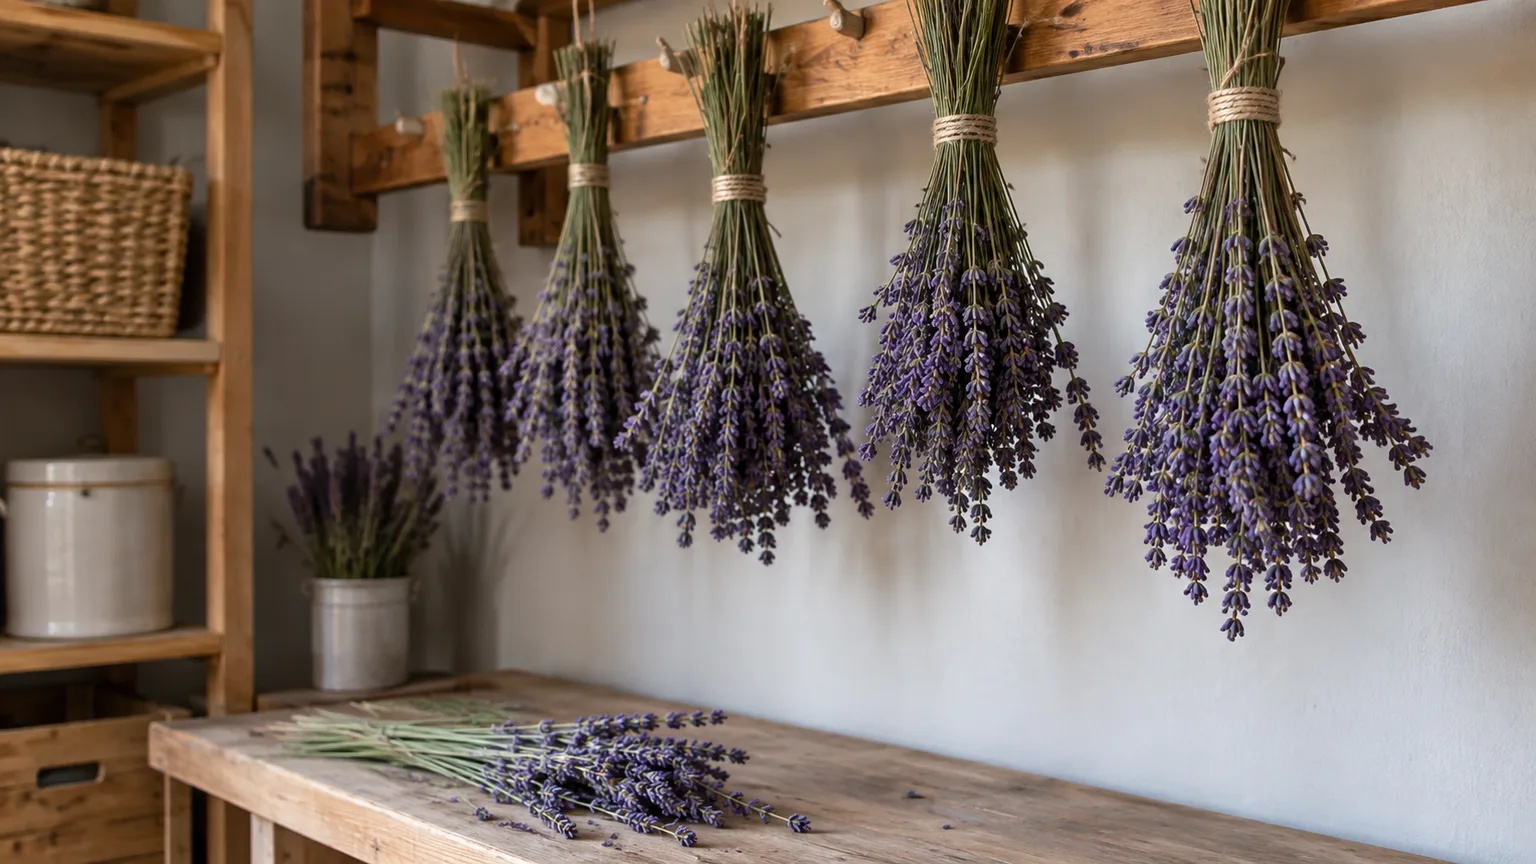
Air-drying steps that prevent loose bunches and mold
- Strip leaves from the lower part of each stem. Leaves hold moisture, crowd the bundle, and often become brittle or unattractive when dry.
- Sort flowers by type and head size. Keep heavy, broad heads separate from slender stems so the thicker flowers do not slow the whole bunch.
- Gather a loose handful and secure it near the cut ends with a rubber band. Stems contract as they dry, so an elastic band tends to stay snug as string loosens. Horticulture magazine suggests five to seven stems as a starting bunch; use fewer when the heads are large or the room is humid.
- Hang the bunch upside down in a dark or shaded, dry room with open space around it. A closet works only if air can move through it; a packed closet or damp basement can trap humidity.
- Check the bunch every few days. If petals touch neighboring flowers or the stems feel cool and damp, separate the bunches and improve ventilation.
Keep flowers away from a sunny window, radiator, stove, and direct stream of air from a heater or air conditioner. The aim is steady, room-temperature airflow, not a blast of heat. UF/IFAS Extension warns against speeding the process with a warm oven or electric heater; besides changing the flowers unevenly, those approaches introduce avoidable fire and heat risks.
Flowers that suit air drying
Choose flowers with firm stems, papery petals, or seed heads that already feel relatively dry. Lavender, statice, strawflowers, baby’s-breath, yarrow, grasses, and many ornamental seed heads are reliable starting candidates. Purdue Extension’s preservation guide lists lavender, statice, strawflower, and baby’s-breath among materials suited to air drying, while the RHS also recommends grasses and yarrow.
Air drying can also work for some roses and other fuller blooms, but expect more shrinkage and a less precise outline than silica gel usually gives. If your flower has a heavy center or tightly layered petals, hang one sample separately rather than hiding it in the middle of a dense bunch. A stiff stem and petals that feel papery are good signs; petals that still bend softly or a thick center that feels cool suggest it needs more time.
Large heads can be dried one at a time on a rack or hung separately. Do not tie them face to face or press them against a wall; contact points flatten petals and slow drying. For decorative grasses and seed heads, keep stems long and leave enough distance between pieces that the dry material will not catch on neighboring stems when you take it down.
2. Use silica gel to preserve a three-dimensional bloom
Silica gel is the better choice when the flower head itself is the keepsake. The loose crystals support petals while absorbing moisture, so the bloom can keep more of its rounded form than it would in a hanging bunch. University of Florida IFAS Extension identifies silica gel as a fast-acting desiccant that retains good color, but color still changes naturally and the flower can become brittle if handled roughly.
This method is useful for roses, peonies, hellebores, and similar blooms whose petals would collapse under a book or lose too much shape while hanging. The Royal Horticultural Society lists those flowers as candidates for silica gel. Use a flower-drying product and an airtight container sized so the heads fit without touching or bending against the sides.
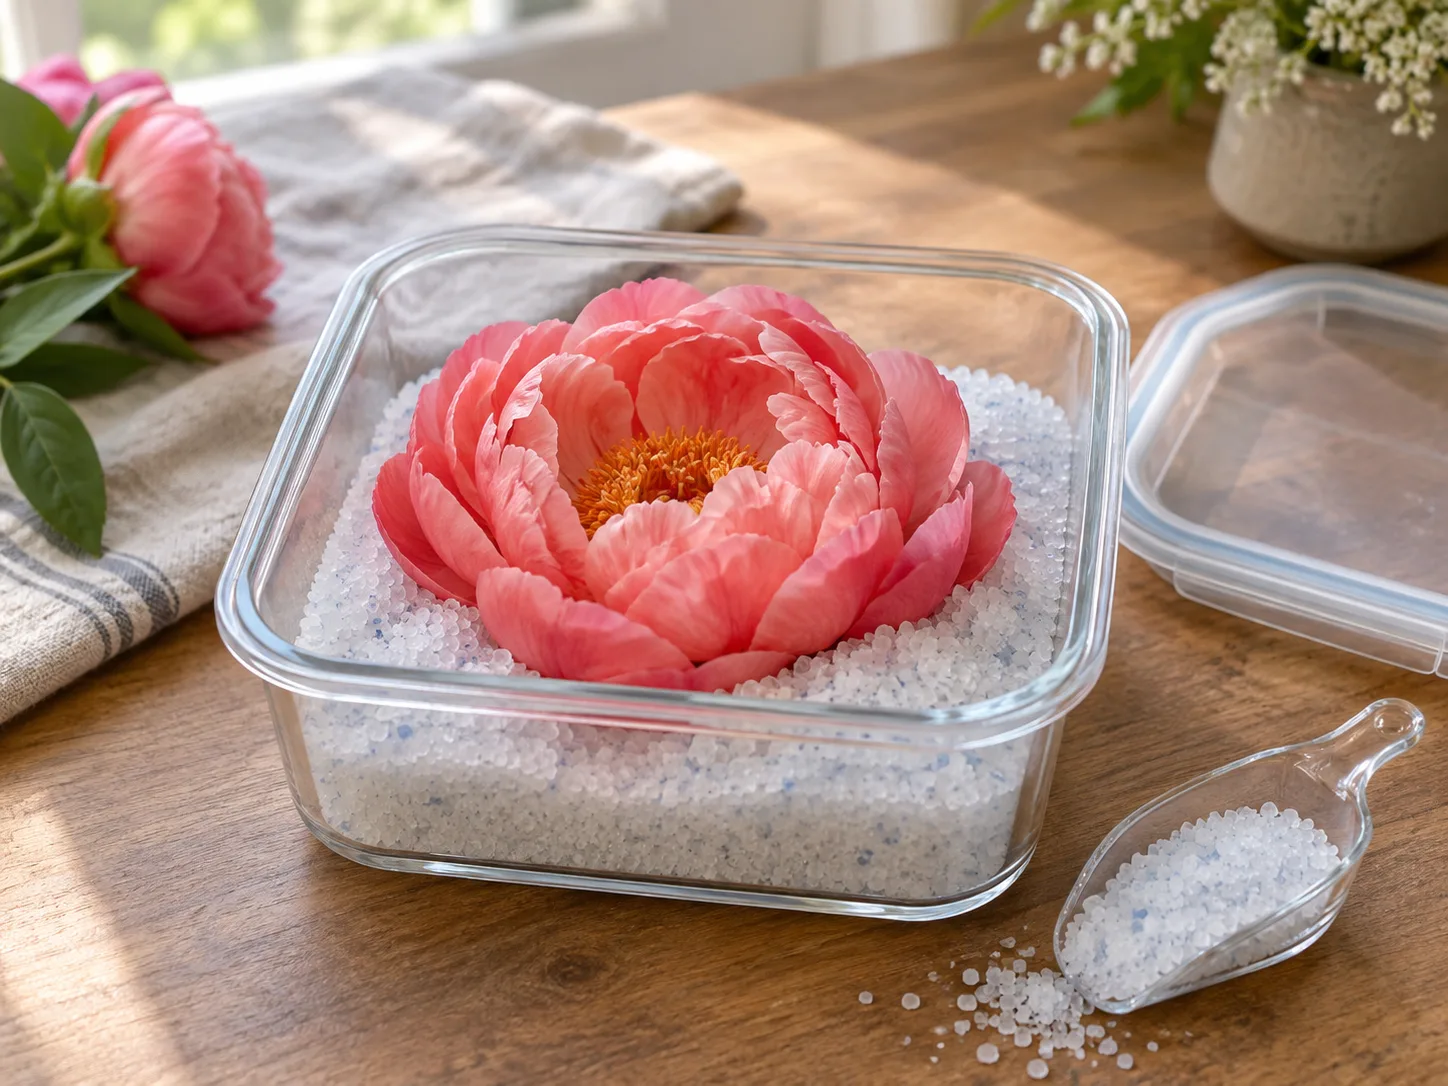
Cover flowers without crushing their shape
- Add a shallow base layer of dry silica gel to the container. It should support the flower head without letting it sit directly on the bottom.
- Trim the stem to a short handle. Place a rounded bloom upright or face up, with the petals arranged as you want them to look when dry. Flat-faced flowers may be placed face down if that position keeps their shape supported.
- Spoon the crystals around the flower gradually. Let them flow between the outer petals rather than dumping the full amount onto the center. Continue until the bloom is covered, keeping the petals in their natural position.
- Seal the container. Silica gel draws moisture from the flower, but it also absorbs moisture from the surrounding air; leaving the container open wastes some of its capacity.
- Label the container with the flower type and date, then leave it undisturbed for the first part of the drying period. If you need to check progress, uncover one test bloom rather than disturbing every flower.
- When the bloom feels dry, pour or brush the crystals away carefully. Lift the flower by its short stem or base, not by the petal edges, and use a soft artist’s brush to remove remaining grains.
Follow the silica product’s directions for reuse and heating. Some products change color as they absorb water, but indicator formulas and heating instructions differ, so do not assume every desiccant can be recharged in a household oven. Keep the container closed between uses and out of reach of children and pets; silica gel is a drying material, not something to mix into food or potting soil.
Check the thickest part before removing a bloom
UF/IFAS Extension lists minimum silica-gel times of about two days for thin textures, three to four days for medium textures, and five to seven days for heavier textures. Those are inspection points rather than automatic finish times. A large peony or layered rose can need more time than a small, thin bloom, particularly if the petals were damp when packed.
The flower is ready when the thickest section feels dry and crisp but not so brittle that it disintegrates when touched. Do not judge only by the outer petals: the base and center dry more slowly. If the petals are dry but the center remains soft, return the flower to the desiccant and check it again later. If the entire bloom is dry, lift it gently and let it rest in a dry place before arranging it; this makes it easier to notice any hidden softness before the flower goes into a frame or keepsake box.
3. Press flowers flat for frames and cards
Pressing is the right choice for a flat display, not a substitute for drying a full bouquet. It brings out the outline and details of thin flowers and leaves, and it needs only absorbent paper plus an even weight or a flower press. The RHS describes simple flowers between paper and books as a practical home method; UF/IFAS Extension and Purdue Extension likewise recommend pressing thin, flat material.
Pansies, primroses, small daisies, violets, single-petal blooms, fern fronds, and individual leaves are easier to press than dense flowers with thick centers. You can press a rose petal or separate a layered flower into pieces, but a whole peony or tightly packed rose head is likely to stay damp in the middle long after the outer petals flatten.
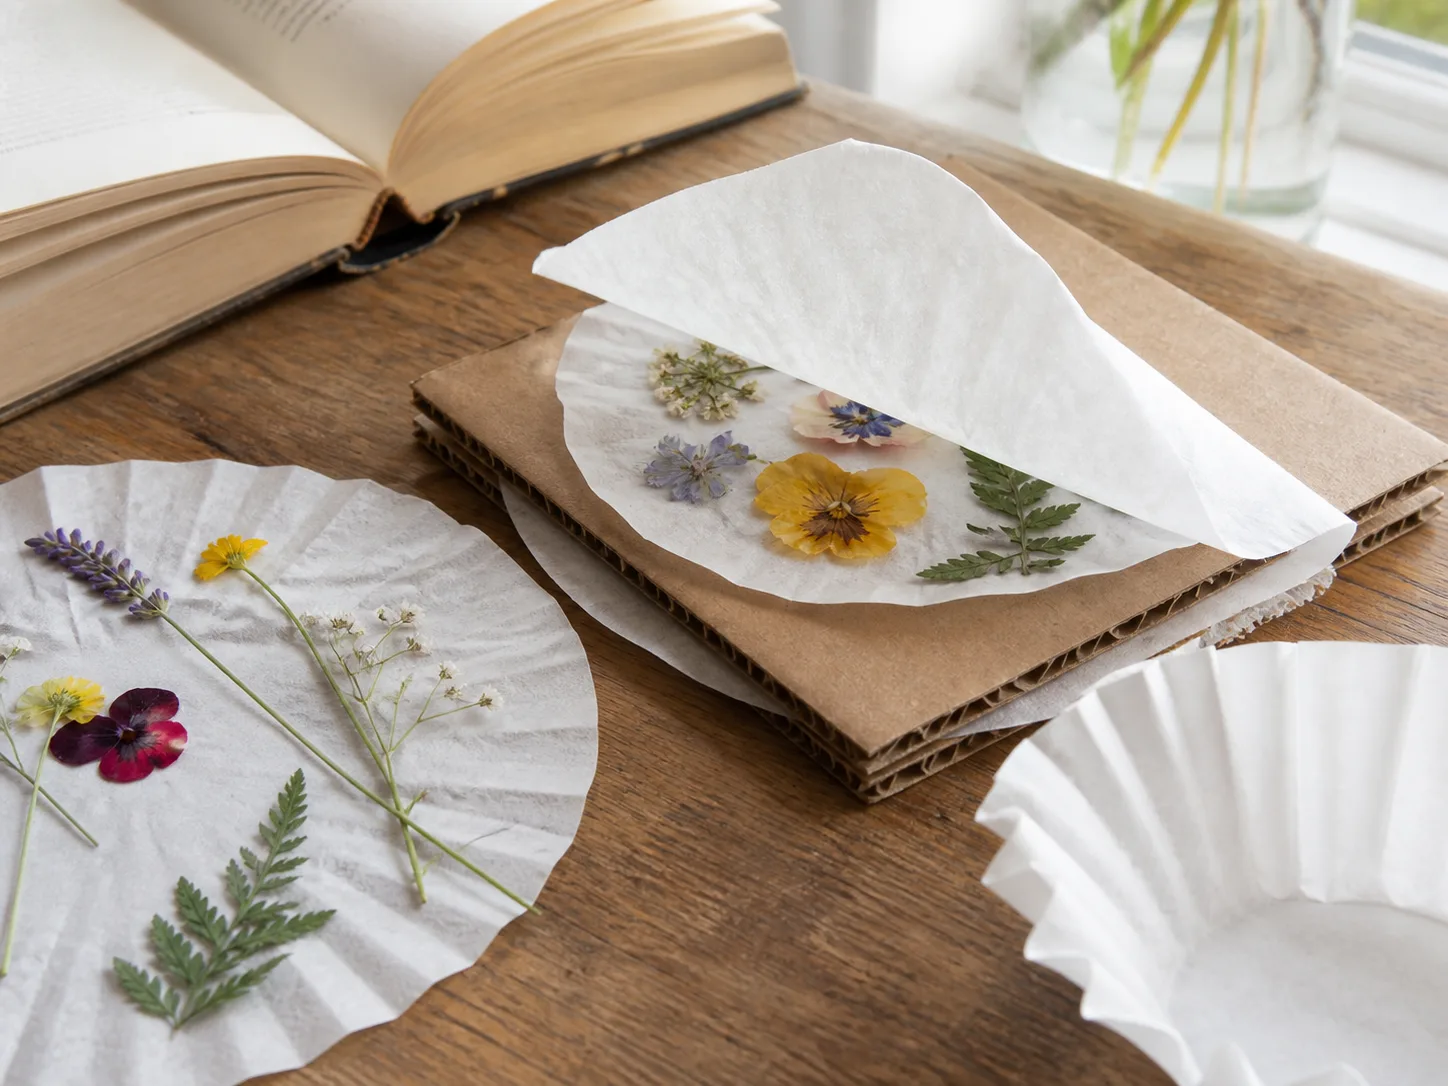
Press in layers and keep the paper dry
- Choose absorbent, uncoated paper such as blotting paper, plain paper, or a coffee filter. Avoid glossy pages and any sheet with ink that could transfer to pale petals.
- Arrange each flower face down or in the position you want, with petals opened and not overlapping. Remove a bulky center or separate thick petals if necessary; pieces that dry evenly tend to keep cleaner edges.
- Sandwich the blooms between paper layers, then add flat cardboard outside the paper if you are using a book or a homemade press. The cardboard helps distribute pressure, while the absorbent sheets draw moisture away.
- Add a heavy, even weight or tighten the flower press. Store it flat in a dry place where it will not be knocked over.
- Check after several days. If the paper feels damp, replace it carefully and return the arrangement to the press. Keep the flowers under pressure while the paper is open only briefly, so petals do not shift.
- Leave the flowers until they are papery and dry throughout. RHS guidance gives about a week for simple pressed flowers, while UF/IFAS and Purdue Extension allow closer to two or three weeks; thickness, paper, and room humidity account for much of the difference.
Resist the urge to peel up a flower every day. The petals can stick to paper or tear before they are ready, and repeated handling can undo the flat arrangement. If you want to label a keepsake, write on a separate card after the flower is dry instead of marking the absorbent sheet beside a fresh bloom.
Flowers that press cleanly
Flowers with one layer of petals or a shallow center are the easiest to press intact. Pansies and primroses naturally lie flat; small daisies and violets can work well when placed face down. Thin leaves and fern fronds add structure around the bloom without introducing a thick, wet center.
For a full flower that is too bulky, press individual petals and reconstruct the shape later on archival paper or inside a frame. This gives you control over spacing and avoids trapping moisture at the center. It is a different look from a whole preserved bloom, but it often makes a more legible composition for a card, bookmark, or botanical picture.
Troubleshoot soft, moldy, or damaged flowers
Most failed batches come from a mismatch between the flower and the method, or from moisture that has nowhere to escape. Before starting another batch, identify whether the problem is a damp center, a crowded air-drying bundle, paper that stayed wet, or a flower that was already past its best. Changing that one cause is more useful than simply leaving every flower for twice as long.
Fix moisture problems before they spread
If an air-dried bunch is still soft after a couple of weeks, separate the stems and give them more room. Check the thickest stem and center rather than the lightest petals. A room that feels damp, a closed closet, or a bundle tied too tightly can keep moisture in place; move the flowers to a drier, better-ventilated location and remove any stem that has visible mold.
If pressed flowers feel leathery or the paper is damp, replace the absorbent layers and continue pressing. Keep the press flat and the stack in a dry room. For silica gel, check whether the crystals were already damp before you began and whether the container sealed fully. Return a soft-centered flower to dry desiccant, but do not keep a bloom that has become moldy or smells musty; discard it rather than sealing it into a frame or box.
Mold is a sign that moisture remained in the material or the surrounding air. Do not brush spores off and use the flower in a closed display. Remove affected pieces, clean the container or press before the next batch, and use dry flowers, fresh absorbent paper, smaller bunches, or a more suitable room. In humid climates, a dehumidified indoor space can be more dependable than a shed or basement.
Prevent fading, curling, and petal loss
A flower that curls or collapses was probably dried without enough support for its shape. Switch a delicate rounded bloom from hanging to silica gel; switch a shallow flower from a bulky bouquet to a press. If a silica-dried flower comes out misshapen, make the next test bloom more carefully supported rather than trying to reshape a brittle flower with water or steam.
Some fading is normal. Purdue Extension notes that color retention is generally better with faster methods such as silica gel, but even a well-dried flower changes as it ages. Keep the flower away from direct sun and bright windows, which accelerate visible fading. If color matters more than a three-dimensional outline, pressing and framing the flower can help limit exposure and handling, though it will not make the pigment permanent.
Petals that shatter when you lift them are either very delicate, over-dry, or already damaged. Handle dried blooms by the stem or base and move them once, directly into the intended vase or frame. For a bouquet that sheds easily, use a glass-fronted shadow box or a covered display rather than a high-traffic shelf where air movement and repeated dusting will knock pieces loose.
Display and store dried flowers so they last
Choose a display location before you finish the flowers. A bright, humid bathroom is a poor place for a delicate arrangement; the RHS advises keeping dried displays away from direct sunlight and moist rooms because moisture can encourage mold. A dry shelf with indirect light, away from radiators, cooking steam, and frequently opened windows, gives dried flowers a more stable environment.
Use a vase without water for an air-dried bunch. For a wreath, keep the most fragile flower heads toward the center where sleeves and door traffic will not catch them. Pressed flowers do well in a frame, card, or album; use a clean, dry backing and keep the finished piece out of direct sun. Silica-dried heads can be set in a shadow box or incorporated into a small arrangement, but avoid tight packing that rubs petals together.
Match the display to the way you dried them
Treat dried flowers as fragile plant material, not as washable decor. If dust settles on an open arrangement, lift it outside and use a soft brush with a light touch. Do not rinse the petals or wipe them with a damp cloth. UF/IFAS Extension notes that a careful whisk with a soft brush is usually enough to clean dusty preserved materials.
For longer storage, place fully dry flowers in a closed box with tissue around the heads so they cannot slide against one another. Keep the box somewhere cool and dry, and check it before bringing the flowers back out. Dried plant material is flammable, so keep arrangements away from candles, fireplaces, stovetops, and other heat or flame sources. No technique makes flowers maintenance-free forever, but limiting sun, moisture, dust, and handling can keep a meaningful arrangement attractive for much longer.
Conclusion
Choose the method by the form you want to keep: hang firm stems for a natural bouquet, use silica gel when a delicate flower head needs three-dimensional support, and press thin blooms for flat art. Begin with fresh, dry flowers, leave room for air or absorbent paper to do its work, and use texture rather than a calendar date to decide when a flower is ready.
If you are unsure how one variety will behave, preserve a test bloom before preparing the whole bunch. A little patience at the start—and a dry, shaded place to display the finished flowers—will do more for a lasting keepsake than trying to force every flower through the same technique.