Halcyon Hosta Care: Shade, Water, and Blue Foliage
Grow a healthy Halcyon hosta with the right shade, steady moisture, and practical advice for planting, dividing, containers, winter care, and leaf problems.
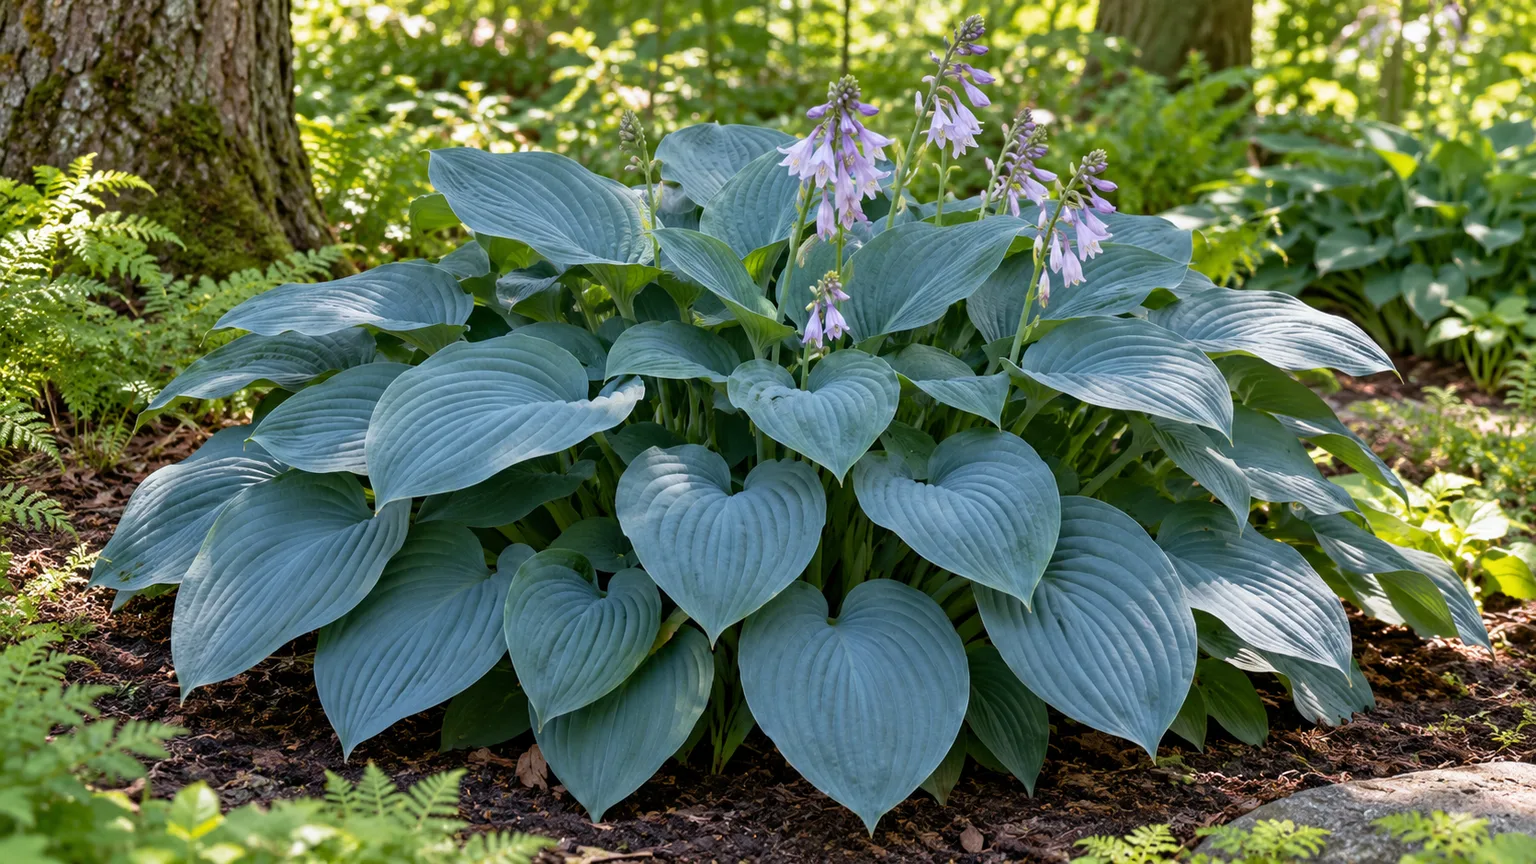
Give Hosta ‘Halcyon’ a cool, evenly moist spot with light or dappled shade, and its compact mound of ribbed blue-green leaves can anchor a shade border for years. The biggest mistake is treating “shade plant” as a complete siting plan: a spot under thirsty tree roots, in dry soil, or exposed to late-day heat can stress the plant even when it receives little direct sun.
‘Halcyon’ is a slow-to-moderate grower, so choose its permanent position with its eventual spread in mind. After planting, keep the root zone from drying while the clump establishes, then water deeply when the surrounding soil begins to dry rather than following a fixed weekly schedule. The advice below is built around those two decisions: protect the foliage’s blue cast and make moisture reliable without keeping the crown soggy.
Halcyon Hosta at a Glance
| Feature | What to expect |
|---|---|
| Botanical name | Hosta ‘Halcyon’ |
| Habit | Clump-forming, deciduous perennial |
| Foliage | Heart-shaped to broadly pointed blue-green leaves with pronounced ribs and a textured surface |
| Mature size | Commonly around 18 inches tall, with a spread of roughly 3 feet or more depending on growing conditions |
| Light | Light shade to part shade; protect from hot afternoon sun |
| Soil | Fertile, moisture-retentive, and well-drained |
| Flowers | Pale lavender to lilac flowers on upright summer stalks |
| Main challenges | Slugs and snails, deer, drying soil, and fading or scorched foliage |
Use the plant label’s mature spread as the best spacing guide for the specific stock you buy. Cultivar references do not always give the same mature dimensions; for example, Gardenia lists ‘Halcyon’ at about 18 inches tall and a spread that can reach 41 inches. Leave about 3 to 3½ feet from the center of one plant to the next if you want separate, full clumps rather than a quickly closed groundcover. (Gardenia’s ‘Halcyon’ profile)
What Makes ‘Halcyon’ Different
‘Halcyon’ is valued for its leaf color and texture more than for its flowers. Its broad blue-green leaves form a tidy, rounded mound; pale lavender blooms rise above the foliage in summer, often later in the season. Gardenia describes the cultivar as a Tardiana hosta and notes that it is slower growing, so a young plant may need several growing seasons to resemble a mature display. That slower pace is normal, not evidence that the plant needs stronger fertilizer.
The blue appearance comes from the way light interacts with a waxy surface bloom over green leaf tissue. Think of the color as a delicate finish rather than a permanent pigment: harsh sun, heat stress, or abrasion can make the foliage look greener or less even. The Royal Horticultural Society notes that blue-leaved hostas generally do best in light shade, while the exact amount of sun a plant tolerates still depends on local heat, humidity, soil moisture, and reflected light. (RHS hosta growing guide)
Choose Light That Protects Blue Color
Aim for bright shade or dappled light: the plant should receive ambient daylight, with perhaps gentle morning sun, but little or no hot afternoon exposure. A north- or east-facing border, the open shade at the edge of a deciduous canopy, or the filtered light beneath high tree branches can work well. Deep, dry shade is not ideal simply because it is shaded; low light can slow growth, while dry tree roots create a separate water problem.
If your only available site gets several hours of direct sun, look at when that sun arrives and how hot the leaves become. Early sun in a cool climate may be manageable if the soil remains moist, but west-facing afternoon sun is a higher-risk location for this blue-leaved cultivar. Watch the plant through a warm spell: fading that is strongest on the sun-facing side, followed by crisp brown patches, is a sign to move it or add temporary shade rather than just watering more.
Plant in Moist, Well-Drained Soil
Halcyon needs soil that holds enough water for broad leaves without remaining saturated around the crown. Loam enriched with mature compost is a useful starting point; heavier soil can still work if it drains freely, while fast-drying sandy soil benefits from added organic matter and a surface mulch. The RHS recommends fertile soil and compost for hostas and cautions that they are poor choices for dry, exposed, windy sites. (RHS hosta growing guide)
Plant in spring after the soil is workable or in early fall while there is time for roots to settle before winter. Avoid planting during a hot, dry spell unless you can provide reliable aftercare. Prepare the whole planting area rather than filling a narrow planting hole with a different soil mix; a sharply contrasting pocket can hold water or dry at a different rate from the surrounding bed.
To plant a potted division, water the nursery pot first, dig a hole about as deep as its root ball and roughly twice as wide, then loosen any roots circling the outside. Set the plant so the crown—the point where the shoots meet the roots—sits at its original soil level. Backfill, firm lightly, and water thoroughly to settle soil around the roots. Keep the crown at grade: burying it under a mound of soil or thick mulch can slow emergence and encourage rot, while leaving most roots exposed can make the plant dry quickly.
Water for Steady Root-Zone Moisture
During the first growing season, check the soil every few days in dry or warm weather. Water slowly at the base when the top layer is drying and the soil a few inches down is only slightly damp; newly planted roots should not be allowed to bake dry while they are spreading. Once established, in-ground hostas may need supplemental water during a prolonged dry spell. The RHS suggests keeping the soil slightly damp several inches below the surface in dry periods and notes that containers dry much faster. (RHS hosta growing guide)
A deep soak is more useful than frequent splashes across the leaves. Water early enough that foliage dries during the day, especially in a crowded or humid bed, and direct the stream toward the soil. A layer of mulch helps slow evaporation, but it does not replace checking moisture. If the plant wilts during afternoon heat, feel the soil before watering: dry soil calls for a thorough soak, while wet soil points toward heat stress, poor drainage, or damaged roots.
Plants tucked below trees often need more attention than their shade suggests. Tree roots intercept rain and draw moisture from the same soil volume, so a hosta can wilt in a shaded bed after a dry week. Place it outside the densest root zone when possible, water the soil deeply rather than the leaves, and check again the following day to see whether moisture reached the root area.
Fertilize Sparingly and Mulch Carefully
If the bed is reasonably fertile and receives an annual top-dressing of compost, routine heavy feeding is unnecessary. Too much fast-acting fertilizer can push soft, lush leaves that need more water and may attract browsing animals. Apply a modest layer of finished compost over the soil in spring, keeping it clear of the crown; use a balanced fertilizer only if growth is poor and the soil or container mix is depleted, following the product label.
Mulch with compost, shredded leaves, or another water-permeable organic material to reduce evaporation and suppress weeds. Keep the mulch loose and away from the base of the shoots so air can reach the crown. In slug-prone gardens, thick damp mulch can also create daytime hiding places, so use a thin layer and clear away decaying leaves that rest against the plant.
Keep or Remove the Flower Scapes
The flower stalks do not need to be removed for the health of the plant. Leave them if you enjoy the pale lavender flowers or want to keep blooms available to visiting pollinators; cut the stalk close to the foliage once the flowers fade if you prefer a tidier outline. The RHS notes that hosta flower stalks can remain until the plant is tidied in fall or be removed after flowering. (RHS hosta growing guide)
Do not cut healthy leaves during the growing season just to force a fresh flush. Leaves are the plant’s energy-producing surface, and premature trimming reduces the resources stored for next year. Remove leaves that are badly damaged, diseased, or fully yellow, then discard them rather than leaving suspicious foliage in a damp pile beside the crown.
When to Divide a Halcyon Hosta
Divide ‘Halcyon’ when you want more plants, need to reduce an overcrowded clump, or are moving it to a better site—not because every hosta must be split on a strict cycle. A healthy, slow-growing mound can remain intact for years. Division is easiest in early spring as the shoots emerge, or in early fall when the weather is cool and the soil is still workable. The RHS recommends spring or autumn division and notes that divisions retain the parent plant’s characteristics. (RHS hosta growing guide)
The simplest cue is an established clump with several distinct growing points, called eyes. A small division with only one eye can survive, but it will take longer to make a substantial display; leave several eyes together if you want the new plant to fill out sooner. Hosta roots are tough, so use a sharp spade or sturdy garden knife and work on a cool day when the soil is moist but not waterlogged. The RHS recommends spring or fall division, while BBC Gardeners’ World illustrates spring division as new growth begins; Savvy Gardening also recommends division as the dependable home-propagation method and cautions that seed-grown plants may not match the parent cultivar. (RHS hosta growing guide; BBC Gardeners’ World division guide; Savvy Gardening’s hosta propagation guide)
A Low-Stress Way to Divide the Clump
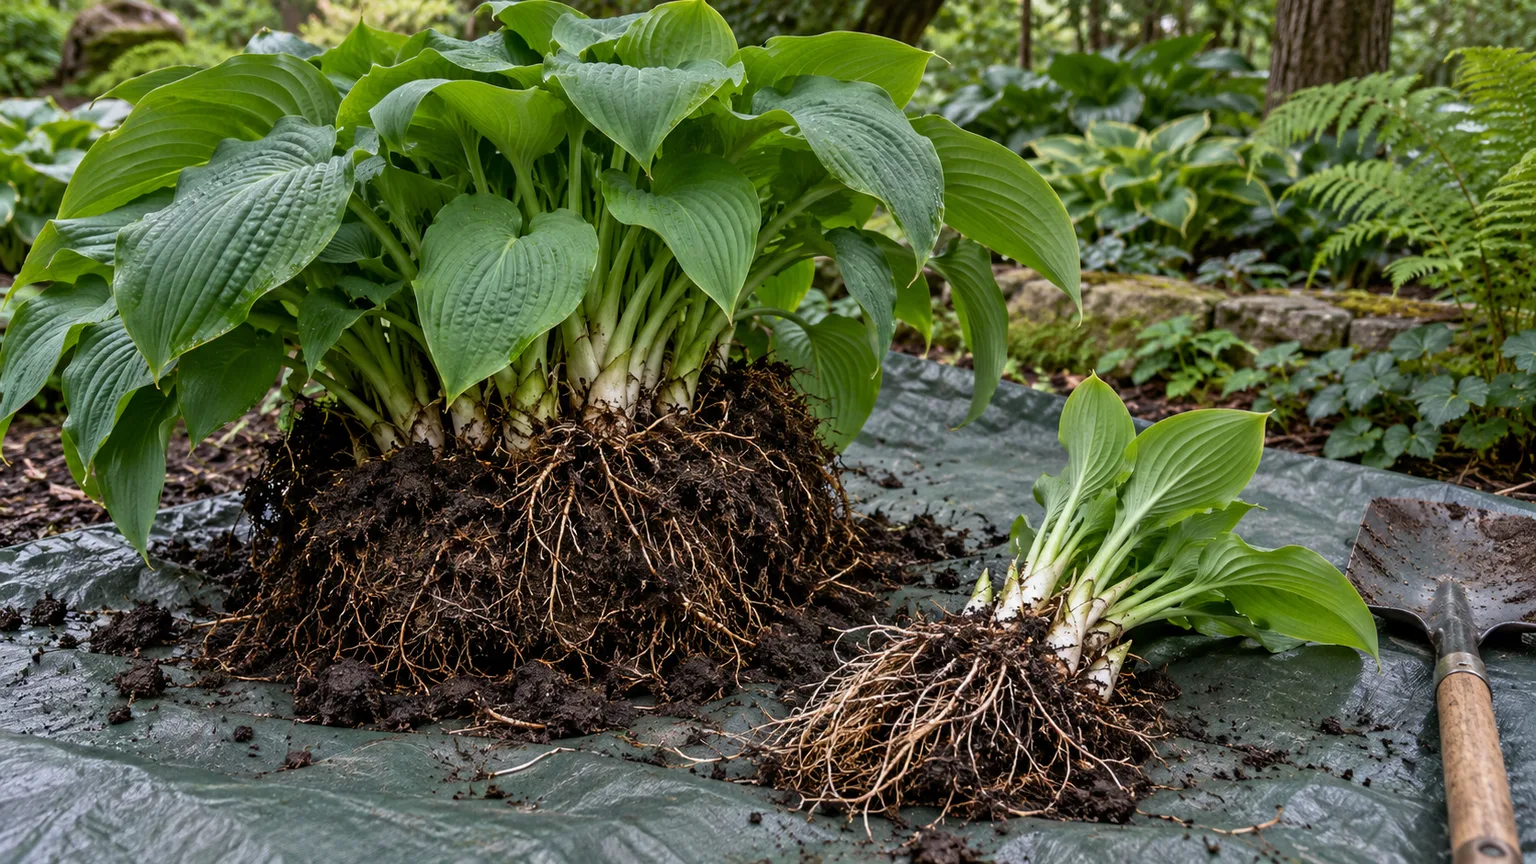
Water the clump the day before if the soil is dry. Slide a spade under the outer edge of the plant, keeping a generous distance from the crown, and lift as much of the root mass as possible. Shake or rinse away enough soil to see the eyes and natural gaps between them, but do not leave the roots sitting in the sun while you plan the next step.
Cut the clump into sections, each with at least one healthy eye and a good share of roots. For quicker recovery, make fewer, larger divisions instead of slicing the plant into many tiny pieces. Replant each section promptly at the same depth it grew before, firm the soil around it, and water it in. Keep the new divisions evenly moist while they establish; postpone another division if the plant is still small or recovering from stress.
Growing Halcyon in a Container
‘Halcyon’ can grow in a pot if you can meet two needs that containers make harder: consistent moisture and winter root protection. Choose a stable, broad container with several unobstructed drainage holes and room for the root clump to expand. A pot only slightly wider than the nursery root ball will require frequent watering and may need replacement soon; a much larger pot is fine if the mix drains well and you avoid keeping a small root system in cold, wet compost.
Use a quality outdoor potting mix with some moisture-holding capacity, not garden soil packed into a decorative planter. Set the crown at the same height it had in the nursery pot and water until excess drains from the bottom. Check the container more often in hot, windy weather, because the exposed sides and limited soil volume can dry out much faster than an in-ground bed. Savvy Gardening’s container guidance likewise emphasizes drainage, pot size, and regular moisture checks for hostas grown above ground. (Savvy Gardening’s guide to hostas in pots)
Place the pot where the leaves receive filtered light and the container itself does not sit in a hot, reflective corner. A pot can be moved when the sun angle changes or when the plant needs more protection, which makes container growing useful for balconies and paved patios. It is not a way to grow hostas indoors year-round: ‘Halcyon’ is an outdoor perennial that follows seasonal dormancy, and a warm indoor room does not replace a suitable outdoor growing cycle.
Winter Care and Spring Frosts
In cold weather, the foliage naturally yellows and dies back; the crown then rests until spring. Once the leaves have collapsed, remove them if they are diseased or if you want to reduce hiding places for slugs and rodents. Healthy, clean leaves can be composted, but discard material with suspicious streaking, persistent spots, or soft rot. The RHS describes hostas as hardy perennials whose leaves die back in late autumn and whose new growth can be vulnerable to a late frost. (RHS hosta growing guide)
A garden-grown Halcyon usually needs no elaborate winter covering where it is suited to the local climate and the soil drains well. The greater risk is often a crown sitting in cold, waterlogged ground, not a lack of warm wrapping. In spring, new shoots may emerge before the last frost; if a hard frost is forecast, a temporary breathable cover can protect tender leaves overnight, then remove it the next morning so the crown does not stay damp and shaded.
Container roots have less insulation than roots in the ground. After the plant goes dormant, move the pot to a sheltered, unheated location or nestle it against a protected wall where the container will not sit in standing water or experience repeated severe freeze-thaw exposure. Check occasionally over winter and water only if the mix has become quite dry; do not keep dormant roots constantly wet. If a clay or ceramic pot may crack, move it before the coldest weather rather than waiting for a freeze.
Protect the Leaves from Slugs, Snails, and Deer
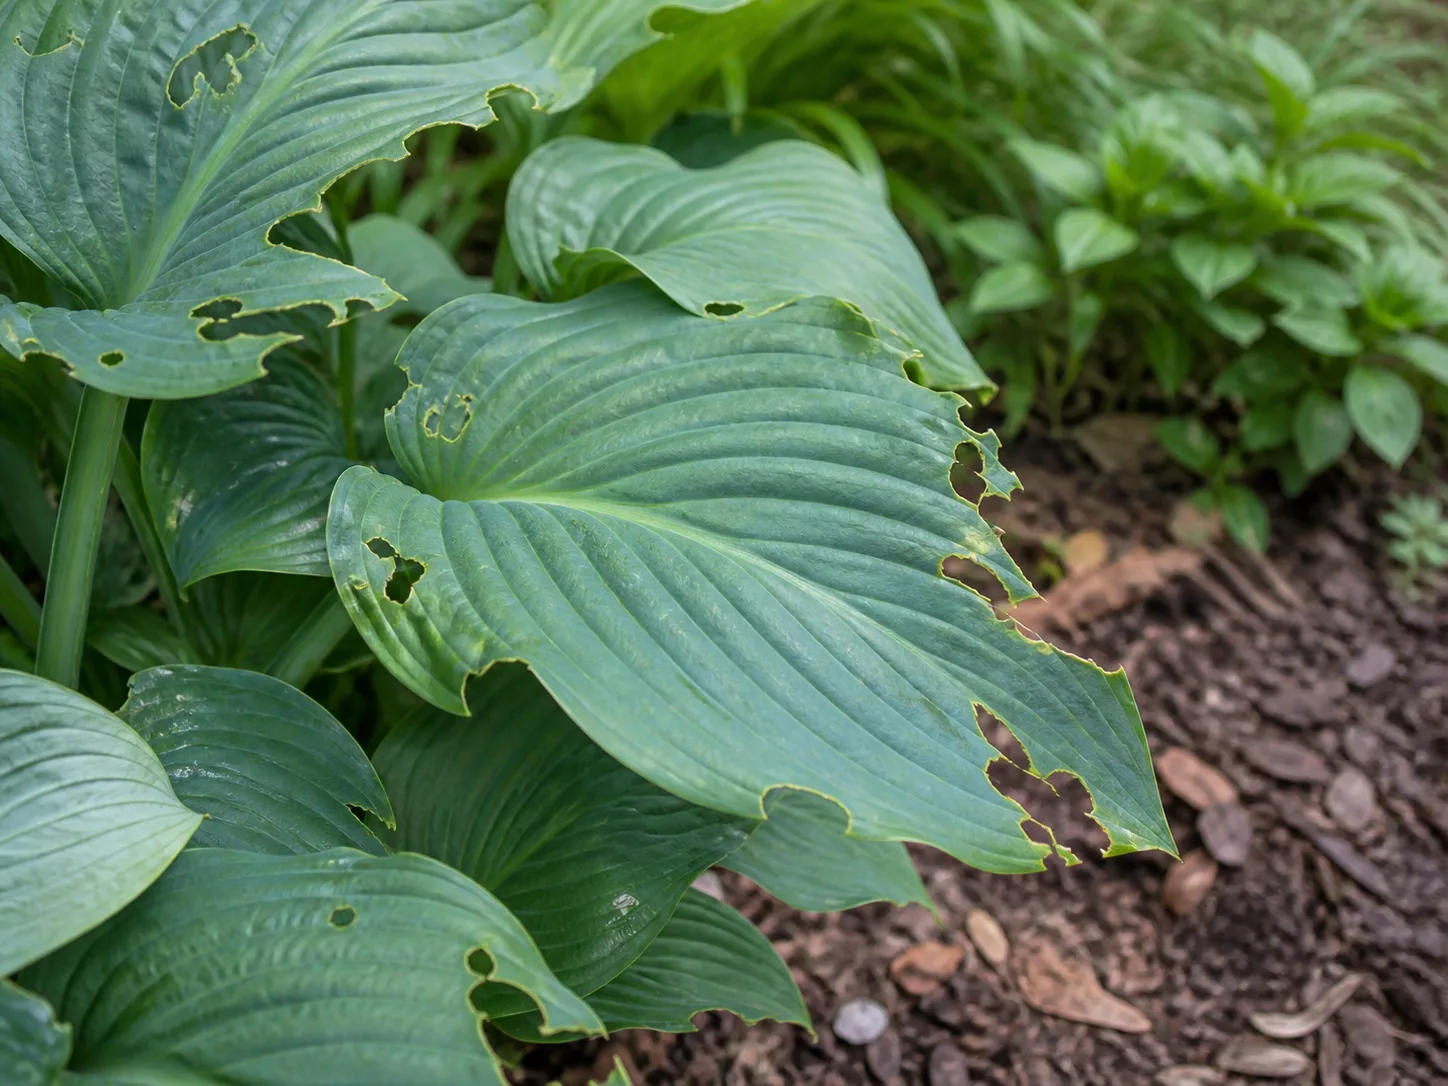
Slugs and snails are common hosta pests because they hide in damp, protected places by day and feed when conditions are cool and wet. Look for irregular holes, shredded edges, or shiny trails; inspect under nearby boards, pots, dense mulch, and fallen foliage after dusk or in the morning. The RHS and Missouri Botanical Garden both describe hostas as frequent targets and provide guidance for identifying mollusk feeding. (RHS slug and snail guide; Missouri Botanical Garden hosta problems guide)
Start with habitat and monitoring: clear spent leaves, thin dense mulch, lift boards or pots that touch the soil, and water in the morning rather than leaving a wet bed overnight. Hand-pick visible slugs when practical and protect especially vulnerable new shoots with a barrier that can be checked and maintained. No single trick works in every yard; if you use a slug-control product, follow its label, keep it away from children and pets as directed, and do not assume a homemade remedy is harmless to soil organisms or wildlife.
Deer can strip a hosta quickly, and rabbits may clip young shoots close to the ground. Look for missing leaves or clean-cut stems and tracks or droppings nearby. A physical barrier is the most dependable protection for a valuable clump; repellents can lose effectiveness after rain and usually need repeat application according to the product label. A hosta’s leaf texture or blue color does not make it deer-proof.
Hostas are toxic to cats, dogs, and horses if eaten. If pets browse plants, place Halcyon behind a barrier or in an area they cannot reach; if an animal has chewed it, contact a veterinarian or animal poison-control service for case-specific advice. The ASPCA lists hosta as toxic to cats, dogs, and horses. (ASPCA hosta toxicity listing)
Diagnose Common Leaf Problems
One damaged leaf does not automatically mean disease. Start by checking where the damage appears, whether the soil is dry or saturated, whether the plant gets afternoon sun, and whether neighboring plants show similar symptoms. Photograph changes over a few days before removing a large portion of the clump; a symptom’s pattern can be more useful than its color alone.
When the Blue Color Fades
If the leaves look greener as summer progresses, inspect light and leaf condition first. A blue hosta’s color is most vivid when its waxy surface bloom is intact and the site stays cool and lightly shaded. Stronger sun and heat can make the foliage appear less blue; rain and abrasion can also wear down the surface bloom. Avoid rubbing or spraying the leaves unnecessarily, and move a pot or add shade if the plant receives hot afternoon exposure.
If the whole plant looks pale or grows weakly rather than simply turning greener, check the root zone. A dry crown under tree roots, waterlogged soil, or a crowded container can impair growth even when the bed appears shady. Correct the underlying moisture or drainage issue before adding fertilizer; color alone is not a reliable reason to feed.
Brown Edges, Holes, or Spotted Leaves
Dry, crispy margins often point to moisture stress or too much sun. Feel the soil several inches down and look for a pattern: scorch tends to be worse on exposed edges or the side facing heat, while persistent wilt in wet soil suggests poor drainage or root trouble. Do not respond to every brown edge by increasing irrigation; first confirm the root zone is actually dry.
Irregular holes can come from slugs and snails, chewing insects, hail, or wildlife. Slug feeding often leaves smooth-edged holes and slime trails; deer damage may tear or remove whole leaves, while rabbits tend to clip young growth more cleanly. The Missouri Botanical Garden’s diagnostic guide compares these signs and also shows how foliar nematode injury develops as yellowing and brown streaks between leaf veins. (Missouri Botanical Garden hosta problems guide)
Tan or pale spots with darker borders that multiply after warm, wet weather may be anthracnose or another leaf disease. Improve spacing and airflow, remove badly affected leaves, and avoid overhead watering late in the day. Yellow-brown streaks bounded by veins, particularly on older leaves, can indicate foliar nematodes; distorted mottling, puckering, or unusual growth can be consistent with Hosta Virus X. These problems need accurate identification, and virus-like symptoms should not be propagated or shared. If symptoms are spreading rapidly or the crown is soft, consult a local extension office or plant clinic before treating or composting the plant.
Place Halcyon in a Shade Border
The blue leaves read especially well beside plants with silver, chartreuse, or fine-textured foliage. Combine Halcyon with ferns, foamflower, Japanese forest grass, or other shade plants only when their moisture and drainage needs overlap; a beautiful pairing will not compensate for a dry root zone. Plant low companions toward the front and leave room for the hosta’s leaves to expand without trapping damp debris against the crown.
Use the cultivar as a repeated edging plant along a north- or east-facing path, as a cool-toned focal clump at the base of a shrub, or in a container that can be moved out of summer heat. If you are designing a low-maintenance groundcover, plan for its mature width rather than crowding plants to fill the bed immediately. The clump fills in gradually, and generous spacing improves airflow and makes slug inspection easier.
Conclusion
For strong growth and the best blue foliage, plant Halcyon hosta in bright or dappled shade, give it fertile soil that stays moist without becoming waterlogged, and protect it from hot afternoon sun. Water new plants consistently while they establish, then check the soil and weather instead of relying on a rigid schedule. Feed lightly, divide only when the clump needs it, and protect vulnerable leaves from slugs, snails, and deer.
If your plant is already struggling, make one change at a time: confirm soil moisture, assess the sun exposure, then examine the shape and placement of leaf damage. ‘Halcyon’ rewards that kind of measured care with a steady, textured mound that returns each spring and becomes more impressive as it matures.



