How to Grow and Care for Rupturewort
Learn how to grow rupturewort in sun or partial shade, prepare freely draining soil, establish plugs, water wisely, propagate it, and control its spread.
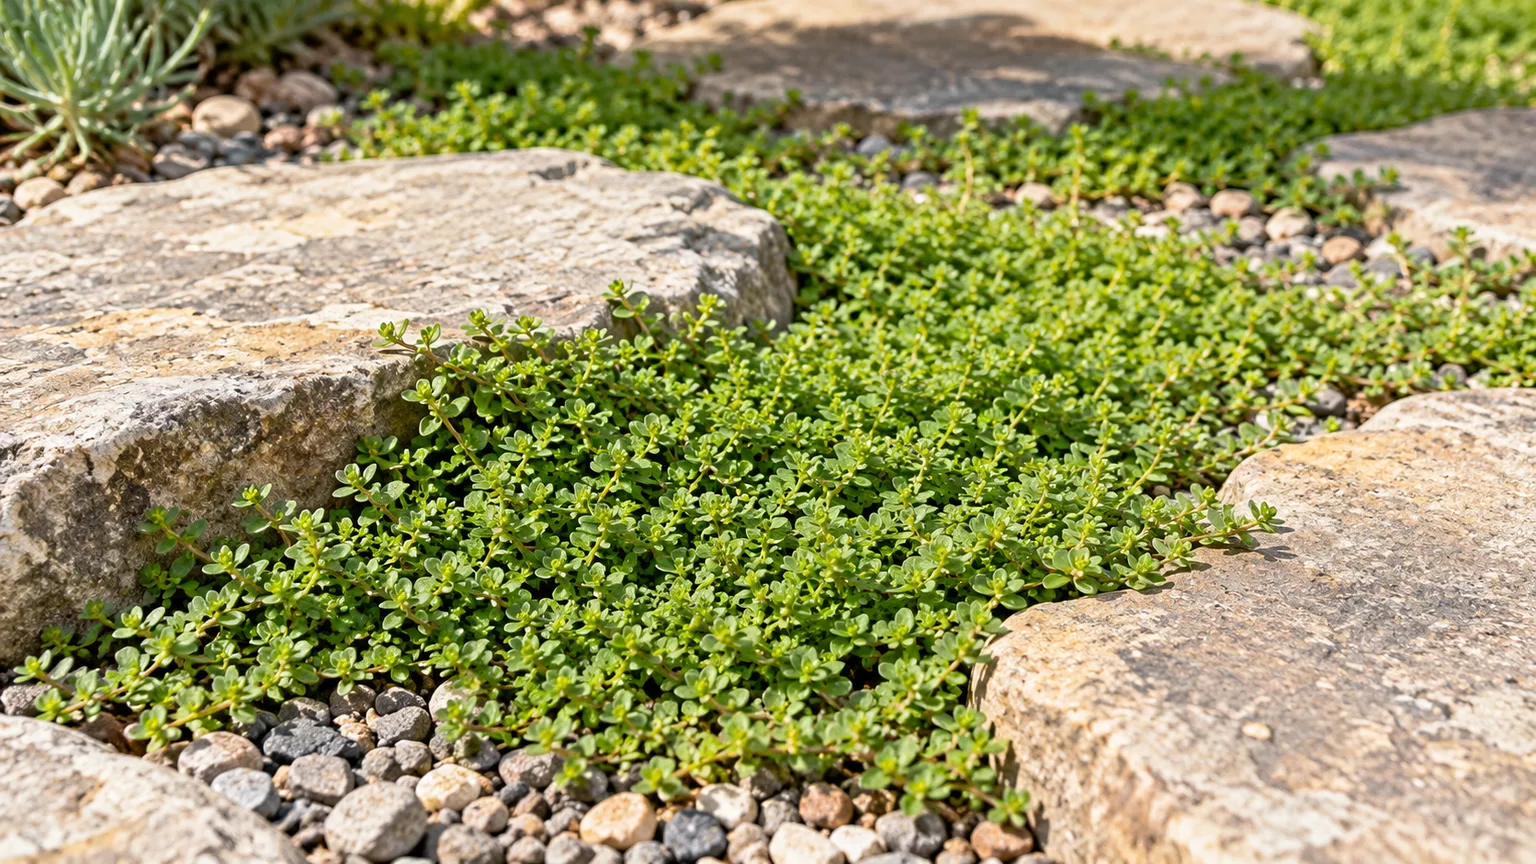
Rupturewort (Herniaria glabra), also called smooth rupturewort or green carpet, grows as a very low, spreading mat of tiny leaves. It is useful where you want a soft green layer over gravelly soil, around a rock garden, or in a sunny path joint that does not get constant use. Its main requirement is not rich soil or a strict feeding routine; it is a site where water drains instead of lingering around the crown.
Once established, rupturewort needs little attention and can withstand dry spells better than a newly planted plug. That does not mean it fills a large patch overnight, thrives in deep shade, or behaves like a durable lawn. Choose it for the right job—low, calm, relatively dry groundcover—and it is much easier to maintain.
Understand What Rupturewort Can—and Cannot—Do
This member of the Caryophyllaceae forms a dense, trailing mat rather than a clump of upright stems. The Royal Horticultural Society describes it as reaching about 10 centimeters (4 inches) tall and spreading roughly 0.5 to 1 meter (1.6 to 3.3 feet) over two to five years. Local growth may differ with climate, sun, water, and competition, so think of those dimensions as a mature range rather than a promise for a particular season. Its foliage is usually bright green, with tiny greenish flowers that blend into the leaves in late spring and early summer; in colder weather the mat may bronze or look less evergreen. RHS’s plant profile describes the plant as mat-forming, drought-resistant, and suitable for groundcover, rock gardens, banks, and containers.
The word “rupturewort” comes from an old belief that the plant could treat hernias. That history explains the name; it is not evidence that the plant is an effective remedy. The Royal College of Physicians’ Medicinal Plant Garden profile records the traditional association, but a garden plant should not be treated as a medical treatment.
Kew’s Plants of the World Online lists H. glabra as native across parts of Europe, North Africa, and Asia, and introduced in several North American states and provinces. “Introduced” does not itself mean invasive, but it is a good reason to check local guidance before planting it broadly, especially near natural areas. If local native plants are a priority, compare regionally native groundcovers before choosing a non-native carpet.
Choose a Site That Fits the Plant
Think about water movement first. A sunny gravel bed that dries after rain is a stronger match than a low, shaded pocket where water collects, even if the latter has richer soil. Rupturewort tolerates lean ground; it does not need you to turn a poor site into a fertile flower bed.
Sunlight: full sun or light shade
Rupturewort grows in full sun or partial shade, according to the RHS. A few hours of direct sun or bright open shade can work, but a dense canopy that keeps the ground cool and damp slows drying and leaves more competition from tree roots. In very hot regions, a site with morning sun and some relief from harsh afternoon exposure can reduce stress, provided air still moves around the planting.
If your site receives little direct light, test a small plug before replacing a whole bed. Watch whether it stays compact and fills sideways, or becomes sparse while moss and moisture-loving weeds take over. The plant’s ability to tolerate partial shade should not be read as a guarantee that it will form a dense mat in deep shade.
Soil: drainage matters more than fertility
Rupturewort handles sandy, gravelly, loamy, or otherwise lean soil, as long as water drains freely. The RHS profile lists loam, sand, and chalk and gives a broad pH range from acidic to alkaline to neutral. That is broader than the acidic-to-neutral advice sometimes repeated for this plant, so do not automatically add an acidifier when leaves look pale. A simple field check is to dig a small test hole, fill it with water, and see whether water remains pooled for hours after nearby soil has drained; persistent saturation calls for a different spot or a raised bed.
Dense clay is not automatically impossible, but planting into an amended pocket can create a bathtub: loose soil in the hole may collect water that cannot escape through the surrounding clay. If drainage is slow, improve the whole planting area with a raised, sloped, or otherwise freely draining profile, or choose a plant better suited to the site. Avoid burying the crown under compost or mulch, which keeps the stems wet and can start rot even when the surrounding soil seems acceptable.
Winter, heat, and regional hardiness
RHS rates the plant H7 on its UK hardiness scale, but that is not a USDA zone number and should not be converted directly into one. Regional listings and nursery labels can use different assumptions, and survival depends on drainage, exposure, snow cover, and whether the plant is in the ground or a pot. In some climates, the mat stays green; in others it darkens or loses some foliage and resumes growth when conditions improve.
Hot or humid weather is not, by itself, a reason to rule rupturewort out. The more actionable question is whether the crown remains wet and airless during warm nights or summer rain. Give it open drainage, avoid frequent overhead watering, and test a small area before planting a large humid-climate site where it has not been proven locally.
Plant Rupturewort for Even Coverage
Plant during a mild spell when the soil is workable: spring is a practical choice in regions with cold winters, while autumn can work where the ground stays warm and drains well. Avoid planting into frozen ground, waterlogged soil, or the peak of summer heat. Water the nursery plug before it comes out of its pot so its small root ball is damp rather than dry and brittle.
Prepare the bed and space plugs
Remove perennial weeds before planting; a low carpet will not smother established dandelion roots or persistent grass runners. Loosen the top few inches of soil, remove large stones where you need continuous contact, and blend in coarse mineral material only if it improves drainage rather than creating an isolated pocket. Set each plug at the same depth it grew in its pot, press soil gently around its roots, then water it in.
Spacing decides how long you wait and how many plants you buy. At 12-inch centers, plan roughly one plug per square foot; at 18-inch centers, you use fewer plants but wait longer for the gaps to close. Closer spacing around 8 to 10 inches can give a quicker carpet, but it does not eliminate weeding or watering during the establishment phase. Because the RHS gives a two-to-five-year period to maturity, treat “instant green carpet” claims cautiously and expect a slow fill across a large bed.
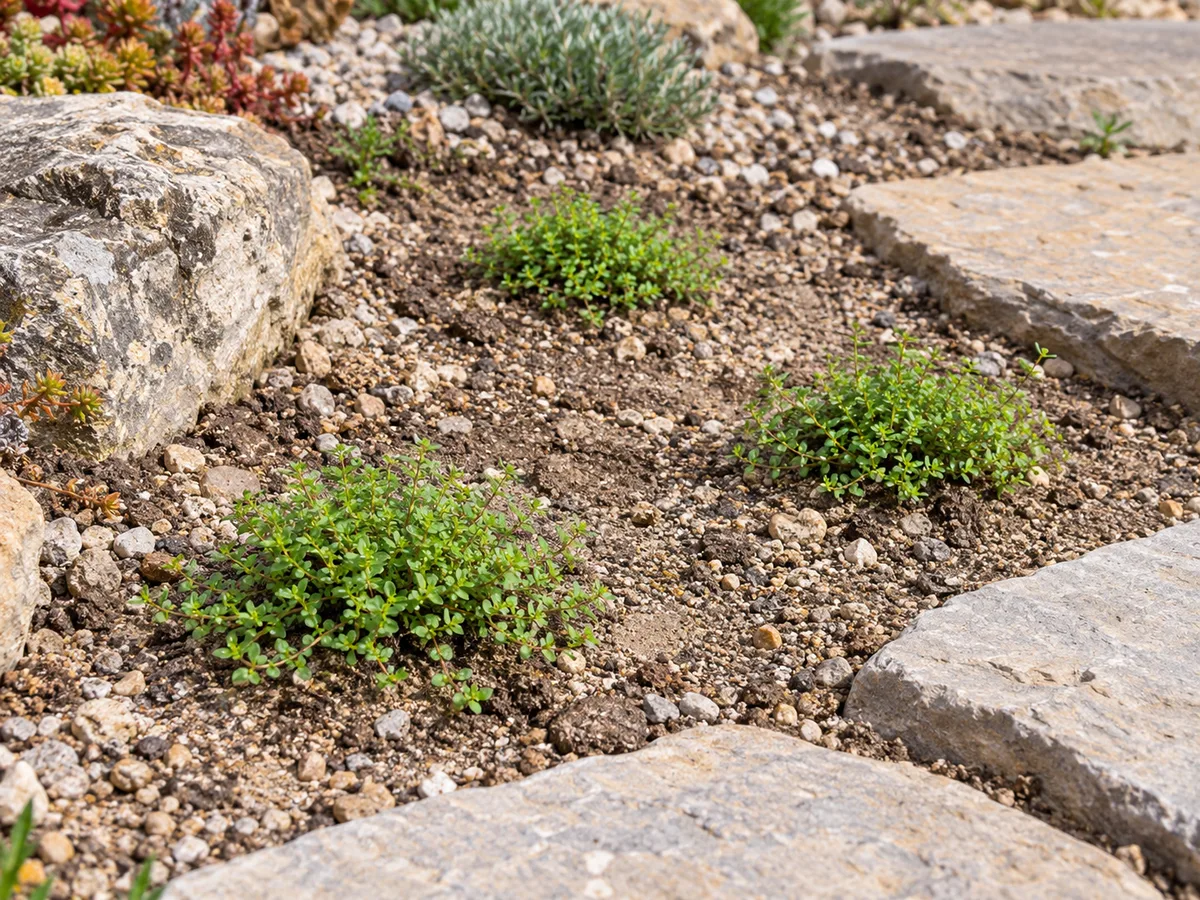
Use it between stones without trapping water
Rupturewort can soften gaps between stepping stones and the edges of a gravel path. Leave enough space for the mat to spread without lifting or hiding the paving, and keep the joint open enough that rain can run through instead of pooling against the plant’s stems. Do not pack the gap tightly with compost or press a thick layer of gravel over the crown.
A useful layout keeps the planted joints slightly below the top of the stone but still exposed to light and airflow. If the stones sit in a shaded, damp channel, use a different filler; choosing a groundcover that matches the drainage matters more than matching a photo or a nursery description. Where the path receives repeated foot traffic, place stepping stones so people walk on the hard surface rather than across the foliage.
Water and Feed During Establishment and Afterward
For the first growing season, check the root ball more often than the surrounding soil. The small plug can dry out before the wider bed looks dry, especially in sand, gravel, wind, or a raised site. Water slowly when the root zone is drying, then allow excess to drain; avoid keeping the entire planting constantly wet just because the plants are new.
Once the mat has rooted across the site, natural rainfall may be enough except during a long hot dry spell. When you do water, a thorough soak followed by a drying interval is usually more useful than frequent sprinkles that wet the leaves but not the roots. There is no reliable calendar interval for every climate or soil texture, so check moisture a couple of inches down and adjust to actual conditions.
Rupturewort is adapted to low-fertility ground and does not need routine feeding in an ordinary garden bed. A high-nitrogen fertilizer can push soft, taller growth that works against the low compact habit. If a young plant is genuinely stalled after you have corrected drainage and watering, use a modest, balanced fertilizer according to its label rather than repeatedly adding feed. For a container, refresh or replace depleted potting mix instead of trying to compensate with heavy fertilizer.
The Gardening Know How growing guide also recommends well-drained soil, allows full or partial sun, and advises against soggy conditions. Those points are useful as a baseline; actual watering still depends on establishment, weather, and the drainage of your site.
Propagate Rupturewort by Seed or Division
You can start rupturewort from seed, buy nursery plugs, or divide an established mat. For a small garden with a few gaps to fill, plugs are the most direct route. For a larger area, division can multiply a plant you already know is thriving; seed is possible but less predictable when you want uniform coverage quickly.
Start seed with patience
The RHS recommends sowing seed indoors in spring or autumn, and gardening references also describe direct sowing. Use a shallow tray or small pots of fine, free-draining seed mix. Distribute the small seed thinly over a level surface, press it gently into contact, and follow the seed supplier’s instructions on covering; avoid burying it deeply. Keep the medium evenly moist, not saturated, in bright light and moderate temperatures.
When seedlings are large enough to handle, pot them individually or thin them so they are not crowded. Harden them off gradually before planting outdoors, then transplant in a mild period and keep the root zone from drying while they establish. Germination timing can vary by seed lot and conditions, so do not discard a tray because it has not emerged on a fixed schedule.
For a project where you need fast, even cover, do not rely on direct seeding alone. A 1983 cultivation study reported an unsuccessful initial sowing before the researchers established material through vegetative propagation; that is one experiment rather than a universal verdict on seed, but it reinforces the practical difference between “can be grown from seed” and “will reliably fill this bed on a deadline.” The study on reproduction and cultivation of Herniaria glabra is useful context, while the RHS profile supports indoor spring or autumn sowing.
Divide a mature mat for faster results
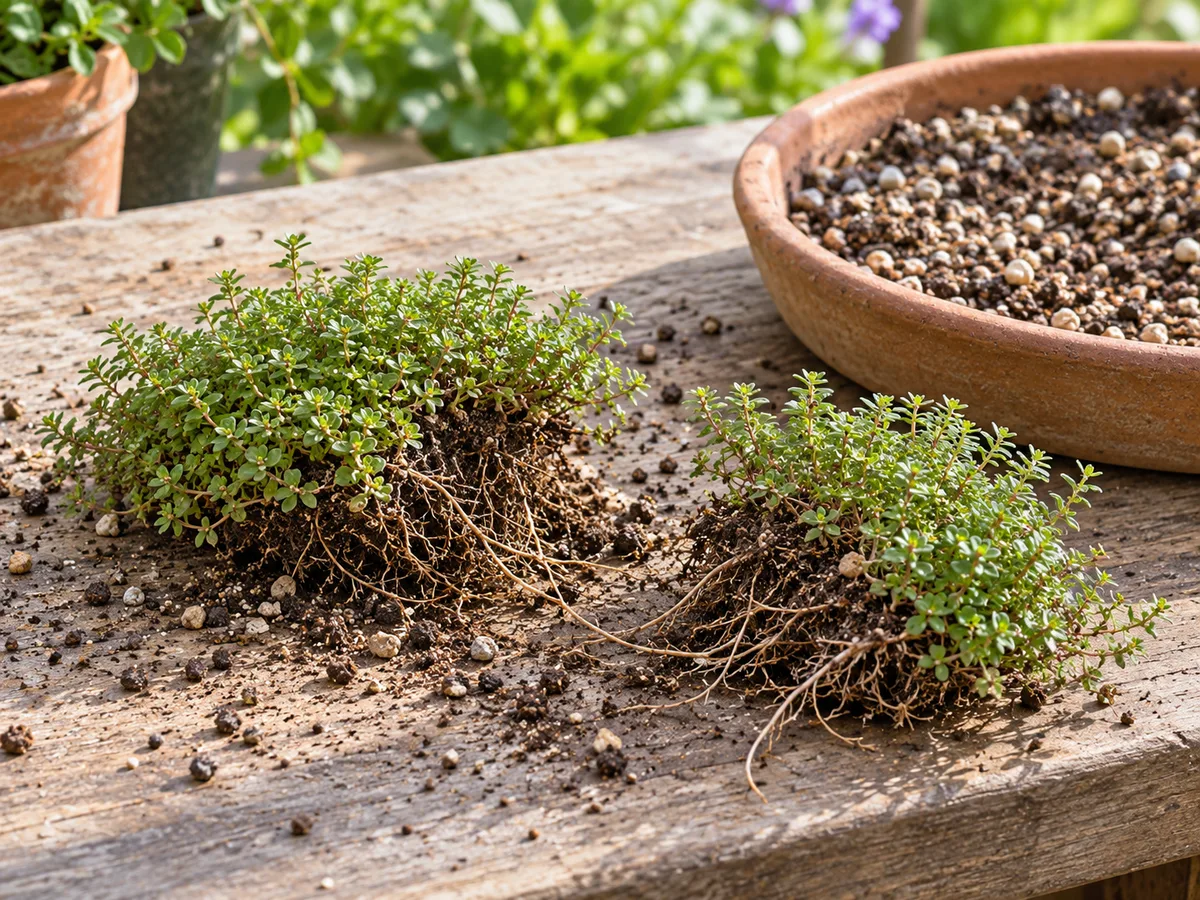
Division is straightforward once a mat has several rooted sections. Work in spring or early autumn when temperatures are mild and the soil will not dry immediately. Water the parent patch the day before if it is dry, lift a small section with a hand fork or trowel, and separate it into pieces that each have both leafy stems and roots. Discard dead, brown, or mushy parts rather than replanting them.
Set the divisions at the same depth in prepared soil and firm the ground around them. Water them in thoroughly, then keep the soil lightly moist while new growth begins; do not leave the divisions sitting in standing water. Mark the new pieces so you do not weed them out before they spread. The planting and spacing advice for plugs applies to divisions too, and the mat can be trimmed later if it crosses an edge you want to keep clear.
Prune Lightly and Keep the Mat in Bounds
Routine pruning is minimal. In spring, remove dead or damaged foliage and clip back a few stems if they have crept into a path or over a neighboring plant. A light trim can restore a tidy edge, but shearing the whole patch hard is rarely needed and may leave it looking bare until fresh shoots fill in.
The mat spreads gradually, and the RHS’s mature spread range is broad enough that you should plan for an edge, not assume it will stop at a stone. Check around pavers, container rims, and the front of a border once or twice during the growing season. Lift or trim the sections you do not want and replant healthy rooted pieces where more cover is useful.
If the plant self-seeds in your garden, pull unwanted seedlings while they are small and before they establish among slow-growing neighbors. Kew lists H. glabra as introduced in parts of North America, so gardeners in those regions should check local invasive-plant lists and extension advice. A plant’s presence in an introduced-area database is not enough to label it invasive, but monitoring spread is sensible.
Grow Rupturewort in a Container
Choose a wide pot with drainage holes and enough depth for a stable root zone; a shallow bowl that dries within hours will need more frequent attention than an in-ground planting. Use a free-draining potting mix with some grit or perlite, and do not leave the pot standing in a saucer of water. Rupturewort can trail over the rim, so leave room for stems without letting them hang where they will be crushed.
Containers heat up and dry out faster than garden soil in summer, then expose roots to colder temperatures in winter. Check moisture by touch rather than assuming that a drought-tolerant plant needs no water in a pot. In cold climates, move the container to a sheltered position or insulate it during severe freezes; the plant’s in-ground hardiness does not automatically protect roots in a small exposed pot.
A pot also gives you a useful trial if you are unsure about local heat, humidity, or winter performance. If foliage remains healthy and the plant spreads at a manageable pace, you can use divisions to establish a larger patch later. If the pot stays wet or the center thins out, adjust drainage before applying fertilizer.
Diagnose Yellowing, Bare Patches, and Leaf Spots
Start with where the symptoms appear and what the soil has been doing. Yellow or limp growth at the center of a mat after rainy weather points to a different problem than scattered bronze leaves at the start of winter. Look under the foliage, check the soil a few inches down, and smell the root zone if a section lifts easily; these observations are more useful than treating every color change as a nutrient shortage.
Separate normal winter color from stress
Rupturewort can turn bronze in winter, and some foliage may thin in climates with colder or wetter seasons. If the stems remain firm and new green growth appears as conditions warm, remove only dead material and wait before disturbing the roots. A whole mat turning yellow during active growth deserves a closer look.
When yellowing appears, check these conditions in order:
- Wet soil: Is water still pooled after rain, or is the crown buried under mulch? Improve drainage and pause irrigation until the upper root zone begins to dry.
- Dry root ball: Is the soil several inches down powder-dry during warm weather? Give the plant a slow soak and recheck the next day.
- Root or crown damage: Are stems mushy, dark, or unpleasant-smelling? Remove the affected section and correct the wet condition before replanting healthy divisions.
- Soil chemistry: If growth stays weak after moisture and drainage are corrected, use a soil test before changing pH. RHS lists rupturewort for acid, neutral, and alkaline soils, so automatic acidification is not a sound first response.
Fix wet-root problems before spraying
Brown, gray, or reddish spots can have several causes, including prolonged leaf wetness, injury, and fungal disease. Remove badly affected foliage, clear debris from the mat, improve airflow, and water at soil level when possible. The RHS rates the species as generally pest- and disease-free, so a few spots do not automatically justify a fungicide.
If spots keep spreading despite drier conditions, photograph the leaves and seek a local extension diagnosis before using a product. Fungicides differ by disease and label, and they cannot repair roots already damaged by standing water. If a patch has collapsed, remove the soft material, let the area drain, and replant sound divisions only after the cause is addressed.
Use Rupturewort as Groundcover, Not Heavy-Duty Turf
Rupturewort is at its best as a low living carpet in a small rock garden, along a gravel edge, in an alpine-style bed, or between stepping stones where feet land mostly on the stones. The small leaves form a neat surface and need little mowing, but slow establishment means young plants still need weeding and attention. The mat can make a bare patch more attractive; it will not suppress every established perennial weed.
Some gardening articles promote Herniaria as a lawn substitute and note that it can tolerate occasional walking. That is a narrower use than a family lawn for running, ball games, pets, or frequent shortcuts. Groundcovers generally handle repeated traffic less reliably than turf; University of Delaware Cooperative Extension recommends considering traffic tolerance when choosing them and notes that plantings can direct walkers away from beds. Use rupturewort where the walking load is light and intermittent; retain a path or choose a more traffic-tolerant surface where people cross every day.
It is also not the right pick for deep shade, a soggy low spot, or an area that must become uniformly covered within a few weeks. If those are your conditions, solve the site problem first or select a locally suitable alternative. A small trial patch lets you see how its winter color, growth rate, and spread behave before you commit to a whole yard.
Conclusion
Rupturewort is a useful low groundcover when you match it to sun or partial shade and, above all, free-draining soil. Plant plugs or divisions at a spacing you can afford, water consistently while they root, then cut back to occasional deep watering and light edge trimming as the mat matures. Choose another plant or a path where shade, standing water, fast coverage, or heavy foot traffic would make rupturewort struggle.



