How to Identify and Remove Creeping Bellflower
Creeping bellflower returns from root fragments and seed. Confirm the ID, choose a removal method by patch size, dispose of roots, and monitor new shoots.
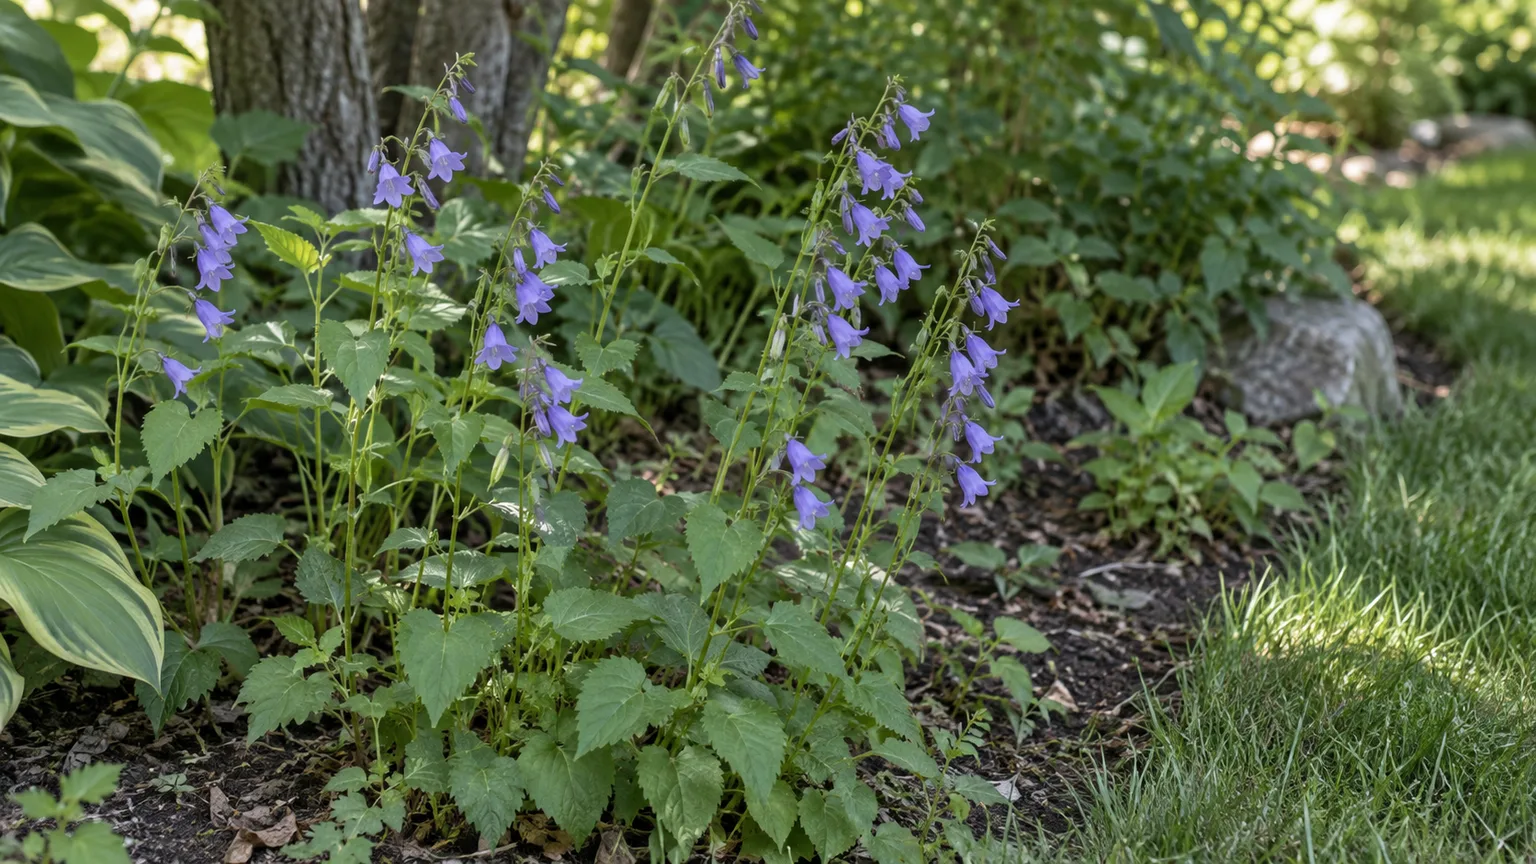
Creeping bellflower (Campanula rapunculoides) is a perennial with nodding blue-violet flowers, heart-shaped lower leaves, and underground rhizomes that can send up new shoots after a careless pull. If you are deciding whether to remove it, confirm the species first; several native bellflowers look similar, and local weed status differs by region.
Once identified, treat the job as two problems: stop seed from escaping and remove or exhaust the underground growth. A single plant in open soil may be dug out; a patch threaded through prized perennials may need staged removal or containment. Expect follow-up rather than a one-afternoon cure.
Check the Plant Before You Pull It
Look at the whole plant, not just the flower color. Creeping bellflower is usually an upright or leaning perennial about 1 to 3 feet tall, though height varies with growing conditions. Its coarsely toothed leaves change shape as they climb the stem, while its blue to purple flowers hang along a long flowering spike. The species profile from the Invasive Plant Atlas of the United States describes its heart-shaped basal leaves, narrower upper leaves, rhizomes, tubers, and high potential seed production.
Do not begin by tugging on the first stem you see. In a garden border, a wrong identification can cost you a native wildflower or a planted Campanula; in a lawn, you may mistake a harmless volunteer for the weed you intend to control. If the plant is not flowering and you are unsure, photograph the leaves, stems, and growth habit, then compare them with a reliable regional plant key or ask a local extension office before digging.
Trace Leaf Changes Along the Stem
The lowest leaves are the easiest clue: they are typically heart-shaped, with a pointed tip, rough surface, coarse teeth, and a long leaf stalk. Higher on the stem, leaves become smaller, narrower, and shorter-stalked until the uppermost leaves are nearly stalkless. This progression is more useful than the color of a young plant, which can be difficult to distinguish from nearby foliage.
Check how leaves attach and how the plant stands. Creeping bellflower has alternate leaves on a stiff, often rough or slightly hairy stem; the stem may lean under a long row of flowers. A plant with smooth, rounded basal leaves, a threadlike stalk, or flowers arranged quite differently deserves a second look before you remove it.
If you find a patch before bloom, note whether multiple upright stems emerge from a shared area and whether new shoots appear beyond the visible clump. The underground parts may connect plants that look separate aboveground. Mark the patch edge with a few stakes or take a photo from the same angle so you can see whether the area is expanding during the season.
Use the Flowers as Confirmation
When it blooms, look for blue, blue-violet, or purple bells that nod downward and hang along one side of an elongated raceme. Each flower has five pointed lobes, and the flowering spike can extend through much of the plant’s height. A mature plant may form dry capsules after flowering; do not wait for those capsules to mature if removal is your goal.
Flowers make identification easier, but they are also a deadline. If seed capsules are already developing, first cut the flowering stems low enough to capture the capsules, place them directly in a bag, and then work on the roots. Avoid shaking or dragging seed-bearing stems through the garden, and do not assume that cutting the flower stalks has controlled the underground plant.
The Invasive Plant Atlas reports that a plant can produce as many as 15,000 seeds. That is a maximum potential figure, not a forecast for every plant in every garden, but it explains why preventing seed set belongs in the plan even when digging is the main control method.
Separate It From Native Bellflowers
Not every bellflower is creeping bellflower. Harebell (Campanula rotundifolia) is a native relative in many regions, and American bellflower (Campanula americana) is another native Campanula; both may be worth preserving. Regional distribution matters, so check your state or provincial flora rather than relying on a broad claim that every Campanula with a blue flower is invasive.
Compare several traits together. Creeping bellflower forms upright stems with coarse, toothed, heart-shaped lower leaves and a long raceme of nodding bells. Harebell is usually much more delicate and slender, with narrow foliage; American bellflower has different foliage and a different flower display. Native bluebells in the genus Mertensia have broader leaves and trumpet-like flowers in tighter, nodding clusters, according to Minnesota Wildflowers’ field profile.
The word “invasive” also does not mean the same thing in every local rulebook. The Invasive Plant Atlas lists invasive-plant records and state listings, while the Washington State Noxious Weed Control Board places creeping bellflower on a monitor list rather than classifying it there as a listed noxious weed. Before transporting plants or soil, check your local invasive-species or noxious-weed guidance; if your identification is uncertain, wait for confirmation before removing native plants.
Why It Returns After Pulling
Creeping bellflower spreads in two ways. It produces seeds, and it also grows from underground rhizomes and stout, tuber-like roots; those underground parts can travel beyond the stems you see. The Minnesota Wildflowers profile describes both the rhizomes and taproot-like tubers, which is why a shallow tug often removes foliage while leaving the plant’s storage and regrowth system in place.
A root fragment left in the soil may resprout. That does not mean every microscopic piece will become a plant, but it does mean chopping, tilling, or pulling only the top growth can make the job longer by leaving connected or separated pieces behind. Gardeners may see the patch return in a different spot because the surviving underground growth was not directly below the stem they removed.
Seeds create a second clock. Even after roots are dug, seedlings may appear later from capsules that dropped before you arrived or from seed already in the soil. Digging controls the established plant; pulling or hoeing tiny seedlings and preventing fresh seed set reduce the next wave. These are related tasks, but one does not replace the other.
That biology changes the goal from “pull until the bed looks clear” to “remove the crowns and roots you can reach, stop new seed, and inspect the area repeatedly.” The Minnesota State Horticultural Society’s Northern Gardener practical guide describes how shallow feeder roots can break during a pull while tuberous rhizomes remain below. That practical warning is a good reason to slow down and loosen the soil around a plant rather than yank.
Choose a Removal Plan for the Patch
Choose a method by looking at the size of the patch, what else is growing there, and whether you can disturb the soil. The table is a starting point: a patch can change categories when you expose roots or discover that the stems are woven through another plant’s root ball.
| Situation | First choice | Main limitation |
|---|---|---|
| One or two plants in open soil | Dig after the soil is moist and inspect the loosened soil for roots | Root growth may extend beyond the visible stems |
| A few stems among prized perennials | Remove seed-bearing stems first; work in small sections and consider lifting the valuable plant | Root separation can damage the plant you are saving |
| A lawn patch | Dig isolated crowns where practical; repair bare ground and monitor | Digging can leave an uneven patch, and seed can establish in thin turf |
| A broad, dense patch | Remove seed heads, then dig or smother a bounded area and plan to repeat inspections | Either method can take more than one growing season |
| A crack beside paving or a fence | Ask a local extension or weed coordinator whether a targeted labeled treatment is appropriate | Roots may be inaccessible, and nearby plants can be injured |
One or Two Plants
A small, isolated plant is the best candidate for careful digging. Work after rain or water the soil the day before so it releases soil around the roots; avoid digging when the ground is saturated, since wet soil smears and compacts. Take a photo first, clip off any seed-bearing stalks, and place them in a bag before disturbing the plant.
Use a garden fork to loosen a wide plug around the crown, then lift the soil slowly. A narrow spade can help define the edge, but repeated slicing through the roots is not helpful. Set loose soil on a tarp or in a bucket where you can inspect it, and tease out the visible roots and rhizomes before backfilling.
A Mixed Border or Lawn
In a mixed flower bed, work on a manageable section rather than pulling every stem in one pass. If a desirable perennial is entangled with the weed, decide whether it is worth lifting: gently remove the whole root ball, separate the bellflower roots over a tarp, and replant only after you have inspected the plant you want to keep. If the roots cannot be separated without destroying the perennial, a small, clearly bounded removal area may be less damaging than tearing through the bed.
A lawn changes the trade-off. Digging a single crown is usually less risky to nearby plants than spraying, but it leaves bare soil that can invite new seedlings; firm the soil and reseed with a grass suited to your region if that fits the lawn. If the infestation is widespread, ask a local extension service which options are labeled for your turf and the weed, because a treatment meant for one lawn grass or broadleaf weed may damage another.
A Dense Patch
For a dense patch, first stop new seed from leaving the site, then decide whether you can dig in sections or need to cover the area. A single large excavation can disturb many desirable roots and expose far more soil than necessary. Divide the patch into small sections, remove what you can inspect carefully, and treat the outer edge as important: creeping stems and roots may extend past the thickest clump.
If the patch is woven into a mature planting and you cannot safely distinguish all the roots, containment can be more realistic than promising total eradication. Cut seed stalks before capsules mature, remove accessible shoots consistently, and cover only an area that can be kept covered without smothering plants you want. If it has moved beyond your property or into a natural area, ask your local weed authority for management guidance rather than moving soil or plant material elsewhere.
Dig Up the Crown and Rhizomes
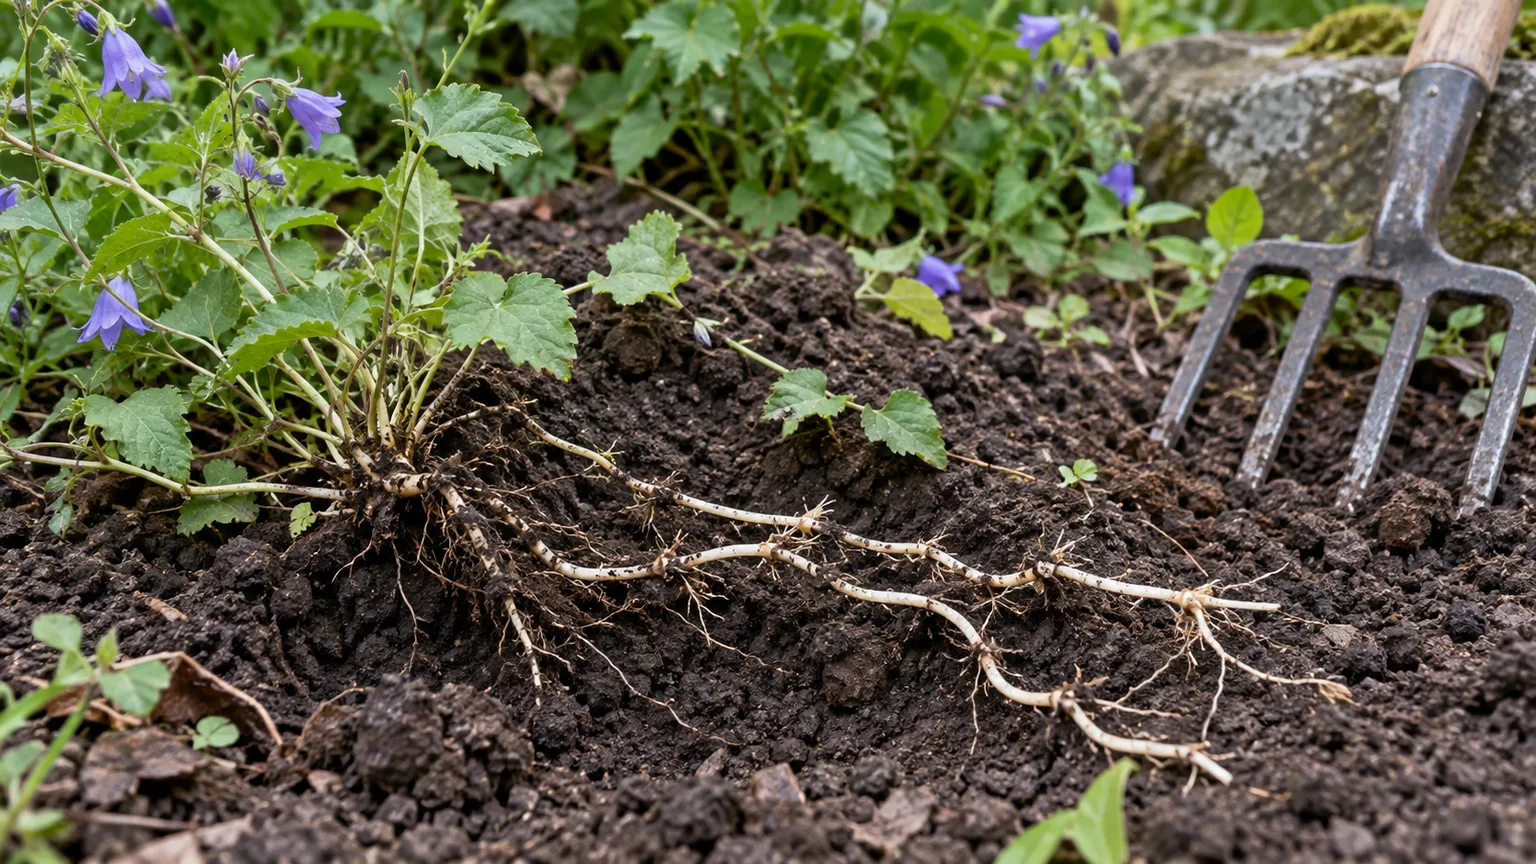
Dig when the soil is moist but workable. Start several inches beyond the outer stems and loosen the soil around and beneath the crown; the visible foliage does not show the full footprint underground. Horticulture sources commonly describe roots several inches deep, with estimates varying by site; a practical starting depth is about 6 to 9 inches, but keep following connected roots if they continue lower or outward. Gardening Know How recommends digging beyond the plant and warns that small leftover root pieces can regrow; Birds & Blooms’ removal guide cites rhizomes and roots that may reach 6 to 9 inches and emphasizes persistence.
Loosen from the outside toward the crown instead of driving the blade straight through the middle. A fork is useful because its tines lift and separate soil; pause whenever you meet a pale, fleshy root rather than chopping through it. Lift the root system in sections, inspect the cavity and surrounding soil, and remove the pieces you can identify without turning the whole bed into loose, fragmented soil.
Put the excavated soil on a tarp or in a wheelbarrow. Break apart clods by hand, remove visible rhizomes and tubers, and examine the edges of the hole where a pale root may run sideways. Do not return root pieces to the bed, and do not move suspect soil to another garden; if the soil volume is too large to inspect, ask your local extension or invasive-plant office about disposal options.
If the plant is growing through another perennial, you may need to choose between saving the host plant and removing every connected root. Lift the host plant only when you can do so without injuring it beyond recovery, then comb through its roots over a tarp. Rinse roots only if needed to expose the weed; keep the plant temporarily in a clean pot or isolated location and inspect for regrowth before putting it back into a clean bed.
After backfilling, mark the spot and check it through the growing season. A new shoot is not proof the first dig was useless; it is a signal to loosen that area again while the sprout is small. The goal is to keep removing regrowth before it restores a full canopy or makes new seed.
Smother a Small, Clear Patch
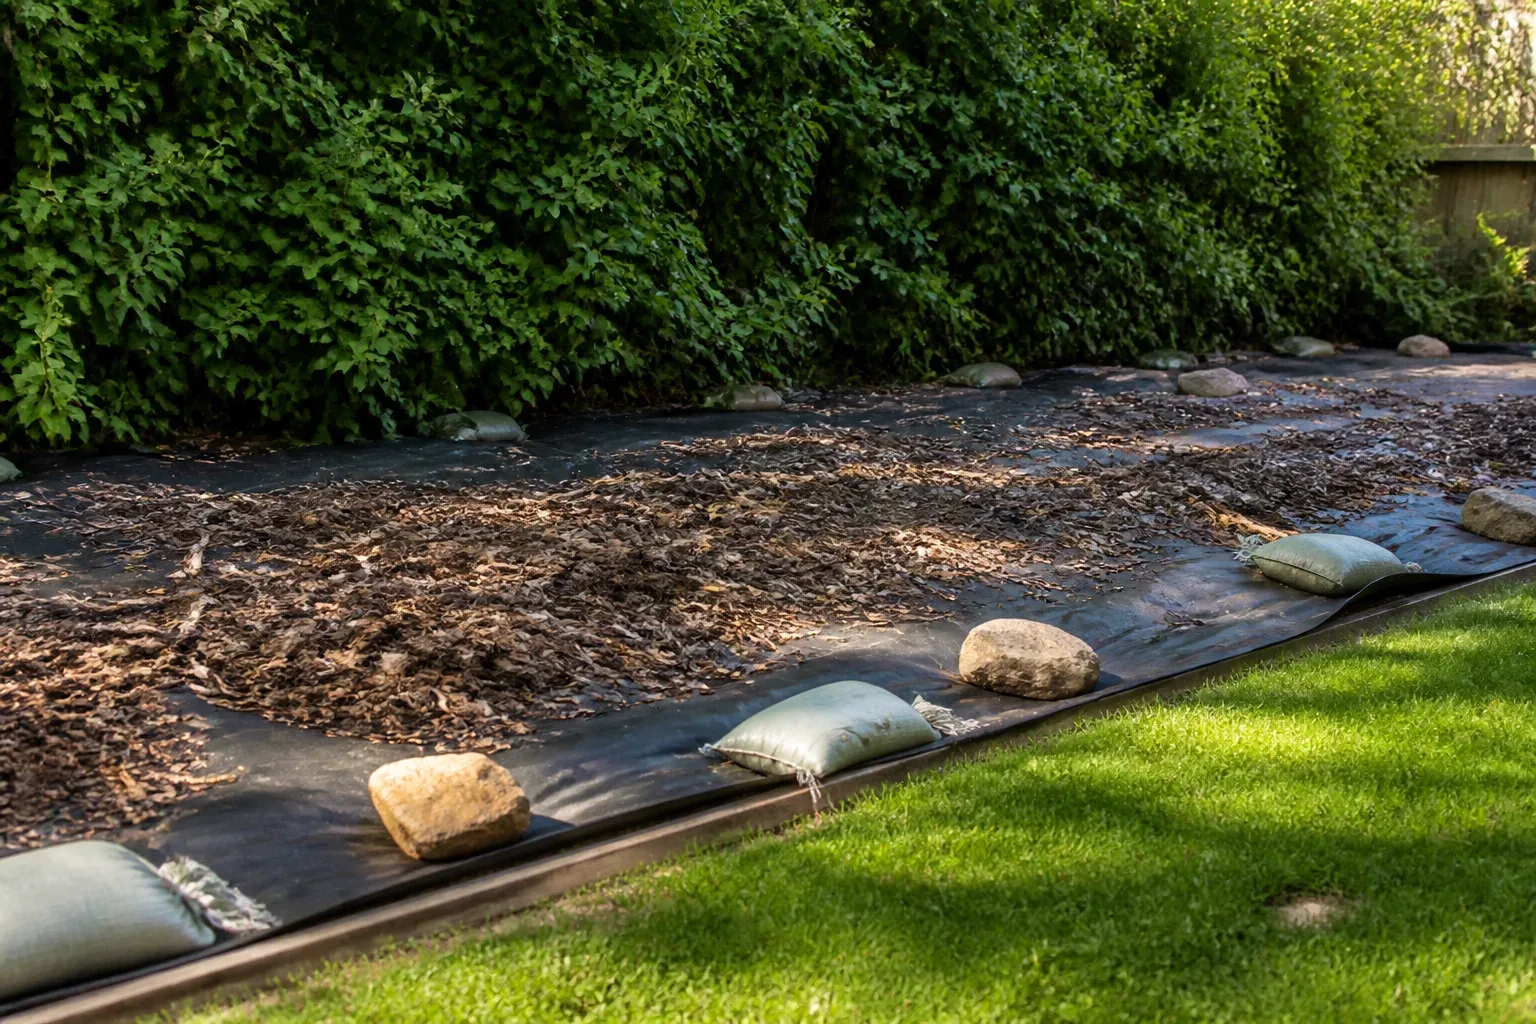
Smothering is most practical when creeping bellflower occupies a defined area with no prized plants under the cover. Cut and bag seed-bearing stalks first, then mow or clip the remaining foliage low without scattering mature capsules. Lay an opaque barrier over the full patch with generous overlap beyond the outermost shoots, and weigh the edges so light cannot reach gaps; cardboard, layered newspaper, or an opaque tarp are common garden materials described in Gardening Know How’s control guide.
The method blocks light from the leaves, but it does not guarantee that every rhizome or tuber is dead. Roots can remain dormant or push growth beyond the covered edge, so inspect the perimeter and the site after you remove the cover. If you choose this method, plan to keep the cover in place through an extended growing period and revisit the patch in later seasons rather than treating one winter under a tarp as proof of success.
A cover also suppresses the plants and seedlings you may want. Do not smother a mixed border without first moving desirable plants or selecting a smaller section. Where a tarp would be unsafe or unattractive, sheet mulch or a different opaque cover may fit better, but avoid piling loose soil or mulch over flowers that already contain seed.
Solarization is a different technique that relies on heat under clear plastic, and it is not a shortcut to promise for a rhizomatous perennial. If you try a covering method, judge it by new shoots at the edges and during follow-up, not by how tidy the covered bed looks. Dig and remove any regrowth you can reach.
Contain Seed Before It Spreads
If you see buds or flowers, cut the stalks before seed capsules dry and split. Hold a bag under the cut stem or place each stalk directly into a bag so capsules do not shake over the soil. If the plant has already dropped seed, removal still helps prevent another crop, but seedlings may appear later and need to be pulled while small.
Mowing can reduce seed production in a lawn or large patch when done before capsules mature, but it does not remove the crown, rhizomes, or tubers. A mower can also fling seed-bearing pieces or carry seeds on debris if you mow after seed has formed. Clean the mower deck and tools after work, and bag the flowering material rather than leaving it where it can dry or fall back into the bed.
Deadheading is containment, not eradication. It is worth doing promptly when you cannot dig immediately, especially if the plant is intertwined with another perennial or you are still confirming its identity. Return later to remove the roots or continue a deliberate suppression plan.
Use Herbicide Only When a Local Label Supports It
Herbicide is a possible option where digging is impractical, such as a plant emerging through a narrow paving crack or a large patch with inaccessible roots. It is not a universal shortcut: the same spray can injure neighboring ornamentals, and a visible top-growth dieback does not prove that underground growth is gone. In Washington, the Noxious Weed Control Board’s species page directs residents to the regional weed-management handbook or county coordinator rather than giving a single product recipe.
Start by asking your county extension service or noxious weed coordinator whether chemical control is appropriate for your location and site. Before applying anything, check that the product label covers the target weed and the place where you plan to use it, and follow all directions for application, protective equipment, weather, re-entry, and disposal. If the product does not clearly fit the site, do not improvise by increasing the concentration or mixing it with another product.
A lawn requires a different choice from a flower bed or a crack in pavement. A nonselective product can injure grass and desirable broadleaf plants it touches; a selective lawn product may not list creeping bellflower or the exact turf species you grow. Avoid blanket applications in a mixed border, and do not spray flowering plants that bees may be visiting. If a locally recommended treatment is used, keep monitoring and remove any new shoots rather than assuming one application finished the job.
Dispose of Roots and Clean Tools
Do not put creeping bellflower roots, rhizomes, tubers, or seed-bearing stems in a casual home compost pile. A compost heap that does not fully kill viable roots or seeds can return them to the garden when the compost is spread. Bag plant material securely and follow your municipality’s invasive-plant disposal rules; when local guidance is unclear, ask whether sealed trash is preferred and avoid transporting loose soil to another site.
Keep excavated soil contained while you inspect it. Shake or brush dirt from tools over the tarp, not in a new bed, then clean off clinging root pieces and soil before moving the tools. If you removed plants with mature seed capsules, clean shoes and equipment before walking through an uninfested part of the yard.
Do not burn plant waste unless your local authority explicitly allows it and conditions are safe; burning is not necessary for a homeowner to contain the material. Disposal rules vary, so do not assume that every municipal compost facility accepts this weed just because it takes ordinary yard waste. When in doubt, keep the material sealed until you confirm the local rule.
Monitor Regrowth Through the Next Seasons
After the first removal, revisit the patch regularly while shoots are small. Check the original hole, the outer edge, nearby mulch, lawn margins, and places where disturbed soil was moved. A simple dated photo or map helps you tell whether the patch is shrinking, spreading, or producing new seedlings.
Remove each new shoot with as much root as practical, and cut off any flower stalk before capsules mature. If sprouts keep appearing in the same area, widen the next excavation or extend the cover beyond the previous edge. If new plants appear in a ring outside the original patch, consider whether connected rhizomes or dropped seed explain the pattern before choosing a wider treatment.
Expect more than one season of attention. The persistent root system and seed production mean a cleared surface is not the same as a cleared site; Northern Gardener and the horticultural experts quoted by Birds & Blooms both emphasize continued effort rather than a one-time pull. Keep the soil covered with desirable plants or mulch after removal if that suits the bed, but do not let new cover hide shoots you need to find.
Conclusion
Identify creeping bellflower from the combination of coarse, heart-shaped lower leaves, narrower upper leaves, and nodding blue-violet bells along a long raceme. Before removal, check that it is not a native lookalike and look up local invasive-plant rules; then stop seed from escaping and choose a method that fits the patch and the plants you want to keep.
For an isolated plant, dig a generous plug around the crown and inspect the soil for pale rhizomes and tuber-like roots. For a larger or entangled patch, work in sections or smother a clearly bounded area, dispose of roots and seed heads according to local guidance, and keep checking for new shoots through subsequent growing seasons.



