Termites vs. Ants: How to Tell the Difference
Termites vs. ants look similar, but their waists, antennae, wings, tunnels, and damage differ. Learn what to check and what to do next.
The 30-second identification rule
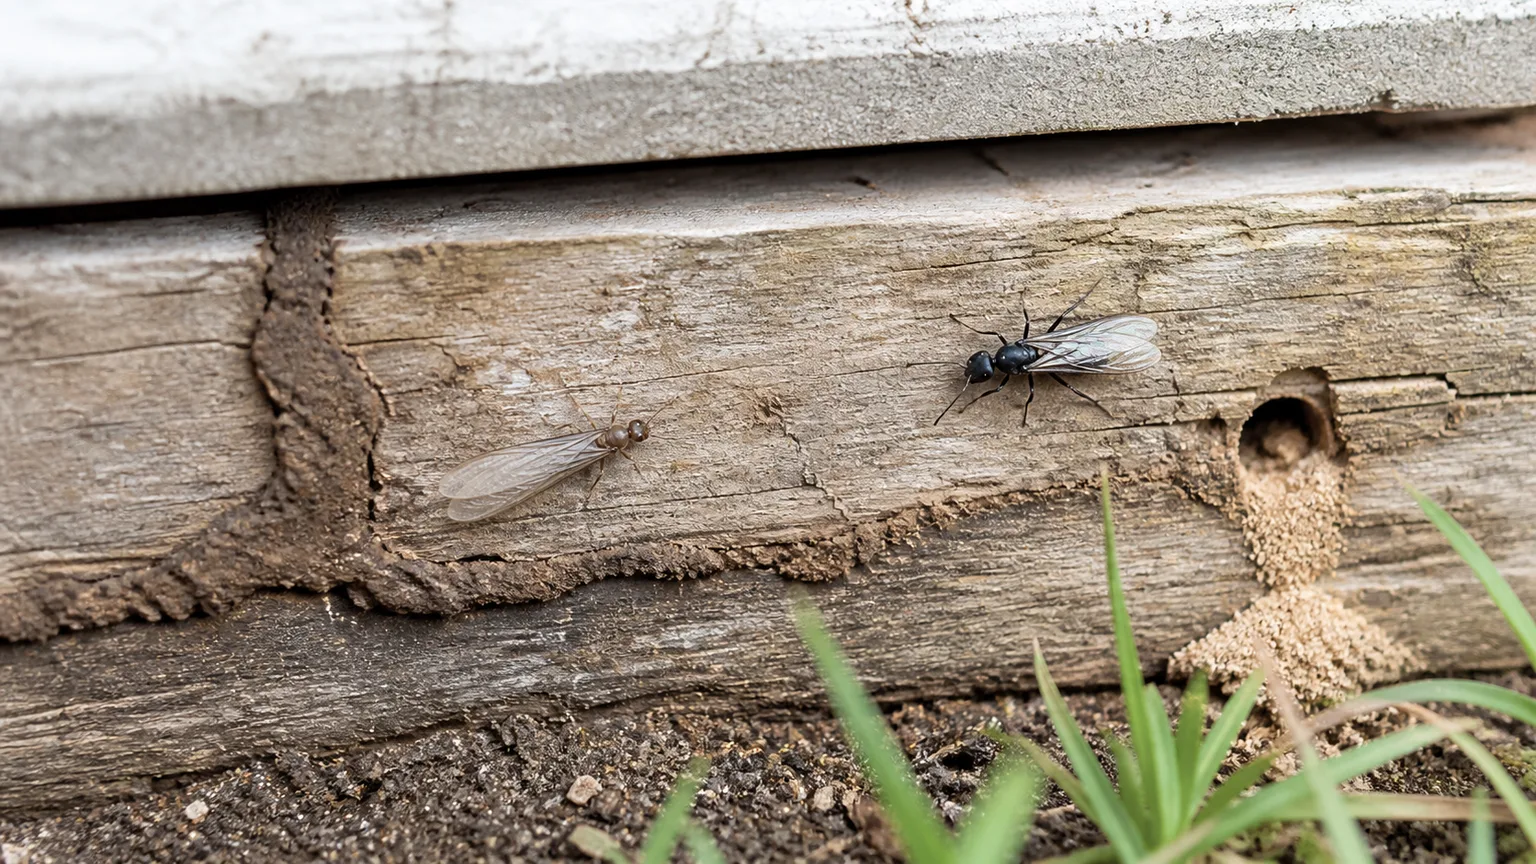
If you see a winged insect near a window, a trail of insects along a baseboard, or suspicious wood damage, start with the insect—not the treatment aisle. A termite has a broad, fairly straight-sided body, straight antennae, and four wings that are similar in length. An ant, including a carpenter ant, has a visibly pinched waist, elbowed antennae, and front wings that are longer than the hind wings.
Those three checks are the most useful first pass. Kansas State University Extension describes the same waist, antenna, and wing differences for separating winged ants from termite swarmers, but identification should not end with one blurry photograph or one shed wing. (Kansas State University Extension)
If you can, capture a few insects or shed wings in a small sealed container, photograph the wood and surrounding area, and note where and when you found them. Then use the evidence below to decide whether you are looking at a food-foraging ant, a carpenter-ant nest, a termite colony, or an unrelated insect that only resembles one of them.
Use body shape first
The simplest way to compare a termite and an ant is to look at the narrow section between the middle and rear parts of the body. You may need a phone macro setting or a magnifying glass, but you do not need to know the species to make this first distinction.
The waist, antennae, and wings
Waist: A carpenter ant has a narrow, unmistakable waist. The abdomen looks attached through a small segment, giving the insect the classic ant silhouette. A termite’s body is more uniform from front to back, without that sharp constriction.
Antennae: Ant antennae bend at an elbow. Termite antennae are straight and often look like a short row of beads. This clue is especially useful when color is misleading or the insect has already lost its wings.
Wings: A winged termite has four wings that are roughly equal in length and extend well beyond the body. A winged ant has unequal pairs: the front wings are longer, while the hind wings are shorter. After either insect swarms, wings may be discarded, so the wing rule works best on a live or intact winged insect.
Color can support the identification, but it should not lead it. Termite workers are often pale and soft-bodied, while termite swarmers can be dark; carpenter ants range from black to reddish or bicolored. Size is also a weak clue because carpenter-ant colonies can contain workers of different sizes, and termite species differ by region and caste.
A quick termites-versus-ants comparison
| Clue | Termites | Carpenter ants |
|---|---|---|
| Body | Broad and fairly straight-sided; no pinched waist | Narrow waist between the middle and rear body sections |
| Antennae | Straight or gently beaded | Elbowed or bent |
| Wings | Four wings similar in length and shape | Front wings longer than hind wings |
| Common worker appearance | Pale, creamy, soft-bodied, and wingless | Usually dark or reddish, with a harder-looking body |
| Relationship with wood | Feed on cellulose and can consume the wood they occupy | Excavate galleries for nests; wood is not their food |
| Gallery appearance | Often rough, ragged, and associated with soil or mud | Usually smoother and cleaner, with wood debris pushed out |
| Strong supporting evidence | Shelter tubes, mud-filled joints, softened or hollow wood | Coarse frass, ants following trails, and moisture-damaged wood |
| First response | Preserve evidence and arrange a structural inspection | Find the nest and correct the moisture or wood condition that supports it |
The table is a decision aid, not a substitute for species-level identification. A homeowner may see a harmless outdoor ant, a termite swarmer that came from outside, or damage caused by rot rather than insects. Treat the pattern as a set of probabilities: several matching clues are more meaningful than one isolated feature.
Read the damage evidence
An insect tells you what may be present now. Wood damage tells you what the colony has been doing and where to look next. Do not pry open large areas or drill into finished walls just to confirm a hunch; first photograph the evidence, check for moisture, and look for the least destructive inspection point.
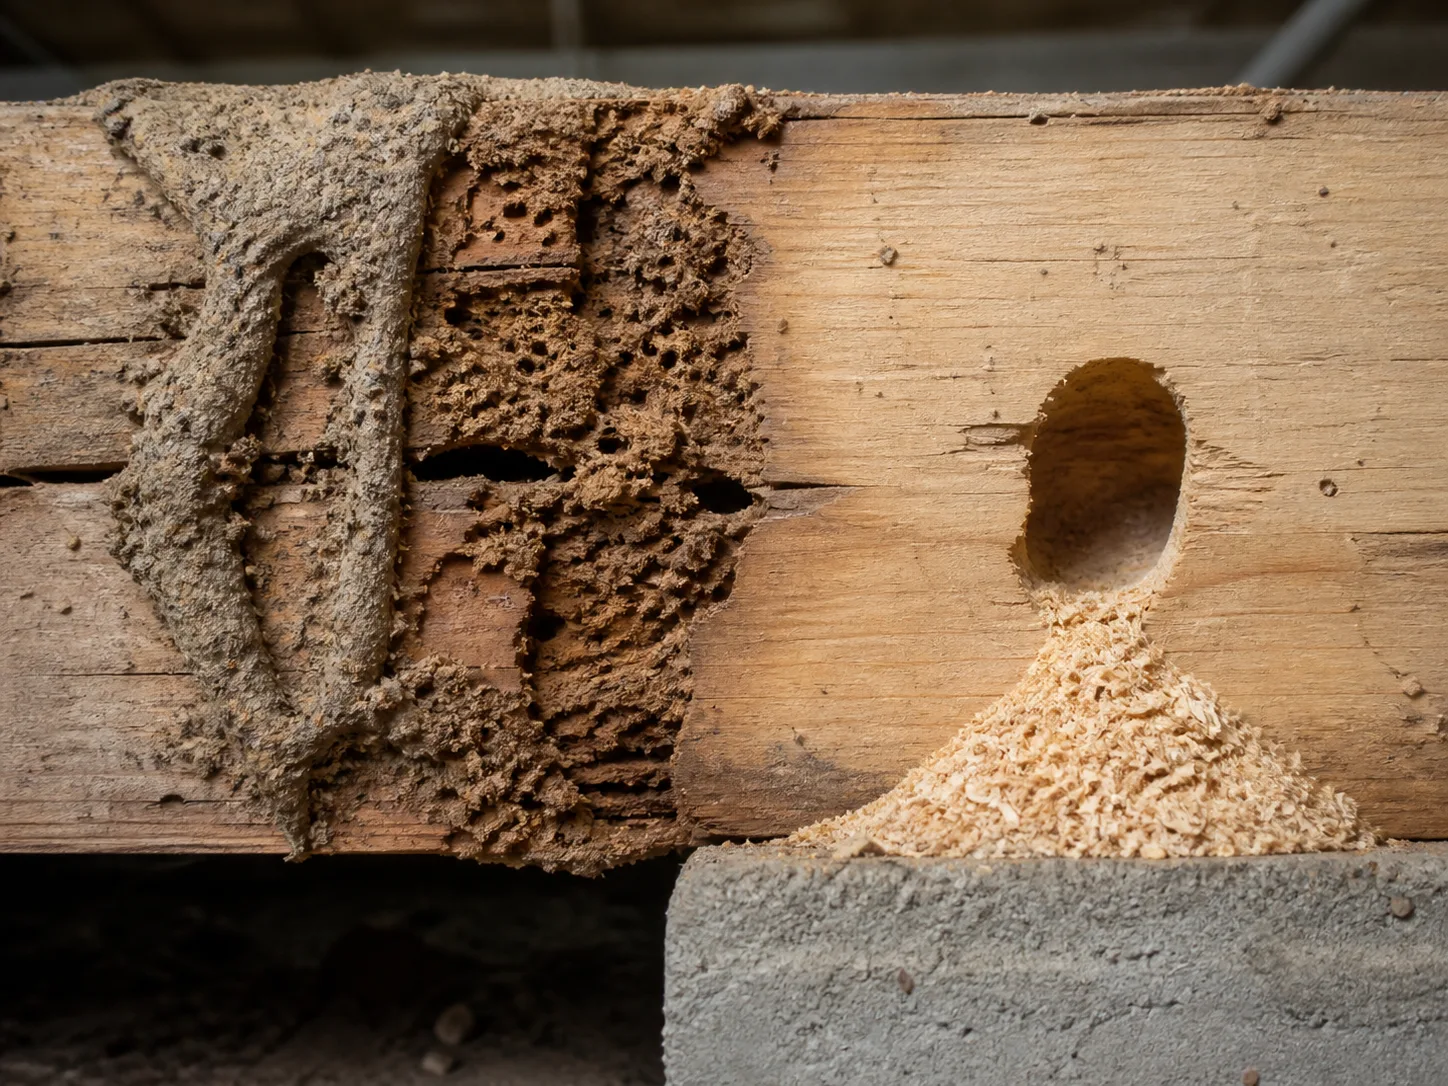
Rough, soil-associated galleries and a smooth opening with coarse wood debris point to different kinds of wood use.
Termite damage clues
Subterranean termites commonly connect soil and wood with shelter tubes made from soil and other colony materials. Look along foundation walls, piers, crawl-space supports, floor joists, plumbing penetrations, and places where wood approaches soil. A tube that is broken but recently repaired can be more informative than an old, dry line that has been abandoned.
Inside wood, termite galleries often follow the grain and may contain soil or mud. The surface can look blistered, thin, or water-damaged even when the exterior paint still appears intact. Soft spots, hollow-sounding trim, sagging or bubbling finishes, and mud-filled cracks deserve attention, but none of them proves termites by itself; prolonged moisture and decay can produce similar weakness.
Kansas State University Extension notes that suspected termite-damaged wood may be soft enough to puncture easily near a foundation. Do not use an ice pick on finished cabinetry, flooring, wiring, or an area that could conceal plumbing. If probing is appropriate, use a small, accessible piece of already damaged or exposed wood and stop when the result is clear.
Carpenter-ant damage clues
Carpenter ants chew galleries into wood to create nest chambers; they do not digest the wood as food. Their galleries are typically smooth and clean compared with termite galleries, and the ants push out coarse wood shavings and other debris called frass. You may find it beneath a hole, on a windowsill, at the base of a tree, or below a hollow door frame.
The moisture pattern matters. University of Georgia Cooperative Extension explains that carpenter ants commonly use damp or moisture-damaged wood because it is easier to excavate and supports the colony. Inspect around roof leaks, plumbing, chimneys, skylights, sinks, tubs, dishwashers, crawl spaces, wet insulation, and poorly draining gutters. (University of Georgia Cooperative Extension)
Carpenter-ant frass looks more like coarse sawdust or tiny wood splinters than soil. It can include insect fragments, so a pile is a useful clue but not a complete diagnosis. Dry, sound wood can still be excavated, and other wood-boring insects can leave debris, which is why the insect trail and nest location matter.
Do not confuse a swarm with an infestation
Both ants and termites produce winged reproductive insects during warm-season conditions. A sudden cloud of winged insects near a window is alarming, but swarmers are the colony’s reproductive stage; the sighting alone does not tell you whether the parent colony is inside the structure.
A few winged ants that appear around an open door or porch light may have entered by chance. A large number emerging from a wall, ceiling, window frame, baseboard gap, or floor joint is more concerning. Termite swarmers found indoors, especially together with piles of equal-length shed wings or shelter tubes, justify a prompt inspection even if the insects are gone.
Do not assume every pile of shed wings is a termite sign. Ant queens also shed their wings after mating, and a swarm can occur outdoors without establishing a nest inside your home. Match the wings to the insect if possible, then inspect the exact place where the swarm appeared rather than treating every room as equally affected.
Follow a practical inspection sequence
The goal of a first inspection is not to prove the entire house is pest-free. It is to preserve evidence, find the likely source, and identify any moisture or wood condition that makes recurrence more likely.
Inspect inside without spreading the problem
Start where you saw the insect or debris. Photograph the baseboard, window track, trim joint, floor edge, ceiling seam, or wall penetration before vacuuming. If the insects are still active, collect a few in a sealed container or place clear tape over a single specimen for identification; do not crush every sample before you know what it is.
Then work outward in a slow circle. Check window and door frames, utility penetrations, plumbing cabinets, attic or crawl-space access points, fireplaces, and areas below bathrooms or kitchens. Look for active trails, frass, shed wings, mud, damp wood, soft spots, and paint that is lifting from the surface.
Vacuuming visible swarmers is reasonable for cleanup, but it is not colony control. Empty the vacuum outdoors, keep the sample if identification is still needed, and do not spray a random contact insecticide over a wall, outlet, or enclosed void. Liquid pesticide in an electrical or concealed space can create damage and safety risks, and killing visible workers may remove the trail that would have led you to the nest.
Inspect outside for moisture and entry routes
Walk the perimeter in daylight. Check the foundation, sill plates, porch supports, steps, fence connections, wood piles, stumps, mulch, dense vegetation, downspouts, gutters, and places where siding or trim meets soil. At night, a flashlight can help reveal carpenter-ant trails up tree trunks or along the edge of a building; UGA Extension specifically recommends following trails because the nest—not the individual forager—is the control target.
Look for a continuous shelter tube from soil to wood, but do not interpret an old broken tube as proof of current activity. If the evidence is ambiguous, mark the location with a removable piece of tape and photograph it again after a few days. A professional can compare fresh activity with old damage more reliably than a one-time glance.
What to do if it is carpenter ants
Carpenter-ant control works best as a nest-finding problem. Follow active ants in the evening, inspect likely moisture-damaged wood, and look for frass at the nest opening. A colony may have a primary nest outdoors and satellite nests indoors, so killing the ants you see at a countertop may only remove foragers while leaving the source untouched.
Correct the condition that made the site useful: repair leaks, dry crawl spaces, replace rotten wood, clear clogged gutters, and trim branches that touch the roof or siding. UGA Extension notes that carpenter ants can travel long distances along established trails, so an indoor trail does not automatically mean the nest is inside the wall.
If the nest is accessible and the product label allows the use, a targeted ant bait or a treatment directed at the nest may be appropriate. Do not use a termite product simply because the ants are near wood, and do not spray over bait or contaminate a trail before the ants can carry bait back to the colony. Use only products registered for the site and pest in your location, follow the label, and keep treatments away from children, pets, food, and pollinators.
Garden ants are a separate decision from structural carpenter ants. The Royal Horticultural Society notes that many garden ants are important predators and generally cause little direct plant damage, although they may protect aphids for honeydew or disturb soil around roots. If the ants are only in a bed and there is no structural wood evidence, identify the garden problem before reaching for an insecticide. (Royal Horticultural Society)
What to do if it is termites
Treat suspected termites as a structural assessment, not a spot-spray project. A termite colony can remain hidden in soil, wall voids, framing, or other inaccessible areas, and visible swarmers are only one caste. A professional inspection should determine the termite type, active areas, moisture conditions, entry points, and whether damage is old, current, or caused by something else.
Do not expect termites to disappear because the swarm ended. The flying insects may die or leave, but the colony can remain. Do not seal a visible tube before it has been photographed and assessed, and do not cover mud-filled joints or damaged trim with fresh paint as a first response.
Treatment options vary by species, construction, soil, climate, and local regulations. Common professional approaches include a continuous liquid soil treatment, monitored baiting, localized treatment for accessible wood, or a combination. Southern Living’s reporting with Clemson extension expertise emphasizes that correct placement, concentration, and distribution matter; an inexpensive barrier that leaves gaps is not equivalent to a complete treatment. (Southern Living)
Get the written inspection findings and ask what evidence supports the recommendation. A sound plan should explain the target termite type, areas treated, follow-up schedule, warranty or monitoring terms, and what repairs or moisture corrections remain the homeowner’s responsibility.
Prevention that helps either problem
Prevention is less about an insect-proof house than about removing the conditions that let insects enter, nest, and remain unnoticed. No checklist guarantees that termites or ants will never appear, but it makes the structure less attractive and the first signs easier to see.
Moisture, wood, and foundation habits
- Repair roof, plumbing, gutter, chimney, and appliance leaks promptly.
- Keep crawl spaces ventilated and address standing water or condensation.
- Replace decayed wood rather than covering it with paint or trim.
- Keep firewood, cardboard, stumps, and scrap lumber away from the foundation and off damp soil.
- Maintain visible clearance between soil, mulch, siding, and structural wood where local construction allows it.
- Direct downspouts away from the house and keep gutters clear.
Moisture control is especially important for carpenter ants because damp wood is easier to excavate. It also reduces the decay that can hide termite damage and makes foundation inspections easier. Southern Living recommends removing wood-to-ground contact, improving crawl-space conditions, limiting moisture-retaining clutter near the foundation, and keeping vegetation from blocking the inspection line.
Entry points and monitoring
Seal practical gaps around doors, windows, vents, and utility penetrations after you have inspected them. Sealing an entry route can reduce foraging ants, but it does not eliminate a nest inside a wall or a termite colony below the structure. Think of caulk as exclusion, not eradication.
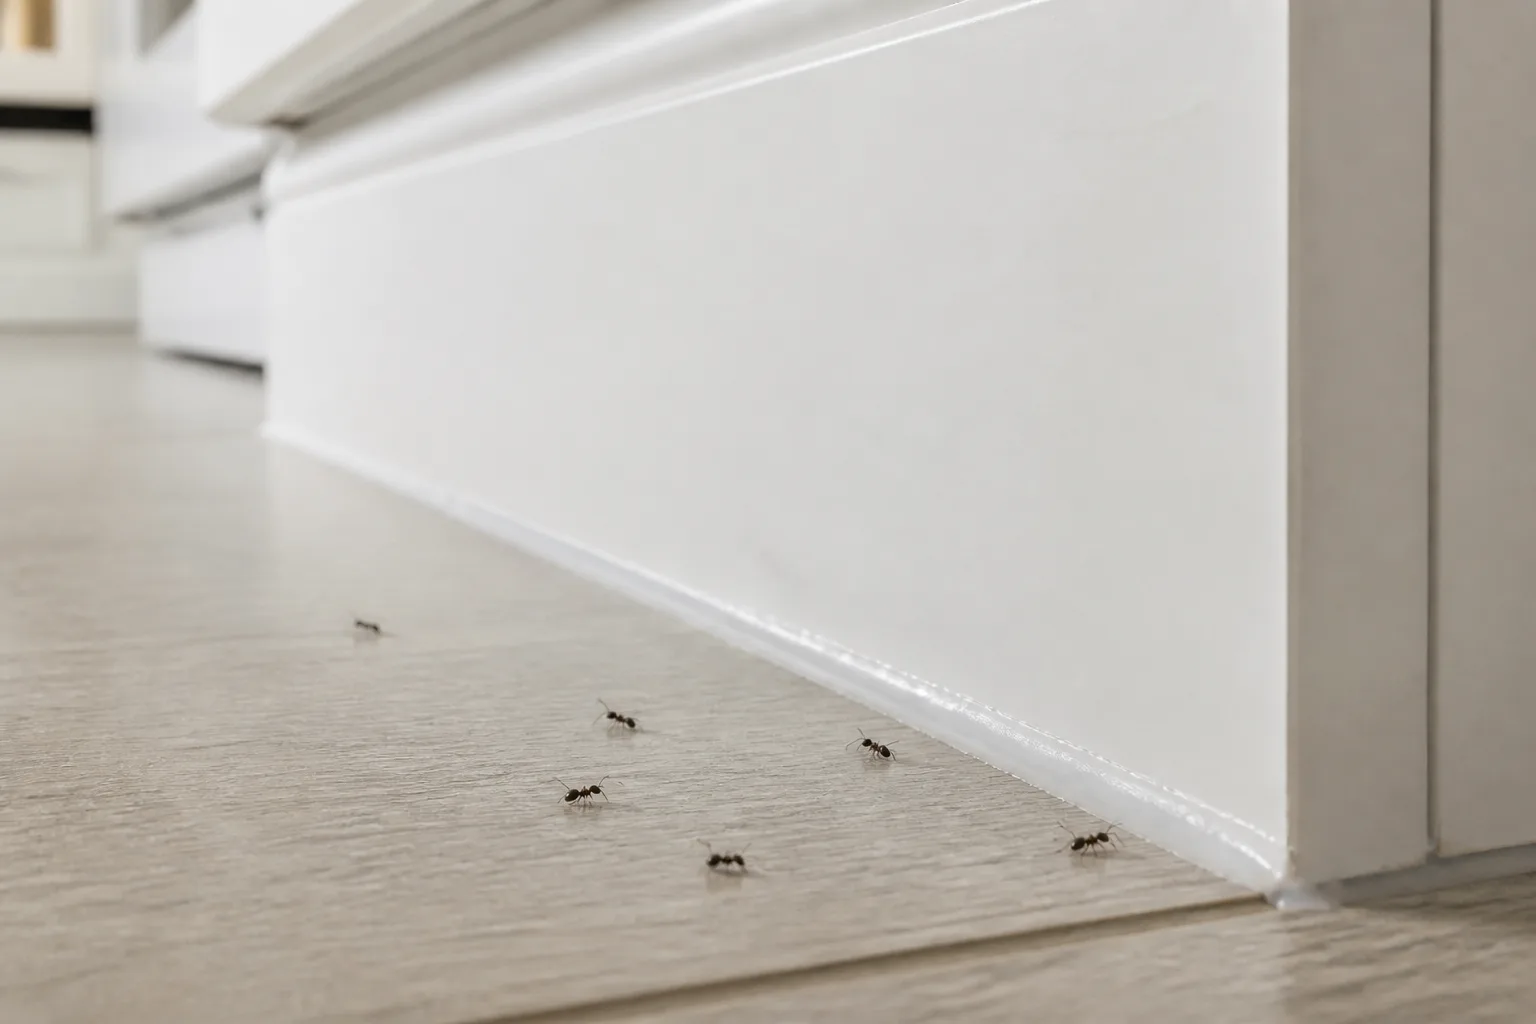
Sealing an entry route can reduce ant traffic, but it is only one part of control when a nest is nearby.
Keep a simple record of recurring trails, wing sightings, repairs, and photographs. A date and location turn a vague “we saw bugs last summer” into useful evidence. If you use bait, do not place it where rain, irrigation, pets, or children can reach it, and do not assume a bait station intended for ants is a termite monitoring system.
Common identification mistakes
“Every winged insect indoors is a termite.” No. Winged ants, wasps, and other insects can enter through windows or lights. Check the waist, antennae, and wings before deciding what you found.
“The insect is pale, so it must be a termite.” Color changes with caste, species, lighting, and age. Anatomy and damage are stronger clues than color alone.
“Carpenter ants eat houses like termites.” Carpenter ants remove wood to build galleries; termites feed on cellulose. Carpenter ants can still contribute to serious damage when moisture and a large colony persist, but the biology and treatment plan differ.
“A single mud mark proves active termites.” Old shelter tubes, water stains, and soil deposits can remain after activity stops. Look for fresh repair, live insects, new debris, and conditions that support activity.
“Spraying the visible insects solves the problem.” Contact sprays can reduce what you see while leaving the nest untouched. For carpenter ants, find the nest; for termites, assess and protect the structure.
“A clean, dry home cannot have either pest.” Moisture and clutter increase risk, but pests can enter sound structures through soil contact, utility gaps, branches, transported wood, or nearby colonies. Prevention lowers risk; it does not replace inspection when evidence appears.
When to call a pest professional
Arrange professional help when termites are suspected, when winged insects emerge from inside a wall or ceiling, when you find shelter tubes or mud-filled wood joints, when structural wood is soft or hollow, or when damage is spreading. A professional is also warranted when you cannot safely reach the likely nest, when the building is historic or difficult to treat, or when repeated DIY control has not changed the evidence.
Choose someone who will inspect before recommending a blanket treatment. Ask for the pest identification, photographs or locations of evidence, the proposed treatment area, product names and labels, follow-up schedule, and any moisture or repair work that must happen first. Your local cooperative extension office can also help with identification and regional pest-management contacts.
Keep treatment and repair decisions separate. A termite treatment may stop or monitor the insects, but it does not rebuild a weakened joist, replace water-damaged trim, or correct a grading problem. Conversely, replacing a visibly damaged board without checking nearby soil, joints, and concealed spaces can leave the source in place. Ask the inspector to explain what is biological control, what is structural repair, and what is moisture correction so you can sequence the work instead of assuming one invoice solves all three.
If the evidence only shows a few outdoor ants in a garden, slow down. The RHS notes that ants can be part of a healthy garden food web, so the right response may be to manage aphids, brush away a troublesome mound, or leave the colony alone rather than treat the whole bed.
Conclusion
To tell termites from carpenter ants, begin with three physical checks: termites have no pinched waist, their antennae are straight, and their four wings are similar in length. Carpenter ants have a narrow waist, elbowed antennae, and unequal wing pairs. Then confirm the pattern with the wood: termite evidence often includes rough soil- or mud-associated galleries and shelter tubes, while carpenter ants leave smoother galleries and coarse frass, commonly in damp or damaged wood.
Preserve a sample, photograph the evidence, and inspect before treating. Carpenter-ant problems call for nest-finding and moisture correction; suspected termites call for a structural inspection and a treatment plan designed for the termite type and building. That short pause between seeing an insect and choosing a pesticide is what prevents a wrong diagnosis from becoming a bigger home problem.



