Why Green Bean Leaves Turn Yellow—and What to Do
Yellow leaves on green beans can signal stress—or normal aging. Read the leaf pattern, check the soil, and avoid unnecessary fertilizer or sprays.
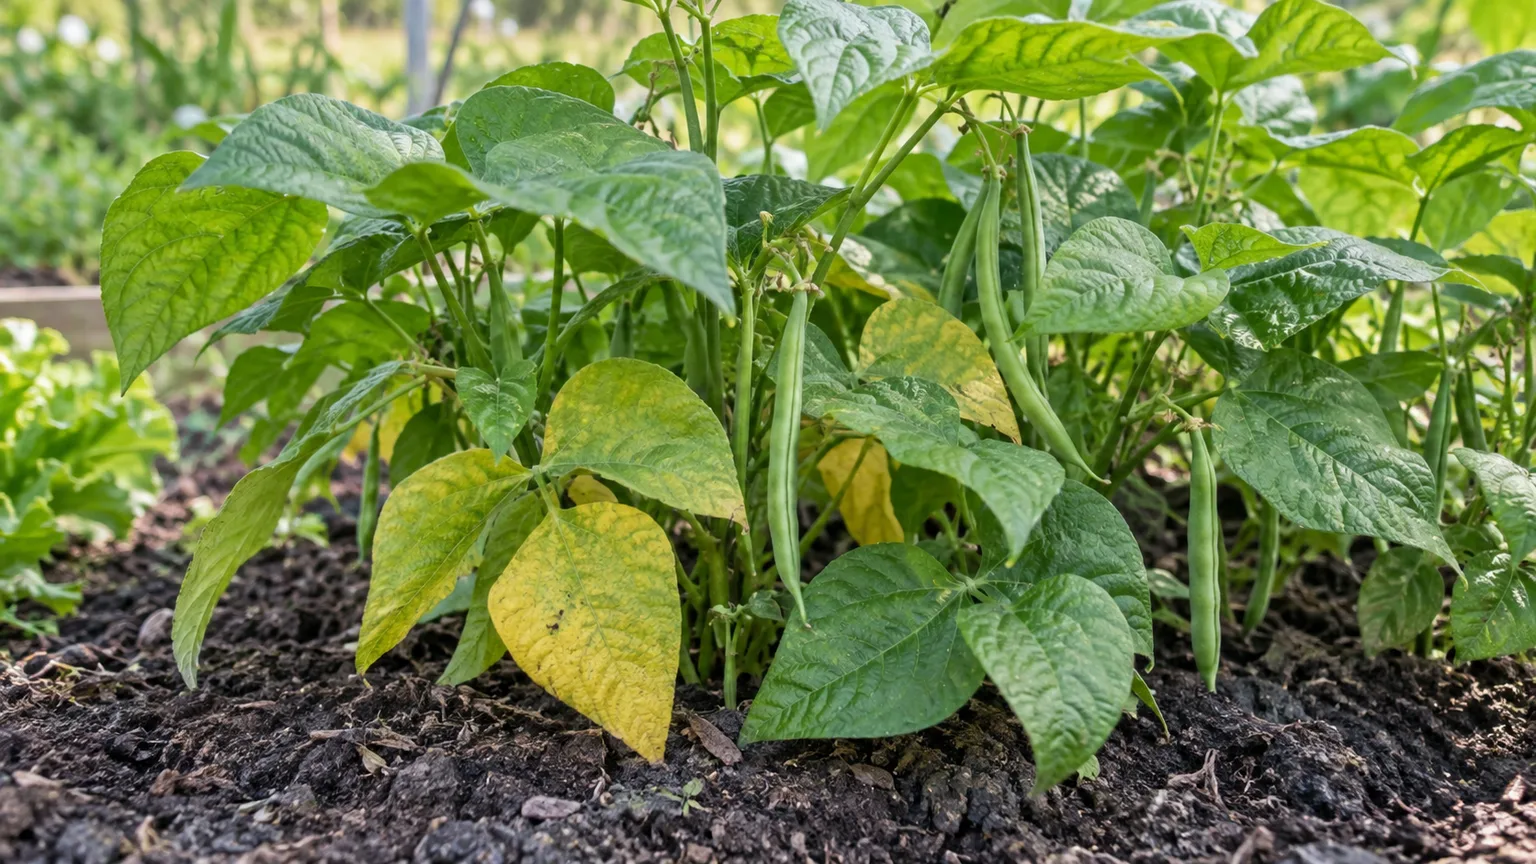
A few yellow leaves on a green bean plant do not automatically mean the crop is failing. The useful clues are which leaves changed first, whether the yellowing is spreading, and what else you can see: wet or dusty-dry soil, stippling, holes, leaf spots, curled growth, or damaged pods.
Before adding fertilizer or spraying, check the plant and its root zone. Yellowing can follow a simple water imbalance, but similar color changes also occur with nutrient stress, pests, diseases, shade, cold, and ordinary end-of-season decline. A short inspection often narrows the possibilities enough to choose a low-risk first move.
Read the pattern before you treat the plant
Look at the whole plant from top to bottom, then compare it with nearby beans. Note whether the leaves are uniformly pale or mottled, whether the veins remain green, whether spots have edges or halos, and whether yellowing appears on one branch, the oldest leaves, or new growth. Also look at flowers and pods: a plant that is still flowering and setting clean pods is in a different situation from one that is stunted and dropping leaves.
Yellow color is a symptom, not a diagnosis. A single yellow leaflet can be damaged or old; several plants with the same pattern may point to a shared condition such as soggy soil, poor light, or a problem in the bed. Take a phone photo today and compare it in two or three days. That simple record helps distinguish a stable blemish from a pattern that is moving up the plant or across the row.
Older lower leaves or new growth?
When the oldest leaves near the soil turn yellow while the growing tips stay green, consider shade, crowding, or natural aging first—especially if the plants are mature and producing pods. Lower leaves receive less light as a bush bean fills out or a pole bean climbs, and the plant may shed some older foliage. If only one or two bottom leaves are affected, the rest of the plant looks vigorous, and the yellowing is not racing upward, leave the healthy canopy alone and keep monitoring.
Yellowing that begins on new leaves or progresses rapidly through the plant deserves closer attention. It can accompany root stress, a serious nutrient imbalance, a virus, or another disease. Yellow between green veins, overall pale foliage, and stunted growth can be consistent with nutrient trouble, but those signs overlap with other causes. The UC IPM bean guide explains that deficiencies and toxicities can create disease-like symptoms and that patterns vary with the nutrient, cultivar, and environment. Use the pattern to decide what to investigate, not to select a fertilizer by guesswork.
One plant, one row, or the whole bed?
A single struggling plant among healthy neighbors raises the odds of localized root damage, a plant-specific pest, or an infection. Yellowing across a row or bed makes shared conditions more likely: irrigation coverage, a drainage problem, shade from a new obstruction, or soil that was amended unevenly. Compare the affected plants with a healthy one growing under the same sun. If the same symptom is showing on beans in a separate container or bed, look for a weather or care change that affects all of them.
The pattern is not proof. Aphids and other insects can move between plants, and soil-borne disease can appear in patches. Still, mapping where symptoms occur is more useful than treating every plant in the garden the same way.
Water stress: soggy roots or dry soil
Both too little water and too much can leave bean foliage yellow. Dry soil limits the plant’s ability to take up and move water and nutrients; saturated soil pushes air out of the root zone, leaving roots short of oxygen and more vulnerable to decay. Wilting can happen in either case, so the surface appearance of the leaves alone will not tell you which one you have.
Check the soil before changing your watering. If it is dry a couple of inches below the surface, give the root zone a slow, deep soak rather than a quick splash that only wets the top. If it is slick, muddy, or still saturated well after rain or irrigation, pause watering and find out whether runoff is pooling, a container is draining poorly, or a mulch layer is trapping excessive moisture against the stems. Practical bean-growing guidance from Savvy Gardening likewise recommends responding to actual soil moisture instead of following a fixed watering calendar.
Check moisture where the roots are
Push a finger or a narrow trowel into the soil near—but not directly against—the stem. A dry surface can sit above damp soil after rain, while a crusted surface can hide a dry root zone in a raised bed. Feel the soil a few inches down; then check again in a second spot if your garden has different textures or irrigation coverage. Containers dry faster than in-ground beds, and sandy soil generally loses moisture faster than heavier soil.
Water deeply at the soil line when the root zone is dry, then let the surface begin to dry before checking again. There is no dependable “every day” schedule for all beans: rainfall, heat, wind, container size, soil texture, and plant stage all change water demand. Flowering and pod fill are periods when inconsistent moisture can be especially disruptive, so check more often then without keeping the bed waterlogged.
Container beans need the same moisture check, but their smaller volume of mix can dry faster than an in-ground bed. Confirm that the pot has open drainage holes and that water can escape freely; empty a saucer rather than letting the pot sit in runoff. When watering, wet the full root ball until a little drains from the bottom, then let excess drain away. A shallow sprinkle can leave the center of a pot dry even when the surface looks dark.
If the soil is saturated, do not try to solve the problem by adding fertilizer or more mulch. Redirect irrigation, clear blocked drainage, and pull mulch slightly away from the plant crowns until the soil is drying normally. If a plant continues to wilt while the soil remains wet, roots or the lower stem may already be damaged; a healthy new flush may not be possible, so focus on preventing the same conditions from affecting neighboring plants.
Nutrient problems and bean nodulation
Beans can form a partnership with rhizobia bacteria that fix atmospheric nitrogen, but that does not make them immune to poor soil or nutritional problems. Nodulation depends on compatible bacteria and suitable growing conditions, and beans still require other nutrients. Soil pH, root health, drought, waterlogging, and damaged roots can all interfere with nutrient uptake even when a nutrient is present in the soil.
A broad, fairly even paling of older leaves can fit a nitrogen shortage, while yellowing between greener veins may suggest another nutrient issue. Those patterns are clues only. UC IPM describes how both deficiencies and nutrient excesses can produce yellow, bronzed, purplish, or interveinal symptoms, so a visual guess can point in the wrong direction. The same pale foliage can accompany roots that are too wet to function properly.
Why yellow leaves do not automatically mean low nitrogen
Adding a high-nitrogen fertilizer just because the leaves are yellow can push a bean plant toward lush leafy growth at the expense of the crop, and it may fail to address the real problem. If excess fertilizer salts are involved, additional feeding can add stress. First rule out wet or dry soil, root damage, disease, and severe shade. If the pattern still looks nutritional—especially if growth is weak throughout the bed—use a soil test to check pH and nutrient status, then follow the test’s recommendation for beans and your soil type.
Do not lime or acidify a bed based on leaf color alone. Those materials change soil pH and can make nutrients less available if the starting pH was already suitable. Compost can improve soil structure over time, but it is not an instant, precise treatment for a diagnosed deficiency. The most reliable correction is the smallest one supported by a test, applied according to the product label or local extension guidance.
If you submit a soil sample, follow the lab’s directions for where and when to collect it, and tell the lab that beans are the crop. A result from one part of a garden may not represent a different bed or a container mix, so keep samples from clearly different growing areas separate. If leaves are declining quickly while you wait for results, prioritize correcting obvious drainage or watering problems rather than applying a broad fertilizer “just in case.”
Light, crowding, and temperature stress
Green beans crop best in a sunny location, but lower leaves can yellow when a dense canopy shades them. Crowded plants also dry more slowly after rain or overhead watering, and limited airflow can favor some fungal and bacterial problems. If foliage is packed tightly, remove weeds and avoid adding new plants into the row; do not strip a healthy bean plant bare in an attempt to improve air circulation.
A lack of light is difficult to fix once a large plant is established. If the upper canopy is healthy and only heavily shaded lower leaves are declining, focus on spacing and site selection for the next planting. Savvy Gardening’s bean guide notes that lower foliage is often the first to show shading effects. For a future bed, track the sun over the growing season: a spot that is bright in spring may become shaded after trees leaf out.
Beans are warm-season plants. A cold snap, cold wet soil, or an abrupt stretch of heat and drought can slow growth and contribute to pale or damaged foliage. A row cover can buffer cool nights early or late in the season, but it will not cure root rot, a virus, or nutrient imbalance. Remove or vent covers when temperatures rise and make sure they do not press tightly against wet foliage for long periods.
Pests: stippling, webbing, and missing leaf tissue
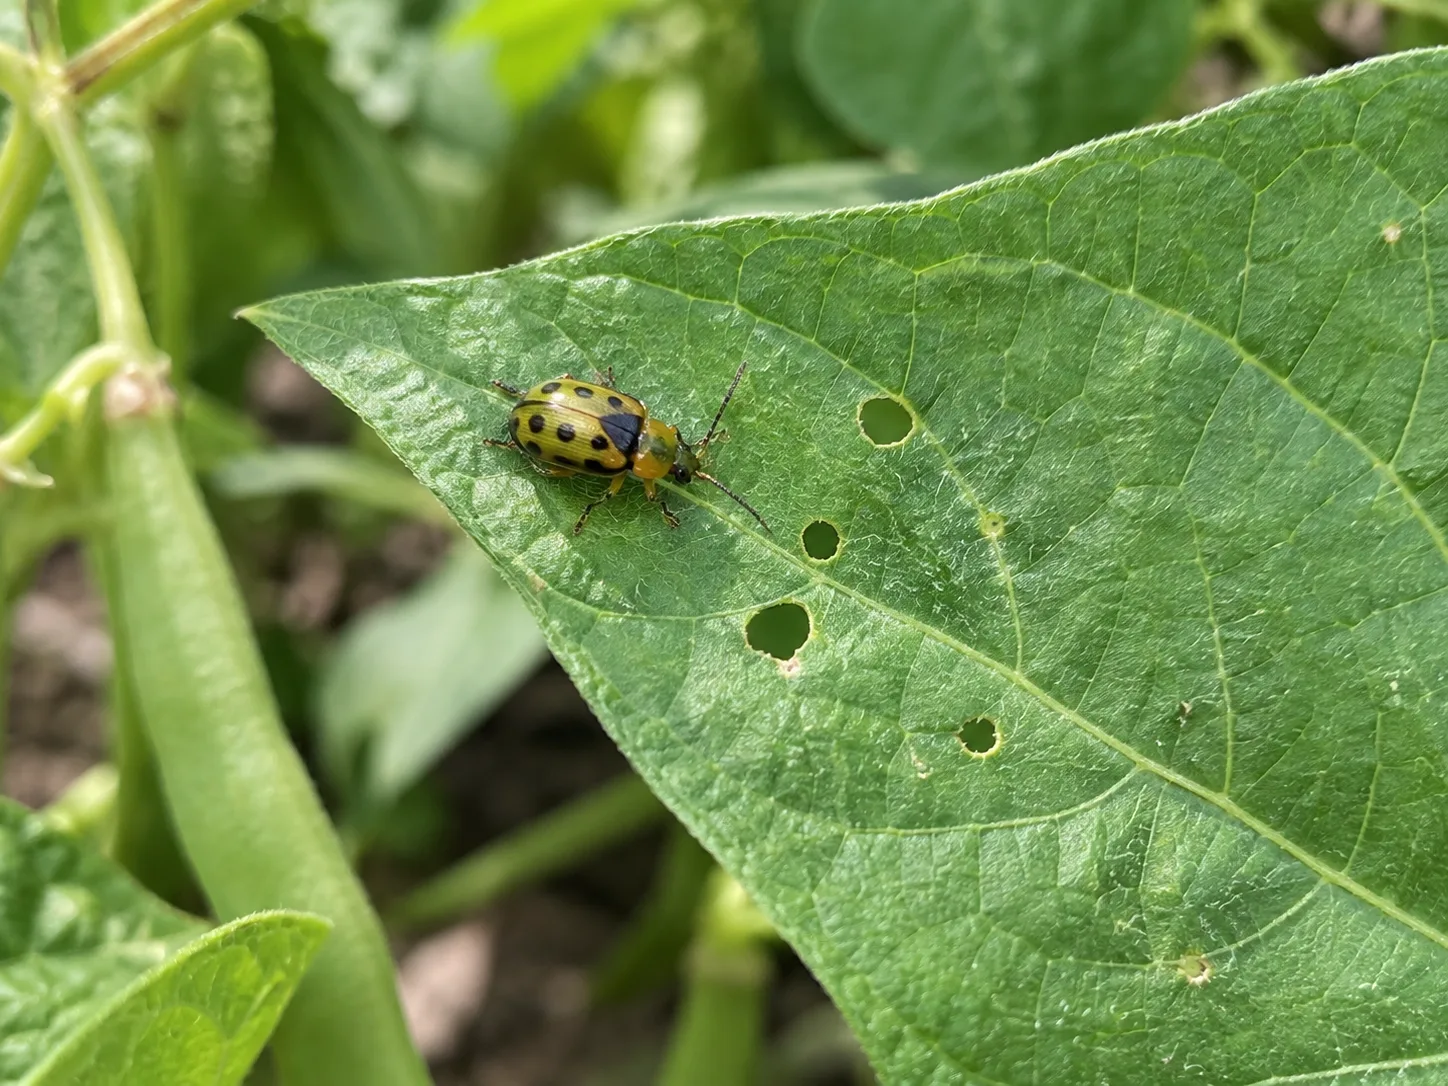
Turn yellowing leaves over and inspect the undersides, veins, and tender tips. Aphids often cluster on new growth and can leave curled or distorted leaves; spider mites are tiny and may produce fine stippling or webbing; thrips can cause silvery or bronzed scarring. Bean leaf beetles and other chewing insects leave holes or a lacy, skeletonized pattern that can make foliage look yellow from a distance. Look for the pest or its feeding signature before treating.
If you find a few large insects or egg clusters, hand-picking can be a measured first step. A firm stream of water may dislodge some small sap-feeders from sturdy plants, but avoid repeatedly soaking foliage when disease is suspected. For any pesticide, including insecticidal soap, check that the product is labeled for the crop and pest, apply exactly as directed, and avoid spraying flowers or active pollinators. A “natural” label does not make an application harmless to beneficial insects.
Pests can also matter because they move pathogens. Washington State University’s Hortsense bean mosaic guidance explains that bean common mosaic and bean yellow mosaic are typically transmitted by aphids, while common mosaic virus can also be seed-transmitted. Aphid control may reduce some transmission opportunities, but it cannot reverse a virus infection already inside a plant. Preventive insect netting is most useful before pests arrive; once plants are flowering, weigh the need for pollinator access before keeping covers in place.
Diseases: halos, mosaic patterns, rust, and mold
Disease becomes more likely when yellowing comes with distinct lesions, leaf distortion, poor growth, or changes on stems and pods. Bacterial blights can make water-soaked or brown lesions; some have conspicuous yellow halos. Bean rust may start as small pale blisters and develop rust-colored pustules, often on the leaf undersides. White mold is more likely in cool, wet, crowded conditions and may produce water-soaked areas or cottony growth on lower stems and foliage. Washington State University’s bean-disease guide describes these distinct signs, which are more informative than yellowing by itself.
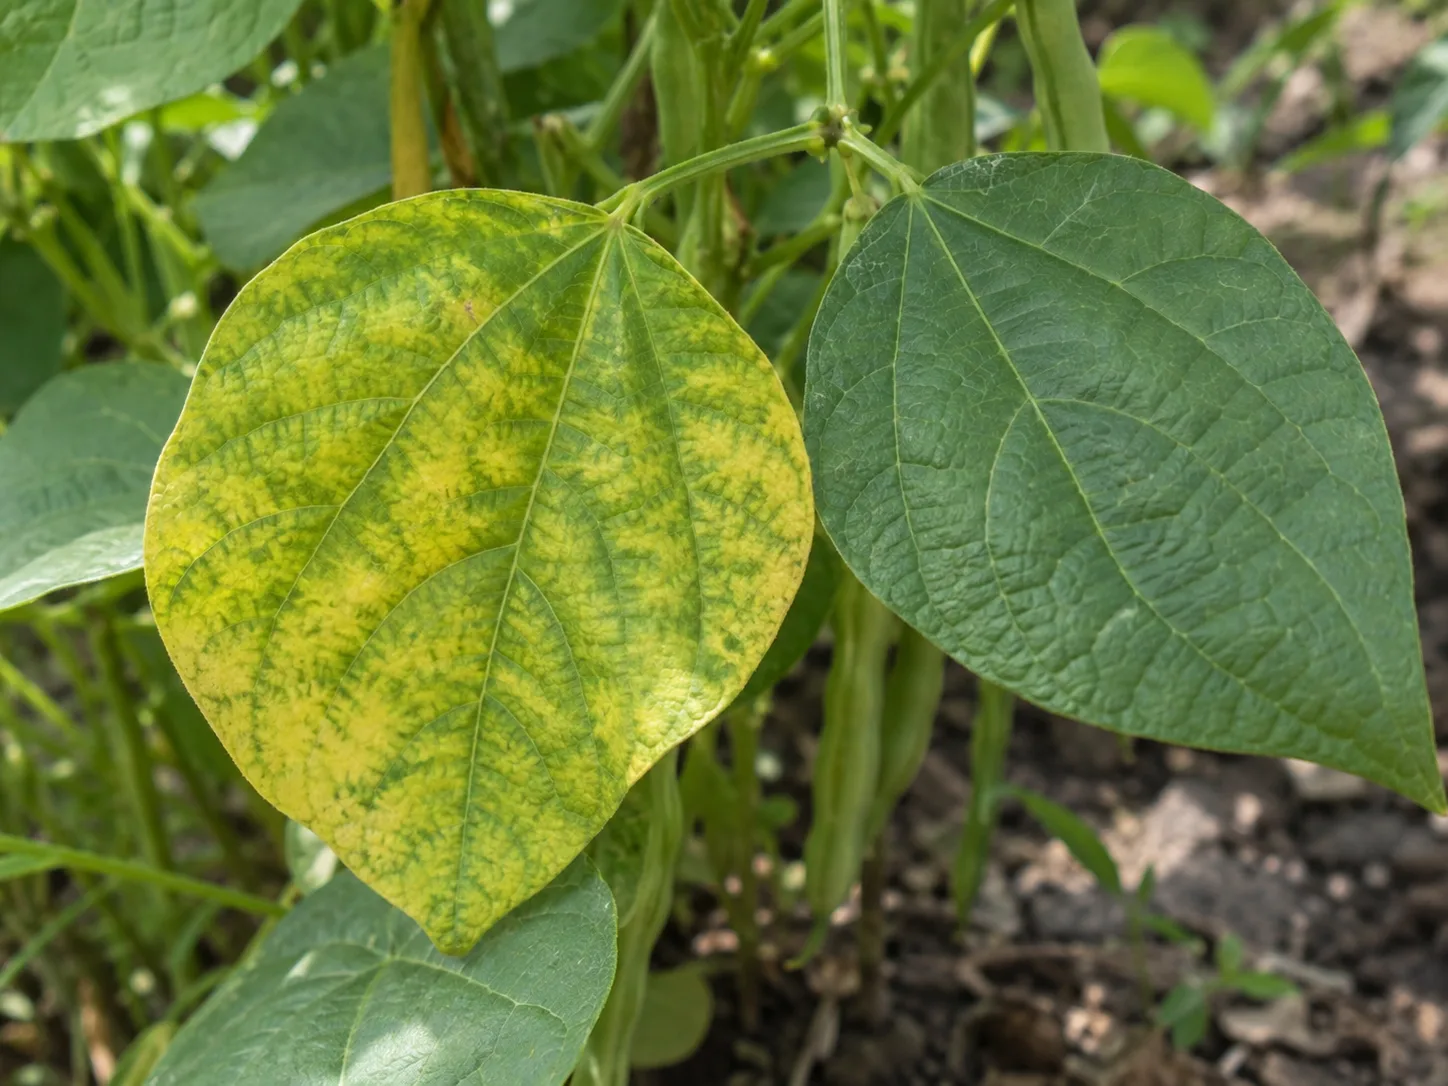
A mosaic virus often produces irregular light-and-dark green or yellow patterning rather than a uniform fade. Leaves may curl, cup, become glossy or brittle, or grow in distorted shapes; pods can be misshapen. WSU’s bean mosaic guidance describes mottling, curling, darkened veins, and deformed pods. A photo comparison can help, but symptoms can overlap, and a confident diagnosis may require local extension or diagnostic-lab help.
What to do when a disease pattern is likely
Avoid handling wet plants, because water and contact can spread some pathogens. Work healthy rows before suspect rows, clean soil and plant debris from tools, and avoid saving seed from plants with suspected virus or bacterial disease. Remove a plant only when the symptom pattern and spread make infection plausible; bag or discard diseased material according to local guidance rather than placing it in a home compost pile that may not heat thoroughly.
There is no spray that cures a virus. Resistant varieties, clean seed, crop rotation, and reducing plant stress are more dependable preventive tools. Rotation is most helpful when you move beans away from an area where disease or root problems have occurred; it cannot guarantee protection if the pathogen arrives on seed, wind-driven rain, insects, or contaminated plant material. Keep a simple note of the bed, variety, date, and symptoms so you can choose a different location or resistant cultivar next season.
Is late-season yellowing normal?
If lower leaves yellow gradually near the end of the crop, the weather is cooling, and the plant has already produced pods, natural aging is a reasonable explanation. The rest of the plant may continue flowering or ripening for a while, but an annual bean does not remain productive indefinitely. Cool nights, declining daylight, and the plant’s shift toward completing its life cycle can all coincide with older foliage fading.
Do not confuse a normal late-season fade with a rapid midseason collapse. If several leaves yellow in a few days, the pattern climbs upward, or spots, webbing, mosaic, stem lesions, or pod damage appear, inspect for the other causes in this guide. Row covers may soften light frost in some conditions, but they will not restore old leaves or correct a disease. Harvest usable pods, remove crop debris after the plants finish, and plan the next planting around what you observed.
A practical 10-minute triage plan
Start with the least destructive checks and change one thing at a time. This sequence helps you avoid the common mistake of watering, feeding, pruning, and spraying all at once; if the plant improves or worsens, you then have a clearer idea why.
- Map the yellowing. Is it one old leaf, lower leaves on several plants, new growth, or an entire bed? Photograph the pattern and mark affected plants.
- Check soil moisture below the surface. Dry root-zone soil calls for a deep soak; persistently saturated soil calls for a watering pause and a drainage check.
- Inspect both sides of leaves. Look for clusters of aphids, mites or webbing, silvery scars, holes, stippling, egg masses, and distinctive spots or halos.
- Check growth and pods. Stunting, curling, mosaic mottling, deformed pods, stem lesions, or fuzzy growth make disease or root stress more plausible than ordinary shade.
- Consider the crop stage and weather. A mature plant with a few fading bottom leaves late in the season is different from a young plant turning yellow after a week of cold rain.
- Take one evidence-based action. Adjust irrigation, remove a clearly diseased plant, or seek a soil test. Do not add fertilizer or pesticide simply because the leaves are yellow.
Recheck in two or three days. Existing yellow tissue often remains yellow even after the cause is corrected, so judge recovery by whether new yellowing stops, new growth looks healthier, and flowers or pods continue to develop. Do not expect a yellow leaflet to turn green again as a test of whether your change worked.
Preventing yellow leaves in the next crop
Prevention begins before planting. Choose a site with ample sun and good drainage, then leave enough room for mature bush or pole bean foliage to dry after rain. Use a trellis for pole beans so leaves are not pressed into neighboring plants. Follow the seed packet’s spacing guidance for the variety rather than using the same spacing for every growth habit.
Water according to soil conditions. Direct irrigation to the base of plants, use a soaker hose or drip line if practical, and add a moderate mulch layer after the soil has warmed. Mulch can slow evaporation and limit soil splash, but it should not be packed against stems or used to compensate for a bed that drains poorly. When prolonged rain is forecast, check whether containers and raised beds can shed excess water.
Rotate beans to a different bed when possible, especially if you have seen disease or recurring root problems. Clean up old vines and fallen foliage at the end of the season, and avoid working among wet plants. Plant clean seed and consider varieties with resistance to diseases that are common in your region; a local extension office can help identify which resistance traits matter in your area. These habits reduce risk without promising that every plant will stay blemish-free.
When to remove a bean plant
A few yellow leaves on an otherwise productive plant are not a reason to pull it. Remove dead or badly diseased leaves only when you can do so without stripping the plant’s working canopy, and disinfect or clean tools between suspect plants if you are handling a likely infection. If the plant is clearly stunted, collapsing in wet soil, showing strong mosaic distortion, or spreading lesions through its stems and pods, removing it may protect neighboring beans from further contact or pest movement.
When you are unsure, isolate the decision: stop overhead watering, avoid touching the plant and then healthy plants, photograph the symptoms, and ask a local extension service or plant clinic for help. A diagnostic service is more useful than trying several sprays because it can distinguish a pathogen from environmental stress. If most of the bed is at the end of its season and pods are finished, remove the crop and reset the bed rather than trying to revive exhausted annual plants.
Conclusion
Green bean leaves turning yellow can mean water stress, nutrient trouble, pests, disease, shade, or simply an aging plant. The location and texture of the yellowing—and what you find on the soil, leaf undersides, stems, and pods—tell you where to look next.
Check root-zone moisture first, inspect for visible pests and lesions, and compare affected leaves with healthy growth. Make one measured change, then watch the new growth rather than expecting old yellow leaves to recover. When symptoms suggest a virus, blight, or a persistent soil problem, use clean-up, resistant seed, crop rotation, or local diagnostic help instead of guessing with fertilizer or sprays.



