Orange Lily Care: How to Grow Lilium bulbiferum Well
Learn how to grow orange lily (Lilium bulbiferum), from choosing a sunny, well-drained site to planting bulbs, growing bulbils, and protecting cats at home.

Orange lily, Lilium bulbiferum, is a bulbous perennial with upright stems and vivid orange, upward-facing flowers. Give it bright sun, soil that stays lightly moist while shoots grow but drains promptly after rain, and time to rebuild its bulb after flowering. The most useful distinction for gardeners is that “orange lily” can describe more than one form: some plants make small stem bulbils, while commonly grown var. croceum is often described as not producing them.
Before planting, check the botanical name on the bulb label. The name Lilium bulbiferum is recorded as a species in the lily family by the NCBI taxonomy database; common names are less dependable, and plants marketed as fire lily may not all be the same species. The guide below focuses on this true lily, not unrelated plants with “lily” in their names.
What orange lily is—and how to identify it
Orange lily is a European species lily, grown for its warm-colored flowers and upright habit. Mature plants commonly reach around 2 to 4 feet, though height and bloom time vary with the form, climate, and growing conditions. Its flowers open upward or outward rather than hanging down, usually in early to midsummer in temperate Northern Hemisphere gardens. The species profile from Gardenia describes the familiar orange-flowered form with darker raised freckles and a height that can approach 3 to 4 feet.
Unlike a daylily, which grows from fleshy roots in a ground-level clump, Lilium grows from a scaly bulb and sends leaves up along a central stem. The species name bulbiferum refers to “bearing bulbs,” and small bulbils may appear where leaves meet the stem. Don’t assume every plant sold as orange lily will make them: the Pacific Bulb Society’s species notes distinguish bulbil-producing forms from var. croceum, which it describes as lacking stem bulbils.
Separate orange lily from tiger lily and daylily
Orange lily and tiger lily are both orange-flowered true lilies, but they are different species. Orange lily usually carries open, upward-facing blooms with comparatively subtle freckles; tiger lily flowers typically nod and have more pronounced dark spots. A daylily is not a Lilium at all: its flowers arise from a basal clump and each bloom lasts about a day. If you’re buying bulbs for a particular look or want to propagate bulbils, the Latin name and seller’s description matter more than the common name.
“Fire lily” is also an unreliable shopping label because common names overlap among unrelated plants. Check whether the label actually says Lilium bulbiferum rather than choosing by a photograph or a broad “lily” name. This small check prevents confusion about the plant’s mature habit, pet risk, and propagation behavior.
Choose a site with sun and fast drainage
Choose a site that receives several hours of direct sunlight, ideally most of the day in a cool climate. In a very hot garden, a little afternoon shade can reduce heat stress, but deep shade often produces a tall, leaning stem with fewer flowers. The orange lily species profile from Gardenia recommends full sun or partial shade; think of partial shade as relief from intense heat, not a dark woodland position.
The soil should hold some moisture during active growth without staying waterlogged. Loam with organic matter is a good starting point, but drainage is more important than whether the soil is labeled clay, sand, or loam. If the bed is soggy after a heavy rain or water pools there for hours, choose a raised bed or a container instead of putting a valuable bulb into a persistently wet pocket.
Improve the bed, not just the planting hole
Loosen a broad area around the planting site and mix in mature compost if the soil is compacted or low in organic matter. Avoid filling a small hole with a rich, loose mix while leaving dense clay around it; water can collect at the boundary like a basin and leave the bulb sitting in wet soil. In heavy ground, raising the entire planting area or moving the lily to a freely draining bed is safer than adding a handful of gravel at the bottom of the hole.
For fast-draining sand, compost and a layer of organic mulch help slow moisture loss without turning the bed soggy. Don’t apply a fixed soil-pH target unless your supplier identifies a form with special requirements; available sources differ in how they describe the varieties and their preferences. A normal garden soil that drains freely and supports steady growth is a sensible starting point.
When and how to plant orange lily bulbs
Plant dormant bulbs in fall or spring, depending on when they are sold and when your soil is workable. Fall gives a hardy bulb time to start rooting before winter in many regions, while spring planting is practical where winters are severe or bulbs arrive later. Lily bulbs have fleshy scales rather than the dry papery tunic of tulips, so they can lose moisture in storage; buy firm bulbs and plant them promptly instead of leaving them in a warm shed.
Before planting, check that a bulb feels firm and has no large soft, wet, or foul-smelling areas. A few dry outer scales are less concerning than a bulb that collapses when pressed or shows spreading rot. If you cannot plant immediately, keep it cool and follow the supplier’s storage instructions; do not leave it exposed to warm indoor air for weeks or soak it in water as a substitute for planting.
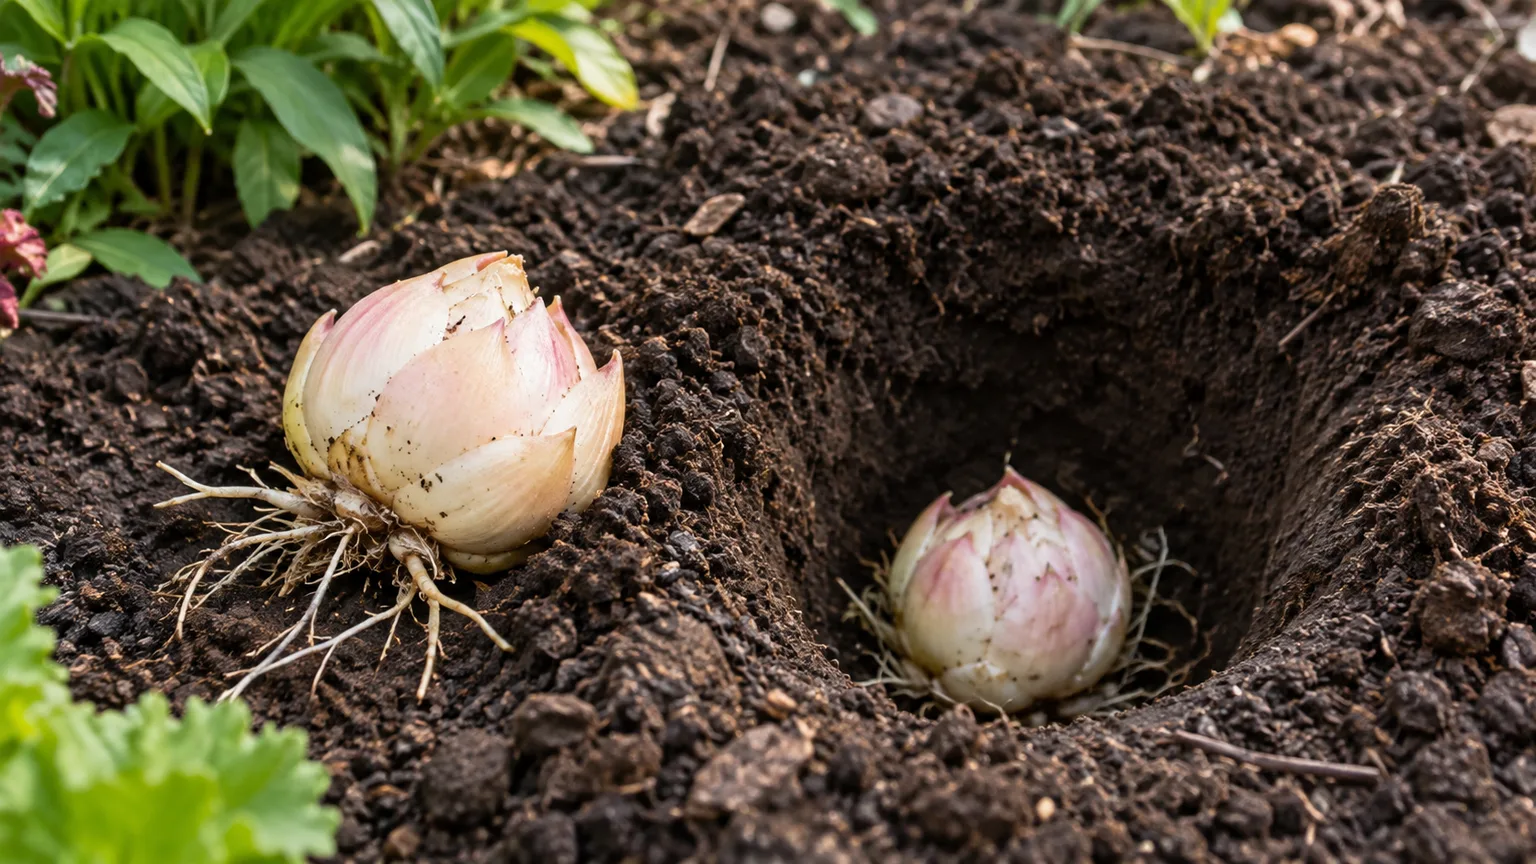
Set each bulb upright, with the pointed growing end facing up and the basal plate and roots down. Handle the scales and roots gently, backfill without compressing the soil hard, then water once to settle the bed. Mark the site so you don’t accidentally dig through the dormant bulb later in the season.
Set depth by rooting habit and bulb size
There is no single depth that fits every true lily. The general planting guidance from Gardenia’s lily-growing guide explains that stem-rooting lilies are planted more deeply than basal-rooting types because they form additional roots on the buried stem. When the plant seller gives species-specific instructions, follow them; if not, use the bulb’s size and known rooting habit rather than a universal “three times the height” rule.
Space bulbs so mature stems have room for air to move through the foliage. Planting a small cluster of three creates a fuller display, while a single specimen gives you room to observe how it grows; neither arrangement is required for the plant to flower. Keep the bulbs away from vigorous groundcovers that will compete for moisture or smother emerging shoots.
Water, mulch, and feed during active growth
After planting, water enough to moisten the root zone, then let the bed drain. Once shoots emerge, check the soil rather than following a calendar: water deeply when the upper few inches begin to dry, especially during stem elongation, bud formation, and hot, dry weather. Established lilies in cool, rainy climates may need little supplemental water, while pots and sandy beds can dry quickly.
Aim for evenly moist soil while the plant is growing, not soil that stays wet. Frequent shallow sprinkling encourages surface roots and can keep foliage damp; watering at soil level in the morning gives leaves time to dry. If leaves wilt in a dry bed, water and check again; if the ground is saturated and stems yellow or collapse, more water is the wrong response.
A light 2- to 3-inch layer of organic mulch helps buffer the soil and reduce evaporation. Keep mulch slightly away from the stem base so the crown is not buried in a damp collar. If the bed is already fertile and amended with compost, extra fertilizer may not be needed; where growth is weak and soil is poor, use a balanced bulb or perennial fertilizer at the label rate as shoots begin to grow. Avoid heavy nitrogen feeding, which can produce soft foliage and tall stems without solving poor drainage, insufficient sun, or a weak bulb.
Support stems without damaging the bulb
Stems can reach several feet, and a cluster of flowers catches wind. In an exposed site, place a discreet stake early, while the stem is still short, and tie it loosely with soft garden twine. Insert the stake several inches away from the bulb so you do not pierce it or its roots; adding a support after a stem has fallen risks snapping it.
A sheltered bed with nearby sturdy perennials may need no stake. If you do support the lily, check the tie as the stem thickens and loosen it if it begins to pinch. Keep the stake in place only as long as it helps the stem stand upright.
What to do during and after flowering
The flowering period is brief compared with the rest of the growing season, and a healthy bulb needs its leaves long after the blooms fade. Orange lily commonly flowers in late spring to midsummer, but local temperature and the bulb’s establishment affect the exact week. The species profile at Gardenia describes it as an early lily that can produce several flowers from a mature bulb; a newly planted or small bulb may flower less heavily.
Deadhead flowers but keep green foliage
When an individual flower fades, snip off the spent flower or developing seedpod if you do not intend to collect seed. This tidies the plant and prevents energy going into seed, but it does not make the same stem produce another flush of flowers. Keep the leafy stem intact so it can photosynthesize and replenish the bulb for next year.
Do not cut the whole stem back just because flowering is over. Wait until the leaves yellow naturally, then cut the dry stem near ground level with clean pruners. If you want cut flowers indoors, take only a portion of the stem and leave as much green foliage as possible; pollen can stain fabric, and cut lilies must never be placed where a cat can reach them.
Propagate bulbils and daughter bulbs
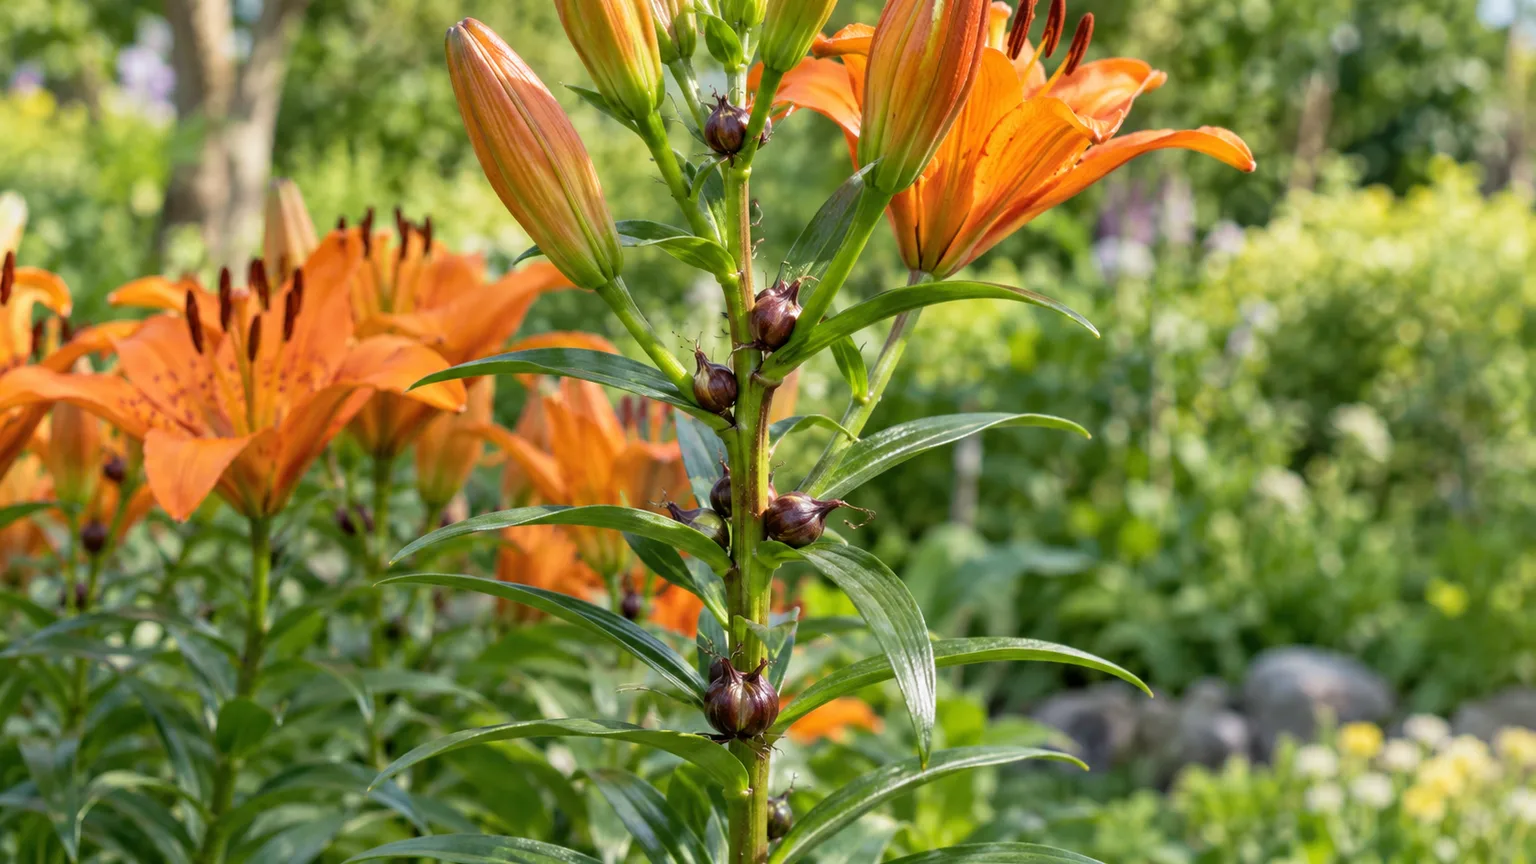
Orange lily propagation depends on what your plant actually produces. Bulbils are small, round propagules at the leaf axils along the stem; daughter bulbs form underground as an established bulb grows. Some plants sold as orange lily, especially those labeled var. croceum, may not make stem bulbils, so an empty stem is not automatically a care failure.
Grow bulbils in a labeled nursery pot
Let bulbils become plump and dark before collecting them; many detach easily when mature. Place each bulbil in a small labeled pot or nursery bed with a loose, moisture-retentive mix, cover it lightly, and keep it evenly damp but not waterlogged. A sheltered outdoor position protects the young bulbs from being washed out or eaten while still letting them follow a normal seasonal cycle.
Mark the plant name and collection year, then be patient. Small bulbils first make small shoots and need time to increase in size before they can support a mature flowering stem. Keep their foliage until it yellows, and do not throw away a pot just because it looks bare while the bulbs are dormant. If the parent plant is a form that does not make bulbils, use division or seed instead.
For daughter bulbs, wait until the plant has died back and the clump is crowded or flowering has declined. Lift gently at the outer edge, separate only bulbs that come apart naturally, discard any bulb that is soft or badly rotted, and replant healthy ones promptly at their appropriate depth. Orange lilies do not need annual lifting; disturbing an established clump every year can damage roots and delay flowering.
Seed is another option if you are willing to wait and accept variation. Seedlings may differ from the parent, and lily seeds do not all germinate on the same timetable; use fresh, correctly identified seed and follow a species-specific propagation guide rather than assuming one treatment works for every lily. For a plant that matches the parent and flowers sooner, a healthy offset is usually more dependable than seed.
Grow orange lilies in containers
A container is useful where garden soil stays wet or there is no suitable bed, but tall lilies need a deep, heavy pot that will not tip in wind. Choose generous drainage holes and a high-quality potting mix that retains some moisture while allowing excess water to escape. A pot around 12 inches across and deep can suit a single bulb, though the best size depends on the bulb and the pot’s usable depth.
Set the bulb at the depth recommended for its rooting habit and leave headroom for watering. Check moisture more often than you would in a garden bed, because wind and summer heat can dry pots quickly, but never let the container stand in a full saucer. Feed modestly if the potting mix is low in nutrients, and stake the stem before the buds become heavy.
Container lilies still need a seasonal rest. After the foliage dies down, keep the pot in a cold, sheltered place if outdoor freeze-thaw cycles threaten the bulb; do not bring it into a warm room and encourage winter growth. A naturally cold winter period helps preserve the plant’s normal cycle.
Protect dormant bulbs over winter
In-ground bulbs usually remain dormant while the leaves and stems disappear. The main winter hazard is often cold, saturated soil rather than cold alone, so make sure rain drains away and avoid piling dense wet mulch directly over the crown. In a colder region, a loose layer of leaf mold or straw after the ground cools can buffer temperature swings and reduce heaving.
Hardiness varies among forms, bulb sources, and local conditions, so do not rely on a broad zone range printed for “lilies” as a promise for every Lilium bulbiferum. Ask the seller how the stock performs in your area, and prioritize drainage if your winters are wet. For pots, insulate the container or move it to a sheltered cold location while keeping the bulb dormant and the mix from becoming bone-dry.
Troubleshoot weak growth or missing flowers
If a bulb sends up leaves but no flowers, check the site before reaching for fertilizer. Too much shade, a bulb that is still small, overcrowding, severe drought during active growth, or foliage cut while still green can all reduce flowering. If a formerly reliable plant weakens over several years, consider whether nearby shrubs have grown and now block the light.
Yellowing has different meanings depending on timing. Leaves turning yellow gradually after flowering are part of normal dormancy; leaves yellowing early while the soil is wet suggest root or bulb stress. Digging immediately can damage a bulb that is simply finishing its season, so first check the calendar, moisture, and whether neighboring plants show similar symptoms.
If the stem emerges and then disappears, slugs may have eaten the tender shoot. Protect new growth with physical barriers or hand-picking at dusk, then look for a firm bulb when the bed is dormant. If there is no shoot next spring, lift carefully only after the normal emergence period and inspect for a soft, foul-smelling bulb; rot calls for improved drainage and replacement with healthy stock.
Use the symptom pattern to choose the first check rather than treating every weak plant as hungry:
| What you see | First thing to check | Practical response |
|---|---|---|
| Healthy leaves, few or no flowers | Light, bulb size, and last year’s foliage | Improve sun or let a small bulb establish; keep green leaves next season. |
| Yellowing while soil is wet | Drainage and bulb firmness | Stop extra watering, improve drainage, and remove only bulbs that are clearly rotted. |
| Wilt during hot, dry weather | Moisture several inches below the surface | Water deeply, then mulch to slow drying without burying the stem. |
| Ragged or missing young shoots | Slugs, snails, or lily beetle | Inspect at dusk and early morning; protect new growth before buds form. |
One damaged leaf is not enough to diagnose a virus or fungal disease. Look for a repeated pattern, spreading symptoms, or similar damage on neighboring lilies before you remove a plant or change the whole bed’s care.
Manage slugs, aphids, beetles, and leaf disease
Slugs and snails can remove tender shoots overnight, particularly in cool, damp weather. Inspect the bed after rain, remove hiding places such as boards and dense debris, and use barriers or hand-picking before damage reaches the flower buds. Avoid treating every lily preemptively; identify the pest and use any control exactly as its label directs.
Aphids cluster on soft tips and buds. A strong but non-damaging stream of water can dislodge a small colony; repeat inspection because aphids may return. Where present, lily leaf beetles and their larvae can strip foliage quickly, so check the undersides and leaf axils from shoot emergence onward and remove adults, eggs, or larvae by hand when practical. Gardenia’s lily care guide summarizes these common lily pests and diseases.
Pale or brown spots that expand during cool, wet weather may indicate a foliar disease such as Botrytis blight. Improve airflow, water at soil level, and remove badly affected leaves rather than leaving infected debris around the bulb. Viruses can also distort or mottle leaves; do not propagate from a plant with persistent, abnormal patterns, and seek local extension advice if symptoms spread across several lilies.
Keep orange lilies away from cats
Lilium bulbiferum is a true lily, and true lilies are dangerous to cats. The ASPCA lily entry lists Lilium species as toxic to cats and notes kidney failure as a clinical concern. Keep the plant out of gardens, bouquets, and rooms a cat can access; do not assume that a flower arrangement is safe because the cat is usually indoors.
If a cat chews any part of a lily, contacts pollen and then grooms, or drinks water from a vase containing lilies, call a veterinarian or animal poison-control service immediately. Do not wait for symptoms or try a home remedy. If cats visit the garden, the safest plan is to choose a different perennial rather than relying on a fence or supervision.
Conclusion
Grow orange lily in bright light and soil that drains freely, keep moisture steady while stems and buds develop, and let every healthy green leaf finish its season after flowering. Plant sound bulbs promptly, use the supplier’s depth guidance, and protect them from standing water; those basics matter more than a complicated fertilizer routine.
Check the botanical name before buying because orange lily, fire lily, and other common names can refer to different plants, and bulbil production varies among forms. If you have a cat, do not grow Lilium bulbiferum where the animal can reach it. A well-sited bulb can return with bright early-summer flowers for years, but only if its roots stay healthy and its foliage is allowed to recharge it.



