Pilea Involucrata Care: Complete Friendship Plant Guide
For Pilea involucrata care, get light and watering cues, pruning advice, stem-cutting steps, repotting signs, and clear fixes for yellow or brown leaves.
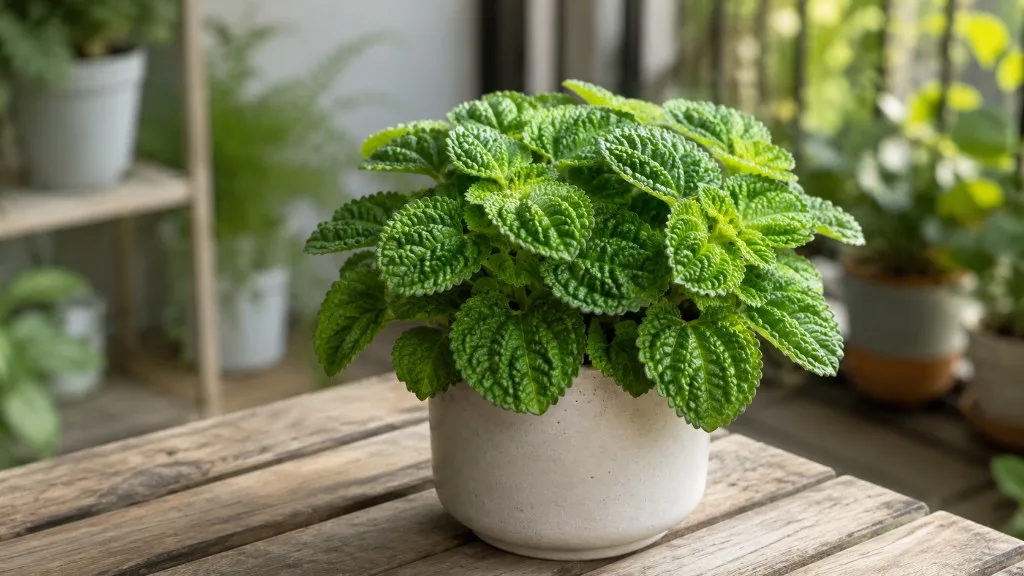
Pilea involucrata is easiest to keep healthy when its small root ball stays lightly moist but never sits in soggy mix. Give it bright, filtered light, a warm spot away from drafts, and a pot that drains freely; then let the surface dry a little before you water again. The plant stays compact, and its crinkled bronze-green leaves remain the main attraction.
This tropical pilea grows well indoors because you can control its light, temperature, and watering. It also roots readily from stem cuttings, so a leggy plant can be shaped and shared instead of replaced. The trick is to respond to what the soil and new growth show you rather than follow a rigid weekly schedule.
What Makes Pilea Involucrata Distinct?
Friendship Plant is the common name most often attached to Pilea involucrata, a small, trailing evergreen perennial in the nettle family, Urticaceae. NC State Extension describes it as native to Central and South America, with soft, velvety leaves that are ovate, toothed, and deeply crinkled. Mature leaves can show dark green and bronze coloring on top, brighter green margins, and dark red undersides; the patterned foliage is why this plant is grown more for leaves than flowers. NC State Extension’s Pilea involucrata profile gives the species-level description and care context.
Retail labels can make identification confusing. “Friendship Plant” is used for more than one pilea, and “Moon Valley” appears in trade under both Pilea mollis and Pilea involucrata. Penn State Extension notes that the proposed synonymy has not been conclusively determined, so the trade name alone cannot settle a plant’s identity. Moon Valley is typically described as strongly puckered, bronze-green foliage with sunken purple veins and brighter margins; Pilea involucrata is also textured and bronze-toned, with light-green edges and red leaf undersides. Penn State Extension’s Pilea houseplant overview explains the naming uncertainty and distinctive foliage. If exact species identity matters for a collection, preserve the nursery label and compare the plant with a botanical reference rather than relying on “Friendship Plant” alone; the core indoor care discussed here is similar across these closely related, moisture-loving pileas.
The usual indoor plant makes a low, spreading mound rather than a tall upright specimen. Pinching the stem tips encourages branching, while untrimmed stems can spill softly over a pot edge. Small pinkish or greenish flower clusters may appear in summer, but indoor plants rarely bloom; a lack of flowers does not indicate poor care.
Pilea Involucrata Care at a Glance
| Care factor | Practical starting point | What tells you it is working |
|---|---|---|
| Light | Bright, indirect light; soften direct midday or afternoon sun | New leaves stay compact and retain their color |
| Water | Water when the surface layer begins to dry | The pot drains quickly, then becomes lighter before the next watering |
| Soil and pot | Loose indoor mix in a container with drainage holes | Mix holds some moisture but does not stay muddy or sour |
| Humidity | Average to moderately humid air, with gentle circulation | Leaf edges remain sound and the crown dries after watering |
| Temperature | Comfortable, stable room warmth | No cold-window injury, draft stress, or heat exposure |
| Feeding | Diluted balanced fertilizer during active growth | New growth continues without crusty salt buildup |
These are starting cues, not calendar rules. A small pot beside a bright window can dry in a few days, while a larger plastic pot in a cool room may remain wet much longer. Check the pot and mix before you water, then adjust the interval to the conditions you actually have.
Give It Bright, Indirect Light
Set the plant near a bright window where the leaves receive plenty of daylight without being heated by strong direct sun for hours. An east-facing window often provides a gentle morning exposure; a south- or west-facing window can also work if a sheer curtain filters the strongest rays or the plant sits farther from the glass. A dim corner may keep the plant alive for a while, but stems usually stretch toward the nearest light and the once-full mound becomes sparse.
Watch the newest growth rather than expecting older leaves to change. Long spaces between leaves, leaning stems, and smaller leaves in the center suggest that usable light is too low. Move it gradually to a brighter location, rotate the pot occasionally for even growth, and give the plant several weeks to show whether the new placement helps.
Direct sun can bleach or crisp exposed patches, especially after a sudden move from a shop or shaded shelf. If the window is very sunny, diffuse the light or pull the plant back during the hottest part of the day. Do not compensate for weak light by watering more often: a plant using less water in shade will stay wet longer, which increases the chance of root stress.
Water by Checking the Root Zone
Keep the mix evenly moist during active growth, but allow its surface to begin drying between thorough waterings. For a small Friendship Plant, press a fingertip about half an inch to an inch into the mix. If that layer feels dry while deeper soil remains faintly cool, water; if it is still damp and the pot feels heavy, wait and check again later. This simple check is more useful than watering every Monday because the dry-down rate changes with season, window exposure, pot size, and the ingredients in the mix.
When watering, pour slowly over the soil until water runs from the drainage holes. Let the pot drain completely, then empty the saucer or cachepot so the roots are not left in runoff. Small sips can leave dry pockets in the root ball, while constant shallow watering keeps only the upper roots active. If a peat-heavy mix has become so dry that water runs down the pot wall, soak the nursery pot briefly from below and then let it drain well.
Reduce the frequency in winter when days are shorter and growth slows, but do not let the small root ball repeatedly bake dry beside a heater. Instead, use the same moisture check and expect the interval to lengthen. If the mix takes many days to dry, improve drainage and airflow before reaching for fertilizer or changing the room humidity.
| Soil and pot check | What to do |
|---|---|
| Top layer has dried slightly; pot feels lighter | Water thoroughly and drain |
| Surface and deeper mix still feel wet; pot is heavy | Wait, then recheck; empty trapped runoff |
| Mix stays saturated for many days or smells sour | Check drainage and roots; replace collapsed or waterlogged mix |
| Root ball is dry and has pulled from the pot edge | Rewet evenly, drain, and monitor the interval |
NC State Extension recommends moderate watering while the plant is growing and less from fall through late winter. That seasonal shift is useful, but indoor heating, light, and pot material still determine how quickly a particular plant dries. Use the calendar as a reminder to check more often, not as a substitute for checking.
Use an Airy Mix and a Pot With Drainage
Pilea involucrata needs enough moisture to support its soft leaves, but its roots still need oxygen. A standard indoor potting mix can work if it does not pack down or stay wet; lighten a dense mix with perlite or fine bark, and retain a moisture-holding component such as coco coir or peat. Gardenia’s Friendship Plant care notes describe the same balance: a rich, loose medium that holds moisture without waterlogging. Gardenia’s Pilea involucrata guide is a useful comparison for the plant’s basic growing needs.
A practical home blend is two parts indoor potting mix to one part perlite or fine orchid bark. That is a starting formula rather than a scientific requirement; if the room is very warm and dry, use a little more moisture-holding mix, while a cool, humid room calls for a faster-draining texture. The finished mix should wet evenly, then release extra water readily.
Choose a pot with at least one open drainage hole, only modestly wider than the root ball. A very large pot holds a larger volume of wet mix than a small plant can use, so the roots may stay oxygen-starved even if you water carefully. You can keep a decorative cachepot for appearance, but lift out the inner pot when watering and empty the outer pot after it drains.
Raise Humidity Without Trapping Stale Air
This plant comes from warm tropical regions and appreciates humid air, but a home does not need to feel like a greenhouse for it to grow. If the plant is producing healthy new leaves and its edges are not crisping, leave humidity alone. Brown edges by themselves do not prove the air is too dry; check whether the soil has dried too far, the plant sits in direct sun, fertilizer salts are accumulating, or a heater is blowing across the foliage.
If the room is persistently dry and new leaves are shrinking or crisping, a room humidifier near the plant gives more consistent results than occasional misting. Keep the unit clean and leave space around the foliage so air can move. A terrarium can also suit a small Friendship Plant because it slows moisture loss, but it needs enough room for growth and occasional ventilation; constant heavy condensation or wet leaves signal that the enclosure needs to be opened and aired.
Grouping plants may make a small local difference, but it is not a substitute for checking conditions. Pebble trays and misting do not reliably raise humidity across a whole room, and wetting foliage repeatedly can leave water sitting in textured leaves. The safer order is to measure the room if possible, address cold drafts or hot vents, then add a humidifier only if the plant’s new growth and the room readings point to dry air.
Keep Temperatures Steady Through the Seasons
Aim for comfortable indoor warmth and avoid sudden cold or heat. Gardening Know How’s Friendship Plant guidance gives 65–75°F (18–23°C) as a practical growing range and advises keeping the plant away from heaters and drafty windows. You do not need to hold the room at an exact temperature, but avoid placing the pot against cold glass at night, over a radiator, or beside an air-conditioning outlet that blows directly on the leaves.
Treat it as a tropical houseplant in regions with cold winters. NC State lists it for outdoor hardiness zones 11–12; elsewhere, keep it indoors or move it inside before cool nights become a problem. If it spends summer on a shaded porch, acclimate it gradually, protect it from strong sun and wind, and bring it back in before temperatures fall toward 60°F (16°C).
Seasonal changes affect watering more than a calendar date does. In winter, shorter days and cooler windowsills usually slow growth, so the mix stays moist longer and fertilizer is rarely needed. In a heated room, however, a small pot can still dry quickly; continue checking moisture instead of withholding water automatically.
Feed Lightly While It Is Growing
Use a balanced liquid houseplant fertilizer diluted to about half the label strength during active spring and summer growth. A monthly feeding is a reasonable starting point for a plant that is actively producing leaves in good light; skip or reduce it if growth has paused, the plant is stressed, or the mix was recently replaced with a fertilized product. Gardening Know How also recommends half-strength liquid feeding during the growing season and suspending it in winter.
More fertilizer does not make the plant fuller faster. Excess salts can damage fine roots and contribute to brown tips, so do not combine repeated liquid feeding with frequent fertilizer spikes or enriched soil. If a white crust forms on the mix or pot rim, pause feeding and flush the soil with clean water, allowing it to drain freely.
Prune for a Compact, Full Shape
Pinch or trim the growing tips when stems become long, bare, or uneven. Cut just above a leaf pair or node with clean scissors; this leaves growth points on the parent stem and encourages a more branched shape. Take a little at a time, particularly on a small plant, because a heavy haircut removes the foliage the plant needs to support recovery.
Pruning cannot correct the cause of thin growth on its own. If the stems stretch toward a window, improve the light first and wait for new growth to adjust, then shorten the longest stems. Healthy trimmed tips can become cuttings, and replanting several rooted cuttings around the pot edge is a practical way to fill gaps without burying the crown or overwatering the parent plant.
Remove yellow, mushy, or badly damaged leaves with clean scissors, but do not strip off every older leaf that has a minor blemish. A few lower leaves aging as the plant grows can be normal. Track whether the problem is spreading to new leaves before changing several care conditions at once.
Propagate From Stem Cuttings
Spring and early summer are convenient times to propagate because the plant is actively growing, though a warm bright room can support cuttings at other times. Select a healthy stem with at least two nodes and several leaves. The node is the small joint where a leaf attaches; roots emerge from the stem around nodes, so a leaf without stem tissue will not make a new Friendship Plant.
Use clean scissors, remove the leaves from the lowest node, and choose one of two methods. Soil rooting keeps the cutting in the medium where it will continue growing; water rooting makes root development visible but adds a transition from water to soil later. Both work when the cutting has warmth, bright indirect light, steady but not soggy moisture, and enough air around the leaves.
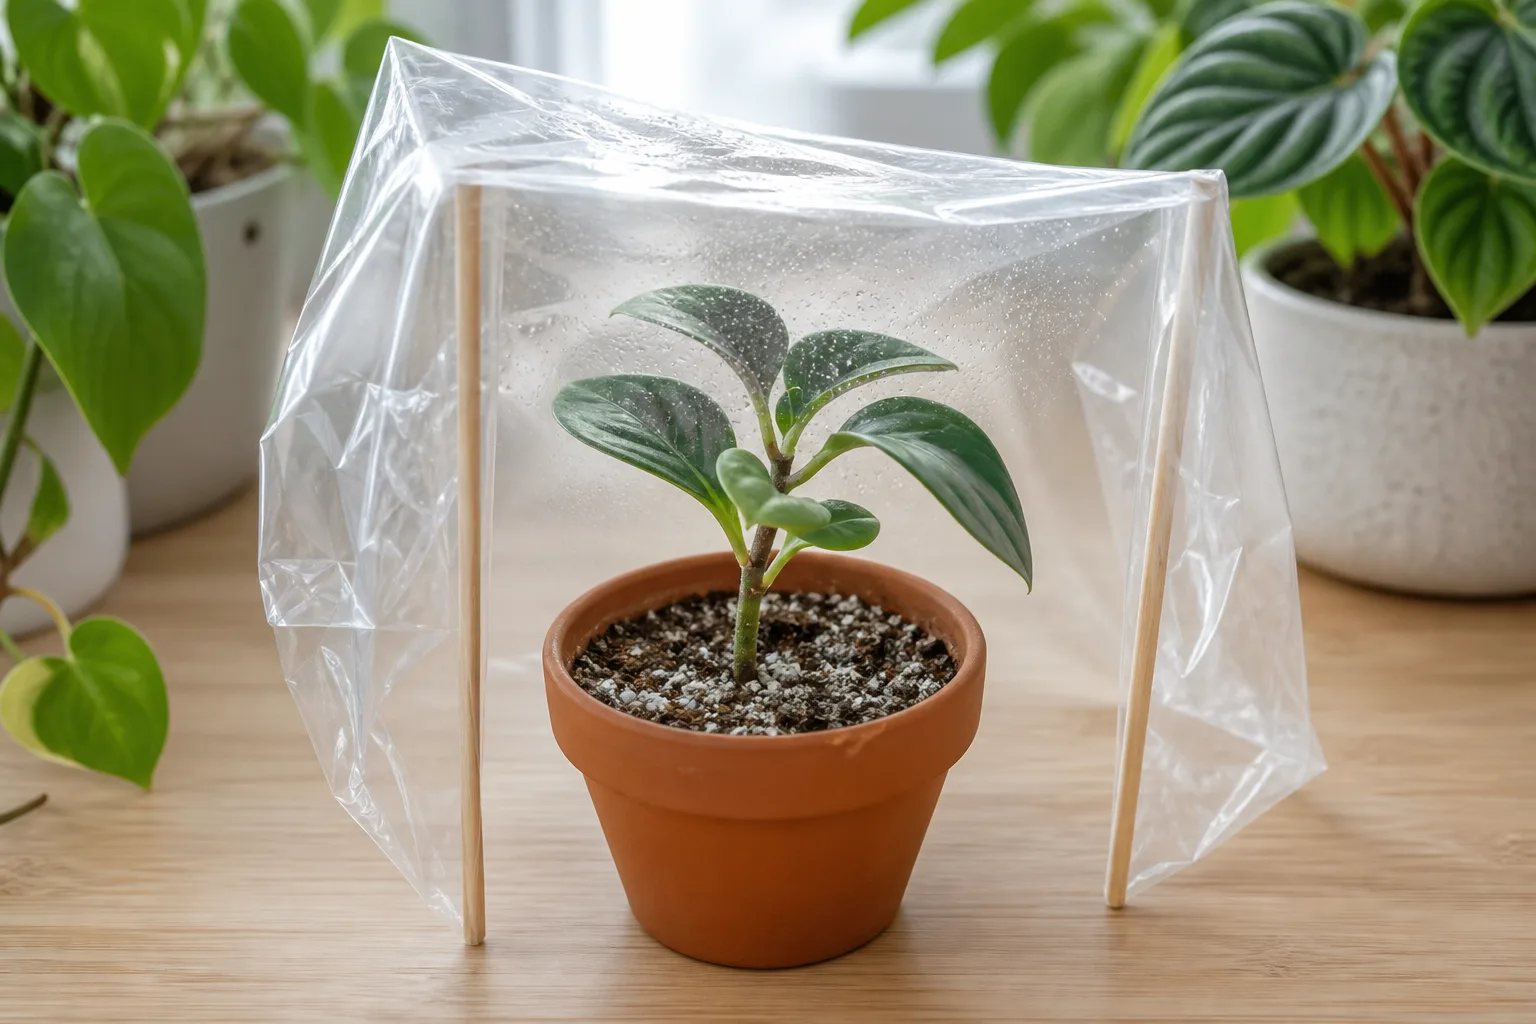
Root cuttings directly in soil
Fill a small pot or propagation tray with a fresh, airy mix and moisten it before inserting the cutting. Place the bare lower node into the soil, firm the mix just enough to hold the stem upright, and keep leaves above the surface. Do not bury several inches of stem or press the mix into a hard plug; a buried, wet stem can rot before roots form.
Cover the pot loosely with a clear bag or dome if the air is dry, but keep the cover from touching the leaves. Open it daily for fresh air, and remove it if water beads heavily inside or the foliage stays wet. Set the pot in warm bright indirect light, not direct sun, because even mild sunlight can heat a small covered pot enough to stress the cutting.
Keep the medium lightly moist, like a wrung-out sponge, rather than saturated. The cutting may root over several weeks, but timing varies with warmth, light, and stem condition. Look for new growth or gentle resistance when you tug very lightly; repeated pulling can damage young roots. Once established, gradually increase ventilation and care for it like the parent plant.
Root cuttings in water
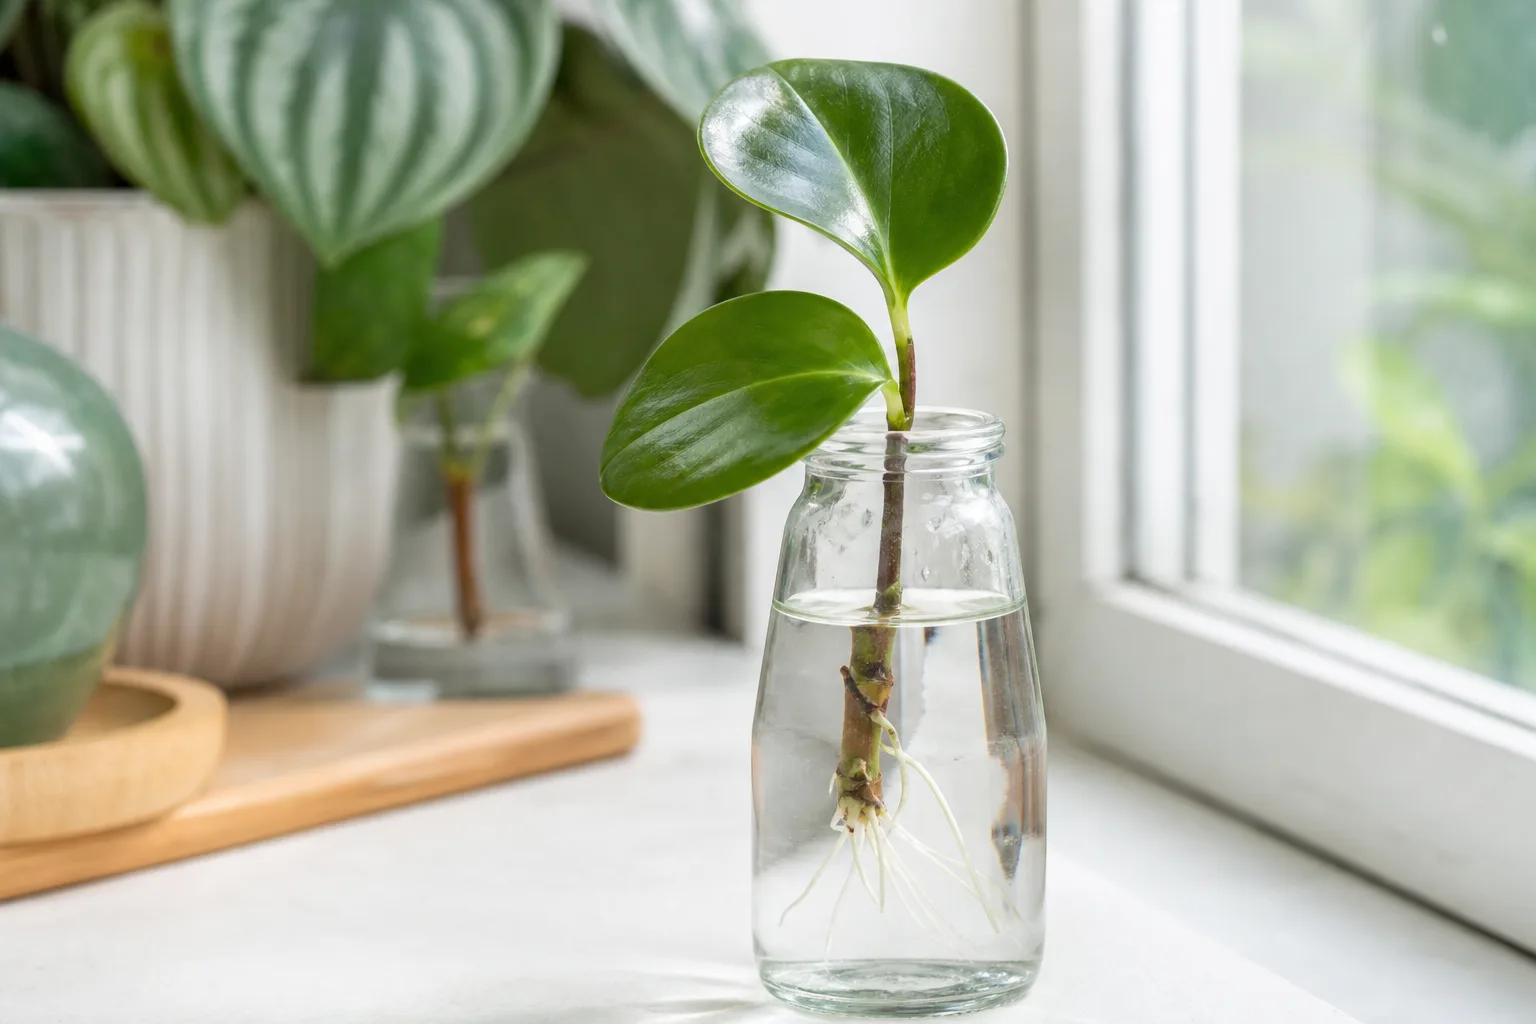
Put the lowest node of a fresh cutting in a small jar of clean water, leaving its leaves above the surface. A narrow container helps keep a short stem from slipping too deep, and bright indirect light encourages growth without heating the water. Replace cloudy water and rinse the container if it develops a film; the goal is a clean, oxygenated rooting environment, not a jar that stays untouched for weeks.
When several roots are visible and roughly an inch long, transfer the cutting to a small pot of lightly moist, airy mix. Water-grown roots can be delicate when they adjust to soil, so keep the medium evenly moist while the cutting settles, then return to the normal surface-dry-before-watering routine. If water-rooted stems repeatedly turn soft, try soil rooting instead; the result depends more on cleanliness, warmth, and moisture control than on rooting hormone.
Repot When Roots Need More Room
Repot when the root ball has filled much of the container, roots circle tightly, or the mix has broken down and stays wet. A few roots showing through a drainage hole do not automatically mean the plant needs a new pot. If it is still growing steadily and the soil dries at a sensible pace, leaving it slightly snug is safer than moving it into a much larger volume of damp mix.
When you do repot, choose a container one size larger, keep the crown at its former soil level, and use fresh airy mix. Loosen only tightly circling roots; the fine root system does not need aggressive teasing. Water thoroughly after planting, let excess drain, and keep the plant in the same bright indirect light while it settles.
Do not repot a newly purchased plant just because it came in a nursery pot. Let it acclimate, inspect the drainage, and repot only if the mix is failing, roots are unhealthy, or the pot has no way to drain. If the plant is already stressed from cold, drought, or overwatering, correct the immediate problem first unless the current mix itself is keeping the roots saturated.
Diagnose Brown Edges, Yellow Leaves, and Drooping
Read the symptom together with the soil, pot, and pattern of damage. Brown edges can follow dry air, a root ball that repeatedly dries out, fertilizer salts, or harsh sun; yellow and drooping leaves can appear after either prolonged wetness or severe drought. NC State Extension notes that stem rot and leaf problems can occur, while its species page stresses adequate drainage and seasonal moderation in watering. The right first step is to check the root zone, not to add humidity, fertilizer, or water based on leaf color alone.
| What you notice | Check first | First response |
|---|---|---|
| Several yellow leaves and a heavy pot | Mix still wet; water trapped in a cachepot | Empty runoff and let the mix dry somewhat; check drainage |
| Limp leaves with very dry, light mix | Root ball has dried too far | Water evenly, let it drain, and check more often |
| Brown patches on the window-facing side | Direct sun or hot glass | Move to filtered light and watch new leaves |
| Brown tips plus a crust on the mix | Fertilizer or mineral salts | Pause feeding and flush the mix thoroughly |
| Crispy edges while the root zone is sound | Dry air, vent, or uneven watering | Move from the vent and confirm room humidity before adding a humidifier |
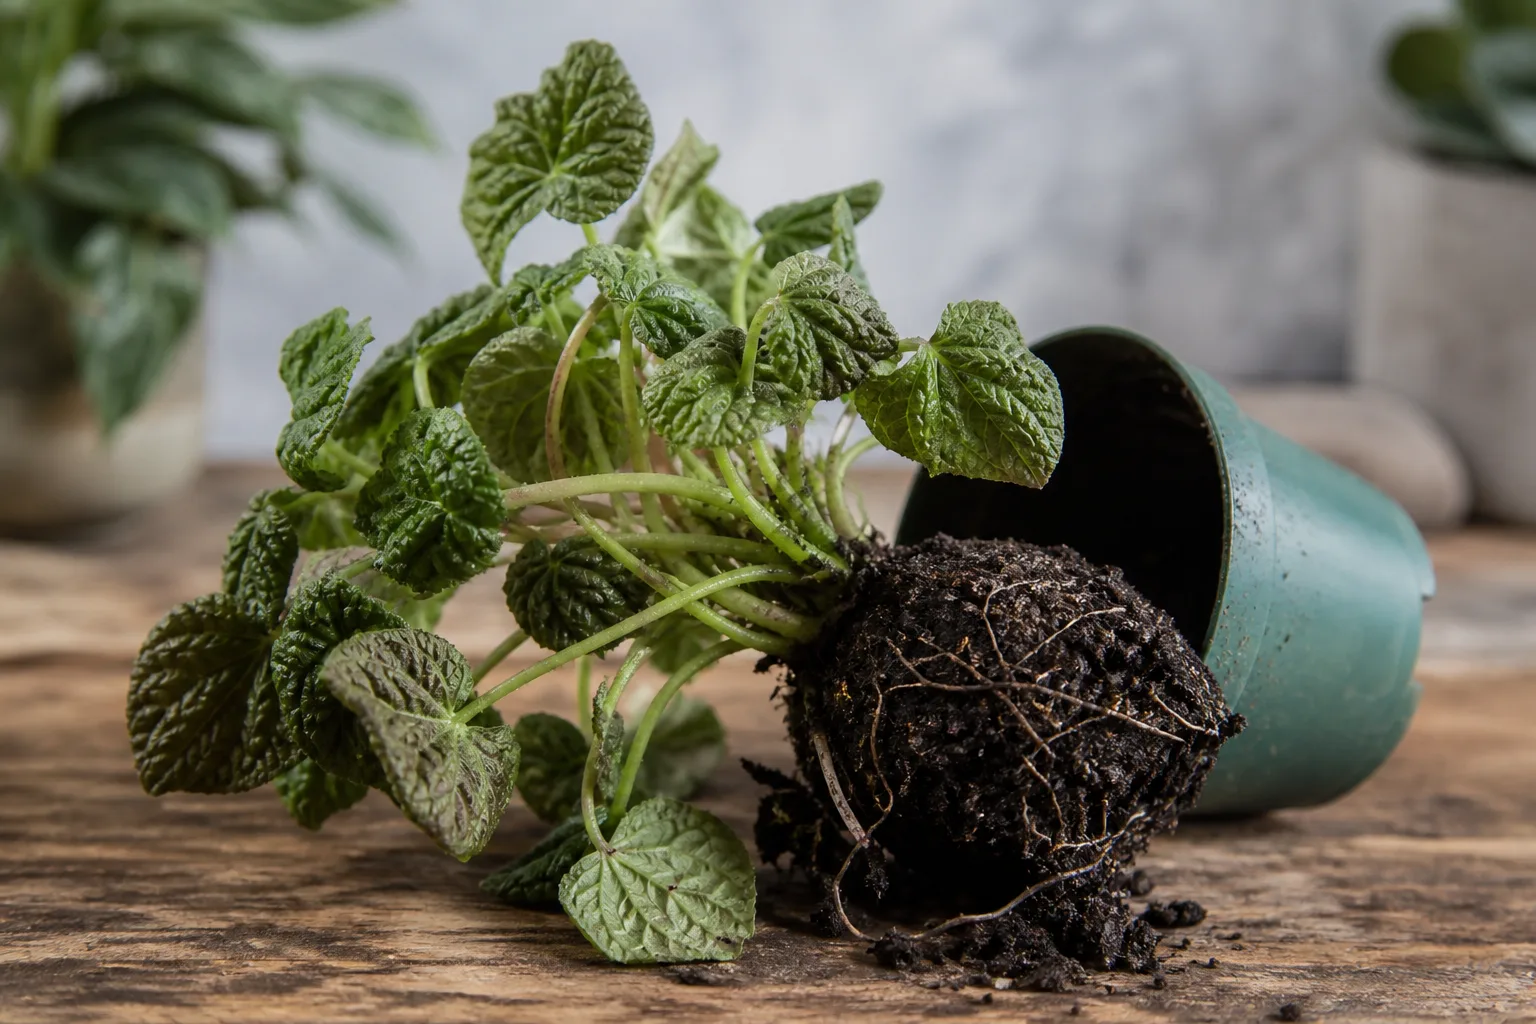
If the mix remains wet for many days and the plant continues to decline, inspect the roots. Healthy roots feel firm; rotting roots are often soft, dark, and may smell sour. Trim only the clearly dead sections with clean scissors, discard the saturated old mix, and repot in a clean pot with open drainage. Do not keep unpotting the plant to check progress; stabilize moisture and observe new growth.
One yellow lower leaf is not a diagnosis. If new leaves look healthy and the rest of the plant is firm, remove the old leaf and monitor it. If several leaves yellow in sequence, compare the current pot weight with how recently you watered, check whether light has changed, and look for cold drafts or pests before making a second adjustment.
Check for Pests Before Treating
Inspect the undersides of leaves, stem joints, and the dense center of the plant when you bring it home and whenever new growth becomes distorted or speckled. Mealybugs look like small cottony clusters; aphids gather around tender tips; spider mites can cause fine stippling and webbing. NC State Extension lists mealybugs, spider mites, and aphids among possible pests for Pilea involucrata, though it describes serious pest problems as uncommon.
Isolate an affected plant from nearby houseplants while you identify the insect. Rinse or wipe reachable pests away, remove badly infested pieces, and recheck the plant over the following weeks because hidden insects or eggs may survive the first cleanup. If you choose a pesticide, use one whose label includes the pest and indoor ornamental plants, follow its directions, and test a small leaf area first; textured foliage can be more difficult to clean than smooth leaves.
Keep Pets Safe Around the Plant
The ASPCA lists Friendship Plant, identified as Pilea involucrata, as non-toxic to cats, dogs, and horses. That is reassuring for a home with pets, but common names are sometimes applied loosely to different plants, so check the botanical name if pet safety is a deciding factor. ASPCA Animal Poison Control’s Friendship Plant listing is species-specific.
Non-toxic does not mean a plant is food. Keep the pot stable and do not let pets chew large amounts of leaves or potting mix; soil amendments and fertilizers are separate hazards from the plant itself. If an animal eats a substantial amount or develops symptoms, contact a veterinarian or animal poison-control service with the plant label available.
Conclusion
Pilea involucrata is a good small-space tropical plant when you keep its leaves bright, its roots airy, and its moisture even. Use a loose mix and a draining pot, water after checking the surface and pot weight, and reduce feeding and watering as growth slows in winter. Lightly pinch long stems to preserve a compact shape, and root healthy tips when you want to fill the pot or share a plant.
If leaves yellow or droop, begin with soil moisture and drainage; if edges brown, also consider sun, salts, drafts, and humidity before changing the routine. Propagate with a node-bearing cutting, and repot only when roots or deteriorating mix call for it. Those few observations are enough to keep this textured Friendship Plant growing steadily without turning its care into guesswork.



