Spider Mites on Peace Lily: Causes, Checks & Fixes
Quick answer
Spider mites on peace lily cause fine stippling and webbing, especially in dry winter rooms. First step: isolate the plant and rinse every leaf underside with lukewarm water before applying any spray.
Spider Mites on Peace Lily: Causes, Checks & Fixes
This guide covers spider mites on Peace Lily. See also the general Spider Mites guide, watering, and light pages for this plant.
Spider Mites on Peace Lily: Causes, Checks & Fixes
Quick answer
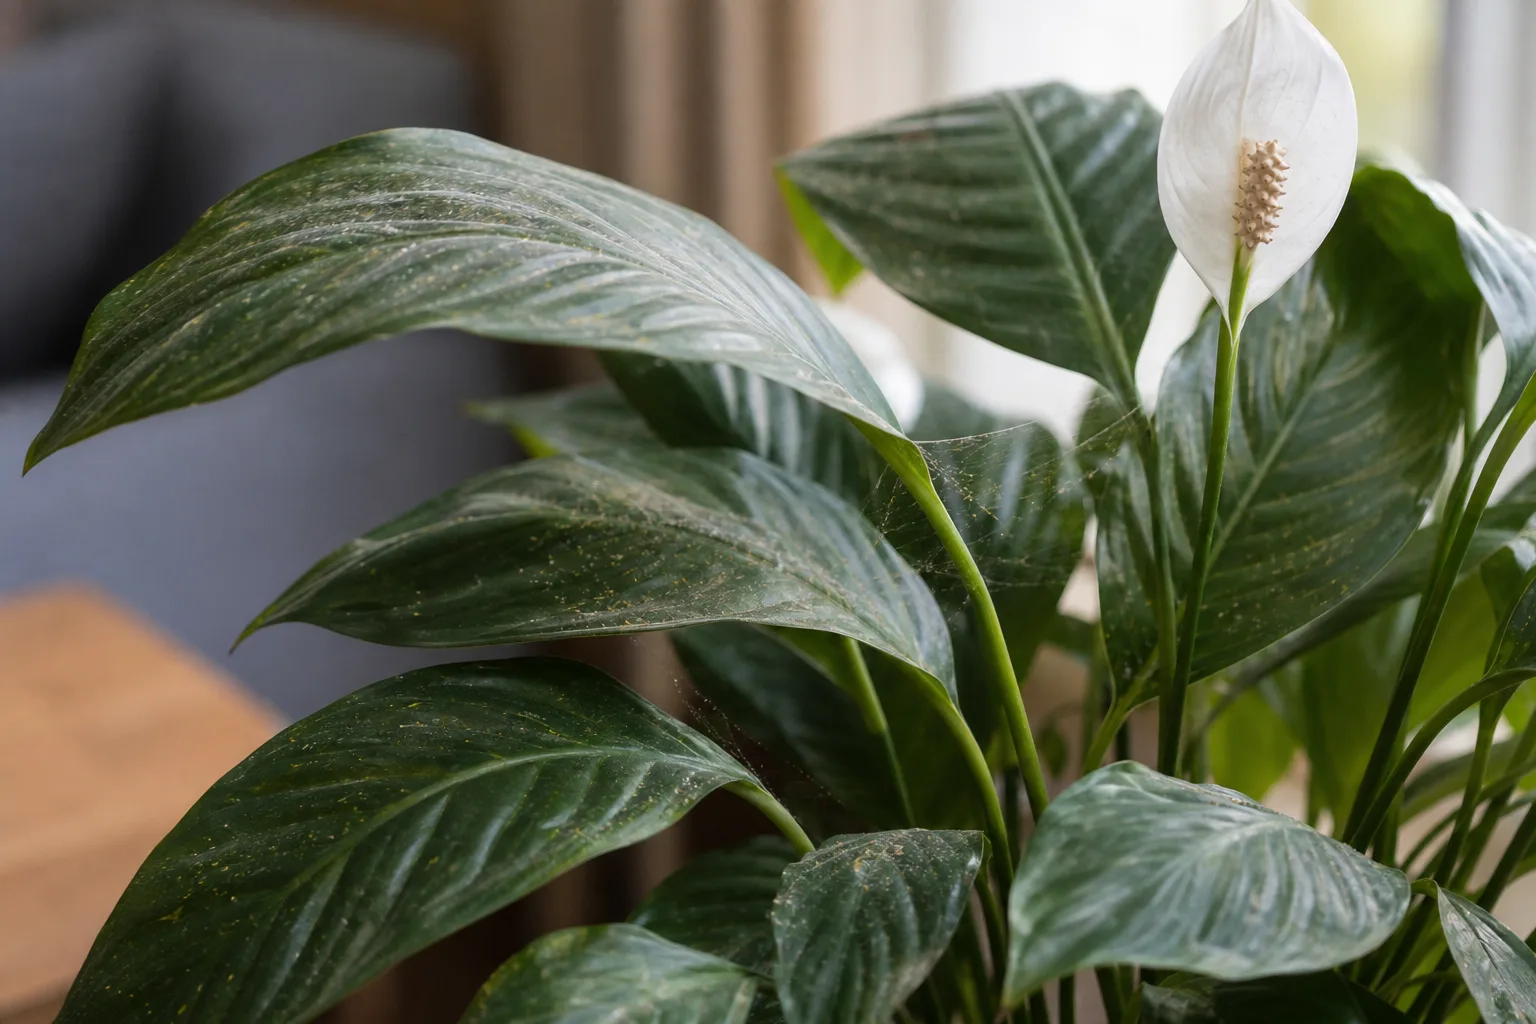
Spider mites on peace lily (Spathiphyllum wallisii) show up as fine yellow or pale stippling on glossy lance-shaped leaves, often with silky webbing at petiole bases and in the dense crown where leaves overlap. They are not insects-they are tiny arachnids that pierce leaf cells and suck sap, and they multiply fast in the warm, dry air common above radiators and heating vents.
First step: isolate the peace lily and rinse every leaf underside with lukewarm water. That single action knocks down live mites and webbing before you confirm severity or reach for sprays. Do not start with fertilizer, repotting, or a single oil application and walk away-mite eggs hatch in cycles, so one treatment rarely finishes the job.
If you see only crispy leaf edges without speckling or webbing, you may be dealing with dry air rather than an active pest colony. See our low-humidity guide for that pattern. This page is for confirmed or strongly suspected spider mites-stippling plus webbing, or moving specks on a tap test.
Spider mites vs. low humidity vs. fluoride tips - which guide to use
Peace lily owners often land on the wrong page because all three problems can appear in the same dry winter room. Use this routing table before you change watering or buy a humidifier:
| What you see | Most likely cause | Start here |
|---|---|---|
| Pinprick stippling on upper leaf surface + fine webbing at petioles | Spider mites | This guide - isolate and rinse first |
| Brown tips or margins only, no speckles, no webbing, no moving tap-test specks | Fluoride, salts, or dry air | Brown tips or low humidity |
| Whole plant limp, wet soil, soft stem bases | Overwatering or root failure | Wilting or root rot |
| Dramatic droop on dry soil, firm stems, no stippling | Thirst | Drooping leaves |
Misting alone will not eliminate an active mite colony-it may help prevent rebound after treatment, but confirmed mites need isolation, repeated washing, and contact sprays through several generations.
What spider mites look like on peace lily
Early feeding:
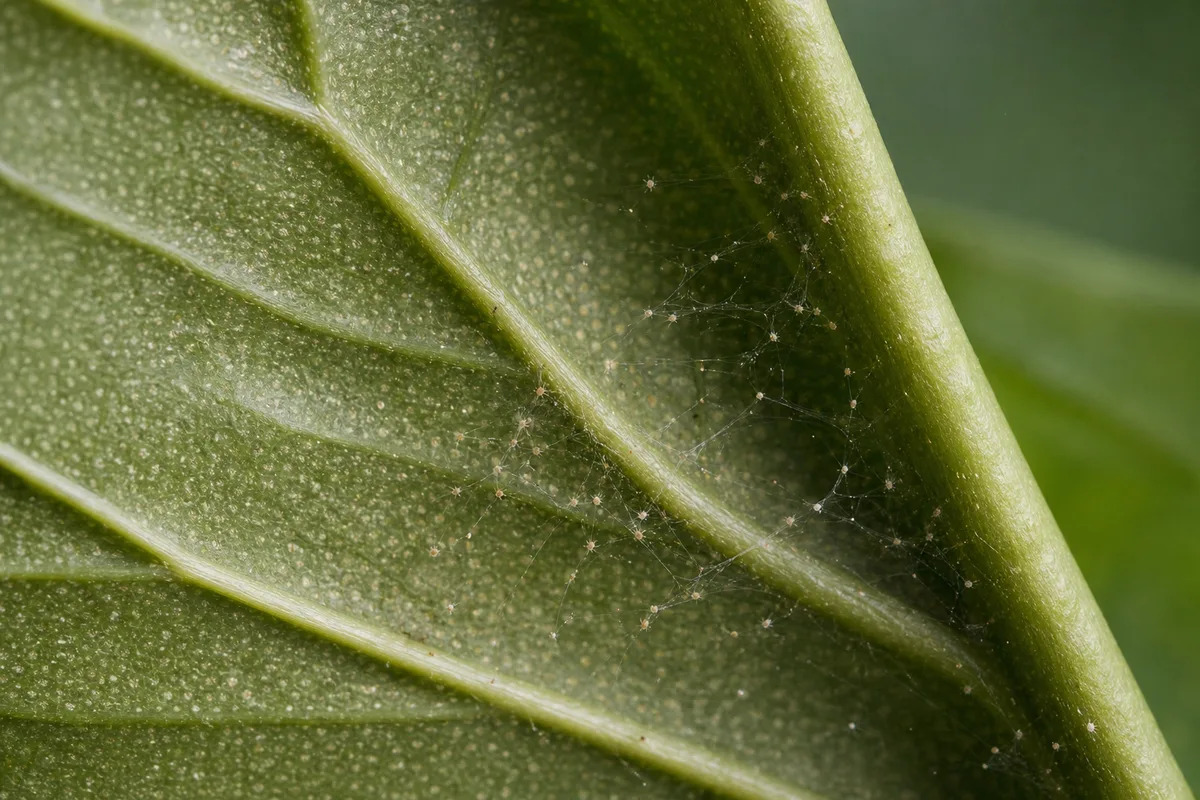
Spider Mites symptoms on Peace Lily - compare with healthy tissue on the same plant.
- Pinpoint yellow or pale dots scattered across glossy upper leaf surfaces-the classic stippled look
- Slight dullness or bronzing on heavily fed blades
- Leaves still attached; the plant may still flower while mites build on undersides
Established colonies:
- Fine silk webbing at leaf petioles, crown junctions, and between overlapping leaves in the clump
- Undersides feel gritty; black fecal specks or amber eggs visible with a hand lens
- Yellowing that follows the stipple pattern rather than uniform chlorosis from wet soil
- Variegated cultivars such as Domino show damage first on pale streaked sections
Advanced infestation:
- Leaves turn bronze or bleach pale, then drop from the outer ring
- Webbing covers stem sections near the crown; mites visible as moving dots when disturbed
- New center leaves emerge small, curled, or fail to unfurl
- White spathes may brown early if mites colonize tissue around the bloom stalk
To the naked eye, mites look like tiny moving dots-about 1/50 inch long. A 10× hand lens makes identification much easier.
Why peace lily gets spider mites
Peace lilies are generally sturdy indoors, but Clemson Extension lists spider mites among the houseplant pests that can still attack them. Several peace-lily-specific factors raise risk:
Dry winter air near heat sources. Peace lilies prefer moderate humidity and consistent warmth. Spider mites thrive in dry, warm conditions. A pot on a windowsill above a radiator or beside a forced-air vent sits in exactly the microclimate mites favor-reflected glass heat plus humidity that often drops below 40% when heating runs.
Glossy leaves that collect dust. Wide, glossy blades accumulate household dust, especially on office desks and upper shelves. Dusty, water-stressed foliage is more susceptible to mite damage. Wiping or rinsing leaves is not just cosmetic-it exposes early colonies.
Clumping crown structure. Peace lilies grow as upright clumps with leaves rising directly from the soil. Inner leaves overlap tightly, reducing airflow and giving mites sheltered undersides to colonize unnoticed. Spray coverage must reach deep into the crown, not just the outer ring.
Dramatic wilt habit masks early damage. Peace lilies collapse when thirsty, which trains owners to watch soil moisture-not leaf undersides. Stippling can spread across several outer leaves before anyone notices pinprick dots while attending to droop cycles.
Recent plant additions. Mites often arrive on newly purchased plants or pots summered outdoors. A new peace lily placed beside an established one on a plant shelf can seed an infestation within days when temperatures are warm.
How to confirm the cause
Work through these checks in order:
-
Tap test - Hold white paper under a suspect leaf and tap the blade firmly. Watch for tiny moving specks on the paper. Static debris does not crawl; mites do.
-
Underside inspection - Part the clump and examine backs of leaves at petiole bases and in the crown center. Mites live in colonies mostly on undersides. Webbing at the leaf-stem joint is a strong mite signal.
-
Pattern check - Stippling scattered across individual glossy blades points to mites. Uniform yellowing from the soil line up often fits overwatering-not a speckled upper surface.
-
Webbing vs. no webbing - Silk webbing confirms spider mites. Thrips cause silvery streaks but not silk. Mealybugs show white cottony masses in leaf axils, not uniform stipple dots.
-
Environment check - Is the peace lily beside a heat vent, on a sun-baked south windowsill, or in a room that has been dry for weeks? That context fits mites better than root rot.
-
Neighbor plants - Scan other houseplants on the same shelf. Mites crawl from plant to plant when populations are high.
-
Droop disambiguation - Whole-plant limp collapse with wet soil and sour smell points to root rot, not mites. Stippling on firm stems with appropriately moist soil points away from overwatering. Predictable perk-up after watering on dry soil is thirst-see drooping leaves.
If the tap test shows no movement, webbing is absent, and leaves are uniformly yellow with wet soil, investigate watering before committing to a mite treatment cycle.
First fix for peace lily
Move the peace lily away from other plants and wash every leaf underside under lukewarm running water or a shower spray.
Hold outer leaves aside so water hits the backs of inner crown leaves directly. Forceful washing reduces mite numbers and breaks up protective webbing. Let foliage dry in bright indirect light the same day-do not leave wet leaves in a dark corner.
Do not apply horticultural oil or insecticidal soap on day one before this rinse. Soap and oils work by contact; a pre-wash clears debris so later sprays reach mites. Do not repot, prune heavily, or fertilize a stressed peace lily until you know the infestation level.
Pet safety during rinse and soap treatment
Peace lily contains insoluble calcium oxalate crystals and is toxic to cats and dogs if chewed, according to the ASPCA. Rinse water, wet foliage, and soap residue can irritate mouths if pets lick treated leaves. Keep the isolated plant out of pet reach while foliage dries, wash hands after handling, and contact your veterinarian or ASPCA Animal Poison Control at (888) 426-4435 if ingestion is suspected. See our peace lily overview for full toxicity context.
Step-by-step recovery
After the initial isolation and wash:
-
Repeat water washes every two to three days for one week if the infestation is light. Re-check undersides with a lens after each session, especially inner crown leaves.
-
Apply insecticidal soap or horticultural oil if mites persist. Both smother mites on contact and are effective against spider mites on indoor plants. Coat undersides completely, working spray into the clump center; repeat every five to seven days for at least three cycles to catch newly hatched nymphs.
-
Raise humidity without overwatering soil. Run a humidifier near the peace lily or group plants on a pebble tray. Higher humidity slows mite reproduction but does not replace direct treatment-and it must not mean keeping soil soggy. Match watering to our watering guide: moist when the top 3–5 cm dries, not constant wetness.
-
Prune only heavily webbed leaves that are mostly bronze or dead. Removing a few worst outer leaves lowers pest load and improves spray coverage on the remaining clump.
-
Inspect adjacent plants on the same shelf or desk tier. Treat any with early stippling even if webbing is not visible yet.
-
Wash hands and tools after handling infested foliage so mites do not hitchhike to healthy plants on clothing or pruning shears.
For severe infestations where most leaves are webbed and the plant is declining, discarding the peace lily in a sealed bag may be more practical than saving one pot at the cost of the whole collection.
Recovery timeline and what improvement looks like
Light infestations often show fewer new stipples within three to five days of repeated washing. A full soap or oil course typically takes two to three weeks with label-interval repeats. Old stippled leaves remain scarred-judge recovery by clean new leaves emerging from the crown center and no fresh webbing, not by old foliage returning to solid green.
If new growth stays clean for two weeks after your last treatment, consider the outbreak controlled. Resume normal peace lily watering only after you confirm mites are gone-overwatering during recovery adds root stress on top of foliar damage.
Lookalike symptoms to rule out
Thrips leave silvery streaks or scuffed patches and black specks of excrement. They do not spin silk webbing. Shake a stem-adult thrips fly; mites crawl.
Mealybugs appear as white cottony clumps in leaf axils and crown pockets, not uniform stippling. Honeydew may feel sticky; mite damage feels dry and gritty.
Overwatering yellows leaves more evenly, often with soft stems and sour-smelling soil. Stippling on upper surfaces with appropriately moist soil and firm stems points away from root rot.
Low humidity edge crisp browns leaf margins on peace lily without the speckled upper-surface pattern mites create. If only edges brown with no webbing or tap-test movement, see low humidity.
Fluoride or salt tip burn affects tips and margins from tap water chemistry-not scattered pinprick dots across the blade. See brown tips when tips brown without stippling or pests.
Nutrient deficiency tends toward overall pale leaves rather than localized stipple clusters with webbing.
Mistakes to avoid
Do not stop after one spray because leaves look better for a day-eggs hatch on a short cycle and populations rebound within a week.
Do not spray only the tops of peace lily leaves. Mites live on undersides and in the crown center; top-only treatment misses colonies.
Do not apply oil or soap to a drought-stressed peace lily in direct hot sun. Avoid treating water-stressed plants or when temperatures exceed 90°F.
Do not use broad-spectrum insecticides aimed at other pests. Pyrethroids can kill mite predators and trigger mite outbreaks.
Do not ignore neighboring plants because one peace lily looks worse. Mites spread along shared shelves and office desks.
Do not fertilize during active infestation hoping to push new growth-that produces tender tissue mites prefer.
Do not confuse dramatic peace lily wilt with mite damage. Limp whole plants on wet soil need a moisture diagnosis, not repeated soap sprays.
Peace lily care cross-check while treating
While treating mites, keep baseline care steady:
- Water when the top 3–5 cm of mix dries or leaves first droop-not on a calendar. Do not let soil go bone dry for weeks, because water-stressed plants suffer more mite damage, but avoid soggy mix that invites root problems.
- Light should stay bright and indirect; do not move a recovering peace lily into harsh direct sun while leaves are weakened.
- Humidity target 50–60% during winter treatment months-a humidifier outperforms misting alone for sustained levels.
- Airflow is fine, but keep the pot away from blasting heat vents.
How to prevent spider mites next time
Rinse or wipe peace lily leaves monthly to remove dust and expose early colonies. Dusty, neglected foliage is easier for mites to colonize unnoticed in a dense clump.
Quarantine new peace lilies and other houseplants for at least two weeks before placing them beside existing pots. Monitor for stippling during isolation.
Run a humidifier in dry winter rooms or move the peace lily away from heat registers. Moderate humidity matches what peace lilies prefer and what keeps mites from exploding.
Inspect leaf undersides weekly during heating season-one quick check of an inner crown leaf takes less time than treating a whole shelf later.
Avoid letting peace lilies summer outdoors without a thorough rinse and quarantine period before bringing them back inside. Outdoor exposure can pick up mites that thrive once windows close.
When to worry
Treat as urgent when webbing covers multiple leaves in the crown, new center growth fails to unfurl, or mites appear on several plants in the same room within days. At that stage, isolation and repeated washing may need to extend to the whole collection.
Consider discarding a severely defoliated peace lily in a shared space rather than risking months of reinfestation. Bag and remove plants when most of the foliage is covered with webbing.
Early stippling on one outer leaf with no webbing yet is manageable-confirm with a tap test and start washing before populations build. That window closes quickly in warm dry rooms.
Conclusion
Spider mites on peace lily are a dry-air, dusty-leaf problem as much as a pest problem. Isolate, rinse undersides thoroughly-including inner crown leaves-confirm with a tap test, then repeat soap or oil sprays through several generations while humidity improves. Stippled old leaves may stay marked, but clean new growth from the crown center tells you the plant is winning. If you are unsure whether stippling is mites or dry air alone, run the tap test and check the routing table at the top before you treat the wrong problem.
Related peace lily guides
- Peace lily overview - species basics, humidity, and pet toxicity
- Watering - depth probe and droop-vs-rot checks during treatment
- Low humidity - edge browning without confirmed pests
- Brown tips - fluoride and salt margins vs. stippling
- Wilting - whole-plant collapse pathways
- Drooping leaves - thirst-focused droop when mites are ruled out
- Root rot - wet-soil failure with soft stems
Related tool
Use the Pest Identifier Tool to narrow causes for spider mites on this plant before changing multiple variables at once.