How to Grow and Care for Boxwood Shrubs
Choose a boxwood for a hedge or foundation, plant it at the right depth, water by soil condition, prune for airflow, and spot blight early.
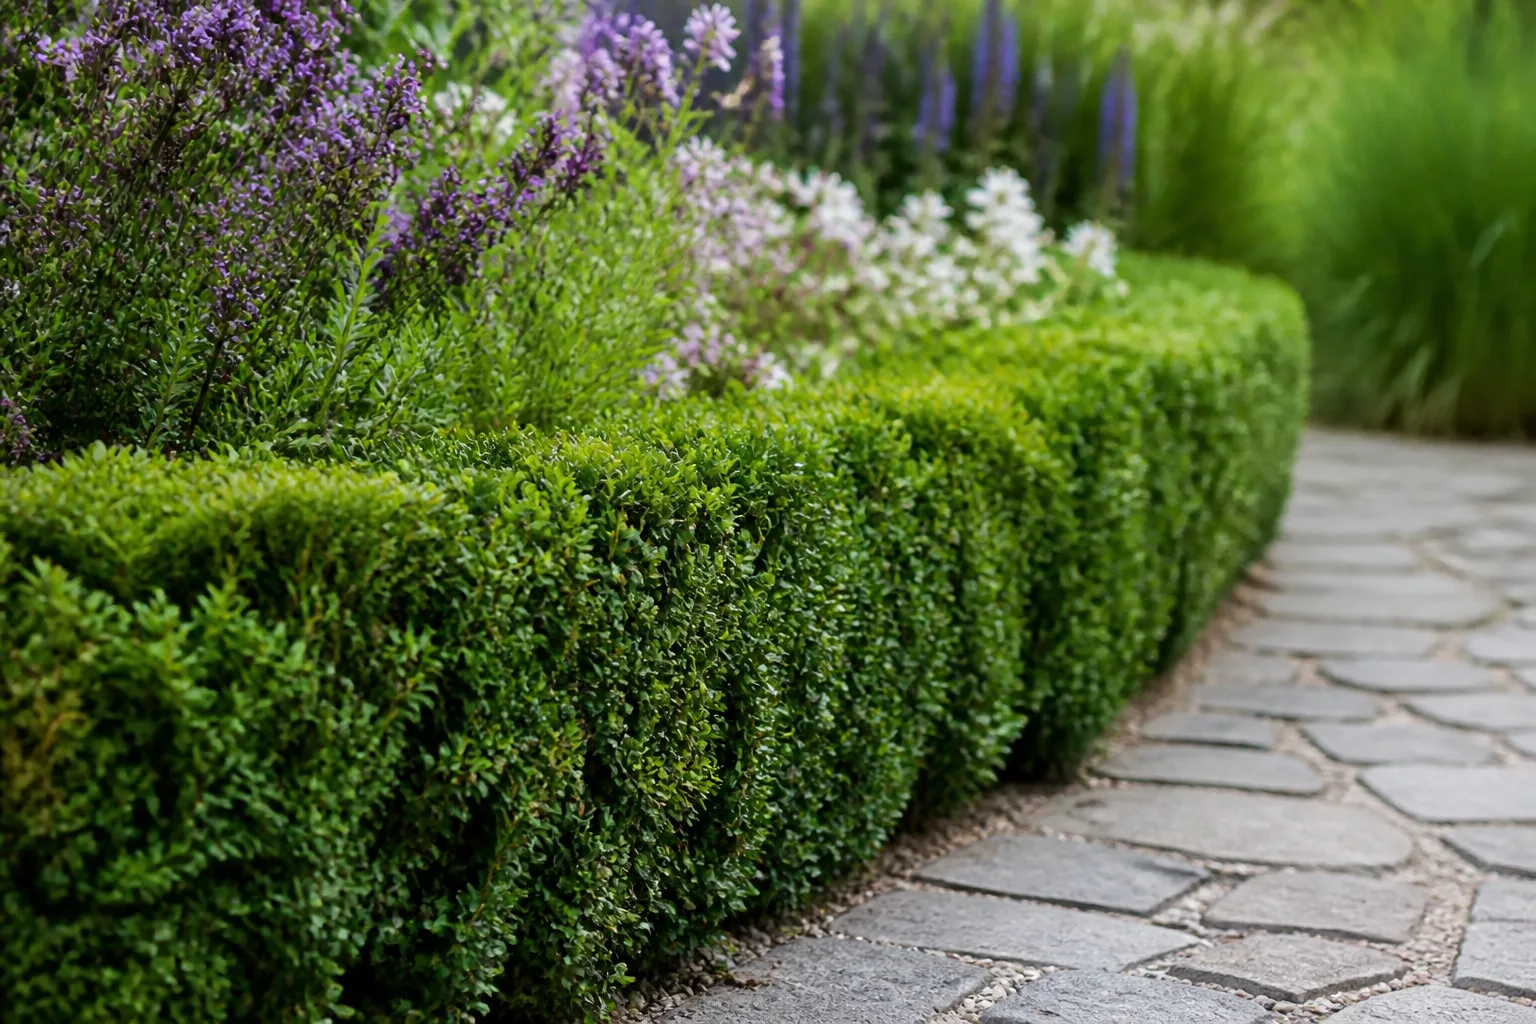
Boxwood’s neat evergreen foliage makes it a natural choice for edging, a low hedge, or a formal shape, but “boxwood” is not one predictable plant. Different species and cultivars mature at very different sizes, respond differently to winter weather, and may not suit the same exposure. Pick a plant for the space it will occupy at maturity, then give its shallow roots reliable moisture without leaving them in soggy soil.
The care that matters most is practical: keep the root collar at soil level, water a new shrub deeply when the root zone begins to dry, and prune in a way that lets light reach the inside. A brown or yellow leaf is a clue, not a diagnosis; check the pattern and growing conditions before reaching for fertilizer or pesticide.
What boxwood shrubs are—and what varies by type
Boxwoods are broadleaf evergreens in the genus Buxus. Their small, opposite leaves form a dense surface that can be shaped into a hedge or topiary, but many cultivars also look good with little more than occasional cleanup. The genus includes slow, compact forms as well as shrubs that can grow into substantial screens or small trees, so the label matters.
The common boxwood, Buxus sempervirens, can become far larger than the clipped nursery specimen suggests. The dwarf English boxwood, B. sempervirens ‘Suffruticosa,’ is one compact cultivar; it is not a name for every boxwood sold as “English.” Littleleaf boxwood, B. microphylla, and its cultivars bring another set of leaf sizes, forms, and cold responses. NC State Extension’s Buxus profile lists both the large species form and cultivars that stay much smaller.
That variation is useful, but it makes a universal care calendar misleading. Treat the botanical name and cultivar as part of the care instructions, especially when you are planting near a walk, under a window, or in a region with severe winter wind or hot afternoon sun.
Choose a cultivar for its mature job, not its nursery size
Before shopping, decide what the shrub needs to do: make a low border, frame a doorway, fill a foundation bed, or form a taller screen. Then compare the cultivar’s mature height and width, growth rate, hardiness, and tolerance for your site. A plant sold at 12 inches tall may eventually be several feet wide, and a slow cultivar can take years to fill a gap.
A useful starting comparison is:
| Boxwood group or cultivar | A possible use | Check before buying |
|---|---|---|
| Dwarf English boxwood, ‘Suffruticosa’ | Low edging or a compact formal planting | Slow growth; verify the cultivar’s expected width and local winter performance. |
| Littleleaf boxwood, B. microphylla | Small hedge, border, or clipped form | Cultivars vary in mature size and cold response; do not treat the species name as a zone guarantee. |
| Hybrids such as ‘Green Gem’ or ‘Green Mountain’ | Rounded foundation plants or a taller clipped accent | Form, height, and winter color differ; check the label and local extension recommendations. |
| Common boxwood, B. sempervirens | Larger screen or long-term specimen where space allows | The species can become a large shrub or small tree if left unpruned. |
NC State lists ‘Suffruticosa’ at about 2 to 3 feet tall, while ‘Green Mountain’ is listed as a taller form suited to hedging or topiary; Illinois Extension likewise warns that common boxwood can reach much larger dimensions than some cultivars. Those figures are guides to specific plants, not promises for every nursery specimen, because pruning, climate, and growing conditions affect the result. Ask for the cultivar’s full name instead of relying on a tag that says only “boxwood.”
Match growth habits to common landscape roles
For a low border, prioritize a compact mature height and slow growth so the plants do not swallow a path or require constant shearing. For a hedge, choose a variety whose mature height matches the privacy or screening job; if you need a tall barrier quickly, boxwood’s often-slow growth may make another shrub a better fit. For a topiary, select a dense, responsive cultivar and expect repeated light trims rather than one severe cut.
A sunny, hot site, a cold and exposed corner, and a sheltered dappled bed are different environments even when they are in the same hardiness zone. If your yard has severe winters, reflected heat, salt spray, or persistent wet soil, tell the nursery or extension office about that condition before choosing a cultivar. The University of Illinois Extension boxwood profile notes that winter injury is common in colder sites and that cultivar selection matters in Zone 5.
Give boxwood the right light, drainage, and air
Many boxwoods grow well in partial or dappled shade, and established plants can tolerate full sun in suitable climates. Afternoon shade can reduce heat stress in hot regions, while deep shade may leave a hedge thin or slow to fill. Sun exposure is not the only variable: winter sun and wind can dry evergreen leaves when roots cannot replace lost moisture, creating bronzing or scorch.
Prioritize drainage. Boxwood can use moist soil, but roots do poorly when the planting area stays saturated; low spots, compacted clay, downspout outlets, and waterlogged containers all raise the risk of root damage. If water sits for hours after ordinary rain, choose a better-drained location or raise the planting bed instead of trying to fix the hole with a layer of gravel.
Soil pH advice varies among general boxwood references and cultivars. NC State’s genus profile gives a broader range than some gardening guides, while the University of Illinois profile describes common boxwood as tolerant of alkaline soil. Test the planting area if you have a reason to suspect an issue, but do not add lime or sulfur just to chase one universal boxwood number; use the plant-specific and local extension recommendation.
Plant at the right depth and plan the spacing
Plant in fall or in late winter to early spring when the soil is workable and moderate weather gives roots time to settle before summer heat. Avoid planting into frozen ground, saturated soil, or a spell of punishing heat. A nursery shrub should be watered before planting so the root ball is evenly moist rather than dry in the center.
Dig a hole wider than the root ball but no deeper than its height. Set the root flare and upper roots at or just above the finished soil line; burying the crown can trap moisture around the stems and stress the plant. Backfill with the native soil unless a soil test or local recommendation calls for a specific amendment, then water slowly enough to settle soil around the roots.
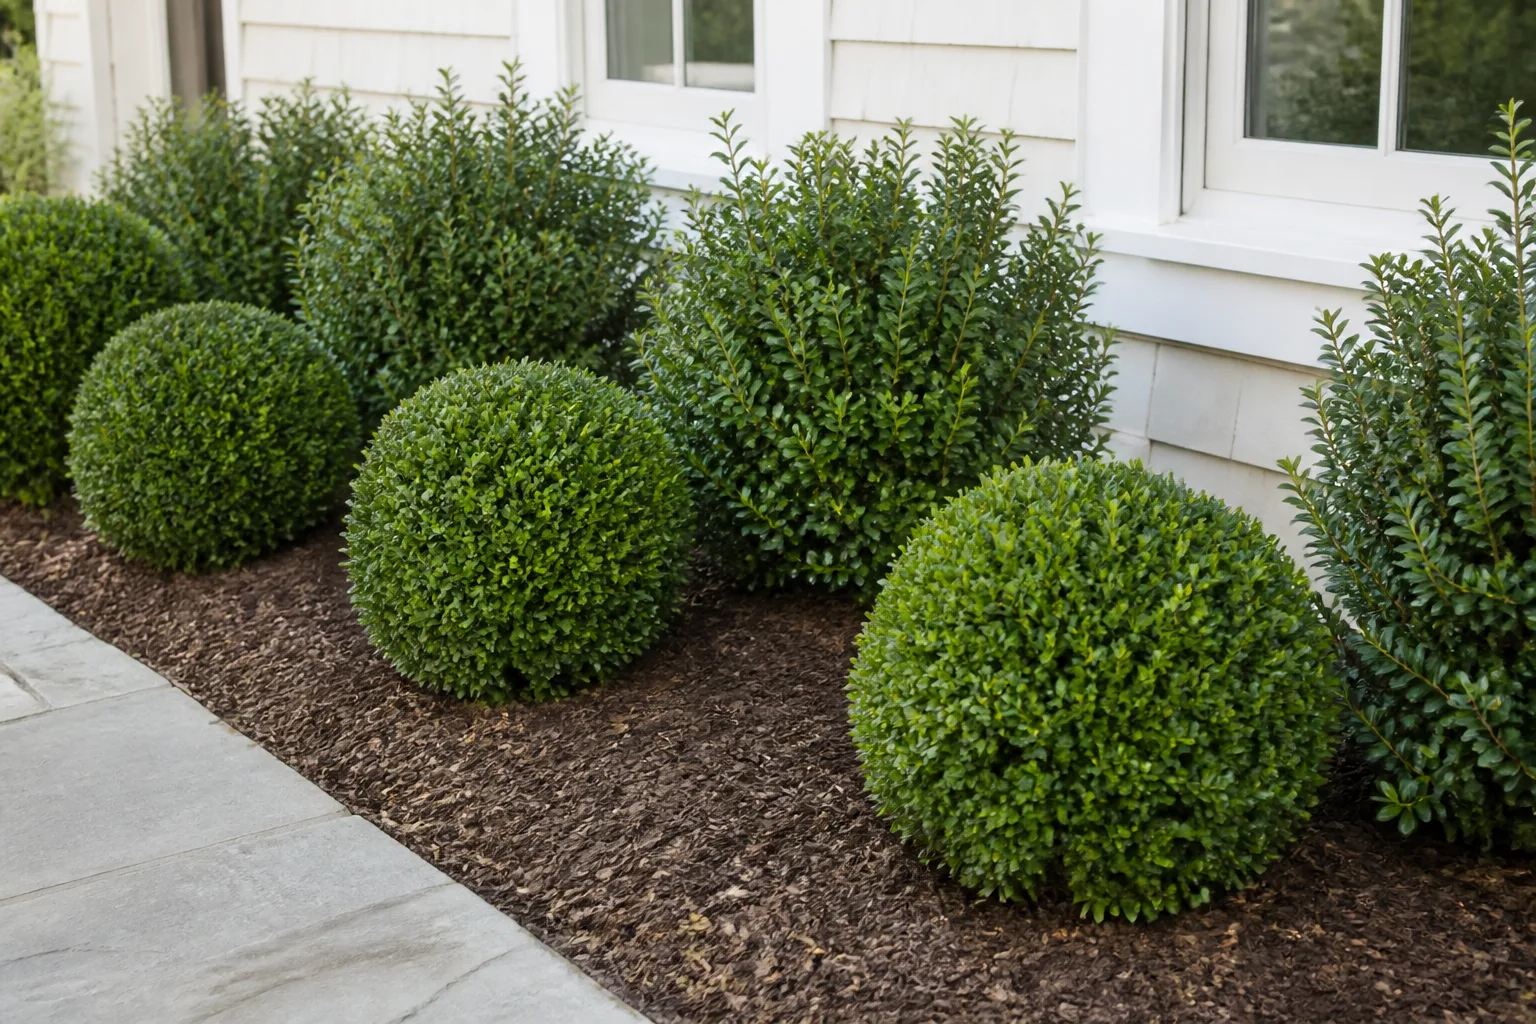
Look around the planting spot before you close the hole. Allow room for the mature width, future pruning access, roof runoff, utility lines, and snow piled from a path; boxwood’s shallow roots also make repeated digging or edging through the root zone a poor plan. Garden Design’s boxwood planting guide recommends protecting plants from standing water and placing the crown slightly above grade so water does not collect at the base.
For a hedge, calculate centers from mature spread
Spacing by the size of the pots on the nursery cart is a common way to create a costly maintenance problem. Use the selected cultivar’s mature width and your design goal to choose center-to-center spacing; placing shrubs closer can close a hedge sooner, but it can also reduce airflow, crowd roots, and make the interior harder to reach. If a disease-prone or humid site is part of the picture, favor breathing room over an instantly solid wall.
For a straight run, divide the hedge length by the chosen spacing to estimate the number of intervals, then add one plant for the final endpoint. For example, an 18-foot run at 3-foot centers has six intervals and needs seven shrubs. This is a layout calculation, not a universal boxwood spacing prescription: use the mature width on the exact cultivar tag and allow for the hedge’s final shape.
Water new shrubs through establishment
Newly planted boxwoods need more attention than established ones because their roots have not yet explored the surrounding soil. During the first growing season, check the root ball and the soil beside it every few days in warm or dry weather; water deeply when the root zone is drying, then let excess drain before watering again. A quick splash on the surface can leave the center of the root ball dry even when the mulch looks damp.
In the second year, keep checking during long dry spells, especially for plants in sandy soil, on a slope, or near hot paving. Once established, boxwood usually tolerates short dry periods better than a newly planted shrub, but that does not mean it should be left dry through a long drought. Apply water at the soil line so foliage dries quickly, and use rainfall and soil feel rather than a fixed weekly interval to make the call.
If leaves turn bronze or curl after you have watered frequently, check drainage before adding more. A root zone that stays wet can suffocate roots and mimic drought stress aboveground, while wind and winter sun can cause leaf loss even if the soil was moist earlier in the season. The NC State Extension profile recommends mulch and irrigation during prolonged dry periods, particularly in the first year, to reduce stress.
Mulch shallow roots without burying the stems
Boxwood roots grow close to the surface, where they compete with grass and weeds and can heat up during summer. Spread about 2 to 3 inches of organic mulch over the root area, extending at least to the drip line when practical, to moderate soil temperature and slow moisture loss. Keep a clear gap around each stem so bark stays dry and visible.
Do not mound mulch into a volcano against the shrub or keep adding layers until the root collar disappears. Thick, wet mulch against the stems can hold moisture where it does not belong, and deep cultivation to remove weeds can damage shallow roots. Pull weeds by hand or use a shallow surface approach; the goal is to protect the root zone, not bury it.
As the hedge grows, its roots may extend beyond the canopy. If you mulch only a narrow ring at the trunk, the outer roots remain exposed to heat and competition, so widen the mulched strip gradually instead of piling on a deeper layer. Gardener’s Path’s boxwood growing guide also emphasizes keeping mulch away from stems and maintaining moisture around the shallow roots.
Fertilize only when soil evidence calls for it
Boxwood does not need a routine dose of fertilizer simply because spring has arrived. A soil test is a better first step when growth is weak, leaves are pale, or a plant has been declining; those symptoms can also come from poor drainage, root injury, drought, winter burn, or pests. Adding nitrogen without confirming a need can burn shallow roots or push tender growth at the wrong time.
If a test shows a deficiency, follow its recommendation and the product label for the shrub’s root area. Apply only when the plant is actively growing and the soil is moist, rather than fertilizing a dry or heat-stressed shrub. Avoid late-season feeding that stimulates shoots before cold weather, and do not put granular fertilizer against trunks or foliage.
Guidance differs on fertilizer because soils and cultivars differ. Some landscape advice favors a spring application, while practical boxwood guides caution that feeding is unnecessary when soil nutrients are adequate; a test lets you act on the condition you actually have. Do not use coffee grounds, Epsom salt, or a high-nitrogen lawn product as a substitute for diagnosis.
Prune to preserve shape and healthy inner growth
An informal boxwood may need only occasional removal of dead, crossing, or damaged branches. A formal hedge can be clipped for a clean outline, but regular shearing is a design choice rather than a biological requirement. Before taking the shears to the whole plant, decide whether you want a natural rounded shrub or a precise geometric surface; the second look requires more maintenance and can create a dense outer layer.
For routine shaping, wait until spring growth has expanded and the risk of late frost has passed, then make light cuts while there is still time for new growth to mature before winter. Local timing varies with climate and cultivar. NC State Extension’s littleleaf boxwood profile advises delaying pruning until late-spring frost risk is over, while Garden Design’s boxwood guide recommends avoiding fall or winter trimming that could leave tender growth exposed to cold.
Use sharp, clean hand pruners for selective cuts and hedge shears only for a light surface trim. If you are removing diseased material, clean tools before moving to another shrub and collect cuttings rather than leaving them lodged inside the hedge. Do not attempt a drastic size reduction without confirming that the plant can regrow from older wood; slow-growing boxwoods may take a long time to recover from a severe cut.
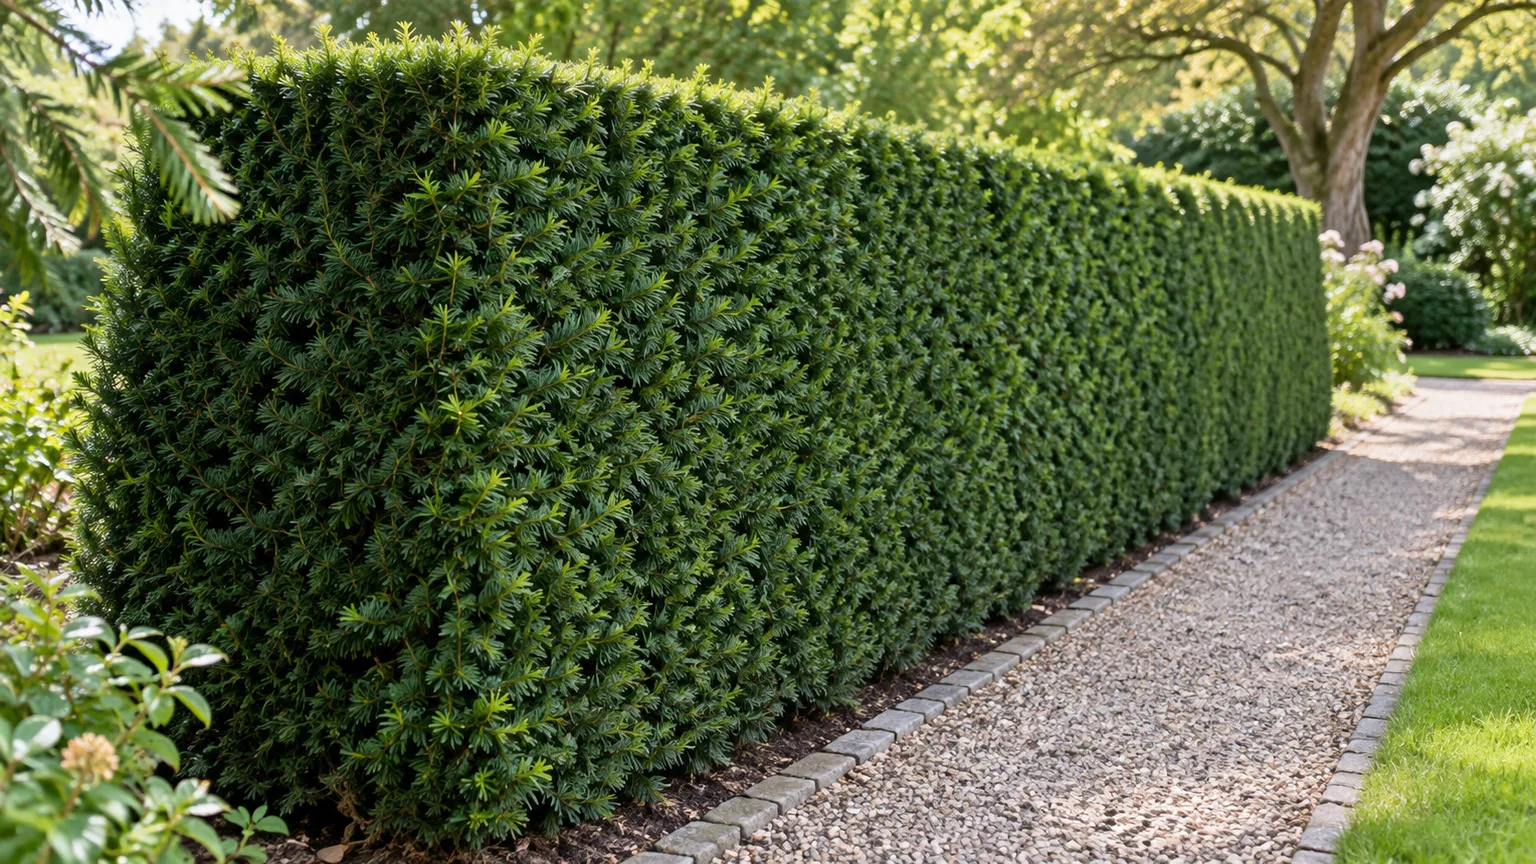
This photo shows a yew hedge; the general shape lesson applies to boxwood too. A hedge that is slightly wider at the base lets more light reach its lower foliage.
Thin a dense hedge instead of shearing a shell
Repeated clipping can make the outside look immaculate while blocking light and airflow in the center. A boxwood hedge that is wider at the top than the bottom can shade its lower branches, leaving a thin or bare base that is difficult to restore. Shape the sides so the base is a little wider than the top, and avoid trimming the plants into a vertical wall.
Once a year, inspect the inside and selectively remove a few small branches so air and light can enter. Do not strip the whole plant or create large holes in one pass; open small windows through the foliage and reassess after the next growth flush. This approach takes longer than a quick shear, but it helps maintain foliage from the ground up and makes pest or disease signs easier to see.
Propagate boxwood from a cutting when you want a clone
If you want another plant with the same cultivar traits as a shrub you already own, start with a stem cutting rather than seed. Seedlings can vary and take time to mature, while a cutting is vegetative propagation from the parent plant. Choose a healthy, disease-free shoot and never take propagation material from a shrub that may have boxwood blight or another serious infection.
A practical home method is to take a 4- to 6-inch semi-hardwood cutting after spring growth has firmed, often in late summer. Remove leaves from the lower part of the stem, insert the bare section into a clean, moist rooting mix, and keep the pot in bright indirect light with steady humidity while roots form. Gardener’s Path’s propagation instructions describe late-summer cuttings and checking for rooted growth before transplanting; timing may shift with local seasons.
Move rooted cuttings into individual pots and protect them while they establish before planting out. Boxwood is slow enough that buying a well-rooted nursery plant is often the more practical route when you need a finished hedge soon. Do not collect seed or cuttings from a plant with suspicious lesions, sudden leaf drop, or an unresolved pest problem.
Grow boxwood in containers with winter in mind
Compact cultivars can work in a large outdoor container near an entry or patio, but a pot changes the care equation. Choose a container with several drainage holes and enough room for the root ball to grow, then use a free-draining potting mix rather than dense garden soil. Avoid a decorative cachepot that traps water around the roots.
A container dries faster than the ground in hot or windy weather, so check the mix more often and water thoroughly when it is drying. At the same time, the exposed root ball is more vulnerable to freezing than roots insulated by garden soil. In cold climates, move the pot to a sheltered location or insulate the container before winter; do not assume the shrub’s in-ground hardiness rating applies unchanged to a small pot aboveground.
If a potted boxwood becomes root-bound, shift it to a slightly larger container and refresh some of the mix, rather than jumping into an oversized pot that stays wet. A slow-growing dwarf form makes a more manageable container plant than a full-size species form. Keep the shrub’s mature dimensions in mind even when it starts life as a compact topiary ball.
Protect evergreen foliage through winter
Boxwood keeps its leaves through winter, which is why cold wind, bright winter sun, and dry soil can be hard on exposed plants. Water thoroughly in late fall if the root zone is dry and the ground has not frozen, then keep mulch in place over the shallow roots. Plants beside pavement, a south-facing wall, or an open corner may need more attention than sheltered shrubs in the same yard.
A burlap screen placed on the windward side can reduce drying winds without wrapping the plant tightly. Avoid plastic that traps moisture against foliage, and do not tie heavy covers so tightly that snow or ice bends the branches. Young plants and container-grown shrubs may need extra shelter while their roots and branches are still vulnerable.
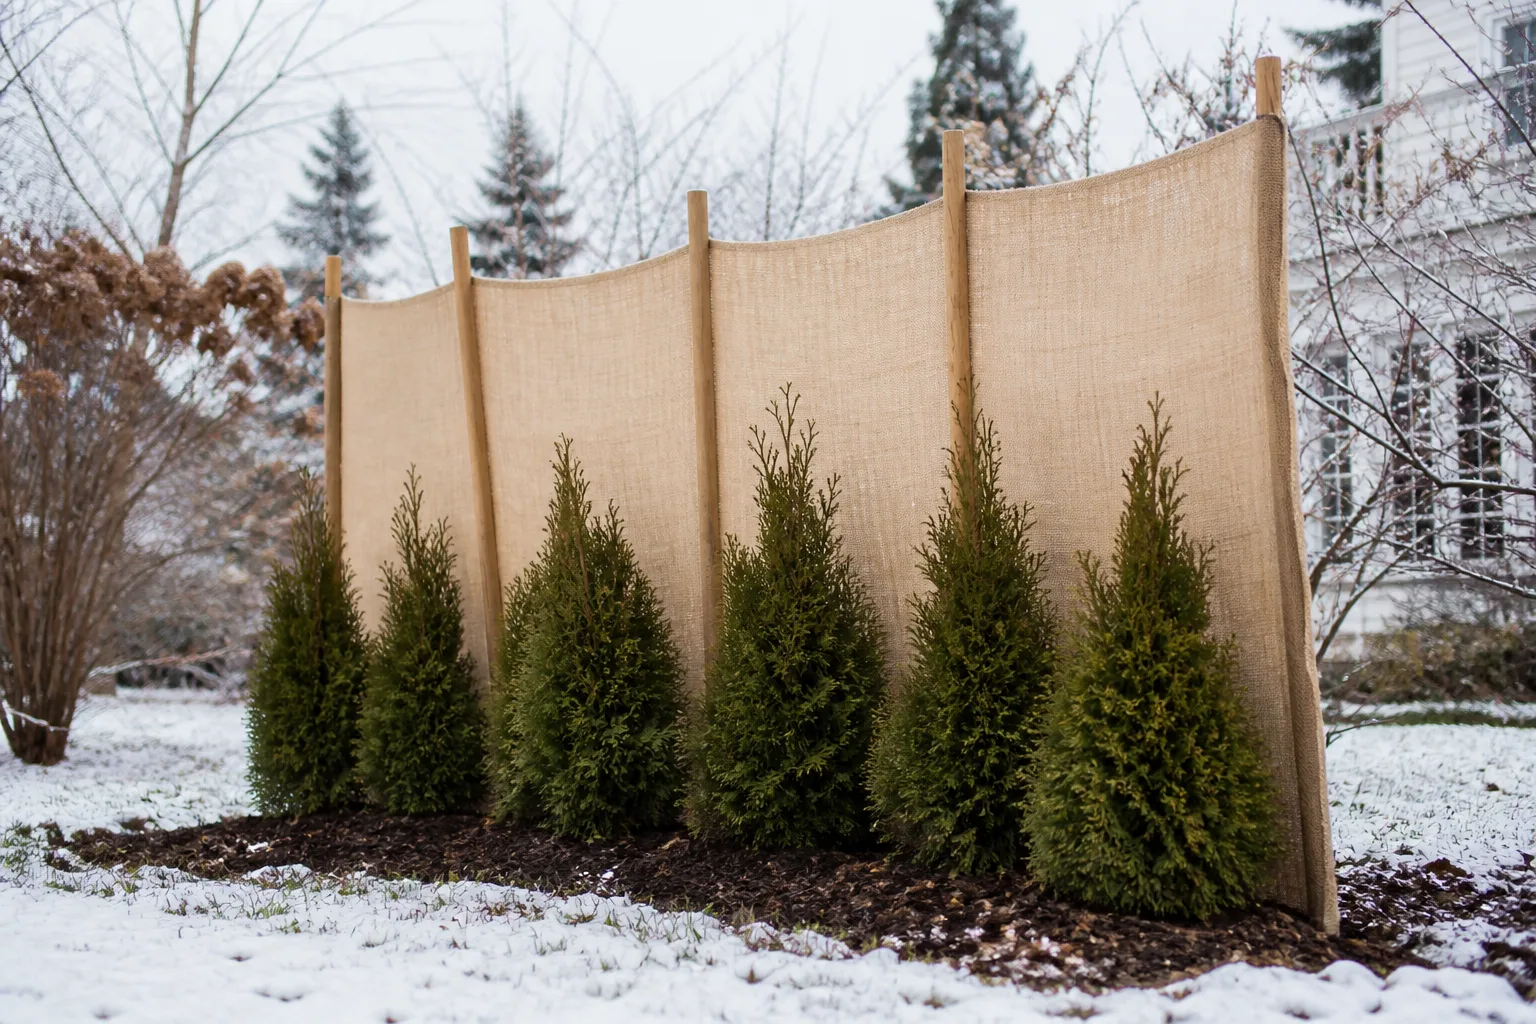
Winter bronzing can be a temporary cultivar response or a sign of environmental stress, not automatic proof of disease. If the shrub looks bronze in late winter, wait for spring growth before cutting it back; small dead tips may recover around healthy buds, while branches that remain brittle and brown can be removed after the plant resumes growth. Illinois Extension’s common boxwood profile specifically flags winter injury and sun scorch as risks in colder sites.
Diagnose bronzing, yellow leaves, and dieback before treating
Start with where the color change appears and what happened before it. Uniform bronzing after a cold, windy winter points toward exposure; a shrub that wilts during a dry spell may need a slower, deeper soak; yellowing in a plant whose soil stays wet calls for a drainage check. These clues narrow the next step, but they do not confirm a diagnosis by themselves.
Look at new and old growth separately. A few yellow inner leaves can be normal as a dense evergreen sheds shaded foliage, while widespread yellowing, premature drop, or dying branch tips deserve a closer inspection. If only one side browns, compare its sun and wind exposure with the green side instead of changing fertilizer across the entire bed.
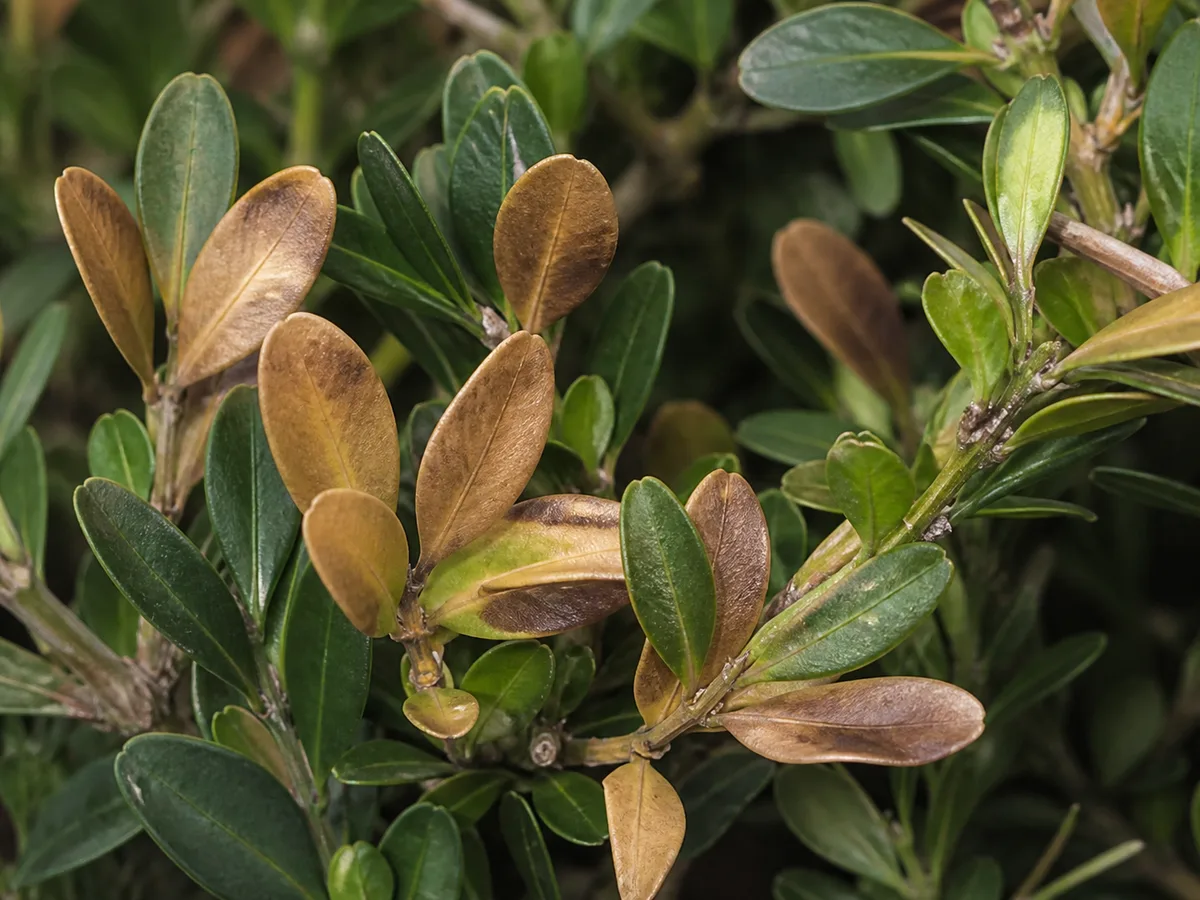
Check the soil several inches below the surface, confirm that water drains away, and look for pests or lesions on both sides of leaves and along stems. If the pattern is expanding quickly, take clear photos and a sample to a local extension office or plant clinic before spraying or replacing the shrub. Correcting an identified problem is more effective than treating every color change as a nutrient shortage.
Check for insect and disease signs with a hand lens
Boxwood pests often leave recognizable marks. NC State Extension’s pest guide describes blistered or puffy leaves with boxwood leafminer, cupped new leaves and white wax with boxwood psyllid, and pale stippling from spider mites. Turn a few leaves over and inspect several parts of the shrub; a single damaged leaf is not enough evidence to justify a broad insecticide treatment.
The first response depends on the pest, the amount of damage, and the shrub’s condition. Improve water and airflow problems you can verify, prune out small localized damage when appropriate, and ask your county extension office to identify an unfamiliar insect or disease. If a pesticide is considered, use only a product labeled for that pest and site, and follow all label directions; spraying the wrong organism wastes money and can affect beneficial insects.
A newer, regional concern is box tree moth, which can feed heavily on boxwood where it is established. If you see caterpillars, webbing, or rapid leaf loss, photograph the shrub and check current state or provincial agriculture guidance before moving plant material or choosing a treatment. The University of Connecticut Extension overview discusses this pest alongside boxwood blight and other challenges.
Treat suspected boxwood blight as a spread concern
Boxwood blight can cause brown leaf spots, leaf drop, and dark lesions on stems, often starting low in the shrub; wet conditions may reveal pale fungal growth. Those symptoms overlap with other stresses, so do not diagnose it from one brown patch or use a homemade spray as a test. Penn State Extension’s boxwood disease guide describes the symptom pattern and notes that contaminated tools, clothing, and plant material can spread the pathogen.
If blight seems possible, stop pruning and avoid carrying leaves or clippings through the garden. Keep debris out of home compost, clean tools and footwear, and contact a local extension office or plant clinic for confirmation and local disposal guidance. The safest next step is a diagnosis, because unnecessary removal wastes a mature shrub while a confirmed infection needs careful handling to protect nearby boxwoods.
Keep boxwood leaves and clippings away from pets
Boxwood is an ornamental shrub, not an edible herb. NC State’s plant profile lists steroidal alkaloids in the bark and leaves and describes a low-severity poisoning risk, including gastrointestinal symptoms after ingestion; it also notes that sap can irritate skin. Keep children and pets from chewing the shrub, and collect pruning debris before animals can reach it.
Wear gloves if you have sensitive skin, wash after handling, and do not use boxwood trimmings in food, tea, or animal bedding. If a person or pet eats part of the plant or develops symptoms, contact a poison-control service, veterinarian, or clinician for advice rather than trying to estimate a safe amount. Risk depends on the amount and the individual, so this guide cannot set a safe dose.
Conclusion
Boxwood is easiest to manage when the plant fits the site before you start pruning. Choose by the cultivar’s mature width and local hardiness, plant with the root collar at or slightly above grade in well-drained soil, and water the root ball deeply as it establishes. Mulch the shallow root zone without piling material against the stems.
After that, keep care responsive rather than automatic: test soil before fertilizing, shape after spring growth hardens, and water during genuine dry spells. Check the pattern of brown or yellow leaves before treating, thin formal hedges so their interiors receive light, and get local help when blight or a regional pest is possible. With the right cultivar and a few measured habits, boxwood can stay dense and useful without becoming a constant pruning project.