How to Build a Cattle Panel Trellis for Your Garden
Build a cattle panel trellis that fits your path and crops. Learn what to measure, how to anchor and bend the panel safely, and how to support heavy fruit.
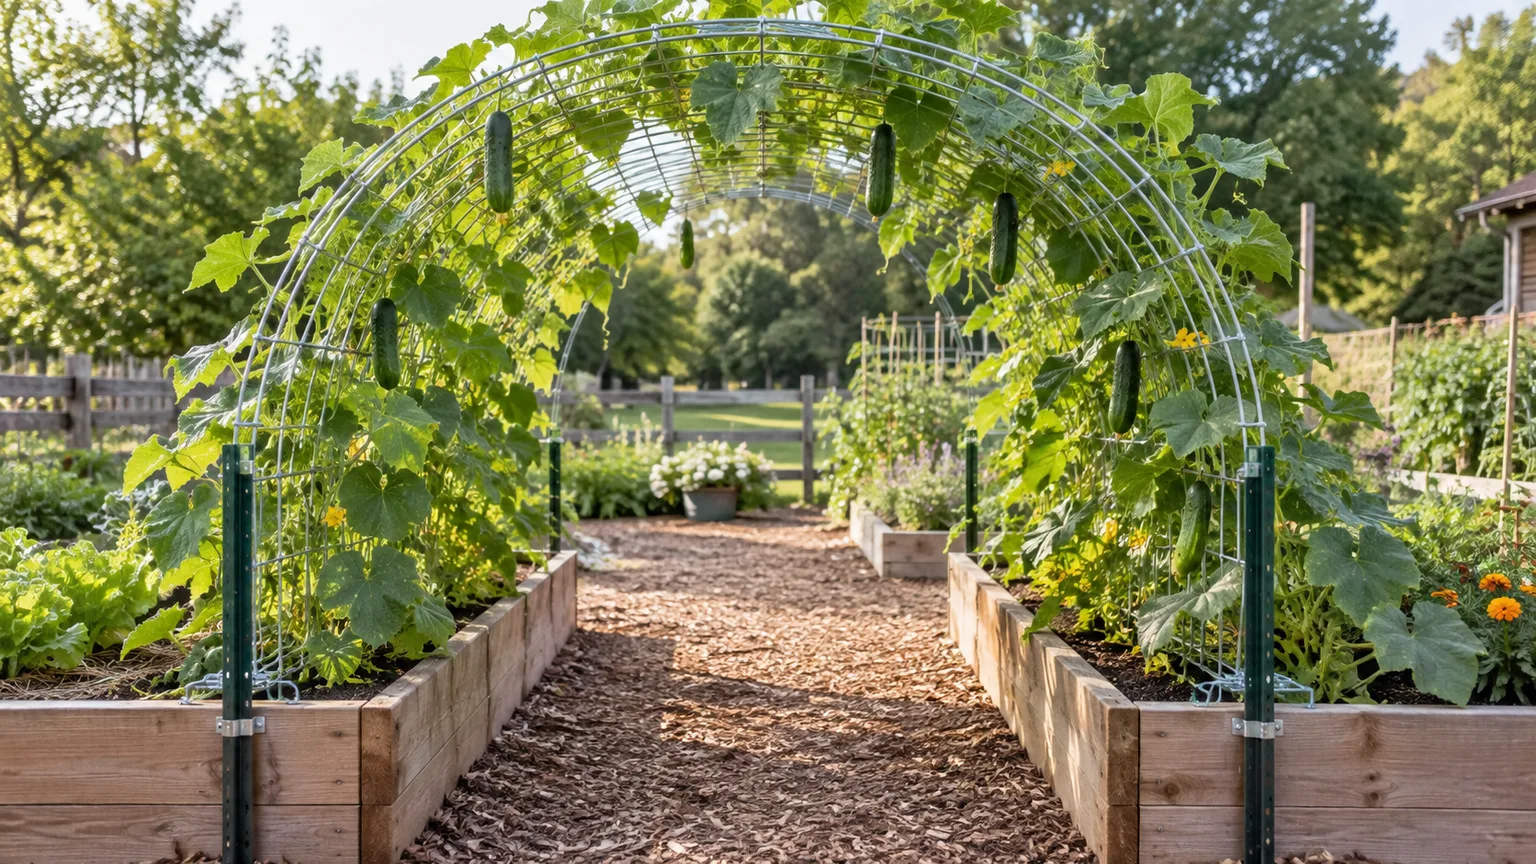
A cattle panel trellis is a stiff livestock fence panel bent into an arch or used upright as a climbing surface. It can turn a narrow path between beds into growing space for pole beans, cucumbers, small melons, and other vining crops, but the project only works well when the opening fits the site and the posts can resist the panel’s spring and the mature plants’ weight.
The most useful step happens before you buy anything: test the shape and clearance you want. A 16-foot panel is a common option, but the finished height depends on how far apart its feet are and how sharply you bend it; there is no single span that reliably produces the same arch in every garden. This guide helps you choose a layout, build it with a helper, and match the trellis to plants that can use it.
Is a cattle panel trellis the right structure?
A cattle panel is a rigid welded-wire sheet, often sold as livestock or feedlot fencing. Gardeners use it as a broad climbing surface, either standing vertically between posts or bent into an arch over a path or bed. The open grid gives tendrils and stems places to catch, while the panel itself can last through multiple seasons if its supports and connections stay sound.
The arch is popular because it does two jobs: it supports crops and creates a tunnel-like feature. It can also make harvesting easier by bringing fruit into view and off the soil. Virginia Cooperative Extension and UW–Madison Extension describe vertical supports as a way to use space efficiently and improve access to produce; better airflow through foliage can also reduce disease pressure, though a trellis does not prevent disease on its own.
An arch is not automatically the best choice. The curve uses a fair amount of panel length to create height, takes careful anchoring, and can leave less headroom than a flat panel; a tunnel also shades the ground beneath it as vines fill in. If your garden is compact, your soil is shallow, or you need a guaranteed accessible passage, compare alternatives before shaping the steel.
Arch, A-frame, or upright panel: choose by job
Choose an arch when you want to span a path or connect two raised beds, and when you can set anchors on both sides. It works especially well for crops with long, flexible vines that can be guided over the curve. Before committing, stand in the planned passage and account for the mature canopy, the height of people who will use it, and any harvest baskets or tools carried beneath it.
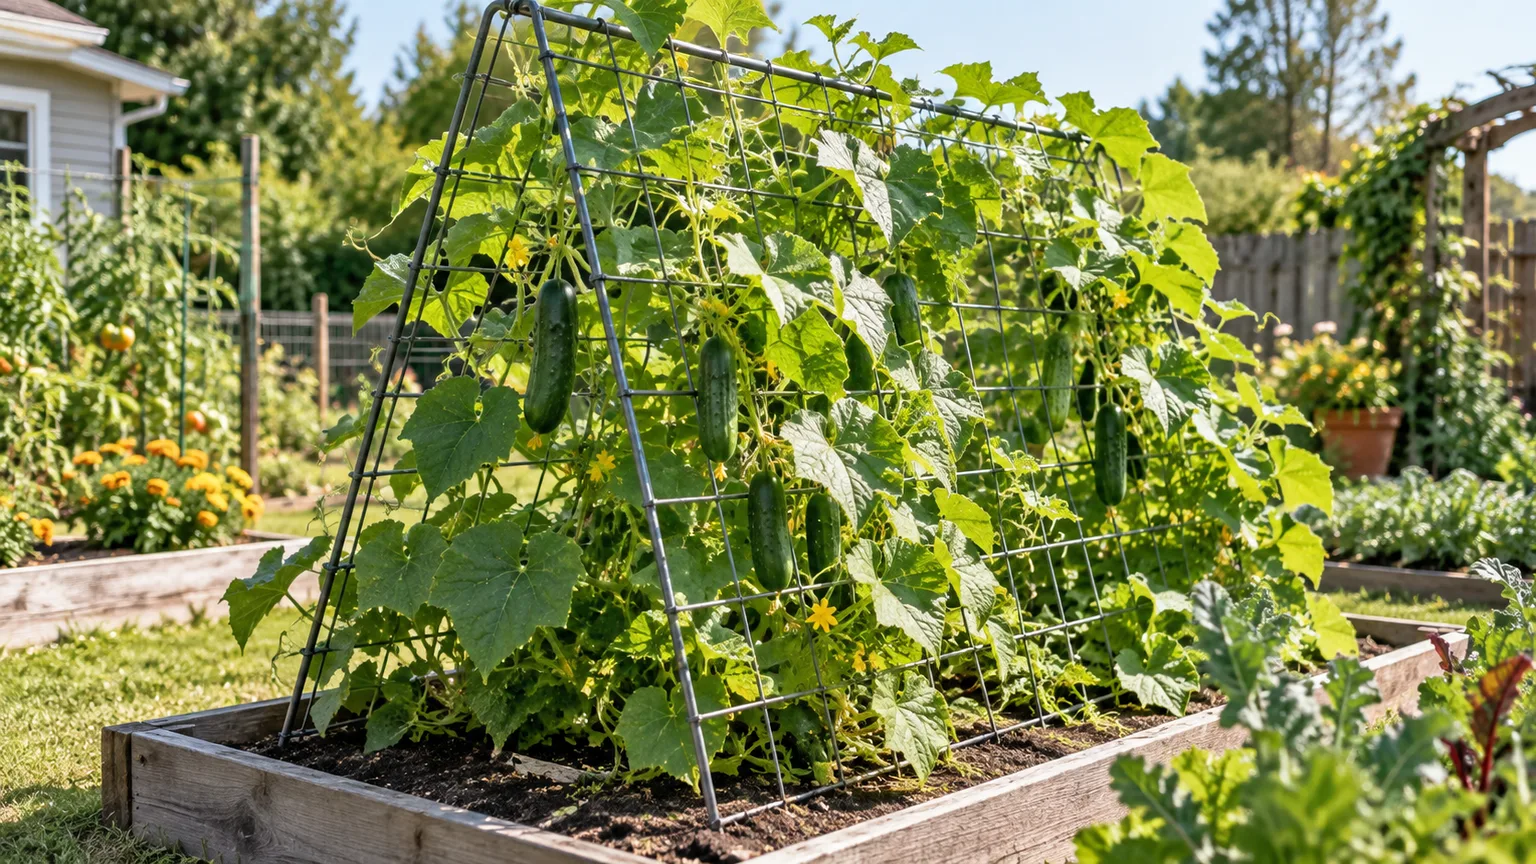
An A-frame uses one panel folded into a peaked shape or two panels joined at the top. K-State Research and Extension describes leaning two cattle panels together and securing them at the top as one vertical-garden option; a single panel can also be tied upright to T-posts. A-frame supports do not make a tunnel, but their sides can be easier to reach and their footprint may suit a bed better. Plan a way to secure the top and feet so the frame cannot spread or tip.
A vertical panel is the simplest layout when the goal is to train vines along a boundary rather than create a passage. It may need fewer bends, but the posts and any top or bottom rails must be strong enough to hold the panel and crop load. If the structure will stand in a windy site or support fruiting vines, add support appropriate to the soil and exposure instead of relying on a single loosely tied post.
The choice is about access as much as appearance. A decorative arch can be awkward if you cannot reach fruit at the crown; an A-frame may shade nearby plants; and a flat panel may be less convenient to walk around once both sides are planted. Sketch the footprint first, including the beds, walkway, post locations, and the space plants will occupy at full size.
Plan dimensions before you buy
Common cattle panels are long, rigid sheets; one frequently described garden size is about 16 feet long and 50 inches wide. Actual dimensions, wire spacing, coatings, and availability vary by supplier, so measure the panel you can actually obtain rather than designing around a catalog assumption. A shorter panel may be easier to transport and maneuver, but it creates a different shape and may not give the opening you need.
Do not treat a published finished height as a promise. Bending the panel more tightly can raise the crown while narrowing the opening; spreading the feet can widen the walkway while lowering the crown. Soil slope, the way the panel is held, and how its ends attach to the posts also affect the final profile. Savvy Gardening and Get Busy Gardening both describe the arch as a shape that changes with its span and bend, which is why a mock-up is more dependable than a universal height chart.
Measure the passage and working clearance
Measure the clear width you need between the inside edges of the posts, not just between the bed borders. Include comfortable shoulder room and any path maintenance needs; the panel, brackets, and post caps should not intrude into the usable walkway. If a wheelbarrow or mobility aid needs to pass, test its actual width and turning room before setting anchors.
Next, decide the minimum head clearance at the center and at the sides. The curve is highest at the crown, but people often walk off-center, where an arch slopes lower; leafy growth and hanging fruit reduce clearance further. Use a tape measure and a temporary support, such as two helpers holding the panel in position, to check a rough shape before driving the posts. Do not force the panel to a tight span simply to reach a target height.
A practical layout note should record the opening width, desired clearance, bed edges, and where each post will go. Mark the outline with string or garden hoses, then walk through it several times. If the opening feels cramped before plants are added, move the posts or choose a different structure now; adding plants will make the space feel tighter, not wider.
Also consider how the arch meets the ground. In a raised bed, posts may need to pass through the bed and anchor into firm soil below; attaching them only to thin bed boards can let the frame rack or pull away. In loose fill, shallow soil, or a container, use a purpose-built braced frame secured to the structure rather than assuming a standard T-post will hold.
Match the site to the crop and sun
Pick the location based on the plants, not just the visual effect. Fruiting vegetables such as tomatoes, cucumbers, beans, and many squash varieties generally need strong direct light; use the seed packet or local extension guidance for the specific crop and climate. A site that is shaded for much of the day may still suit shade-tolerant greens beneath or near an arch, but it is a poor place for a sun-loving crop simply because the walkway is convenient.
Think about light on both sides of the structure. Tall vines can cast shade on a neighboring bed, and the arch itself may shade the path below. If planting on both sides, plan which crop goes where and leave enough room to reach the roots for watering and harvest. The orientation of the arch can influence light distribution, but nearby trees, walls, and the sun’s seasonal angle matter more than a rigid compass rule.
Finally, consider wind and access to water. A foliage-covered panel catches more wind than an empty one, so exposed sites need stout, well-driven posts and secure attachments. Place the structure where you can inspect the ties and reach both sides; a beautiful trellis that cannot be maintained safely will become a burden once the vines are dense.
Materials and tools
For one arch, a common starting list is a rigid cattle panel, four appropriately sized T-posts or another compatible support system, and outdoor-rated ties or galvanized fence wire. A post driver or heavy mallet, measuring tape, marker or string, wire cutters, and a level help with layout and assembly. Bring a helper, sturdy gloves, eye protection, and boots; the panel is bulky, has exposed edges, and can spring as it changes shape.
Choose posts based on the depth of firm soil, the height of the arch, and the load expected. Virginia Cooperative Extension recommends driving trellis posts 18 to 24 inches into the ground as a general guideline, but that is not a guarantee for every soil or exposed location. If your ground is loose, wet, rocky, or shallow, or if you plan to grow a dense crop in a windy spot, use longer posts, add bracing, or select a different construction method.
For connections, galvanized wire makes a durable attachment when it is twisted and trimmed so no sharp tail protrudes. Heavy-duty, UV-resistant cable ties can be easier to install, but inspect them for cracking and replace them if they weaken; ties are a maintenance item, not a permanent structural guarantee. Use enough attachment points along each post to prevent the panel from shifting, and do not fasten the wire so tightly that it cuts into the panel coating.
Check transportation before you pay. A long panel may not fit safely inside a standard pickup bed, and bending it for transport can obstruct visibility or put pressure on the vehicle. Arrange a trailer, delivery, or a vehicle designed to carry the panel securely; do not leave a long rigid load loose or protruding without proper restraints and legally required flags or lights.
How to build a cattle panel trellis
Build the structure in calm weather with a clear work area and at least one capable helper. Keep children, pets, and bystanders away from the panel while it is being lifted or bent. Complete the layout and decide on the finished opening before the panel is under tension; it is much harder to rethink the design while someone is holding a springy sheet of steel.
Mark four post positions
Set the panel on level ground and mark its center so you can keep the arch symmetrical. With a helper, gently bring the ends toward each other to preview the curve; do not try to bend it sharply at one point or twist it into a corkscrew. Use the trial shape to estimate the footprint, then mark four post positions—one on each side of the path near the panel’s ends.
Measure from fixed reference points so the two sides are parallel and the posts form a square or rectangle, not a skewed shape. If the posts are not aligned, the panel may twist, sit unevenly, or pull one anchor harder than the others. Check the bed borders and walkway after marking; allow room for the post itself, the panel edge, fastening hardware, and safe access to the plants.
Before driving posts, confirm that there are no buried irrigation lines, electrical cables, or other services where you plan to work. Use a locator or check local guidance when the area is uncertain. This is a small but important step: a post driver can force steel into the ground with enough impact to damage an unseen line.
Drive and check the anchors
Drive the posts vertically into firm soil, keeping each one at a consistent depth and orientation. Virginia Cooperative Extension recommends an 18-to-24-inch embedment range for ordinary trellis supports; use it as a starting point, match it to the soil and post design, and do not treat shallow bed fill as equivalent to undisturbed ground. Follow the post maker’s instructions, especially where the anchor plate or studded face must point.
Check each post with a level in two directions as you work. A post that leans inward or outward can change the arch shape and make the panel want to slide; one post set substantially higher than the others can create an uneven crown. Correct errors while the posts are still easy to adjust, then push each one firmly by hand to spot looseness before attaching the panel.
If the supports rock, stop and fix the anchoring plan. Add suitable bracing, move the posts to better soil, or switch to a frame attached to a stable raised bed or footing. The structure will become heavier and more wind-resistant once covered with foliage, so a post that feels marginal while bare is not ready for a mature crop.
Bend, raise, and fasten the panel
Wear gloves and eye protection, and have one person control each end while a third person, if available, watches the center and alignment. Hold the panel near its ends and move them inward gradually, keeping the centerline at the top. The steel resists the bend, so work slowly and evenly; do not jerk, stomp, or let go suddenly. If the panel is difficult to control, lower it and reset rather than trying to catch it mid-spring.
Lift the arch into position with the posts already set and the walking area clear. Seat the ends where you planned, then check the opening width, crown height, and side-to-side symmetry before fastening. If the opening is too low or too narrow, change the span while the panel is still free; do not try to gain height by pulling hard against one post.
Fasten the panel to the posts at multiple points along each leg. Use galvanized tie wire or outdoor-rated structural cable ties suited to the panel and weather, then twist or trim every end so it cannot snag skin, clothing, or vines. Do not rely on only one connection near the bottom or top; a few well-spaced fasteners distribute movement along the support and keep the panel from rattling loose.
If you are building an A-frame instead, keep both feet aligned and secure the top joint so it cannot slip apart. A single upright panel needs lateral support against wind and crop weight; add top and bottom rails or braces when the posts alone do not make a rigid frame. The goal is a structure that stays steady when vines and fruit load it, not just one that looks straight on installation day.
Inspect the finished arch before planting
Walk through the empty opening and check it from both sides. Measure the narrowest point, look for sharp ends or loose hardware, and verify that no post moves when the panel is pushed gently at several heights. If you see a shifting anchor, a twisting panel, or a connection pulling open, correct it before planting; plants will hide defects and make repairs harder.
Push and pull the frame in the directions wind and vines will load it. This is not a substitute for engineering a structure for extreme weather, but it can reveal a weak connection or a post that was never firmly seated. Add a brace or improve the anchor if the trellis sways noticeably. Avoid climbing on it or hanging body weight from the arch; a garden trellis is not a ladder, swing, or overhead support for people.
Look closely at the points where stems or fruit will cross the wire. Remove or cover any sharp protrusion, and leave enough room to reach through the grid to harvest without scraping your arms. Once the basic frame passes these checks, water the planting area and set crops along the base at the spacing recommended for that variety.
Train vines without overloading the trellis
A wire grid gives climbing crops somewhere to catch, but it does not train every plant automatically. Pole beans and peas often climb by themselves; tomatoes do not twine around a panel and usually need to be tied, clipped, or woven through the grid as they grow. Cucumbers, squash, and melons may need occasional guiding so stems do not crowd one section or wedge fruit against the wire.
Use loose, soft ties around the main stem, leaving room for it to thicken. Attach the tie to a sturdy horizontal wire rather than cinching it around a delicate leaf stalk or flower stem. Check new growth every few days during the fast-growing part of the season; redirect a young vine gently instead of trying to bend a thick, brittle stem later.
Plan where fruit will hang before vines cover the panel. A fruit that grows behind a wire, rests on a post, or hangs in the walkway can be difficult to harvest and may rub as it enlarges. Keep fruit visible and accessible, and use slings where the weight or shape makes extra support prudent.
Choose crops by support needs
Good low-fuss climbers: Pole beans and some peas are natural candidates because their tendrils or twining stems grip a grid. Cucumbers also work well, but guide young stems to the panel and check that fruit can hang without becoming trapped in the wire. K-State’s horticulture guidance distinguishes crops that climb readily from those that need help, so consider the growth habit of the variety rather than assuming all vines behave alike.
Crops that need regular training: Tomatoes can be grown vertically, but the panel is a broad support, not a self-climbing surface. Tie or clip the main stems at intervals and prune only according to the variety and your growing method; a sprawling, heavily branched plant can become a dense load. Squash and gourds also need a plan for directing vines and keeping leaves from swallowing the whole arch.
Heavy-fruited crops: Small melons and some squash can grow on a strong trellis, but the fruit needs room and may benefit from a sling made from breathable mesh or another supportive material. The plant’s vine and the frame must still carry the overall load; a sling does not fix weak posts or an unstable arch. Extension guidance from Virginia Tech and K-State emphasizes matching support to fruit weight, while UW–Madison Extension notes that larger melons may benefit from mesh support.
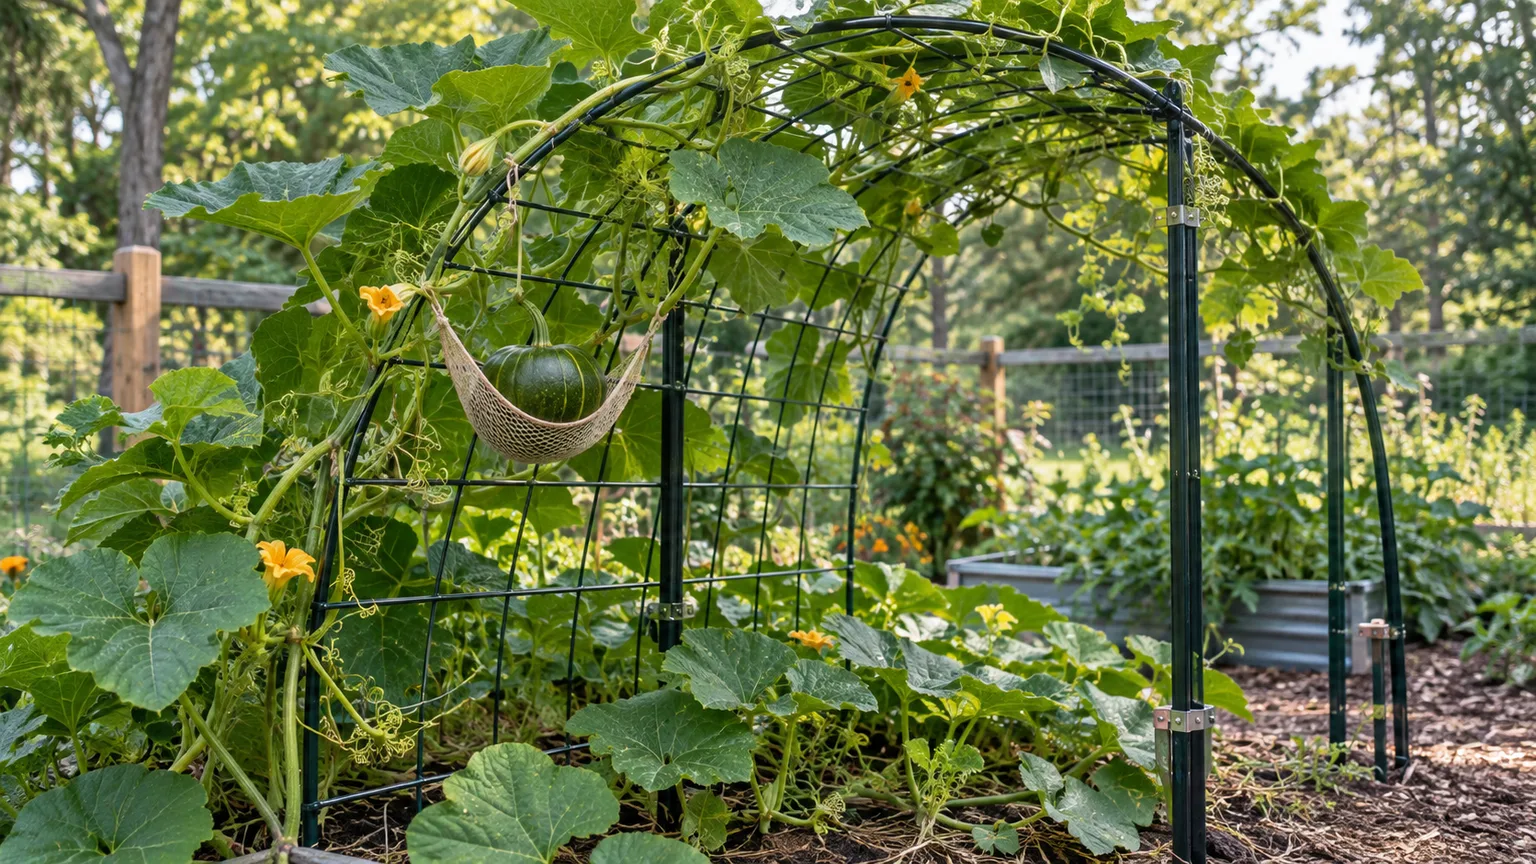
Make each sling large enough to cradle the fruit without squeezing it, and attach both ends to separate points on the panel so the load is shared. Check the sling as the melon grows and keep it from rubbing a sharp wire crossing. If the fruit is too large, the vine attachment is too delicate, or the arch moves under the load, let the fruit rest on a padded surface below rather than forcing the plant to carry it overhead.
Flowers such as climbing nasturtiums can soften the structure, but do not mix a vigorous ornamental vine into a vegetable arch without checking its mature size. A plant that becomes woody or extremely heavy can outgrow a light garden frame and make seasonal removal difficult. For a first project, choose one or two manageable crops, then add variety after you see how the arch performs in your climate.
Troubleshoot a wobbly, low, or awkward trellis
The arch is too low. First measure the actual clearance at the sides, not just at the crown. If the passage is unsafe or uncomfortable, remove the crop load and reshape the panel with help, widening the span only if the posts and panel design can accommodate it; otherwise move the structure or replace it with an upright panel. Do not pull the top upward against installed posts and hope the connections will hold.
The arch is too narrow. Check whether the panel ends and posts are inside the walkway you intended to keep clear. If you can safely reset the structure, move both sides outward evenly and retest headroom; widening usually lowers the curve. If that trade-off no longer works, switch to a taller A-frame or a vertical panel rather than forcing a tight bend.
One side leans or the panel twists. Stop adding vines and inspect each post, fastener, and panel edge. A leaning anchor can mean loose soil, uneven post depth, or tension concentrated on one side. Re-seat or brace the posts before the frame is loaded further, and replace damaged ties or wire connections.
The trellis sways in wind. Foliage increases the area that catches wind, so a structure that was stable when bare may move once covered. Check whether the posts reach firm soil, whether the panel has enough attachment points, and whether the location is too exposed for the chosen support. Add bracing or reduce the crop load; if movement remains, relocate the arch or use a sturdier frame.
Fruit is wedged in the grid or pulling on a vine. Guide new growth toward open wire spaces and support heavy fruit before the stem begins to strain. Move fruit gently while it is small; once it is large, avoid twisting or dragging it through a panel opening. A sling or ground-level support can protect the fruit, but neither can compensate for an arch that flexes under load.
The walkway becomes uncomfortable after planting. Prune or redirect only where it is appropriate for that crop, and keep stems and hanging fruit out of the walking line. If dense growth closes the passage every year, plant on one side only or move the trellis away from a high-traffic route. A trellis should make tending easier, not turn harvesting into squeezing through foliage.
Maintain it through the season and winter
Inspect the panel, posts, and fasteners at planting time and periodically while crops are growing. Look for corrosion, cracked ties, sharp wire ends, loose post movement, and vines pulling the grid out of alignment. Replace damaged connections before they fail under the full crop load; if you use cable ties, choose outdoor-rated UV-resistant ones and treat them as components that may need replacement.
After strong wind, heavy rain, or a major harvest, repeat a quick stability check. The soil around posts can soften, settle, or heave with freeze-thaw cycles, and a trellis covered in wet foliage can place more strain on the frame than it carries on a dry day. Tighten or replace hardware only when the structure is unloaded enough to work safely.
At season’s end, remove dead vines without pulling hard against the panel. If the structure will stay outdoors, check for loose connections and decide whether winter weather at your site could shift or bend the supports. Savvy Gardening recommends checking posts after freeze-thaw periods and replacing worn ties; UW–Madison Extension notes that leaving dried vines until brittle can make cleanup easier. Follow whichever approach fits your disease-management needs and local conditions, then rotate crops where practical.
A permanent panel can stay in place while you rotate the vegetables trained on it. Changing crop families helps avoid repeating the same planting pattern in one spot, but keep the trellis accessible enough to clean and inspect. If you remove it for winter or move it to another bed, label the posts and hardware so the next installation begins with a square layout rather than guesswork.
Conclusion
A cattle panel trellis succeeds when its opening, anchors, and crop load work together. Measure the real walkway, test the panel’s curve before setting posts, secure the frame into firm ground, and inspect it before planting; a familiar 16-foot panel size does not guarantee a particular finished height.
Start with crops that suit the grid, guide young stems, and sling heavy fruit when needed. With a helper during the bend and a few checks through the season, the result can be a useful growing surface and a comfortable garden feature that fits the space you actually have.



