How to Propagate Peperomia in 3 Simple Methods
Learn how to propagate peperomia by water, soil, or leaf cuttings, when division suits a clumping plant, and how to check roots without disturbing them.
Peperomia is a large, varied genus: some kinds grow upright from a compact crown, others spread as low mounds, and some trail from flexible stems. That variation matters when you take a cutting. A technique that works on a fleshy-leaved ripple peperomia may be awkward for a tiny-leaved trailing type, so start by looking at how your plant grows rather than choosing a method from a calendar.
The three cutting routes are stem cuttings rooted in water, stem cuttings rooted directly in potting mix, and whole-leaf cuttings. Water gives you visible roots; mix avoids moving water-grown roots later; a leaf cutting can make sense when the species is suited to it and you want to remove little from the parent. Division is a separate option for a mature plant whose rooted crowns can be separated cleanly. For year-round growing conditions, see the Peperomia care guide.
Start With the Plant’s Growth Form
Before cutting, identify whether your peperomia has distinct stems, a low clumping crown, or trailing shoots. The Royal Horticultural Society’s genus guide describes upright, horizontal, and trailing forms, with a wide range of leaf shapes and textures. Its peperomia growing guide recommends softwood stem cuttings for peperomias generally and notes that some fleshy-leaved kinds can also be propagated by leaf cuttings.
That variation makes a stem cutting the broadest starting point if you are uncertain about the exact species. Look for a healthy, flexible shoot with visible points where leaves attach. A trailing peperomia such as a string-of-turtles type gives you convenient stem sections; a compact, mound-forming type may offer fewer obvious long stems but can sometimes supply intact leaves or rooted divisions.
The plant’s label helps, but the label is not a promise that every propagation method will work identically for every cultivar. If it names a cultivar, especially one selected for variegated foliage, keep a piece of the parent’s actual growing shoot in the cutting. The new plant’s color and shape depend on the living tissue that grows it, so don’t assume that a leaf alone will reproduce a particular mature look.
Where Division Fits
Division does not mean cutting a single stem into pieces. It means separating an established plant into sections that already have roots and a growing point. Consider it only when the parent has multiple distinct stems or crowns and the root ball naturally comes apart into sections; otherwise, you can injure the parent without gaining viable plants.
If you can see a rooted offshoot at the base while repotting, tease the root mass gently and check that the section has both roots and active foliage before you separate it. Keep it attached if the roots are tightly interwoven or the crown has no independent growth point. For a one-crown plant, a stem cutting is the safer propagation choice. Division avoids waiting for new roots on a cutting, but it also disturbs the parent’s existing roots, so it is useful only when the plant’s structure already supports it.
Compare the Three Cutting Routes
| Route | Choose it when | Main advantage | Main risk to manage |
|---|---|---|---|
| Stem cutting in water | You want visible root progress or have a sturdy shoot | Easy to inspect and simple to set up | Too much time in water can leave fragile roots that are harder to pot |
| Stem cutting in mix | You want roots to form in the plant’s eventual medium | No water-to-mix transfer | Moisture problems stay hidden below the surface |
| Whole leaf with petiole | The species is suited to leaf propagation and the leaf is healthy | Removes less stem from the parent | It may take longer, and cultivar traits are not guaranteed |
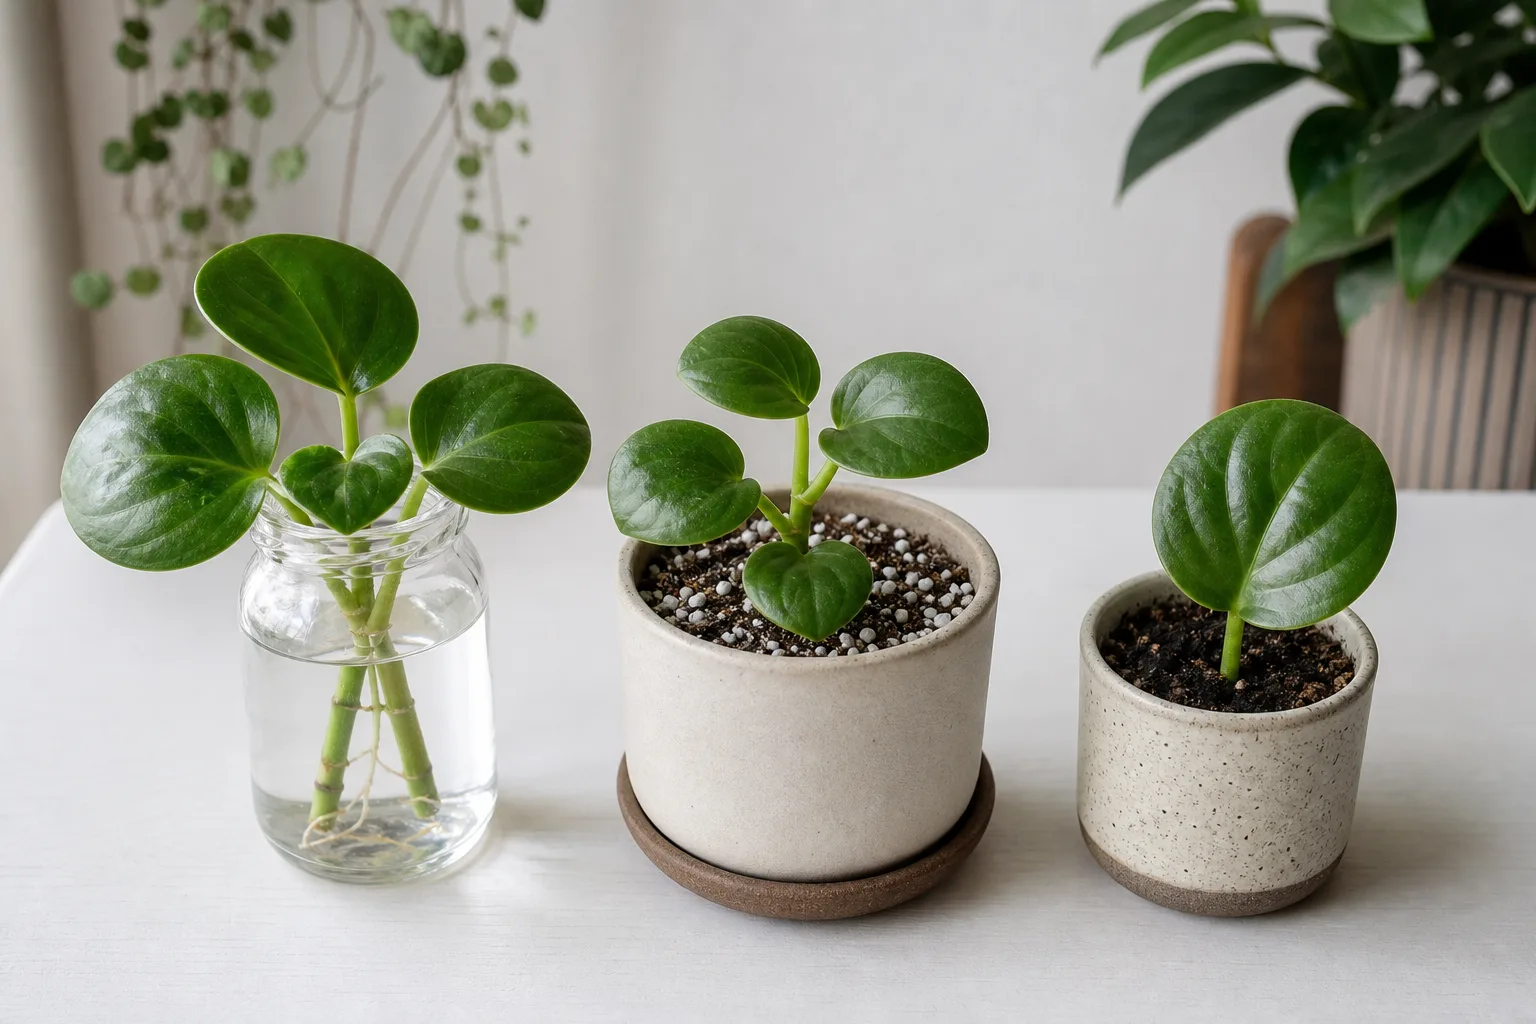
A practical gardening account from Brittany Goldwyn describes all three cutting routes and the trade-off between watching roots in water and keeping a cutting in its eventual medium. Blooming Expert’s peperomia propagation guide also treats stem cuttings as the broadest choice and describes leaf cuttings and division as options that depend on the kind of plant. The RHS peperomia growing guide similarly recommends stem cuttings generally while treating leaf propagation as suitable for some kinds. The useful takeaway is not that one technique wins every time; it is that the parent’s growth form and the environment you can maintain should set the method.
Choose a Healthy Parent and Set Up
Take cuttings from a plant that is firm, actively growing, and free of obvious pests, mushy stems, or widespread leaf yellowing. A cutting has no established roots to compensate for stress, so a weak shoot often loses moisture faster than it can replace it. Spring and early summer are convenient because the plant is usually producing fresh growth, but an indoor cutting can still root outside that window if light and warmth remain steady.
Use clean, sharp scissors or a small pruning blade, a clear jar for water cuttings, and a small pot with drainage for mix-based cuttings. A loose, free-draining propagation mix is more useful than a large container of dense potting soil: it needs to stay lightly moist around the cut while allowing excess water to drain. The RHS peperomia guide recommends free-draining compost for the genus, and its leaf-cutting advice cautions that excess moisture can cause decay.
Do not feel obliged to buy rooting hormone or build a sealed greenhouse. These are optional tools, not substitutes for choosing sound plant material and controlling moisture. If your room is dry, a clear cover can slow water loss, but it must be easy to vent and must not trap persistent condensation against the cutting.
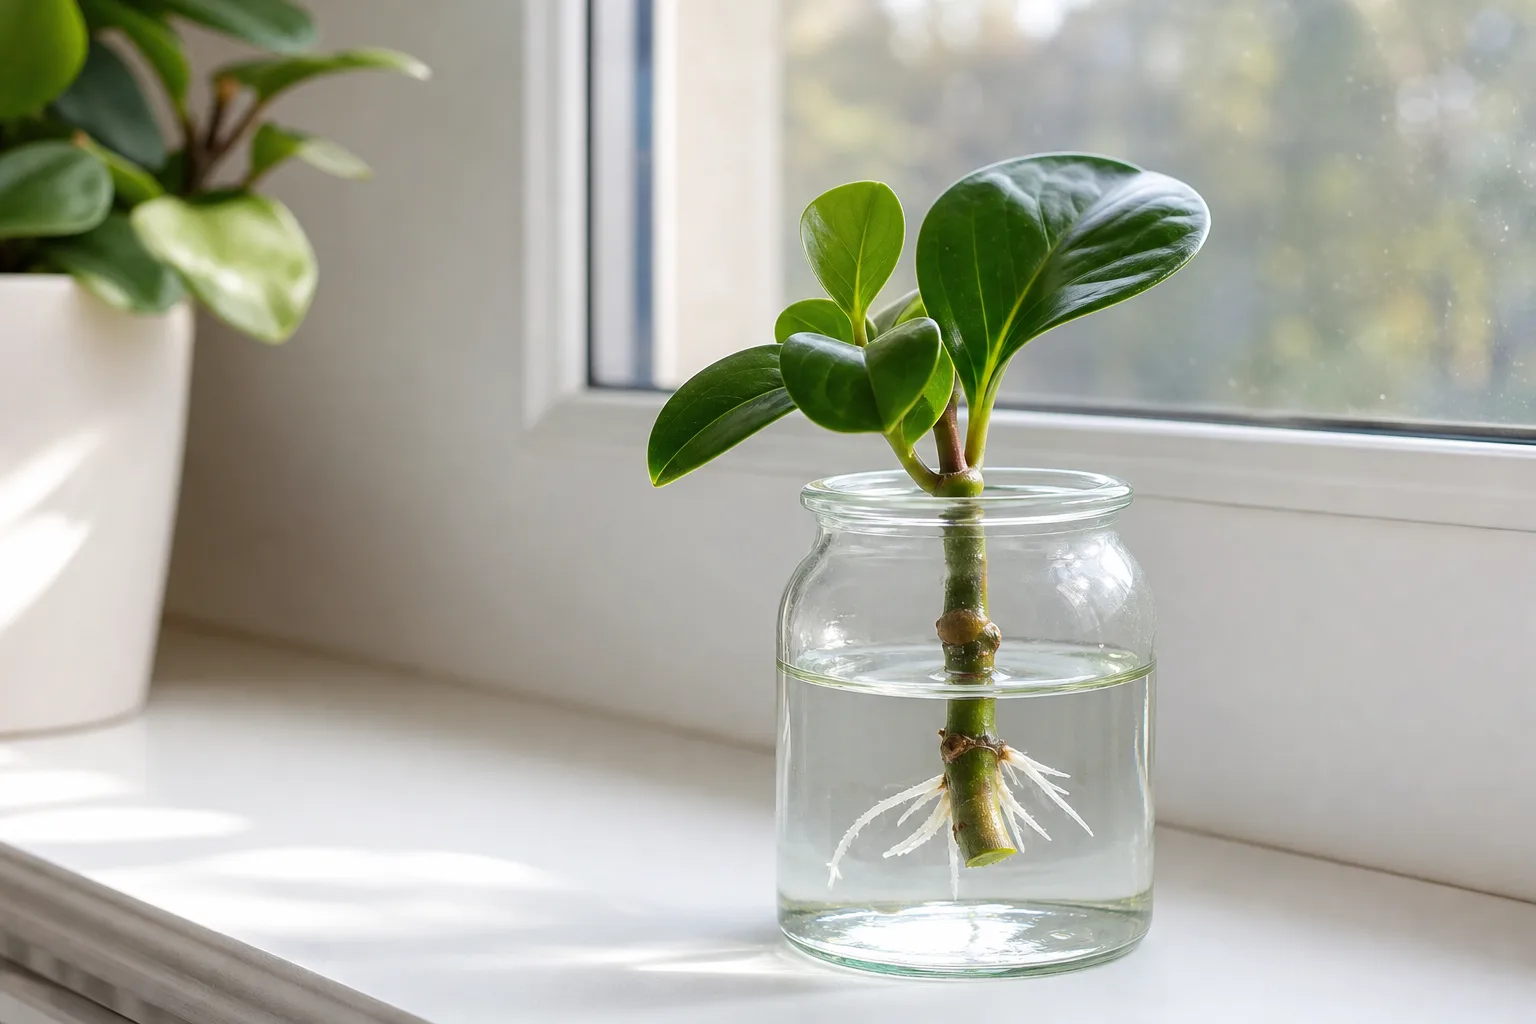
Method 1: Root a Stem Cutting in Water
Choose this route if you want to see whether a cutting is rooting instead of guessing what is happening under the soil. It suits a healthy leafy stem with at least one visible leaf attachment point. Although some general guides oversimplify peperomia as plants that root from any arbitrary stem piece, including a node is the cautious choice because it gives the cutting a clear point where roots and new growth may develop.
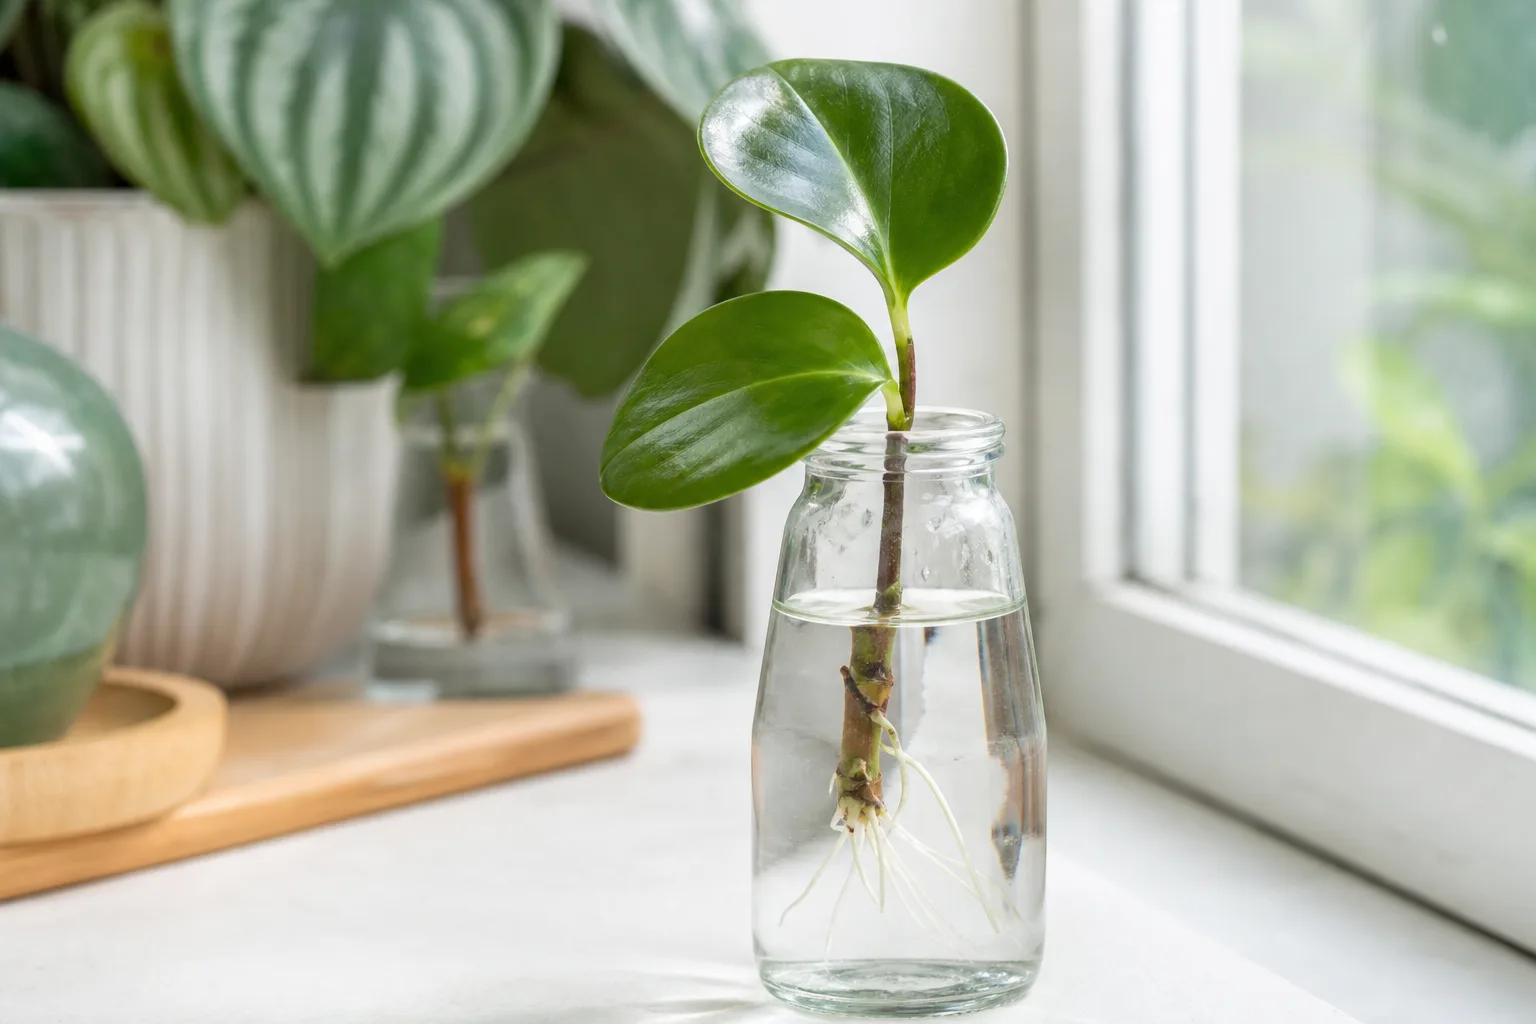
- Select a firm, non-flowering shoot with a few healthy leaves. Make one clean cut below a leaf attachment point, leaving enough bare stem to sit in water without submerging the foliage.
- Remove any leaf that would sit below the water line. A submerged leaf can soften and decay, while leaves left above the water can keep supplying energy to the cutting.
- Set the cutting in a clean, narrow glass with room-temperature water covering the cut end and lower node. Keep the jar in bright, indirect light, away from direct midday sun that can heat the water.
- Check the water every few days. Top it up if it evaporates; replace it if it turns cloudy, develops a film, or smells stale. Rinse the jar if slime or debris has collected rather than leaving the cut end in dirty water.
- Watch for firm, pale roots. A few roots branching from the submerged stem are a better cue to pot up than an exact number of days, since temperature, light, and species all affect the pace.
The RHS genus guide allows peperomia softwood cuttings to stand in water until roots form before planting them. That makes the method accessible, but water is a temporary rooting medium rather than a permanent home for a terrestrial peperomia. A cutting left in a jar for too long may develop a tangled mass of delicate roots that has to adjust when it is moved into potting mix.
Move It Before Roots Become Long and Brittle
Pot the cutting once it has several visible roots long enough to hold the stem in place, rather than waiting for a dense tangle or a large leafy shoot. Prepare a small pot of lightly moist, free-draining mix, make a hole first, lower the roots gently, and firm the mix just enough to support the stem. Pulling the roots through dry mix or packing soil tightly around them can break the new growth.
After potting, water enough to settle the mix, let the container drain fully, and keep it in the same bright, indirect light. For the first several days, avoid alternating a bone-dry root ball with a soaking wet one. Water-grown roots are adjusting to the new medium, so even, modest moisture is more useful than daily watering or a continuously wet saucer.
Method 2: Root a Stem Cutting in Mix
Root directly in mix when you prefer not to move new roots from a jar. The trade-off is that the root system stays hidden. Resist the temptation to pull up or tug the cutting every few days to check it; each disturbance can tear the fine roots before they have anchored.
Take a stem section as you would for water propagation, remove the leaves that would touch the medium, and identify the node that will sit below the surface. Moisten the mix before planting so you do not need to drench a rootless cutting afterward. Push a pencil or chopstick into the mix to make a narrow opening, insert the bare stem, and press the surrounding medium lightly to hold it upright.
Use a small pot with drainage rather than a roomy decorative container. A large volume of damp mix takes longer to dry, which is a poor match for a cutting with little or no root system. Keep the surface just moist enough that the node does not dry out; if the pot feels heavy and the mix remains glossy or saturated, wait before adding more water.
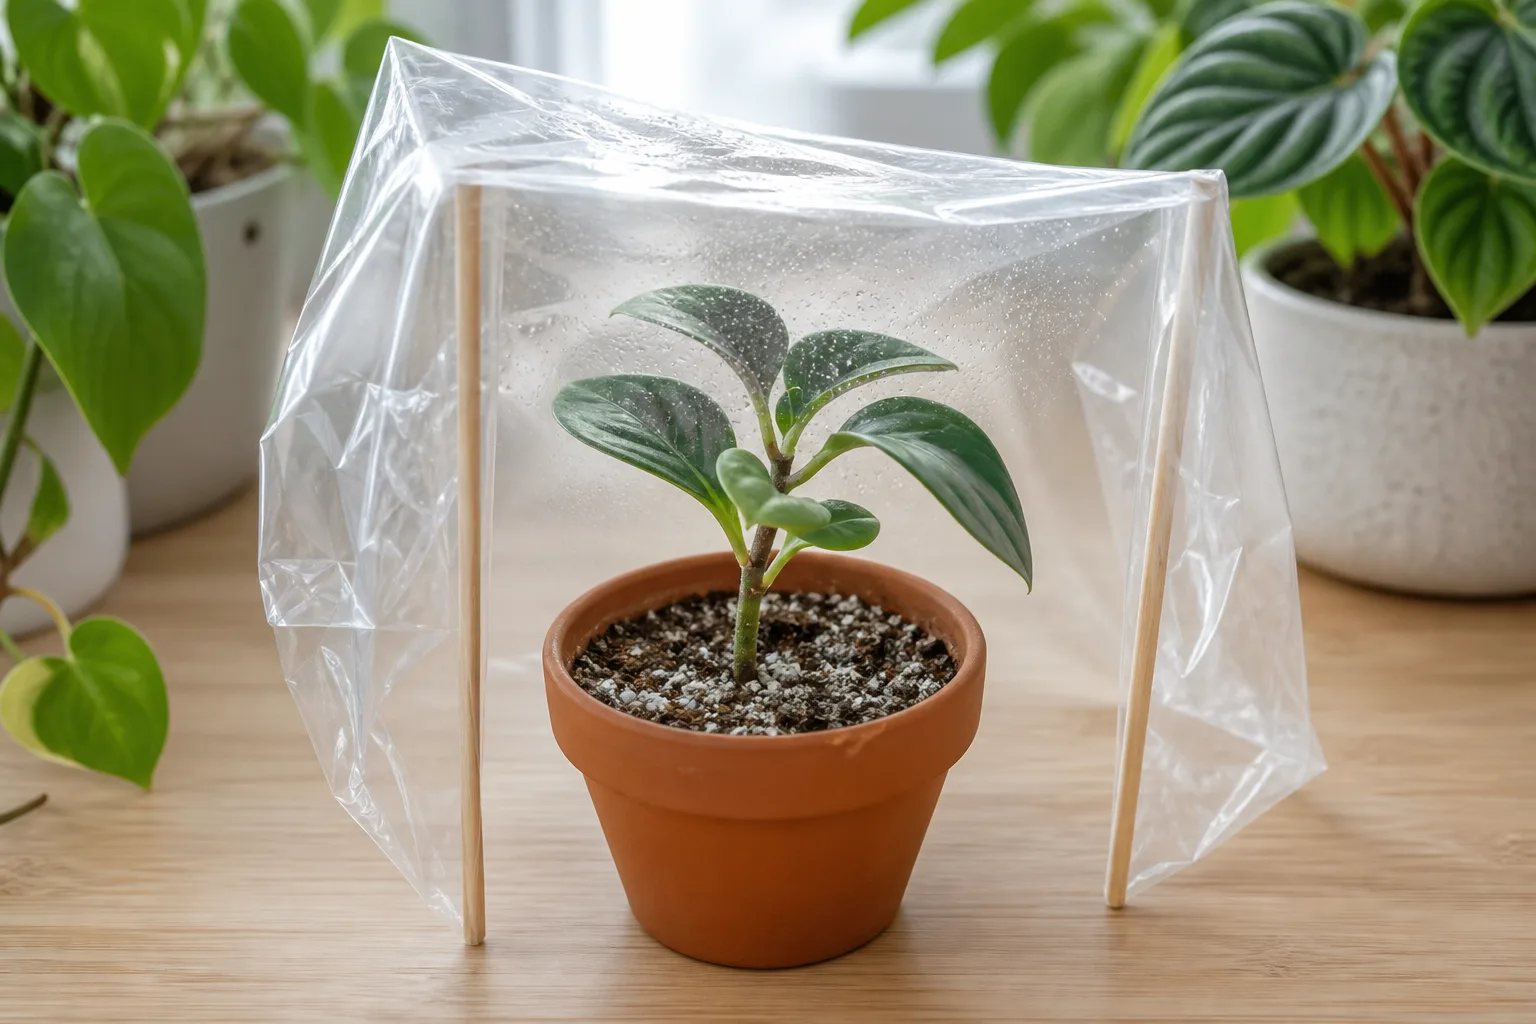
Place the pot in bright, indirect light and a comfortably warm spot, away from a cold draft or hot radiator. A loose clear cover can help if the leaves wilt quickly in dry room air, but the cover should not press against the leaves. Remove it regularly to exchange air, and remove it altogether once the cutting is holding itself upright and producing new growth.
Humidity Helps Only When the Mix Can Breathe
High humidity can reduce the amount of water a rootless cutting loses through its leaves, but enclosing a plant in a wet, unventilated bag creates a different problem: persistent dampness around the stem and soil. A few beads of condensation are not automatically a failure, but water constantly running down the cover or a musty smell means it needs more air and less moisture.
If your home is already comfortable and the leaf remains firm, skip the cover. A healthy peperomia cutting does not need a sealed chamber as a ritual. When a cover is useful, prop it above the foliage, vent it daily, and watch the medium rather than watering on a fixed schedule. The RHS leaf-cutting guidance recommends warm, humid conditions for tropical leaf cuttings while also warning that overly wet compost can cause decay; the same balance matters for rootless stem sections.
Method 3: Root a Whole Leaf With Its Petiole
A leaf cutting is the smallest of the three cutting options, but it is not equally suitable for every peperomia. A whole leaf with its petiole—the small stalk joining the blade to the main stem—is a better starting piece than a leaf blade torn off without its base. For some species, new roots or plantlets can form at the base of this leaf stalk; for others, a stem cutting is more dependable.
The RHS profile for Peperomia caperata specifically lists leaf-stalk or leaf-blade cuttings in spring and summer, while the RHS genus guide says only some fleshy-leaved peperomias can be raised this way. General RHS guidance on whole-leaf cuttings says to keep the stalk intact and place the base at the surface of the medium. That distinction matters: do not transfer a technique for one species to every plant sold under the broad common name “peperomia.”
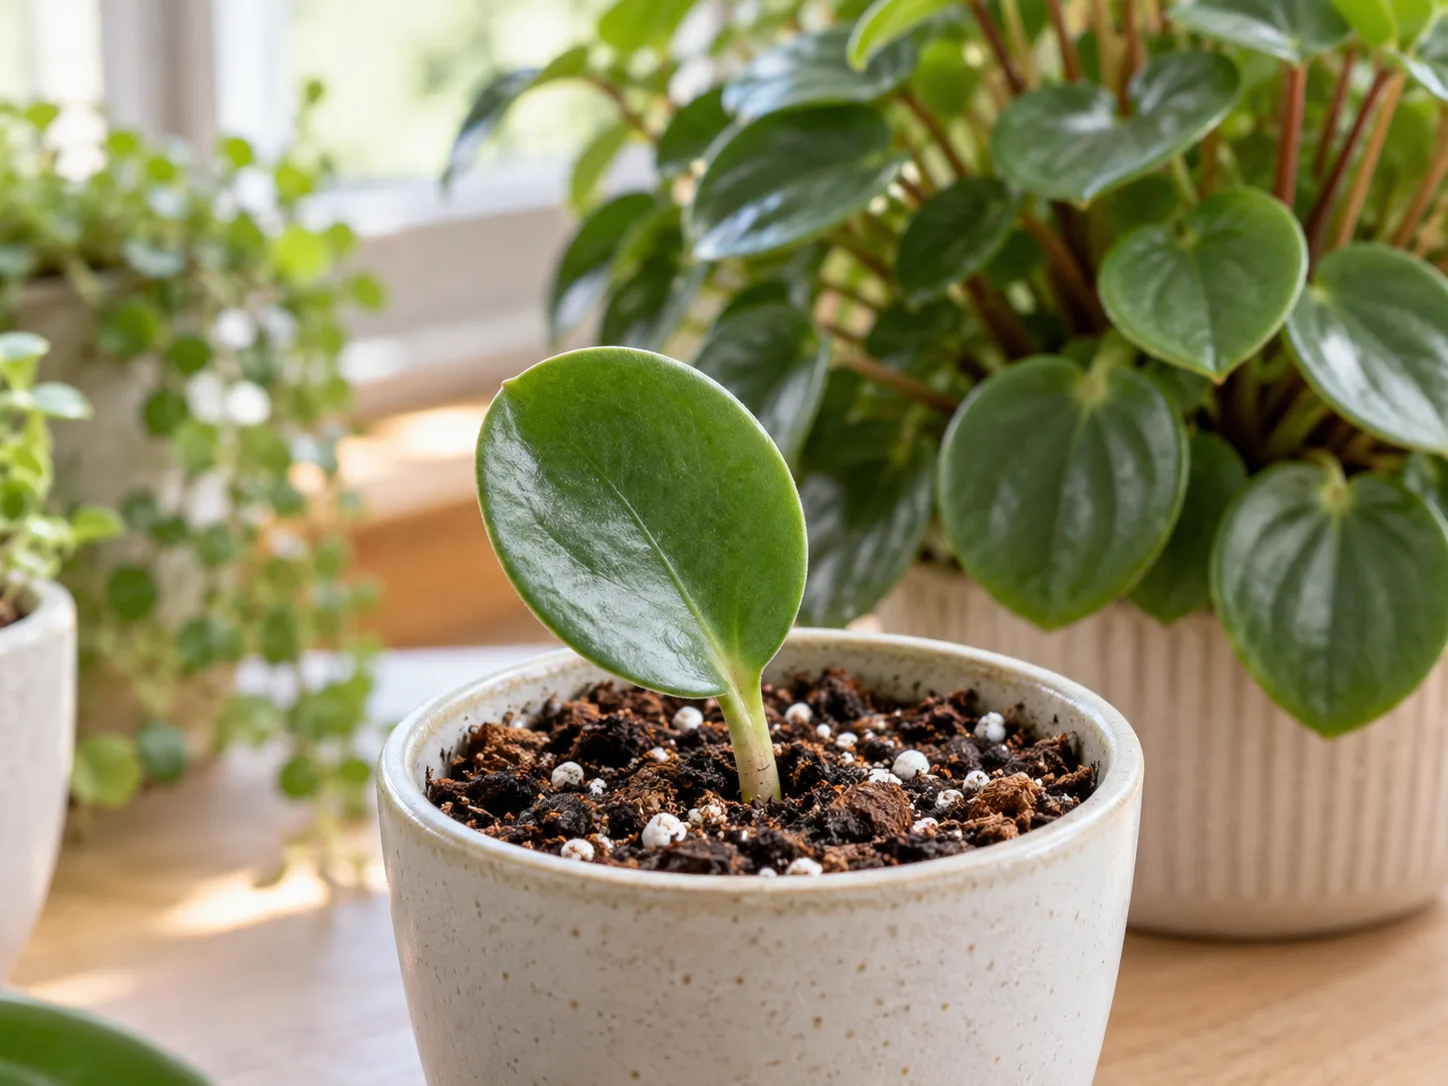
Choose one mature, undamaged leaf from a healthy plant and cut it cleanly where the petiole joins the stem. Use a small pot or propagation tray filled with lightly moist, airy mix. Make a narrow opening, insert the lower petiole or set its base against the medium according to the species’ guidance, and leave the leaf blade exposed. Do not bury the blade: trapped moisture around the leaf can turn a promising cutting into a soft, rotting one.
Keep the medium lightly moist and use a vented cover only if the blade begins to lose firmness in dry air. Place it in bright, indirect light, not in a hot, sunny window. A leaf may remain green for a while before a new plantlet appears; that does not prove the cutting has succeeded, so give it time without digging through the medium to inspect the base.
Treat Variegation and Cultivar Shape Conservatively
A cutting can root successfully and still fail to reproduce the feature that made the parent appealing. Brittany Goldwyn and Blooming Expert caution that leaf propagation is not a reliable choice for maintaining variegation, while RHS species guidance confirms that leaf propagation is not universal across the genus. Those points support a conservative rule: if a cultivar’s pattern, compact growth, or other selected feature matters, do not assume a leaf cutting will retain it.
Use a stem cutting from a shoot that visibly shows the desired pattern, or a rooted division that includes that same growing shoot, and label the new plant so you can observe what it does as it matures. Even then, propagation advice can be cultivar-specific; a general guide cannot guarantee that every new plant will look exactly like its parent. If you only want another green peperomia and the species is known to respond to leaf cuttings, a leaf is a reasonable experiment. If you want a faithful copy of a named cultivar, follow species-specific propagation guidance and favor material that includes active shoot growth.
What Progress Looks Like, and How Long It May Take
Rooting is governed by the cutting’s condition and the room as much as the method. Warmth, active growth, and adequate indirect light tend to support faster progress; cool conditions or short, dim days slow it down. Gardening guides often give week ranges, but those are estimates, not deadlines for a particular window, cultivar, or home.
With water propagation, look for pale roots emerging from the submerged node or stem. With a soil cutting, look for a stem that stays firm and upright and eventually resumes growth; a new leaf is encouraging, though it may appear after roots have already formed. With a leaf cutting, the visible plantlet may take longer than root initiation, so judge the cutting by its firmness and the absence of decay rather than by whether a tiny shoot has appeared on a certain week.
Read the Cutting Instead of Pulling It Up
A healthy cutting stays reasonably firm even if its oldest leaf loses some shine. A rooted stem may resist a very light sideways nudge, but repeated tugging is unnecessary. Check the drainage opening or the pot wall if roots are visible there; otherwise, give the cutting stable conditions and let new growth provide the signal.
Rot looks different from slow progress: the stem base turns dark or translucent, feels soft, or smells sour. A dry cutting tends to wrinkle or lose firmness without the slimy tissue of rot. Cloudy water alone is a cue to refresh the jar and inspect the submerged stem; it is the stem’s texture, not a single cloudy day, that tells you whether the cutting is failing.
Potting and First-Month Aftercare
Once a cutting has roots or a leaf plantlet is established, move it into a small pot with drainage that is only modestly wider than the rooted section. The RHS peperomia growing guide cautions that overwatering can lead to root rot because peperomia roots are prone to rotting when kept too wet. Use a loose mix that drains freely instead of burying a tiny root system in a deep container of dense soil.
Water after potting to settle the medium, then let the top begin to dry before watering again. A cutting’s small root system cannot use a large volume of water quickly, so keep the saucer empty and avoid a permanent reservoir. Continue with bright, indirect light and stable temperatures; a sudden move to direct sun or a dark corner adds stress while the plant is still establishing.
If you used a plastic cover, open it for longer periods over several days before removing it, especially if the leaf has been in very humid air. This gradual change gives the new plant time to adapt to the room. Wait until you see sustained new growth before feeding, and then use a conservative label rate; fertilizer cannot replace roots or compensate for weak light.
Do not rush to divide or repot a freshly rooted cutting again. Let it build a small, functioning root system first, and upgrade the pot only when roots have filled the current space or water management becomes difficult. The early goal is stable establishment, not rapid top growth.
Troubleshoot Rot, Wilting, and Stalled Growth
| What you see | What to check first | A useful next move |
|---|---|---|
| Stem is soft or dark at the base | Leaves or too much stem may be submerged or buried; mix may be saturated | Remove decayed tissue with a clean blade if firm healthy tissue remains, then restart in fresh water or lightly moist mix |
| Leaf cutting folds or wrinkles | Is the leaf losing water in dry air, or is its base actually soft? | If it is dry but firm, reduce water loss with a vented cover; if it is mushy, remove rot and reduce moisture |
| No visible soil roots or new leaves | Is the cutting still firm, and is the room warm and bright enough? | Leave it undisturbed, correct light or cold exposure, and reassess before discarding |
| Water turns cloudy or smells stale | Is the stem still firm where it sits below the surface? | Rinse the jar and stem, refill with clean water, and discard a cutting whose base is already soft |
Do not respond to a limp cutting by saturating the pot. A stem with no roots cannot absorb a large flush of water, and constant wetness may speed decay rather than recovery. First determine whether the tissue is dry and firm or soft and rotting; those symptoms call for opposite adjustments.
If a cutting remains firm but seems inactive, avoid changing several conditions at once. Confirm that the node or petiole base is actually in contact with water or moist mix, move it to brighter indirect light if the spot is dim, and allow more time during cool seasons. If the base is collapsing, discard it or cut back to firm tissue; waiting for mushy tissue to recover rarely helps.
Conclusion
Choose a method that matches the plant in front of you. A leafy stem can root in water if you want to see progress, or directly in mix if you prefer to skip the transfer; a whole-leaf cutting is an option only for peperomias that respond to it. Division is worthwhile when a mature clump already has separable rooted sections, not when a single crown has to be forced apart.
Start with healthy material, keep foliage out of water and buried soil, and make the rooting medium moist rather than saturated. Then judge success by firm tissue, visible roots, and renewed growth—not a fixed number of days. That gives a peperomia cutting the time and conditions it needs without creating the rot that careful propagation is meant to avoid.