How to Save Marigold Seeds for Next Season
Learn when marigold seed heads are ripe, how to harvest and dry them, and how to store seed safely for next spring. Includes hybrid and germination guidance.
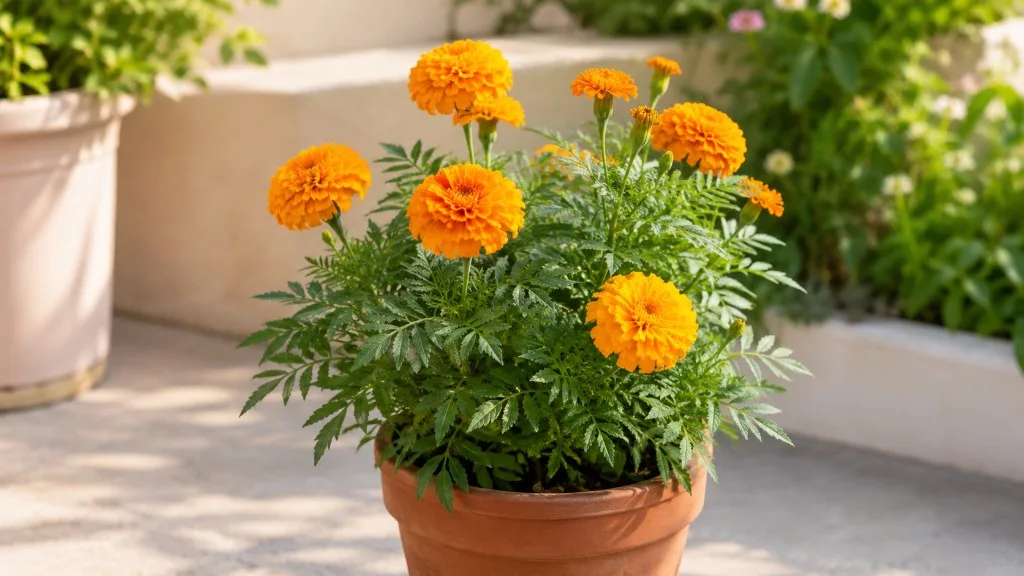
Saving marigold seeds is simple when you get the timing right, but “pick a brown flower and put it in an envelope” skips the decisions that determine whether the seed is mature, dry, and likely to sprout. The reliable sequence is to choose a healthy plant, leave a few flower heads to finish maturing, harvest them in dry weather, dry the seed thoroughly indoors, and store it with a clear label.
The result also depends on which marigold you grew. Some cultivars are open-pollinated and can produce seedlings much like the parent when pollen is controlled; others are F1 hybrids whose offspring may vary. That does not make hybrid seed unusable. It simply changes whether your goal is “more marigolds” or “the same named flower again.”
The reliable four-step method
First, choose a healthy plant with blooms you want to see again, then check its seed packet or cultivar information for “open-pollinated,” “heirloom,” “hybrid,” or “F1.” Leave several flowers on that plant instead of deadheading every spent bloom. Wait until the selected heads are brown, papery, and dry, with well-developed seed-like fruits inside.
Clip mature heads on a dry day and keep each cultivar in its own labeled bag or tray. Rub the dried head gently over a plate to release the slender fruits, let them air-dry in a thin layer until completely dry, then put them in a labeled paper packet inside a sealed container. Store that container somewhere cool, dark, and dry; test a sample of older seed before sowing a whole bed.
This order matters. A green head may contain immature embryos; a wet head can mold in a closed container; and an unlabeled packet is easy to mistake for a different cultivar months later. Seed saving is forgiving when each stage is treated separately, not when “dry enough” is guessed from appearance alone.
Start with the right marigold plant
Save from a vigorous, healthy plant that has the flower form, color, height, and habit you actually want. Avoid heads from a plant that struggled all season or showed serious disease. You are not making a laboratory selection, but choosing a good parent gives you a better chance of collecting mature, well-filled seed and helps you keep traits you value in the garden.
The name “marigold” can also cause a mix-up. French, African, and signet marigolds are true marigolds in the genus Tagetes. Calendula, often called pot marigold, is Calendula officinalis and belongs to a different genus; its seed heads and seed shapes are different. If you bought a packet labeled calendula, use calendula-specific seed-saving directions rather than assuming it is the same plant.
Check the cultivar label
Not all marigolds are hybrids. Hybrid status belongs to a particular cultivar or seed lot, not to the whole marigold group. Look for “F1” or “hybrid” on the original packet or the breeder’s description. “Open-pollinated” and “heirloom” are useful clues that the variety is intended to reproduce from saved seed, although pollination still matters.
Illinois Extension’s seed-saving article includes marigolds among approachable annual flowers to save, while Illinois Extension’s guide to choosing seed packets distinguishes hybrids from open-pollinated choices. An F1 plant can produce viable seed, but the next generation is not the same uniform F1 cross: its seedlings may split into different combinations of color, height, and flower form. Some can resemble the parent; others may not. Do not promise yourself an identical copy just because the saved seed came from a named F1 plant.
That variability may be welcome. If you enjoy surprises, collect the seed and grow it as a mixed selection. If you are trying to preserve a specific cultivar, start with a clearly labeled open-pollinated variety and keep its pollen source as controlled as practical. If the packet is gone and the cultivar is unknown, save a small amount, label it “unknown,” and treat the outcome as an experiment rather than a guarantee.
Account for cross-pollination
Open-pollinated does not mean every seed is automatically identical. Marigolds are visited by pollinating insects, and compatible varieties growing nearby may exchange pollen. The flower head develops on the plant you know, so the maternal parent is clear; the pollen parent may not be. A seed from an open-pollinated cultivar can therefore produce a variation if it crossed with another variety.
If you grow several marigold varieties, keep the seed heads separate from the moment you cut them and write the cultivar name on each bag. That preserves the identity of the mother plant, though it cannot undo pollen transfer that already happened. For a home garden, the practical options are to grow one variety when consistency matters, accept some variation, or consult a seed-saving reference for controlled pollination and isolation methods specific to the plants involved. There is no single small spacing distance that guarantees purity in every garden.
The easiest rule is to match your effort to your goal. A colorful bed next year needs mature seed, not perfect genetics. A reliable named cultivar needs both a suitable open-pollinated parent and attention to which plants can cross with it.
When a marigold head is ready
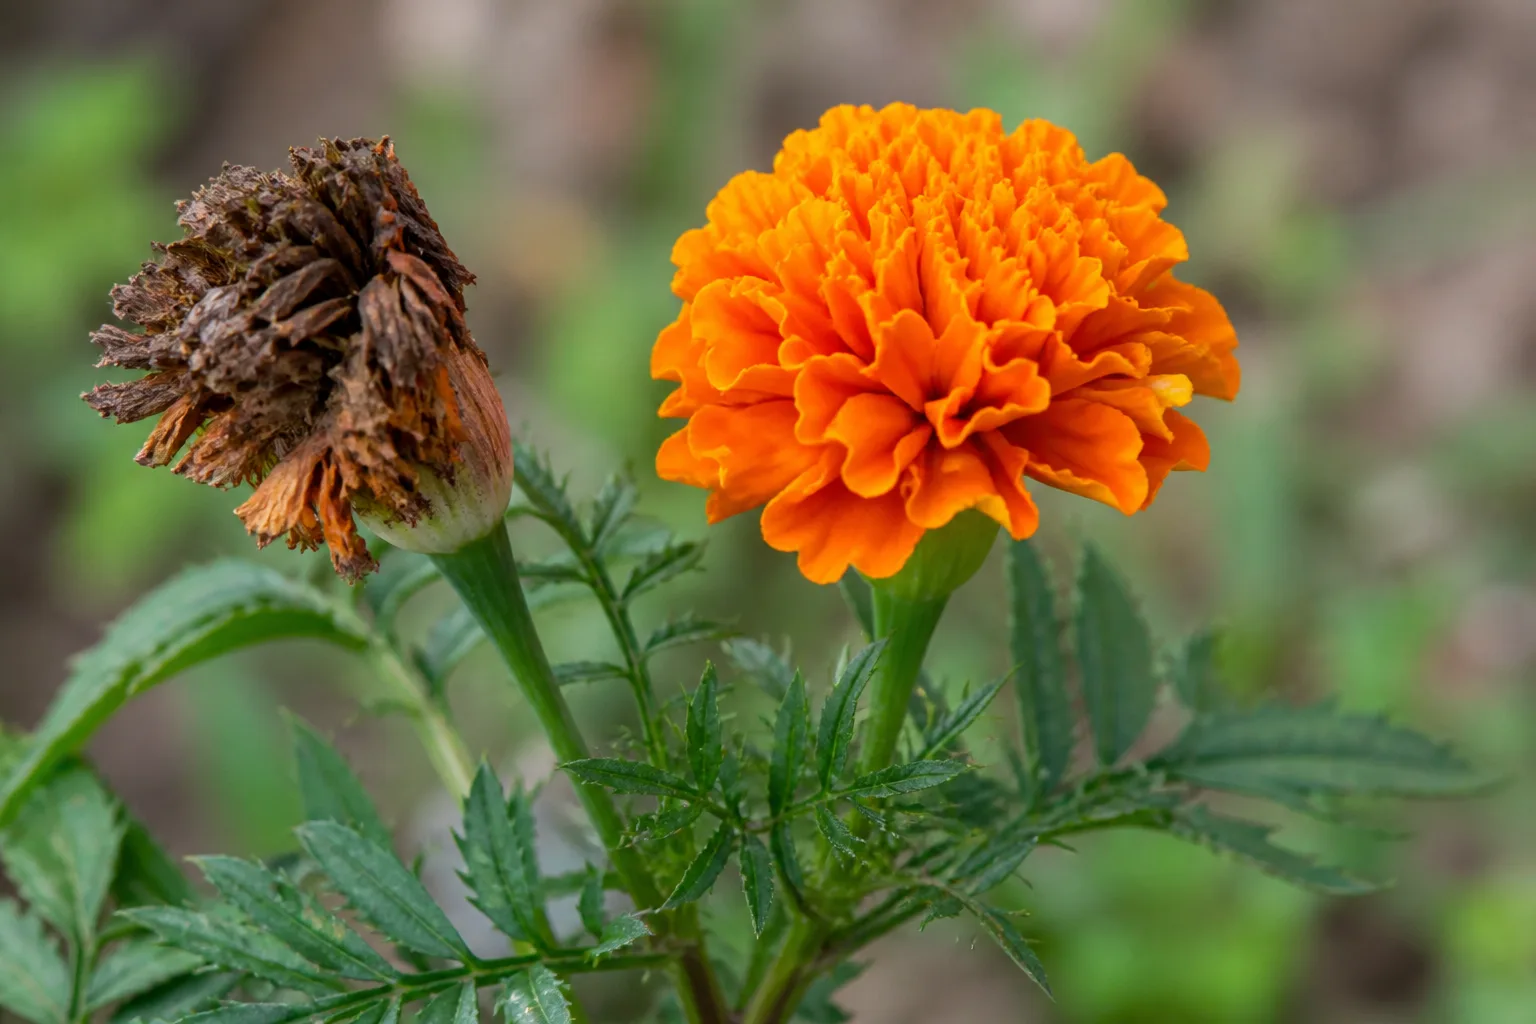
Harvest when the flower has finished blooming and the seed-bearing head has dried on the plant. The petals usually shrivel or fall away; the base and surrounding structures turn brown and papery; and the elongated fruits inside look filled out rather than soft and pale. The head should feel dry, not cool, pliable, or damp.
Calendar dates are only a rough guide. A plant in a hot, dry garden may finish seed earlier than one in a cool, rainy climate, and individual blooms on the same plant mature at different times. Savvy Gardening’s marigold seed guide describes collecting heads from late summer into mid-autumn, but the visible condition of the head is a better guide than copying that window for a different region.
Read the head, not the calendar
A ripe head is brown and papery, and its individual seed-like fruits are firm and well formed. Many are dark at one end and lighter or straw-colored along the rest of the length. Color varies with cultivar and maturity, so do not judge by a single patch of black or by the dark tip alone. The important cue is the whole head: dry, finished, and no longer green and succulent.
The slender pieces commonly called marigold seeds are whole one-seeded fruits, botanically achenes. You sow the entire narrow piece; there is no separate black “seed” that needs to be peeled away from a pale husk. Garden Gate’s marigold guide uses the practical cues of a dry calyx and dark, mature seed, while Savvy Gardening contrasts an unripe head with a fully ripe one. Together, those signs are more reliable than waiting for every petal to disappear or relying on a fixed number of days after flowering.
If the base is still green or the head feels soft, leave it attached longer. An immature head may turn brown after cutting, but drying it does not reliably finish seed development that never happened on the plant. Conversely, do not wait until every old head has crumbled or dropped its contents; collect ripe heads before wind, rain, or birds scatter them.
Keep flowers blooming while saving seed
You do not need to let the entire plant turn brown to collect enough seed. Deadhead most spent flowers during the main bloom period if you want the plant to keep producing fresh flowers, but deliberately leave a few strong, well-positioned heads to mature. Mark those stems with a loose piece of thread or a small plant marker so you do not cut them by habit.
Toward the end of the flowering season, stop removing the heads you want to save and let them dry naturally. Choose more than one head per cultivar; not every head will contain equally well-filled fruits, and a weather event can spoil a portion of the crop. If you want the bed to self-sow, you can leave some mature heads in place, but that trades controlled placement for volunteer seedlings that may appear in inconvenient gaps.
Think of it as allocating flowers: deadhead for continued color, retain a small tagged group for seed, and leave only as many heads to self-sow as you can manage. This keeps seed collection from unnecessarily shortening the display across the whole bed.
Harvest selected heads cleanly
Use clean, dry snips and clip only heads that have reached the brown, papery stage. A short piece of stem makes handling easier, but there is no need to remove a long branch. Harvest after dew has dried and avoid collecting heads soaked by rain or overhead watering; damp material takes longer to dry and is easier to pack into a mold-prone clump.
Put one cultivar in one paper bag or open tray and label it immediately. A simple label can include the common name, cultivar, whether the packet said F1 or open-pollinated, harvest date, and any trait you selected for. Do not rely on remembering which orange or yellow flower came from which plant after several similar heads are on the table.
If rain is expected, collect mature heads before they are soaked and bring them into a dry, ventilated room. Use a breathable paper bag only as a temporary catcher, not as a sealed drying chamber. Spread damp heads out as soon as you get indoors; do not tie a wet paper bag closed or leave the heads in a plastic shopping bag.
Open the head and remove the seed-like fruits
Once the heads are fully dry, work over a shallow plate, tray, or sheet of smooth paper so the small pieces do not roll away. Hold a head by its base and gently rub or crumble the dried material between your fingers. The slender fruits should loosen without force. If the head is still leathery and the pieces will not release, let it dry longer instead of crushing it.
Pick out large petal fragments, stems, and obviously damaged or moldy material. A little dry chaff is harmless in a home seed packet, so do not grind or aggressively clean the collection to make it look perfect. Avoid soaking the heads or washing the seed; added moisture creates more drying work and can damage seed that was ready to store.
Keep the full achene intact. The dark end is not a cap to pinch off, and separating it from the rest of the narrow piece can injure or discard the embryo. Select firm, filled pieces for planting; discard soft, badly shriveled, visibly moldy, or insect-damaged ones. A difference in color alone is not enough to prove that a seed is dead, so use a germination test when you need a real viability answer.
Dry seeds fully before storage
Spread cleaned seed-like fruits in a single layer on a plate, screen, or smooth paper in a warm room with good air circulation. Keep them out of direct sun and away from radiators, ovens, and other intense heat. Turn or stir the layer once in a while so trapped pieces are not left against a damp surface. A paper towel can cling to tiny seeds; a smooth plate or waxed paper is easier to cleanly lift from.
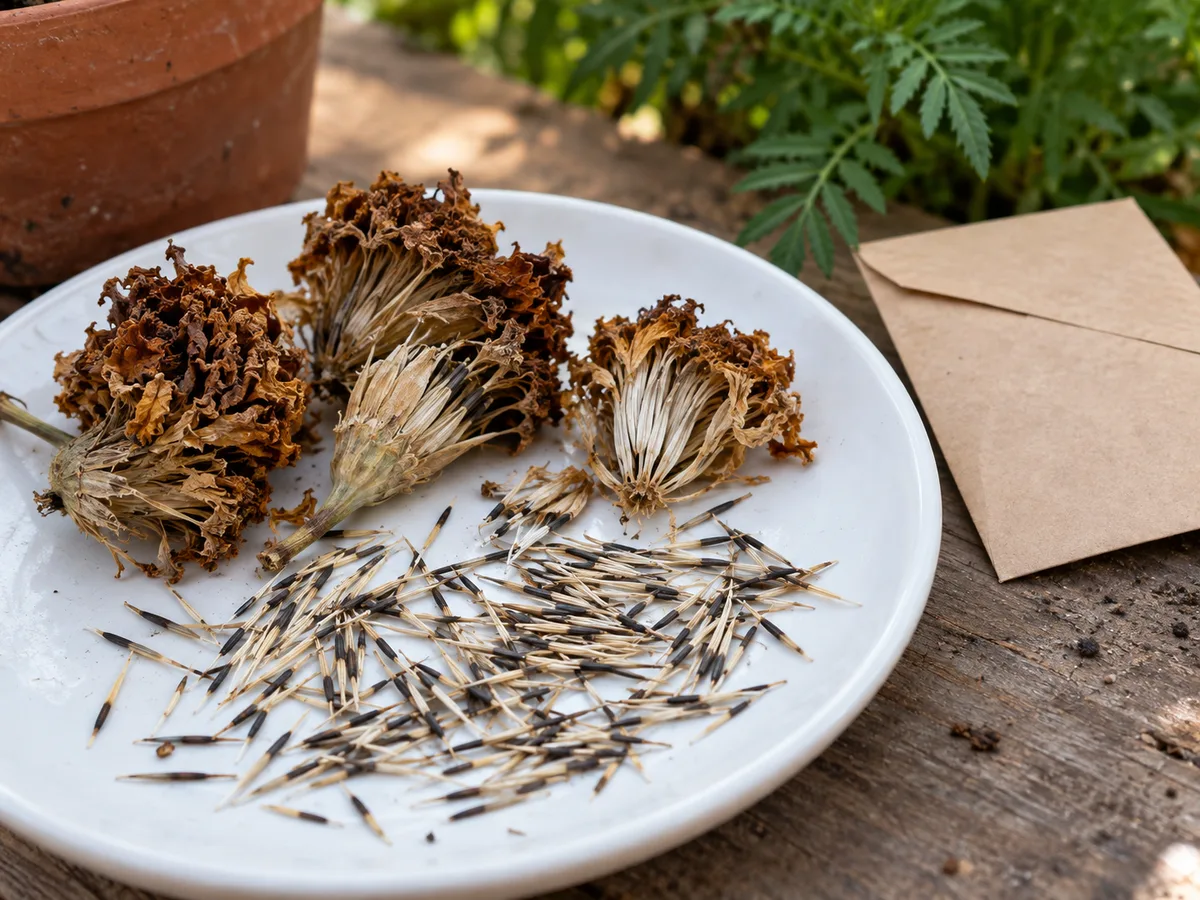
Five to seven days is a useful starting point in a dry home, but it is not a universal timer. Garden Gate suggests air-drying marigold seed for a week or two; the actual time depends on humidity, how wet the heads were, and how thickly the seeds are spread. Utah State University Extension’s seed-collection guide likewise emphasizes air-drying collected seed in a ventilated, low-humidity place away from direct sunlight. Dry longer when the room is humid or the pieces still feel cool or flexible.
The aim is not to make the seed brittle by force. It is to let surface and internal moisture equilibrate before the seed goes into a closed container. If you are unsure, leave it exposed another day or two. Sealing a batch that only feels dry on the outside is one of the easiest ways to create condensation, clumping, or mold during storage.
What to do in wet autumn weather
A humid climate changes the drying setup, not the maturity rule. Harvest only heads that have finished developing; bring them indoors before prolonged wet weather, remove any visibly moldy head, and dry the rest in a single layer with space between them. A fan moving air across the room can help, but do not aim a strong blast directly at tiny seeds that could scatter.
Do not try to rescue green heads by putting them in an oven, dehydrator, or hot car. Extra heat may damage seed, and it cannot substitute for development on the plant. If a head was cut because rain was coming but is already brown and papery, it can finish drying indoors; if it was still green and soft, treat its viability as uncertain and do not mix it with your best collection.
Label each collection
Label before the seed leaves your work surface. Write the plant name, cultivar if known, F1 or open-pollinated designation if known, harvest year, and optionally the flower traits you liked. If the pollen parent is unknown, say so. A label such as “French marigold, orange, open-pollinated packet, collected September 2026” is more useful than “marigold seeds.”
Use separate packets for separate cultivars and keep the labels with the seed through every step. If you are experimenting with offspring from a hybrid, mark that clearly, such as “saved from F1; variable offspring expected.” This prevents a surprise mix from being mistaken for a packet of reliable, true-to-type seed next spring.
Store seeds cool, dry, and protected
Once the collection is thoroughly dry, place it in a labeled paper envelope. For one season in a consistently dry home, the envelope may be enough if it is kept in a dark cupboard away from heat and moisture. For better humidity protection, especially in a humid house or if you want to store seed beyond the next planting, put the sealed paper packets inside a clean airtight jar or container.
Utah State University Extension’s seed-storage guidance notes that high temperature and high relative humidity reduce seed germination and vigor. Its storage guidance gives 35–40°F as an ideal cool range and recommends a good seal for seeds kept in a refrigerator, where the surrounding air is humid. You do not need specialized equipment for a small home collection; the practical priorities are fully dry seed, a closed moisture-resistant outer container, stable cool conditions, and no direct light.
Avoid a sunny windowsill, hot shed, damp basement shelf, or a jar opened repeatedly in a steamy kitchen. If you refrigerate the sealed container, let it warm to room temperature before opening it. That reduces the chance that humid room air will condense on cold seed. Do not put damp seed in a sealed jar with a desiccant and assume the problem is solved; dry the seed first, then protect that dryness.
Why paper packets and airtight jars work together
Paper envelopes make it easy to label and separate cultivars, while an airtight outer jar limits the exchange of humid air. Those jobs are complementary. A paper packet on its own breathes, which is useful in a dry place but offers less protection in a damp room; a sealed jar around incompletely dried seed traps the moisture you meant to remove.
Garden Gate describes airtight containers for well-dried seed and paper envelopes for short-term use, while Utah State Extension’s seed-collection guide recommends paper packets inside a sealed plastic bag, bucket, or jar when longer storage is needed. The shared principle is not “paper always” or “plastic never”; it is dry the seed first, then choose a package that keeps the storage environment stable. For a small batch, a labeled envelope inside a screw-top jar is a simple, low-cost arrangement.
How long marigold seeds last
There is no dependable expiration date that applies to every marigold packet. Seed age matters, but so do maturity at harvest, damage, how dry the seed was when packed, temperature, and humidity during storage. A fully mature batch kept cool and dry may remain usable for more than one season; a batch that went into storage damp or spent summer in a hot shed may lose viability much sooner.
Published home-gardening estimates for marigolds differ: Savvy Gardening gives about two years under good storage, while Garden Gate says properly stored seed can last several years. Those are practical ranges, not a guarantee for an individual packet or a controlled test of your conditions. Plan to use saved seed the next growing season, but do not automatically discard an older, dry, well-labeled packet. Test it and let the result guide how heavily you sow.
Test older seed before planting
A germination test answers the useful question directly: how many of these seeds actually sprout? Place 10 seeds on a clean, damp paper towel or coffee filter, fold the paper over them, and put it in a loosely closed bag or covered container so it stays moist without sitting in water. Keep it warm, around 70–80°F, and check it daily. Use the packet’s expected germination period when available; if you do not have that information, keep checking for roughly two weeks before calling the test.
Count a seed as germinated when a root emerges. If 8 of 10 sprout, your test germination is 80 percent. If only 3 of 10 sprout, you can sow several times the number you want to grow, start extra seedlings, or replace the batch. Utah State University Extension’s seed-collection guide describes the same basic method—moist paper, warmth, periodic counts, and dividing germinated seeds by the total tested—to estimate viability.
This is more informative than bending, snapping, or floating a few seeds. A dry seed may snap and still be dead; a seed may sink without a living embryo; and buoyancy varies with air trapped in the seed coat and with the seed itself. Those shortcuts do not measure germination. If you have only a few seeds, test a smaller sample and remember that the estimate will be less precise.
Sow saved seeds next season
For outdoor sowing, wait until frost danger has passed and the soil has warmed. Follow the depth and spacing on the variety packet when you have it; otherwise, sow shallowly, cover the narrow seeds lightly, and keep the surface evenly moist rather than waterlogged until seedlings emerge. Marigolds are warm-season annuals, so a cold, saturated bed is a poor place to test the patience of an old seed batch. Savvy Gardening’s guide to growing marigolds from seed recommends direct sowing after frost danger passes or starting indoors about four to six weeks before the expected last frost.
If you want flowers earlier, start a modest number indoors several weeks before your local last frost date and give seedlings bright light. Sow a few extra when your germination test was below ideal, then thin or transplant after seedlings are established. Keep the label with the seed tray so an F1-derived experiment does not get confused with a packet intended to preserve a named open-pollinated cultivar.
Expect variation when the cultivar was a hybrid, the pollen parent was unknown, or several compatible varieties grew together. That variation is not a failed seed-saving project if you wanted a colorful mix. It is a poor fit only when you were counting on every plant to repeat a particular height, flower shape, or color.
Common seed-saving mistakes
| Mistake | Why it causes trouble | Better move |
|---|---|---|
| Cutting a green, soft head | Drying cannot reliably complete seed development that did not finish on the plant. | Leave it attached until the head is brown and papery. |
| Collecting after rain and sealing the bag | Trapped moisture encourages clumping and mold. | Harvest dry heads, spread them out indoors, and seal only after thorough drying. |
| Assuming every marigold is a hybrid | Hybrid status belongs to a cultivar or seed packet, not to all Tagetes. | Check the label; if unknown, save a small test batch and label it honestly. |
| Expecting open-pollinated seed to be perfectly identical | Nearby compatible cultivars may cross-pollinate. | Keep varieties separate and control pollen when true-to-type seed matters. |
| Pinching off the dark end | The whole slender achene is the unit to save and sow. | Keep each complete piece intact. |
| Trusting a float or snap test | Neither directly measures whether the embryo will germinate. | Test a counted sample on moist paper. |
| Storing an unlabeled envelope | Color and cultivar names become difficult to reconstruct later. | Label the packet when you harvest, not at planting time. |
| Storing seed only because it looks dry | Residual moisture in a sealed container can lower viability. | Air-dry in a thin layer; use a sealed outer container only afterward. |
The simple recovery rule is to separate the failure point. If a packet smells musty or shows mold, discard the affected seed rather than mixing it with clean stock. If it is dry but old, run a germination test. If the seedlings sprout but look different from the parent, the issue is likely cultivar genetics or cross-pollination, not necessarily poor storage.
Conclusion
Choose the plant first, check what its cultivar label says, and leave only the flowers you intend to save on the plant long enough to become fully brown and papery. Harvest the heads when dry, release the slender seed-like fruits without splitting them, and air-dry the collection thoroughly before packaging it.
Keep each cultivar labeled, store the dry packets cool and protected from humidity, and test older seed before relying on it. That small test is the difference between guessing at an old envelope and knowing how many seedlings to start. With those steps, you can save marigolds confidently—while staying realistic about the variation that hybrids and cross-pollination can introduce.



