How to Use Beneficial Nematodes for Common Garden Pests
Beneficial nematodes can help control certain insect larvae. Choose the right species, prepare moist soil, apply carefully, and know what results to expect.

Beneficial nematodes are tiny roundworms sold as biological controls for certain insect pests that spend part of their lives in soil or growing media. They can help with problems such as some lawn grubs and fungus gnat larvae, but the product has to match the pest and the soil conditions have to suit the nematode. Buying a packet labeled “beneficial” is not enough: identify what is damaging the plant, check the nematode species and target on the label, then apply it while the target is vulnerable.
The most reliable approach is to treat nematodes as a precise tool in an integrated pest-management plan. They are not a general soil tonic, a cure for every grub, or a way to kill adult beetles flying above the garden. Their odds improve when you can answer three questions first: Which insect is present? Which life stage is in the soil? Can you keep the treatment area moist and within the temperature range on the product label?
What beneficial nematodes do—and what they do not do
Nematodes are roundworms, an enormous group with many different feeding habits. The products gardeners use for insect control contain entomopathogenic nematodes, often shortened to EPNs. The infectious form is the third-stage juvenile. It moves through a suitable soil environment, finds a susceptible insect, enters through an opening or sometimes through the body wall, and releases symbiotic bacteria that kill the host. The nematode then feeds and reproduces inside it. UConn Extension describes this life cycle and emphasizes that these organisms are especially suited to pests in growing media because ultraviolet light and drying make exposed foliage a poor environment for them. (UConn Extension)
That distinction matters because “nematode” does not automatically mean “beneficial.” Plant-parasitic nematodes, including root-knot species, feed on plant roots and cause a different problem. An insect-control product should not be chosen as a treatment for swollen root knots, unexplained stunting, or a suspected plant-parasitic nematode issue unless a qualified diagnostic service identifies a compatible control. Conversely, a product containing the right insect-killing species will not reliably control an insect that lives only on foliage or spends its vulnerable stage outside the soil.
EPNs are also living organisms, not a residue that continues acting like a conventional pesticide. Their performance depends on the condition of the organisms in the package, their ability to move through moist soil, their compatibility with the host insect, and whether they are applied where the host is. That is why good diagnosis and timing matter more than simply applying a heavier dose.
Match the nematode to the pest
Start with the insect, not with a favorite product. A chewed leaf, brown lawn patch, or weak seedling can have several causes, and nematodes only help if an appropriate insect host is present. Lift a small section of affected sod, inspect soil around damaged roots, or examine the potting mix where larvae are likely to feed. Note the pest’s appearance and location, then compare that evidence with the product’s listed targets.
Common species and target examples
The species names on packages are useful because different EPNs have different host ranges. The following are common starting points, not a replacement for a product’s current label: the formulation, pest species, and use site must all match.
| Nematode commonly sold | Target examples to check on the label | Practical fit |
|---|---|---|
| Heterorhabditis bacteriophora (Hb) | Japanese beetle, European chafer, or other susceptible white grubs | A common choice for grub problems in lawns and beds; timing depends on which grub is present and when young larvae are in the soil. |
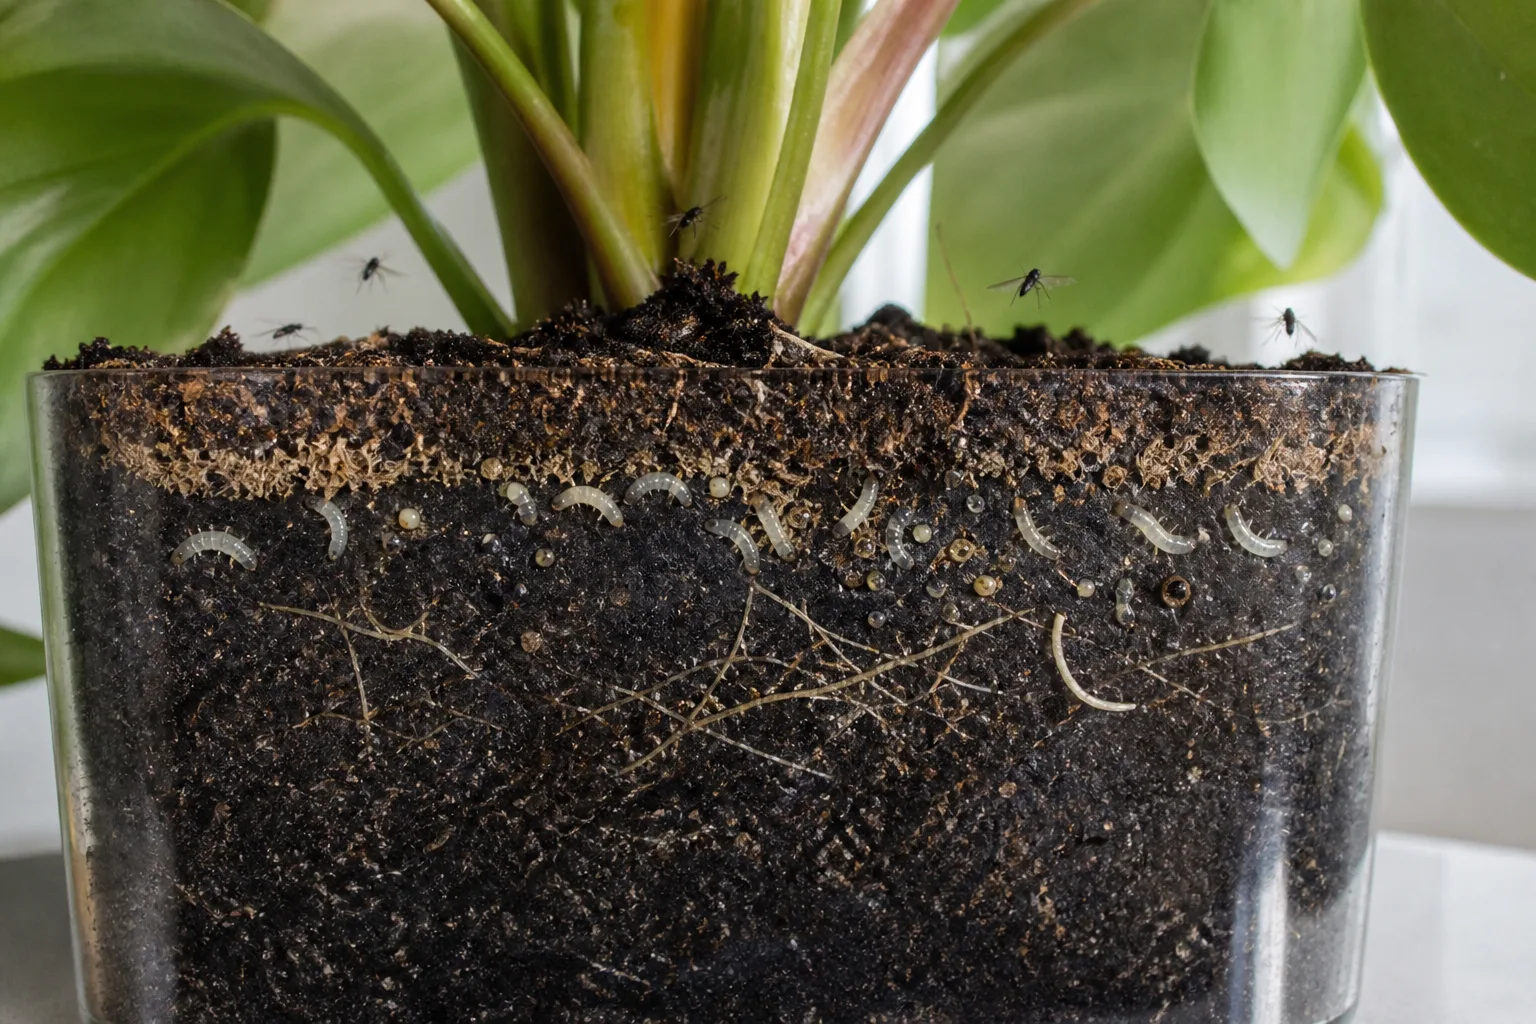
| Steinernema feltiae (Sf) | Fungus gnat larvae and certain soil-stage thrips | Often used as a drench in containers or greenhouse growing media. It does not remove adult gnats flying around the room, and it is not a universal treatment for every thrips species. |
| Steinernema carpocapsae (Sc) | Shore fly larvae and certain surface-active or shallow-soil pests | Host behavior and application placement matter; verify that the named pest and use site appear on the product directions. |
University of Maine Cooperative Extension identifies H. bacteriophora as a more effective choice for Japanese beetle and European chafer grubs than S. carpocapsae, while also explaining that timing depends on weather and grub species. UConn Extension names S. feltiae for fungus gnat larvae and soil-dwelling stages of some thrips, and S. carpocapsae for shore fly larvae. These examples show why “beneficial nematodes” is not a single interchangeable treatment. (University of Maine Cooperative Extension; UConn Extension)
A mixed-species blend can be convenient when the label lists each pest you have, but it is not automatically stronger. A blend may contain a species that cannot thrive in your soil temperature or will not encounter the target at the right depth. If you cannot match the pest to the package, ask the supplier or your local extension office before spending money.
Confirm the pest has a reachable soil stage
Nematodes work below the soil surface, so think through the pest’s life cycle. A Japanese beetle adult feeding on a rose leaf is not the same target as its grub feeding among grass roots. A fungus gnat adult hovering over a pot is not the main target either; larvae in the moist growing mix are the stage a soil drench can reach. For thrips, UConn Extension notes that some species have susceptible soil-dwelling pupae, while other thrips do not pupate in soil and are not a good match for that treatment.
This check prevents two common disappointments. First, a treatment cannot reach a pest that is currently on leaves, in a stem, or inside fruit. Second, even when a pest has a soil stage, the product’s species must attack that particular insect. Gardening Know How likewise distinguishes soil-borne pests from insects in the leaf canopy, which is a useful location check before treatment. If the signs point to a leaf-feeding caterpillar with no relevant soil stage, choose a control that reaches its actual location and stage rather than pouring nematodes into the bed. (Gardening Know How)
For lawn grubs, inspect a few small squares of turf at the edge of the damaged area rather than treating by color alone. Birds, drought, compacted soil, disease, and irrigation failures can also produce stressed turf. For indoor pots, use a yellow sticky card to monitor flying adults, but inspect the potting mix as well; adult counts tell you that gnats are present, not whether the larvae are in the treated root zone.
Decide whether nematodes fit the problem
Nematodes are a reasonable option when you have identified a susceptible soil-stage pest, can treat the infested area directly, and can keep the soil conditions within the product directions. They may be less useful when the pest is misidentified, most damage is already done, the soil is dry and cannot be watered, temperatures are outside the stated range, or the insect is above ground. They are a treatment, not an instant rescue for damaged roots or turf.
A useful decision rule is: If you cannot identify both the pest and the stage you are targeting, scout again before buying. If you can identify them, compare the label’s species, crop or site, application method, rate, and environmental conditions. If one of those does not fit, choose another tactic or ask an extension educator to help identify the pest.
Consider the scale too. A watering can may make sense for a few pots or a small raised bed, while a large lawn needs a calibrated sprayer or a different control plan. Estimate the square footage first, then use the coverage listed on the package. Do not stretch one package across more area than its label allows: applying a thin, uneven film to a large space can leave untreated pockets where larvae continue feeding.
Buy, receive, and store a viable product
Beneficial nematodes may arrive in a sponge, gel, powder, granules, or another carrier. The carrier is not the treatment rate; the package instructions tell you how much product covers a given area or how to dilute it. Look for the nematode species, target pests, expiration date, storage requirements, application temperature, and covered square footage before checkout. If a listing does not identify its organisms or offers no usable application directions, choose a product with clearer labeling.
Plan delivery around the application window when possible. On arrival, follow the product’s storage directions promptly. Many formulations need refrigeration, but the permitted shelf life varies by species and carrier; do not assume every product lasts for several weeks. Keep it from freezing, overheating, or sitting in a sunny delivery area. Maine Extension says unopened nematodes in its guidance may be refrigerated for two to three weeks, while UConn Extension cautions that storage life depends on formulation and says to follow the package expiration date. Those ranges are not a universal warranty for every product. (University of Maine Cooperative Extension; UConn Extension)
Once mixed with water, apply the suspension promptly rather than saving it for another day. UConn’s greenhouse instructions explain that nematodes settle in standing suspension and use stored energy while waiting in a tank, so a long delay or warm tank water can weaken them. For a home garden, the practical version is simple: prepare the watering can or sprayer, measure the target area, and have the soil ready before you open the package. Keep the mixture moving gently if the label calls for agitation so the organisms do not settle in the bottom of the container.
Choose an application window by conditions, not calendar alone
A calendar date is only a rough clue because grub species, climate, and product formulation change the useful window. For Japanese beetle and related lawn grubs, Maine Extension says mid-to-late August is usually about right in Maine, but its own advice makes that window dependent on weather and grub species. A warm-region lawn, a different beetle, or a container pest may need another schedule. Follow local extension guidance and the product label rather than copying a month from another region.
Prepare soil moisture first
The soil should be moist enough for nematodes to move, but it should not be waterlogged. If the surface is dry, pre-water and let the water soak in before application. For very dry ground, Maine Extension’s Japanese beetle guidance cites at least 0.5 inch of pre-irrigation; use that as a regional example, not a universal volume for every soil. On compacted or crusted ground, water may run off before it reaches the root zone, so solve the infiltration problem first rather than applying organisms into puddles.
After application, water the treated area according to the label to carry nematodes off the surface and into the soil. The goal is movement into the target zone, not runoff into a path, drain, pond, or neighboring bed. In containers, keep water inside the pot and make sure excess can drain; a saturated pot can injure roots even when the nematodes themselves need moisture.
Check soil temperature and sunlight
Measure soil temperature at the depth where the pest lives if the label provides a temperature range. Air temperature is a poor substitute: a sunny surface can heat quickly, while soil several inches down may remain cooler. UConn Extension’s fungus-gnat guidance is specific to S. feltiae in greenhouse media: it calls for media above 50°F, avoids temperatures above 80°F, and gives 60–70°F as an optimum range. Do not turn those greenhouse figures into a rule for every nematode species; use the range on your package.
Apply in the evening, at dusk, or on a cloudy day when possible. Strong sunlight and drying can damage nematodes before they enter the soil. Epic Gardening also recommends applying during cooler, low-light conditions and watering before and after treatment, a practical summary that aligns with the extension advice. (Epic Gardening)
Apply beneficial nematodes step by step
The precise mixing rate, water volume, nozzle, and repeat interval come from the package. Keep the area size within the labeled coverage; do not substitute a generic “one packet per garden” rule. The broad sequence below helps you apply the product evenly while protecting the living organisms in the suspension.
- Confirm the target and treatment area. Mark the infested bed, pots, or lawn sections rather than treating every square foot by default. Check that the pest and use site are listed on the package.
- Measure coverage and prepare equipment. Use a clean watering can for small areas or an appropriate sprayer for larger ones. If using a sprayer, check the product’s pressure and nozzle guidance. UConn Extension warns that screens or fine filters can trap nematodes in greenhouse equipment; only remove or adjust components when the product and equipment instructions allow it.
- Pre-water dry soil. Wet the target zone enough to make it evenly moist, then let excess surface water drain. Do not apply into a dusty, bone-dry crust or across ground where water is running away.
- Mix the package as directed. Use the listed dose and water amount. Avoid adding fertilizer or pesticide unless the nematode supplier confirms compatibility for that exact product and mixture.
- Apply evenly over the target zone. Work in manageable passes and keep the solution gently agitated if directed. Get the suspension onto soil or potting mix rather than spraying foliage where the nematodes will dry in sunlight.
- Water in and clean up. Apply the post-treatment irrigation specified on the label. Rinse the equipment promptly, then maintain soil moisture for the period the product recommends.
Treat pots, beds, and small gardens evenly
For a few houseplants, a watering can with a rose or fine-spout head can distribute the suspension across the pot surface without blasting soil out of the container. Treat the root-zone mix, not just the saucer or leaves. If only one pot is infested, focus on that pot and nearby susceptible containers after checking them; applying nematodes to every plant does not improve control when the pest is absent.
In raised beds, divide the surface into manageable sections and keep track of where you have applied the solution. Dense mulch may intercept some suspension, so move it aside or follow the package’s direction for getting the drench onto the soil. Then replace it if it helps retain moisture. Avoid application on flowers or foliage when a soil drench will do the job; direct placement reduces drift and puts the organisms where the target lives.
Treat lawns without wasting the suspension
For turf, water the lawn first if the soil is dry, then treat the infested area and a sensible margin according to the product label. An ordinary hose-end sprayer can distribute organisms unevenly if the flow rate, filter, or walking speed is wrong. Calibrate the equipment over a measured section using plain water before mixing a living product, and move at a steady pace. If the lawn is too large for the package coverage or your equipment, treat confirmed hot spots or consult a local extension service about a broader plan.
Do not reseed, aerate, or apply another soil product immediately unless the label says it is compatible. Disturbing or washing the treated zone can make it harder for the nematodes to reach grubs. The right order may differ by product, so plan lawn renovation around the label’s re-entry and timing instructions instead of assuming every biological control has the same waiting period.
Keep the treated zone suitable after application
Moisture after treatment is as important as pre-watering. Many home-garden directions ask you to keep the target soil damp for several days or longer; the exact duration varies. Check the label rather than promising that every treatment needs exactly two weeks. Water deeply enough to keep the upper root zone from drying, but avoid flooding, puddles, or repeated runoff. In hot weather, a thin mulch layer can slow evaporation if it does not prevent the drench from reaching soil.
Use the weather forecast as part of the plan. A soaking rain immediately after application may move product out of the target zone, while several hot, dry days may dry the soil before nematodes establish. If conditions are unfavorable, wait for a better window when the pest’s life cycle allows it. Nematodes cannot be protected by watering alone if the soil temperature is outside the label range or if the target insect is not susceptible.
Coordinate nematodes with other pest controls
Treat beneficial nematodes as one part of integrated pest management. For fungus gnats, for example, a soil-stage treatment is more useful when you also let the potting mix dry to the level the plant tolerates, empty saucers, and remove decaying plant material. Those steps make the habitat less favorable to new larvae while the nematodes target larvae in the mix. For lawn grubs, confirm the grub species and local timing, then improve the lawn’s basic growing conditions rather than expecting one drench to repair dead turf.
Do not assume a product is compatible with every “organic” or conventional spray just because the organisms are biological. UConn Extension notes that nematode compatibility depends on the pesticide and formulation and advises checking its compatibility references; its greenhouse guidance also warns against combining them with certain pesticide groups and fertilizer water. Compatibility can change by product, concentration, water quality, and timing. Keep the treatment separate unless the nematode supplier or label confirms the exact tank mix and interval. (UConn Extension)
Monitor results and troubleshoot a disappointing treatment
Do not judge success by whether you see the nematodes; they are microscopic. Instead, record the pest evidence before treatment and check again on a realistic schedule. In pots, use the same number and placement of yellow sticky cards to compare adult fungus gnat activity, and inspect the media for larvae. In lawns, examine the same kind of turf sample in the treated zone and compare grub counts rather than relying only on the green color of the grass, which can take longer to recover.
If nothing changes, review the treatment in this order:
- Wrong insect or life stage: confirm the pest again and make sure the susceptible stage was in soil when you treated.
- Wrong species: compare the exact nematode name and listed target on the label; a broad marketing phrase is not enough.
- Poor viability: check the expiration date, storage history, shipping heat or freezing, and whether the suspension sat in a warm tank.
- Poor conditions: compare soil temperature with the product range and check whether the root zone dried soon after application.
- Uneven placement: look for untreated patches, clogged screens, overly high pressure, runoff, or a surface crust that prevented water from entering.
- Unrealistic expectations: adult pests or already-damaged plants may remain visible after a successful soil-stage treatment. Nematodes do not repair roots or replace lost turf.
Make one evidence-based correction before repeating. For example, if monitoring confirms fungus gnat larvae but the pot dried quickly, correct the watering pattern and treat the media evenly at the next label-approved interval. If you cannot find larvae or identify the pest, spend the next week scouting instead of applying a second dose automatically. Reapplication intervals and the number of treatments vary by species, pest pressure, and formulation; follow the label and a local extension recommendation.
Understand the limits and safety considerations
Nematodes are not a fast-acting general pesticide. They may begin infecting suitable hosts soon after application, but visible population changes depend on pest abundance, life stage, weather, soil, and how you measure the result. Avoid a fixed promise such as “all pests disappear in 48 hours.” A small pot infestation and a large lawn grub problem are different jobs, and neither guarantees a particular result.
The treatment is also not guaranteed to persist indefinitely. EPN populations need suitable hosts and habitat to reproduce; exposure to drying, temperature extremes, or a lack of susceptible insects can reduce their numbers. Buying extra product “for insurance” may be wasteful if it expires before use, while under-dosing a large area may leave pests untreated. Buy only what you can apply within the labeled storage window and target the area where you have evidence of a problem.
Use the package directions for personal protection, pets, edible crops, water bodies, and any local restrictions. UConn Extension reports no adverse effects on non-target organisms in the field studies it summarizes for greenhouse biological control, but that is not the same as a blanket guarantee for every species, product, habitat, or application. Avoid drift, keep the drench in the target soil, and do not apply where the label or local guidance says not to. If you are treating a commercial crop, a regulated site, or a large area near sensitive habitat, get product-specific advice before application.
Conclusion
Beneficial nematodes can be useful when the pest, nematode species, vulnerable life stage, and soil conditions line up. Identify the insect first, match the label to that pest, apply to moist soil in a suitable temperature and low-light window, and keep the treated zone damp without saturating it. If the treatment disappoints, check pest identity, product viability, soil conditions, and coverage before repeating. That simple sequence gives a living control a fair chance—and keeps you from treating the wrong problem.