How to Identify Slug and Snail Eggs in Your Garden
Learn what slug and snail eggs look like, where to find them, how to tell them from lookalikes, when they hatch, and how to remove confirmed clusters safely.
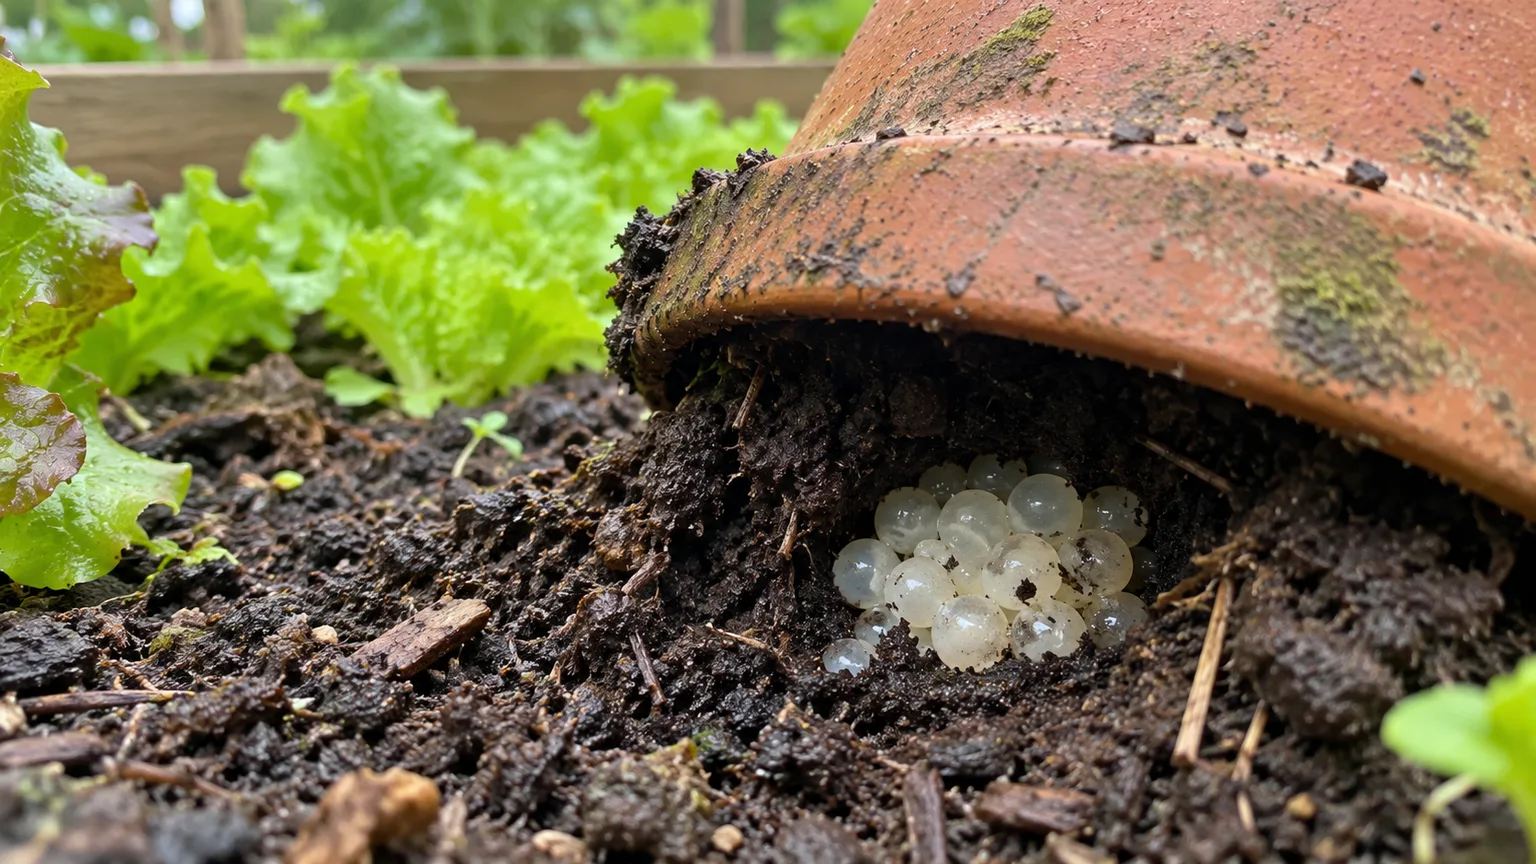
Small, pale clusters in garden soil are easy to mistake for fertilizer, insect eggs, or bits of gravel. A likely slug or snail egg clutch is a loose group of round, pearl-like eggs with a soft, gelatinous coating, usually tucked into a damp, shaded pocket in or just under the soil surface. The cluster’s location and texture are more useful than color alone: land slugs and snails lay eggs that can look very similar, and many other garden objects are white or translucent.
Look before you dig. Check the sheltered soil beneath a pot, board, stone, mulch, or leaf litter, then compare the cluster with the clues below. If the identification is strong and the bed contains vulnerable seedlings, remove that small clutch carefully; if it is uncertain, leave it undisturbed until you can inspect it more closely.
What slug and snail eggs look like
Most garden slug and snail eggs that people encounter are small, round to slightly oval beads grouped in a soft cluster. They may look translucent, cloudy white, cream, pale yellow, or milky, depending on species, age, moisture, and light. A moist gelatinous layer can make a clutch glisten or feel cohesive; soil often sticks to the coating, so the eggs may look dirtier and less pearl-like than photographs suggest.
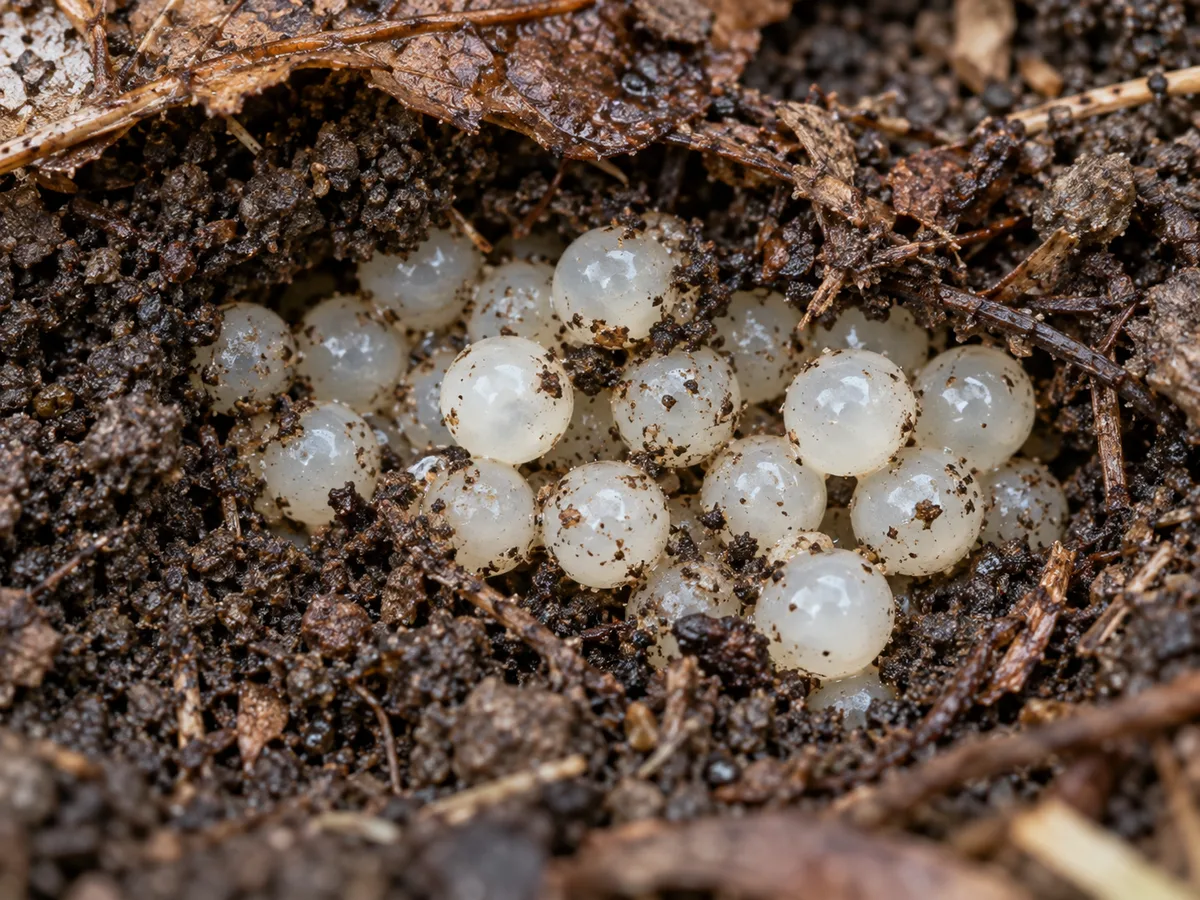
The important pattern is not “white spheres equals slugs.” Look for several similar eggs gathered together in a protected pocket, with damp soil or decomposing plant material nearby. One isolated hard bead in dry potting mix is a weaker match than a cluster of soft-looking pearls under a pot rim or a piece of damp debris.
Color, texture, and shape
For land slugs, University of Connecticut Extension describes clusters of pearl-shaped eggs covered by a gelatinous shell that can give them a milky appearance. A gardening column by Jeff Lowenfels in the Anchorage Daily News describes garden slug and snail eggs as small, roughly pinhead-sized, oval beads that may range from milky white to yellow, opaque, or clear. That range is a reminder that color is not a reliable age chart or species test; it is one clue to use alongside shape, grouping, and the place you found them. (UConn Extension, Anchorage Daily News)
Avoid the squeeze test. It is unnecessary, messy, and not a dependable way to tell an egg from a soft soil particle. Use a small hand lens or your phone’s camera, keep a ruler or coin beside the cluster for scale, and take a photograph before moving anything.
Clutch size and why it varies
One clutch may contain a few eggs; another may contain many more. UConn Extension reports clusters of about 20 to 100 slug eggs in a greenhouse setting, while Lowenfels describes a similar range for garden slug or snail clutches. These numbers are useful as an order of magnitude, not a rule: species, age, and the way a gardener uncovers a clutch all affect the count you see. (UConn Extension, Anchorage Daily News)
An exposed group may appear incomplete because the eggs are spread through loose soil or partly hidden under a leaf. Do not dig a large crater to count every egg; the goal is a confident, low-impact decision, not a census.
Where to look for egg clusters
Search where the soil stays moist, shaded, and protected from disturbance. UConn Extension points to locations beneath containers and debris; practical identification guidance from Gardening Know How also calls attention to soil covered by leaf litter or other organic material. In a home garden, that means checking the underside of movable objects and the first inch or so of loose material beneath them before turning over a whole bed. (UConn Extension, Gardening Know How)
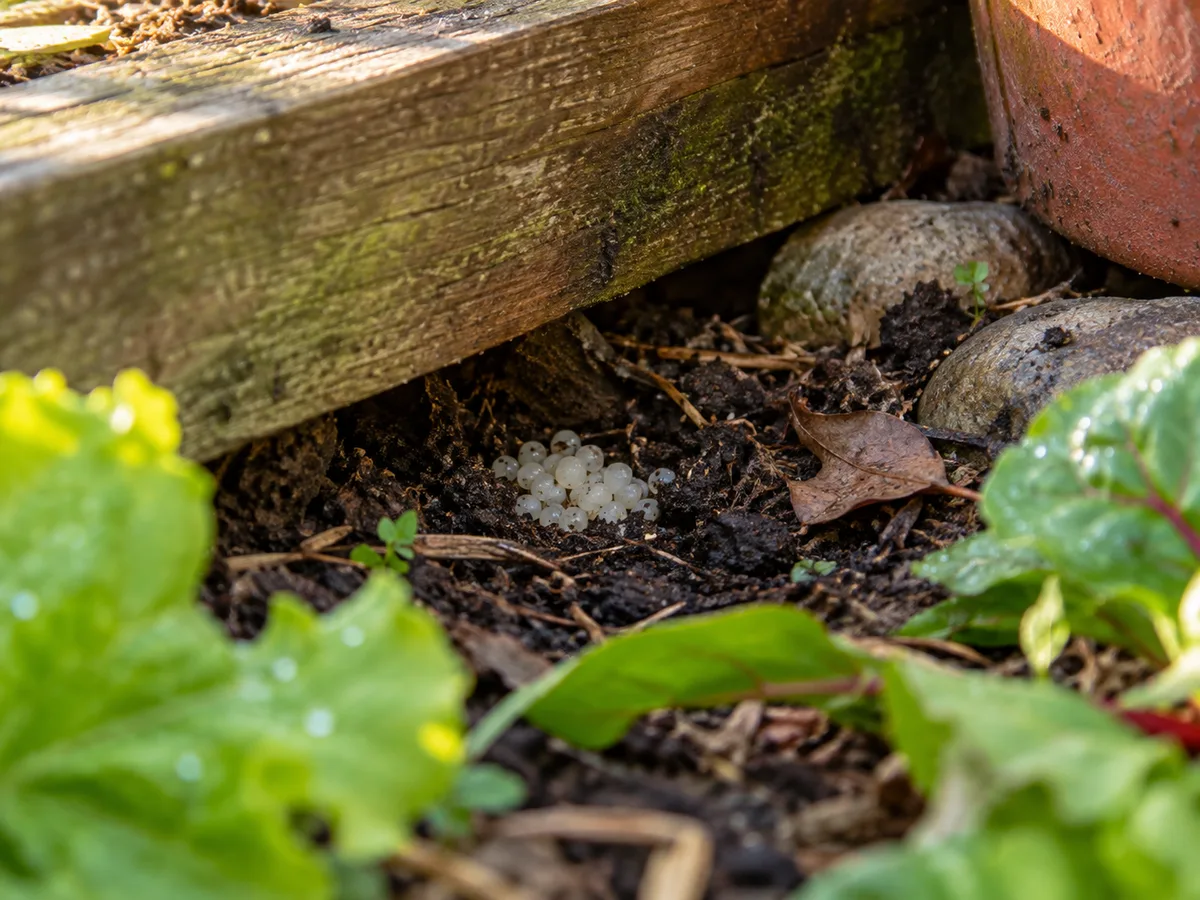
Prioritize the spots that already attract adult slugs or snails: under nursery pots, saucers, boards, flat stones, edging, and dense foliage; at the damp edge of a compost bin; and in crevices in loose mulch near tender plants. Egg clusters can be in or on the soil surface, not necessarily buried deeply. A dry, sunny patch in the middle of a frequently cultivated row is a lower-priority search than a cool pocket under a planter that sits in one place all season.
How to separate likely clutches from lookalikes
Use three clues together: clustered rather than scattered, soft or gelatinous rather than hard, and sheltered soil rather than an orderly attachment to foliage. None proves an identification on its own. If one clue conflicts with the others, do not destroy the object just because it is pale or round.
| What you find | Clues to compare | Better next step |
|---|---|---|
| Likely slug or snail clutch | Similar pearl-like eggs in a loose, soft-looking group in damp soil or beneath cover | Photograph, then remove only if you are confident and control is warranted |
| Slow-release fertilizer prills | Often firm, round pellets dispersed through potting mix rather than a single gelatinous clutch | Leave in the potting mix; compare another pellet from the same bag if needed |
| Insect eggs | Often attached to a leaf, stem, bark, or other surface; may appear in neat rows or a species-specific pattern | Photograph in place and identify before disturbing |
| Earthworm cocoon or other soil capsule | Often a single capsule with a different shape, surface, and color from a many-egg clutch | Leave it alone unless an expert confirms otherwise |
| Frogspawn or other amphibian eggs | Usually associated with water or a wet breeding site and may contain visible dark embryos | Do not treat it as a garden-pest clutch; seek local wildlife guidance if needed |
Fertilizer pellets and soil amendments
Slow-release fertilizer is a frequent false alarm in a newly opened bag of potting mix. These pellets tend to be evenly mixed through the medium, feel firm rather than jelly-coated, and look more alike in size and surface than a naturally laid clutch. If a suspicious group appears only in a fresh bag or container and the pellets are scattered throughout the mix, a fertilizer explanation is more likely.
Other amendments complicate the picture: perlite is usually angular and bright, while small stones feel hard and have irregular mineral surfaces. Do not crush or taste an unknown object to test it. If you cannot tell, photograph it beside a scale and compare the unopened mix or ask a local extension office before removing a large amount of soil.
Insect eggs, cocoons, and frogspawn
Eggs placed on stems or leaf undersides may belong to insects, including beneficial predators. Their shape and placement vary widely, so “a neat row means good bugs” is not enough to identify a species, but it is a strong reason to pause before scraping the cluster off a plant. Photograph both sides of the leaf and preserve the eggs until an extension service or a reliable local identification resource can help.
Frogspawn is a different problem: it is normally associated with water, and jelly masses often contain dark embryos visible inside. A clutch discovered in wet ground close to a pond, drain, or seasonal pool deserves more caution than beads found beneath a dry pot. When wildlife may be involved, leave the site alone rather than moving eggs to water yourself; the animal’s identity and local rules matter.
Can you tell slug eggs from snail eggs?
Often, not from an ordinary garden photograph alone. Common land slug and snail eggs overlap in color, shape, coating, and clutch size, so a pale cluster can support a “slug or snail” identification without telling you which animal laid it. You usually need to find and identify the adult, or have a specialist examine the eggs, to go further.
That distinction rarely changes the first garden decision. If the clutch is confidently from a land gastropod and it sits beside seedlings suffering fresh ragged feeding damage, selective removal may be worthwhile. If your mature plants are healthy and the cluster is isolated in a compost edge or wildlife area, a species-level label may not justify disturbing a useful habitat.
A careful garden inspection route
The easiest time to inspect is after rain or irrigation, when slugs and snails are active and their damp hiding sites are easier to spot. Carry a flashlight or headlamp, a hand lens or phone camera, a small trowel, and a container for confirmed clutches. Gardening Know How recommends a flashlight and checking under leaves; a University of Connecticut greenhouse guide also points gardeners toward damp sites, containers, boards, stones, and dense foliage. (Gardening Know How, UConn Extension)
A short, repeatable search
Start around the plants that are actually being eaten rather than inspecting every square foot. Look for fresh ragged holes, a slime trail, and low cover; then lift only movable shelters and examine the damp soil directly beneath them. Scrape away mulch with a fingertip or narrow tool in thin layers, stopping as soon as you can see the soil surface and any cluster.
Check containers in a set order: under the rim, beneath the pot base or saucer, then at the soil line inside the pot. Slugs can hide under equipment or hitchhike on containers brought in from outdoors, so inspect nursery pots before setting them beside seedlings. Mark productive hiding spots on a simple garden map; revisiting three known shelters is more efficient than randomly turning over the entire bed.
What to do with a confirmed cluster
If the group fits the land-gastropod clues and is near valuable seedlings, remove just the clutch and the small amount of surrounding loose soil needed to lift it intact. Wear gloves or use a trowel, avoid direct skin contact, and do not scatter eggs across the bed while scraping. Put the material into a sealed bag for household trash where local rules allow, or use a covered container of soapy water for the clutch; keep it away from pets and wildlife.
Remove it without spreading eggs
Work over a scoop, not over the planting row. If you are uncertain, take a photo first and leave the cluster in place until you can identify it; killing a beneficial insect clutch or disturbing amphibian eggs is harder to undo than waiting a day. Wash the tool and gloves after handling soil from a confirmed pest site, especially before moving to a clean seed tray or another part of the garden.
Avoid pouring salt, vinegar, bleach, or boiling water into garden soil. Those methods can damage roots and soil life well beyond the small patch you mean to treat, and they do nothing to find hidden clutches elsewhere. If you choose to remove a cluster, physical collection is more controlled than trying to sterilize the surrounding bed.
When eggs hatch and why timing varies
There is no single countdown that works for every slug and snail egg. UConn Extension reports that eggs of the greenhouse slugs described in its guide hatch in fewer than 10 days at 50°F, but that is a specific setting, not a universal garden timetable. Species and local temperature and moisture change development, so treat any cluster as potentially close to hatching rather than relying on a fixed number of days. (UConn Extension)
Warm, damp conditions make prompt follow-up sensible. If you found eggs beside a seedling bed, check that area again within about a week and look for new slime trails or fresh feeding; the interval is a practical monitoring schedule, not a biological guarantee. In cool weather, eggs may persist longer, and a dry exposed clutch may fail, but do not assume it is harmless without evidence.
Find adults and check for new clutches
Removing eggs does not remove the adults that laid them. Slugs and snails are usually easier to locate at night, early morning, or after damp weather; check under the same pots and boards where eggs were found, as well as along the edges of tender foliage. A silver trail is useful supporting evidence, but it does not prove that a nearby white object is an egg mass.
Repeat a targeted check once or twice a week while seedlings are at risk, and inspect new pots or bags of growing medium before bringing them into the clean area. If damage continues without fresh slime, consider other night-feeding animals or caterpillars instead of assuming every hole comes from slugs. A short observation log—date, rain, bed, shelter, and what you found—can show whether pressure is local or spreading.
Protect vulnerable plants without clearing every habitat
Slugs and snails are part of a garden food web, and some feed mainly on decaying organic matter rather than live plants. RHS guidance recommends reducing damage through growing practices and targeted protection, while noting that winter raking can expose some eggs to birds but may also make the garden less welcoming to predators and other wildlife. That trade-off argues for a focused approach around seedlings, not a bare, debris-free yard. (RHS Advice)
Make targeted changes around seedlings
Water in the morning when practical so the surface and foliage have time to dry before the main overnight feeding period. Keep nursery pots, stacked boards, and damp saucers from resting right beside vulnerable crops, and thin dense growth where it traps moisture against stems. A clean, inspectable strip around a seedling bed can help; leave leaf litter and refuge habitat in less sensitive parts of the garden.
Do not rely on rough barriers or crushed shells as an automatic fix. RHS notes that many supposed barriers have little evidence in garden conditions, and its tests found no reduction in slug damage from several materials, including copper tape, bark mulch, eggshells, grit, and wool pellets. If a physical barrier is part of your plan, test it on one short bed edge and inspect for gaps rather than assuming the material has formed an impermeable wall. (RHS Advice)
Common identification and cleanup mistakes
The most costly mistake is destroying an object based on color alone. A white round pellet can be fertilizer; an egg attached to a leaf may be an insect; a cluster near water may be amphibian eggs. Combine location, arrangement, texture, and context, and pause when those clues disagree.
The next mistake is turning a careful check into wholesale digging. Slug and snail eggs are small and easy to miss, so disturbing an entire bed to find every last clutch can damage roots, expose helpful soil life, and still fail to reach eggs elsewhere. Focus first on high-risk shelters near fresh damage, photograph finds, and repeat the inspection after the next wet spell.
Finally, do not assume one clutch means a garden-wide infestation—or that removing it solves one. A few feeding marks on established plants may be tolerable, while repeated losses in a seedling tray deserve more attention. Use the damage and the plant’s stage to decide how much control is justified, then adjust the search area based on what you actually find.
Conclusion
Look for a loose, soft-looking group of pearl-like eggs in damp, sheltered soil; that combination is a stronger clue than whiteness or size alone. Check beneath pots, boards, stones, mulch, and leaf litter close to plants showing fresh damage, and compare any suspicious cluster with fertilizer pellets, insect eggs, and amphibian spawn before touching it.
When the identification is clear and seedlings are vulnerable, lift the clutch carefully, dispose of it in a controlled way, and revisit the same shelters soon. When the evidence is mixed, take a photo and wait for a better identification. That small pause protects beneficial life while keeping the most useful garden action—targeted checks around vulnerable plants—simple and repeatable.



