Urn Plant Care: How to Grow Aechmea Fasciata Indoors
Learn urn plant care for Aechmea fasciata indoors, from filtered light and fresh cup water to airy potting mix, long-lasting pink bracts, and healthy pups.
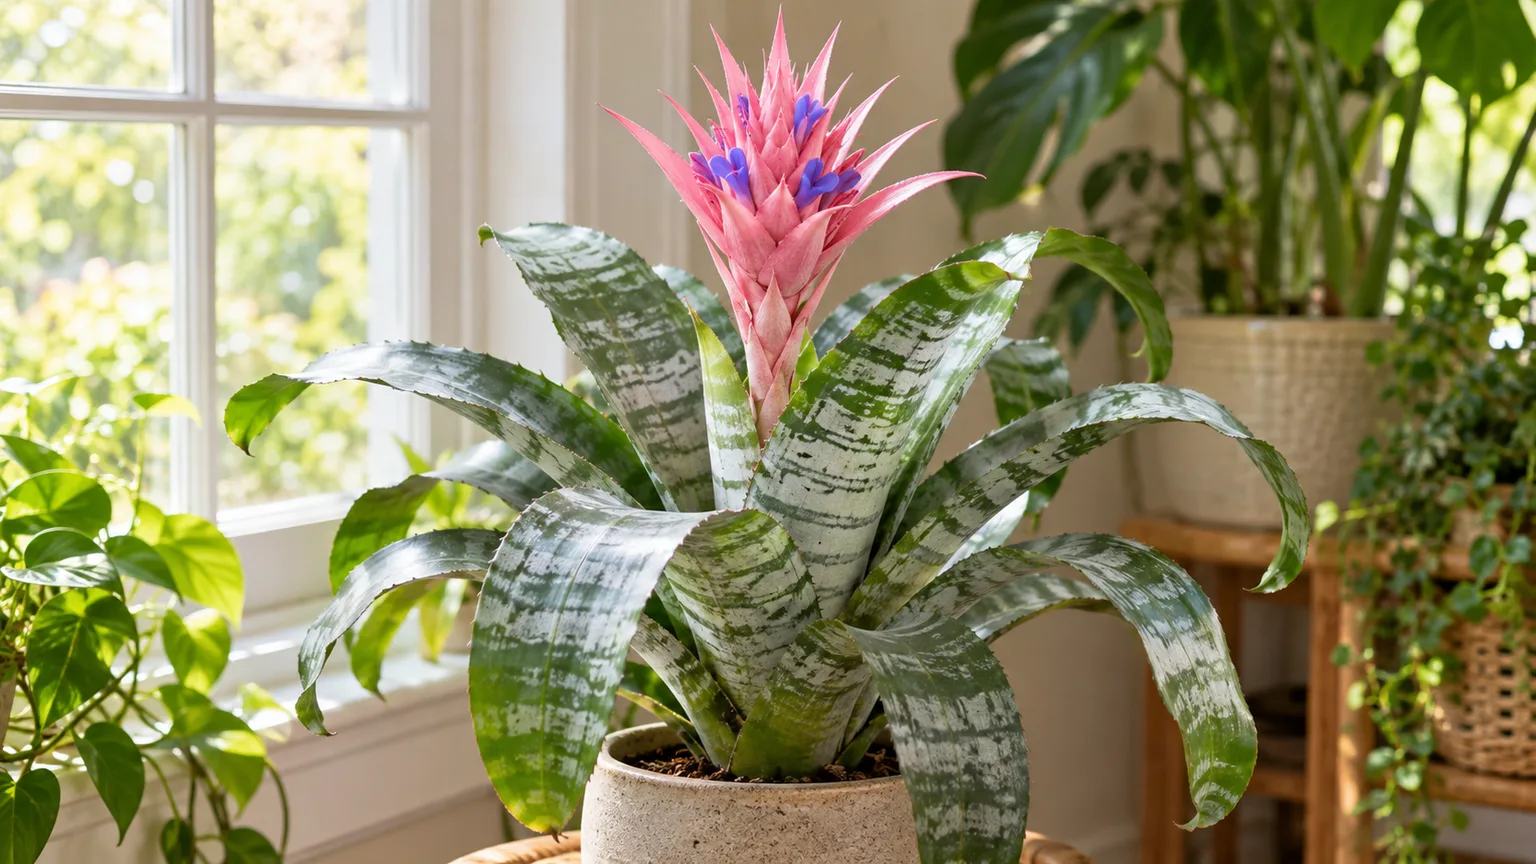
Urn plant care is easiest when you treat the plant’s vase-shaped center and its roots as two different growing zones. Keep the central cup clean and lightly filled, give the roots an airy mix that drains, and place the silver-banded rosette in bright light without prolonged hot sun. That routine suits the plant’s natural habit and avoids the mistake that most often harms it: leaving the roots in a dense, soggy pot while assuming the cup alone supplies everything.
Urn plant care at a glance
| Need | Practical target | What to watch |
|---|---|---|
| Light | Bright, filtered light; gentle morning sun is usually easier than afternoon sun | Pale or scorched patches can mean excessive direct sun; weak growth can mean too little light |
| Cup | Keep a shallow reservoir of clean water in the central rosette while the plant is warm and actively growing | Empty, rinse, and refill regularly; refresh more often if water is mineral-heavy or debris collects |
| Roots | Use a porous epiphytic or orchid-style mix and water when the mix is approaching dry, not on a fixed weekly schedule | The mix should not stay saturated or sit in the cachepot’s runoff |
| Temperature | Normal warm indoor conditions; protect from cold drafts and frost | Growth slows in a cool, dim room, so reduce root watering and feeding |
| Fertilizer | Little is needed indoors; if used, dilute it and apply to the mix during active growth | Do not routinely pour concentrated fertilizer into the cup |
| After flowering | Leave the mother plant in place while its offsets grow | The original rosette flowers once; pups are the next generation |
Use the table as a starting point, then adjust for your room, pot, and water. An urn plant in a small clay pot beside a bright window dries differently from one in a plastic nursery pot in a cool room, so observation is more reliable than a universal watering calendar. North Carolina State Extension describes Aechmea fasciata as an epiphyte with bright, indirect light, a water-holding central cup, and a preference for moist but well-drained medium (NC State Extension Plant Toolbox).
What makes an urn plant different
The urn plant, also sold as silver vase plant or silver vase bromeliad, is Aechmea fasciata, a member of the pineapple family, Bromeliaceae. In its native southeastern Brazil, it grows as an epiphyte: it anchors itself to other plants rather than relying on deep soil. Indoors, the roots still need oxygen and a secure foothold, while the overlapping leaves form a cup that catches water and debris.
Its broad, arching leaves usually show pale silver cross-bands and small spines along the margins. A mature plant sends up a prominent pink inflorescence, or flower cluster; the bright pink parts are bracts, while the small true flowers are violet-blue and short-lived. The bracts can keep their color for months, so a few fading flowers do not mean the display is already over. The Royal Horticultural Society’s bromeliad guide describes the bracts as the long-lasting color and the true flowers as comparatively brief.
When choosing a plant, look for a firm, well-centered rosette with no mushy base, widespread yellowing, or cottony deposits tucked between leaves. If you want the longest time to enjoy the bloom, a plant with colored bracts and just a few true flowers emerging may have more display ahead than one whose small flowers have all opened. That is a useful buying cue, not a guarantee: growing conditions and the plant’s maturity affect how long the bracts remain attractive. A grower’s account at Ohio Tropics illustrates the difference between the bracts and flowers and describes choosing an inflorescence at an earlier stage.
Give it bright, filtered light
Place an urn plant near a bright window where daylight reaches the leaves but the plant is shielded from long stretches of intense midday or afternoon sun. An east-facing window often offers a forgiving mix of brightness and mild morning sun. At a south- or west-facing window, set the plant a little back from the glass or diffuse direct rays with a sheer curtain, especially in hot climates or summer.
Too little light usually shows up as slow, weak growth and a plant that stays green but does not flower readily. Too much direct sun can bleach or scorch the exposed leaf surfaces. Move it gradually when changing rooms or windows; a plant that grew in a shaded shop can burn if moved straight into a sunny sill. Bright filtered light supports a compact rosette and gives a mature plant a better chance to bloom, but it cannot force a young offset to flower before it is ready.
Water the cup and potting mix on separate schedules
The cup and the potting mix do different jobs, so check them separately. In a warm room, keep a small amount of clean water in the central cup; a deep, stagnant reservoir is unnecessary. Water the potting mix when it has begun to dry rather than keeping it wet. Pour slowly around the base of the rosette, let excess drain through the holes, and empty the saucer or decorative outer pot afterward.
This distinction matters because the plant’s epiphytic roots are adapted to air around them. They can tolerate a brief drying between waterings better than a dense mix that remains saturated, but they should not be left bone-dry for long periods either. The cup does not make drainage optional: if the lower stem or roots stay wet and oxygen-starved, rot can still develop even while the leaves are holding water.
Refresh the tank before water turns stale
Cup-water advice varies by bromeliad and growing conditions. For a typical indoor urn plant, keep the cup lightly filled and refresh it about monthly: tip out old water, rinse away loose debris, and refill with fresh water. If the room is warm, the water evaporates quickly, or organic debris falls into the cup, check more often. This keeps the reservoir from becoming a stagnant pocket without requiring you to empty it every day.
Water quality may change how often you flush. The University of Wisconsin–Madison Extension bromeliad guide says most tap water is usable, but moderate mineral content can accumulate as water evaporates; rain or deionized water can help when mineral spots or tip damage become a recurring problem. NC State recommends changing the cup water monthly, while UF/IFAS advises occasional flushing to remove stagnation and salts. Taken together, a monthly refresh is a sensible home routine, with more frequent flushing when your tap water leaves visible deposits.
Adjust watering for season, hard water, and pot type
Use room-temperature tap water if it has not been softened with sodium and does not leave heavy crust or spotting. Hard water does not automatically make the plant unsafe to grow; the practical issue is that dissolved minerals can build up on leaves and in the cup. If you see persistent white rings or brown tips despite a sound watering routine, try rainwater or deionized water for the cup and flush the leaves gently with fresh water. Avoid assuming distilled water is always necessary; the Wisconsin Extension guide notes that very pure water can also leach nutrients from foliage unless nutrition is handled appropriately.
In winter, a warm, bright home may still support normal growth, but a cool or dim room slows evaporation and root activity. Let the mix approach dryness before watering again, use less water in the cup, and pause fertilizer until growth resumes; a Washington State University Extension handout recommends reducing cup water in cooler, darker months. Do not leave the cup full when an outdoor plant is exposed to freezing weather; UF/IFAS notes that water held in bromeliad cups can contribute to cold injury in freezing conditions. For an indoor plant, the simpler protection is to bring it inside before cold weather arrives.
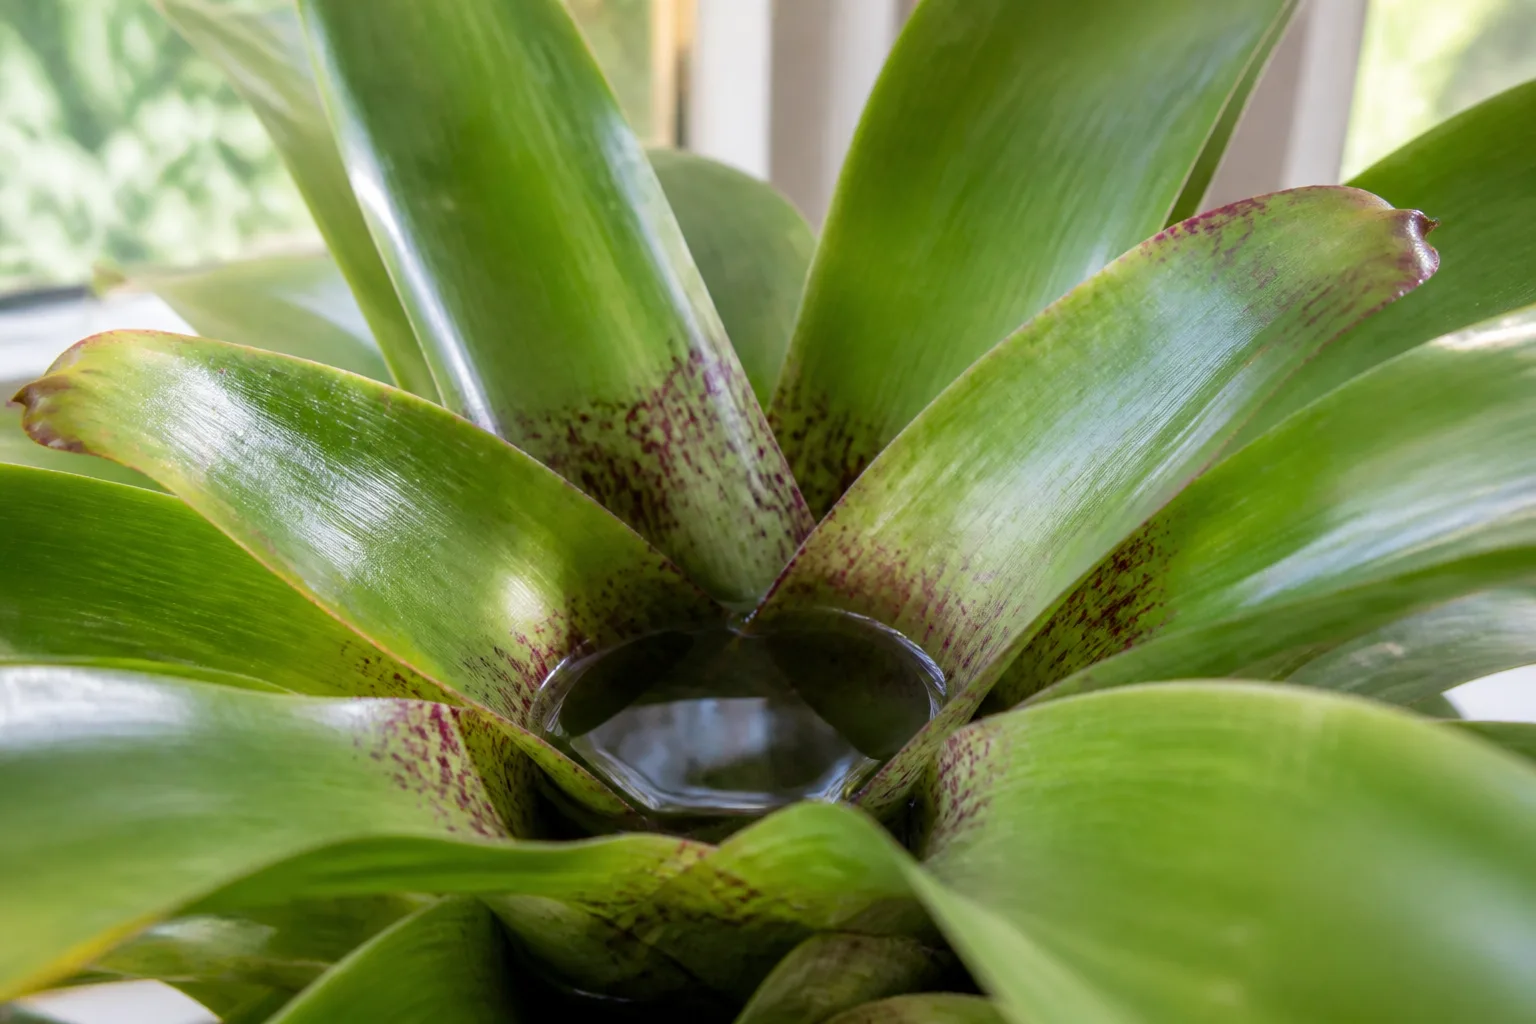
The central cup is a water reservoir; refresh it separately from watering the potting mix.
Choose a fast-draining, airy mix and a snug pot
Use a commercial bromeliad or epiphytic orchid mix, or make the existing mix more open with coarse orchid bark and perlite. The goal is a medium that holds the plant steady and retains a little moisture while letting air reach the roots. Avoid dense garden soil and heavy, fine potting compost; both can stay wet long after the cup has drained.
There is no single recipe that suits every indoor climate. A dry, air-conditioned room may call for a mix with a little more moisture retention, while a humid home or a grower who tends to overwater benefits from a coarser blend. The Wisconsin Extension guide gives orchid bark with coarse perlite and humus as one suitable option and emphasizes that roots can rot in tight or saturated medium. Change the mix to correct a real drainage problem, not just because a calendar says to repot.
Avoid a pot that stays wet
Choose a pot with open drainage holes that is only modestly larger than the root mass. Bromeliads have relatively small root systems for the size of their leaves, so a huge pot does not help them grow faster; it leaves extra medium wet for longer. If the plant is top-heavy, stabilize its smaller nursery pot inside a heavier cachepot, but lift it out to water and drain rather than leaving water pooled at the bottom.
Clay pots dry faster than plastic, which can suit a humid home or someone who waters generously. Plastic retains moisture longer and may work better in a dry, heated room, provided the grower checks the mix before watering. Repot only when roots have filled the container, the mix has broken down, or the plant needs a safer, airier medium. Avoid burying the rosette’s base or pressing mix tightly around it.
Keep temperatures warm and humidity moderate
Typical comfortable indoor temperatures suit an urn plant. NC State lists about 65–75°F (18–24°C) as a favorable range for Aechmea fasciata; protect it from cold windows, heating vents, and abrupt temperature swings. If you move it outdoors for warm weather, bring it back in before nights turn cold and always before frost.
Some humidity helps, but you do not need to build a greenhouse around this bromeliad. Its leathery leaves tolerate ordinary home humidity better than delicate tropical foliage, as University of Missouri Extension’s horticulture article notes for thick-leaved bromeliads. If indoor air is very dry, group plants or use a room humidifier; avoid frequent misting as a substitute for watering because droplets sitting in leaf bases do not improve root drainage or cup hygiene.
Fertilize lightly, or skip it in dim months
An urn plant is not a heavy feeder, particularly indoors, where light and growth are limited. During active spring and summer growth, you can apply a balanced liquid houseplant or bromeliad fertilizer at a very dilute rate to the potting mix every month or two. Start around one-eighth to one-quarter of the label rate for a low-light indoor plant; if the foliage is pale and growth is weak, first check light, roots, and water rather than immediately increasing the dose.
Extension recommendations differ on strength and placement because they cover many bromeliads and growing systems. Wisconsin Extension recommends diluted feed for bromeliads, while UF/IFAS advises applying fertilizer to the medium rather than routinely to the central cup, where fertilizer salts can collect and damage new leaves. For a home urn plant, the conservative approach is to feed the mix lightly, flush it with plain water occasionally, and stop in winter or whenever growth has paused. Too much fertilizer can produce oversized, less compact foliage and brown tips.
Know what to expect from the bloom cycle
An individual urn plant rosette produces one flowering spike. The pink bracts are the long-lived feature; individual violet-blue flowers open and fade sooner. After the bracts age, the mother rosette gradually declines while small offsets grow at its base. This is a normal life cycle, not a signal that the plant needs a drastic cutback or a stronger fertilizer dose.
Light, maturity, temperature, and overall health all affect when a plant blooms. A nursery plant may already be mature and arrive in flower; a pup raised at home can take a long time to reach flowering size. Adequate bright light supports a mature plant, but there is no reliable month-by-month schedule that fits every plant. Keep the leaves and pups healthy rather than sacrificing them to chase an immediate bloom.
Some growers use ripening fruit as a source of ethylene to prompt a mature bromeliad to flower. The University of Missouri Extension describes placing an established bromeliad in a sealed clear bag with an apple for roughly a week, then returning it to normal bright indirect light. Treat this as an optional forcing technique, not routine care: a plant that is too young or stressed may not respond, and flowering starts the mother rosette’s gradual decline. If you try it, keep the bag out of direct sun so heat cannot build up around the leaves.
When the pink bracts fade
Once the pink structure is brown or no longer attractive, cut the flower stalk near its base with clean pruners. Do not pull at it or cut into the central rosette. Continue normal bright-light care and modest cup and root watering while the pups develop; the mother plant can remain useful as a support and nutrient source for them during this period.
The outer leaves may slowly yellow or lose their shape after flowering, even when the pups are healthy. Remove only leaves that are fully dry or dead, using clean scissors and avoiding cuts into the center. If yellowing starts suddenly across the whole plant, or the base turns soft and smells sour, investigate waterlogged roots or crown rot rather than assuming the life cycle explains every symptom.
Grow the next generation from pups
Offsets, commonly called pups, form around the mother plant’s base after flowering. You can keep the cluster together for a fuller container or separate pups into individual pots. Neither choice is wrong: an intact clump avoids disturbing young roots, while separating offsets gives each one room and makes it easier to share plants.
Wait until a pup is a substantial fraction of the mother’s size—roughly one-third to one-half is a useful range—and has its own roots or a firm base that can be potted securely. Wisconsin Extension recommends offsets around one-third the size of the mother, while NC State and other extension guidance use larger practical thresholds. The more developed the pup, the more forgiving it is after separation. Small offsets without roots may survive, but they are easier to desiccate or rot.
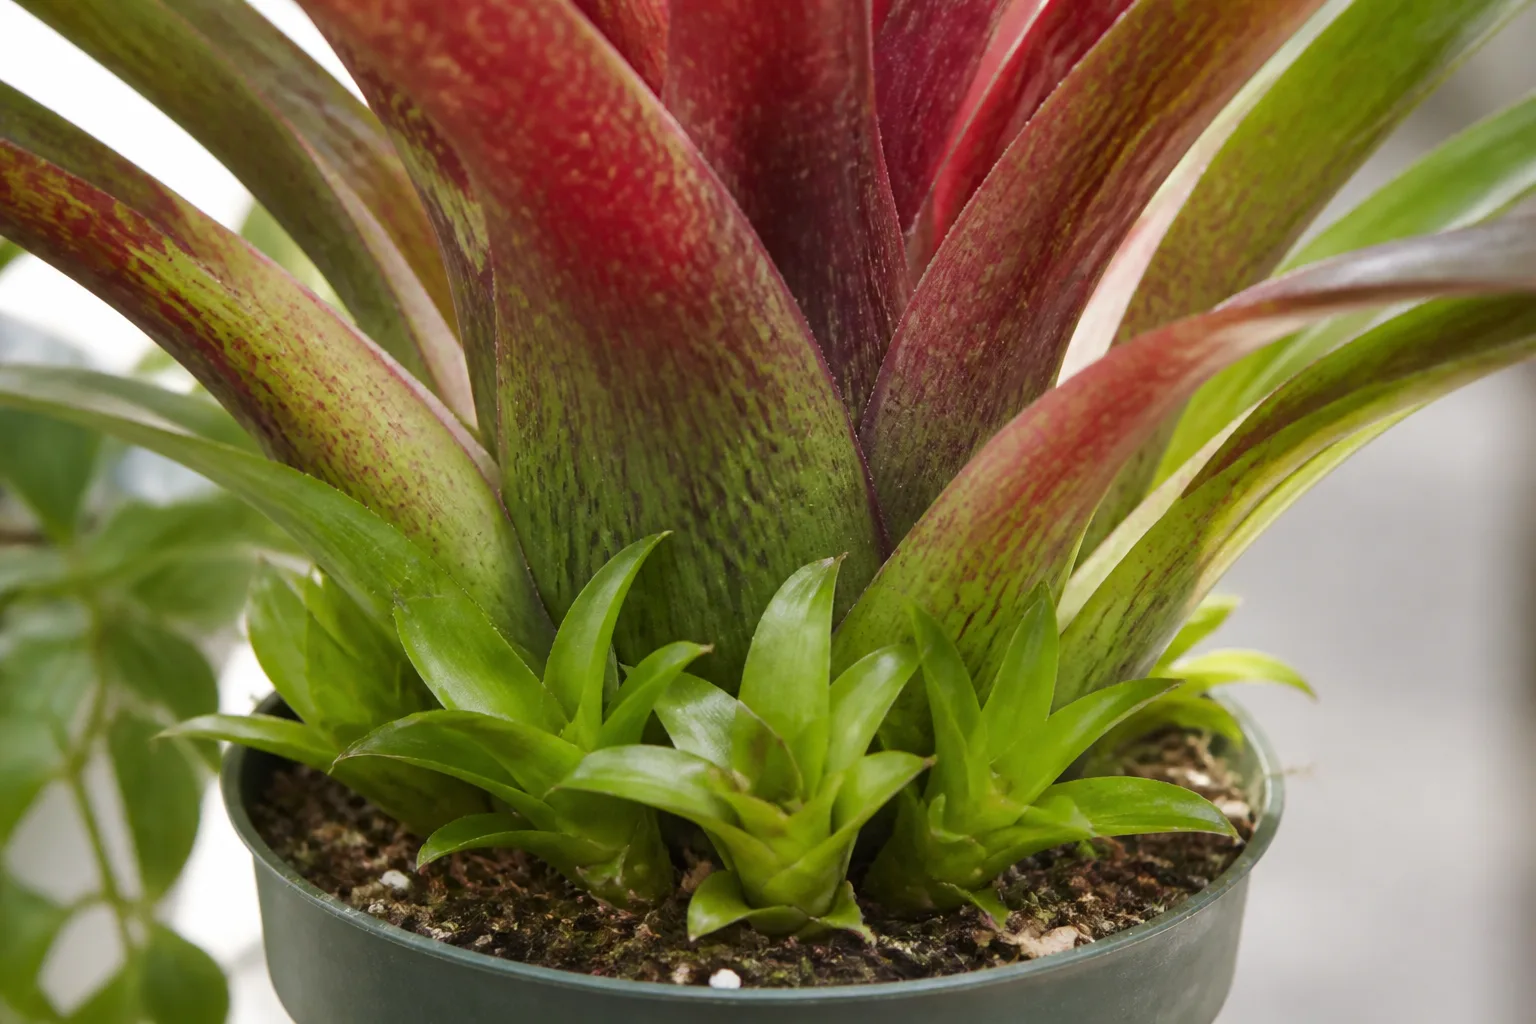
Let pups grow large enough to handle and anchor before dividing them from the mother rosette.
Separate a pup without damaging it
Water the plant lightly the day before if the mix is very dry, then slide the root ball out gently. Use a clean, sharp knife to cut the pup where it joins the mother; keep as much of the pup’s own base and roots as possible. If the roots are tangled, take time to tease them apart rather than tugging the leaves, which can snap at the base.
Pot each offset in a small container with drainage and fresh, airy bromeliad or orchid mix. Set it upright at the same depth it grew before, firm the mix only enough to stabilize it, and keep it in bright indirect light while it settles. Do not bury the central leaves or drench the new pot repeatedly. Keep the mix lightly moist but well aerated, and avoid fertilizer until new growth shows that the pup has resumed growing. The mother plant can be removed once it is mostly dry and no longer supporting pups; there is no need to cut it away while offsets are still small.
Solve yellow leaves, brown tips, and a soft base
Start by identifying where the change begins and whether the base feels firm. A few older outside leaves drying after flowering are expected. Widespread yellowing, a persistently wet pot, or a soft, dark, foul-smelling base points to a root or crown problem and calls for an immediate drainage check.
| Symptom | Likely cause to check first | First response |
|---|---|---|
| One or two outer leaves yellow after flowering | Normal aging of the mother rosette | Leave healthy pups in place; remove only fully dry leaves |
| Soft, dark base or sour smell | Rot from saturated mix or poor drainage | Remove pooled water, inspect roots, trim dead tissue with clean tools, and repot into fresh airy mix if needed |
| Brown tips with otherwise firm leaves | Dry roots, mineral buildup, fertilizer salts, or cold exposure | Check pot moisture and water source; flush salts and move away from cold drafts |
| Pale patches on window-facing leaves | Too much direct sun | Move to bright filtered light and avoid abrupt exposure changes |
| Slow growth and no bloom on a small plant | Low light or an immature rosette | Improve filtered light and give the plant time; do not force fertilizer |
Brown tips are a symptom with several possible causes, so change one condition at a time. If the mix is bone-dry and pulls away from the pot, water thoroughly and let it drain; if it remains wet for days, improve the mix and drainage instead. If a hard-water ring has formed around the cup, flush it with lower-mineral water and reduce fertilizer buildup before cutting off healthy leaves.
When root rot is present, remove the plant from its container and inspect the roots. Healthy roots are generally firm; rotted roots are soft, dark, or collapsing. Trim only damaged portions with a clean blade, discard old soggy mix, and repot in a snug container with drainage. If the central base itself is decayed, recovery may be limited; save any firm, viable pups and correct the conditions that caused the damage.
Watch for mealybugs and scale
Mealybugs and scale can hide in the tight leaf axils, beneath lower leaves, or around the base of the flower stalk. Look for cottony white clusters, small attached brown or tan bumps, sticky honeydew, or distorted new growth. A quick glance at the outer leaves can miss an infestation in the center, so rotate the pot and inspect both sides of several leaves during routine watering.
Isolate an infested plant from nearby houseplants and remove visible insects with a damp cloth or cotton swab, then recheck the leaf bases every few days. Iowa State Extension notes that small numbers of mealybugs can be spot-treated with an alcohol-soaked swab, but test first on a small area because plant response can vary; for larger infestations, use only a product labeled for indoor ornamentals and follow its label. Iowa State Extension’s houseplant pest guide explains why protected feeding sites make mealybugs difficult to control. Avoid drenching the central cup with pesticide or fertilizer unless the product label specifically permits that use.
Grow it outdoors only in a warm, sheltered climate
In a frost-free subtropical climate, urn plants can grow in sheltered outdoor containers or suitable garden positions with bright shade. In cooler regions, use outdoor placement as a warm-season option: acclimate the plant gradually in a protected spot, keep it out of harsh afternoon sun, and bring it back indoors before cold nights or frost. The RHS notes that some bromeliads can spend summer outdoors, while only a few tolerate year-round outdoor conditions in very mild, sheltered gardens.
Outdoor care changes the cup routine. Rain can flush it naturally, while hot, dry weather may empty the cup quickly; check it during dry spells and remove fallen leaves or debris. In humid, rainy climates, avoid a pot that stays saturated and keep air moving around the plant. If local mosquito guidance applies to water-holding plants, follow your municipality or extension service’s directions for container water rather than using a pesticide or larvicide not labeled for the situation.
Common mistakes to avoid
- Watering only the pot or only the cup. Check the reservoir and the root zone separately; the plant depends on a clean cup and a draining medium.
- Leaving runoff inside a decorative pot. The cup can hold water while the roots remain oxygenated; standing water around the pot does not help either job.
- Using a large, dense potting setup. Small roots in too much wet mix are vulnerable to rot. Use a snug container and an airy medium.
- Treating fertilizer as a bloom switch. Strong feeding cannot mature a young pup on command and can damage leaf tips or distort growth.
- Cutting off the mother rosette as soon as the bloom fades. Let pups size up first; the mother may continue supporting them while it declines.
- Dividing pups too early. Tiny offsets without roots are more difficult to establish. Wait until each can anchor and stand in a small pot.
- Assuming every brown tip means thirst. Compare moisture, mineral deposits, feed history, and temperature before watering more.
Conclusion
An urn plant thrives when its cup stays fresh, its roots get air, and its leaves receive bright filtered light. Water the two zones according to their different needs, keep fertilizer modest, and use a snug pot with a porous mix rather than trying to manage it like an ordinary soil-grown houseplant.
After flowering, patience is part of care: the original rosette will gradually decline, but its pups can become the next generation. Give offsets time to grow, divide them only when they are sturdy enough, and you can keep the plant’s silver-banded foliage and future pink bracts going for years.



