When and How to Harvest Shallots for Storage
Learn when shallots are ready, how to lift them without bruising, and how to cure, sort, and store bulbs so fewer spoil after harvest.
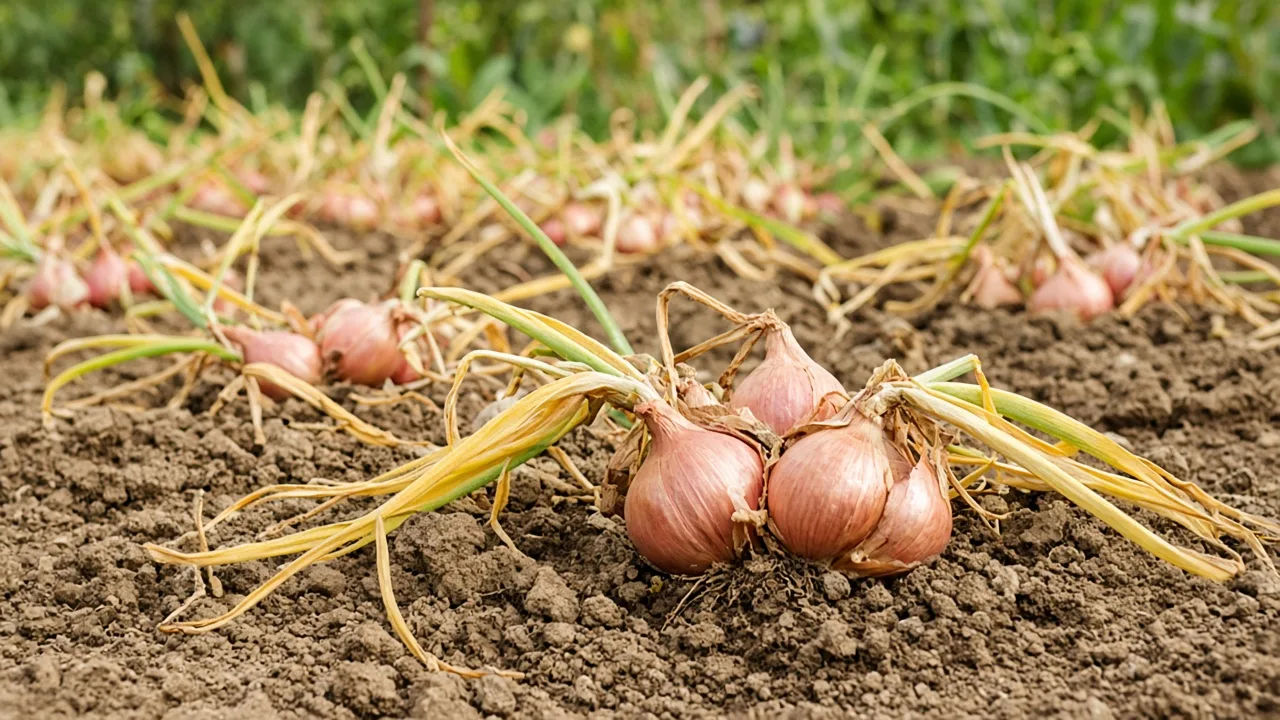
The best time to harvest shallots is when most of the foliage has naturally yellowed, weakened, and fallen over, and the bulbs feel firm and mature. That visual change matters more than a calendar date because a spring-planted crop, an autumn-planted crop, and a seed-grown crop do not finish on the same schedule.
If you want shallots for immediate cooking, you can lift a few while the tops are still partly green. For bulbs that need to last through the season, let the plant finish as far as weather and soil conditions allow, then lift during a dry window and cure the crop thoroughly. The real threat is not simply “waiting too long”; it is leaving mature bulbs in wet ground, bruising them during harvest, or storing them before the neck has dried.
The Short Answer: Harvest by Plant Signals
Shallots are storage organs, so the plant gives you a useful end-of-season signal. During active growth, the leaves are upright and green. As the bulb reaches maturity, the neck softens, the leaves lose color, and the tops bend down. When most of a clump has reached that stage, begin harvesting.
The Royal Horticultural Society describes yellowing, floppy foliage as the harvest cue and notes that shallots commonly ripen in mid- to late summer, depending on variety, planting time, and weather. That is a much safer rule than pulling every crop on the same week each year. RHS guidance on growing shallots
What Natural Maturity Looks Like
Look for a gradual, crop-wide change rather than one damaged leaf. Most of the leaves should be yellowing or drying, several tops should have fallen to the side, and the bulbs should have filled out rather than remaining tiny, soft, or mostly buried in a tight green collar. Some green tissue can remain; you do not need to wait until every leaf is brown and brittle.
If you can see the shoulders of the bulbs sitting higher in the soil, treat that as supporting evidence, not the deciding test. Shallots vary in shape and may naturally expose more of the bulb as they swell. A firm bulb and naturally declining foliage tell you more than surface visibility alone.
Do not bend healthy green tops down by hand to force maturity. That creates a wound, but it does not recreate the plant’s natural finishing process. Leave active leaves working until the plant begins to senesce on its own.
When Sudden Collapse Is Not Maturity
A mature planting usually declines progressively. Sudden wilt, a foul smell, soft tissue at the base, a white fungal growth on roots, or one plant collapsing while its neighbors remain vigorous points toward damage, water stress, or disease rather than harvest readiness.
Lift a suspicious plant separately and inspect it. Do not mix a soft or diseased bulb into a healthy curing batch. Virginia Cooperative Extension lists neck and bulb rots among the storage problems of onions, garlic, and shallots, and careful curing cannot rescue a bulb that was already infected. Virginia Cooperative Extension on onions, garlic, and shallots
How Planting Time Changes the Harvest Window
The number of days printed on a packet is a planning aid, not a command to dig. Weather, daylight, cultivar, soil drainage, and whether you planted a set or seed all change the finish date. Label separate plantings so you can evaluate each row on its own.
Autumn-Planted Shallots
Autumn-planted sets can establish roots before winter, pause through cold weather, and resume growth in spring. In suitable climates they often finish earlier than spring plantings, commonly from late spring into summer. A harsh winter, saturated soil, or spring cold can delay that pattern, so the foliage still gets the final vote.
Do not assume an overwintered crop should be dug simply because the calendar has reached early summer. Check whether the bulbs are firm and whether the tops are actually finishing. Conversely, do not leave a mature crop in soggy ground for weeks while waiting for a date that no longer matches the weather.
Spring-Planted and Seed-Grown Shallots
Spring-planted shallots often take roughly 100 to 120 days to reach harvest, while fall-planted crops may take around seven to nine months from planting to maturity. Seed-grown shallots can be slower because they begin as seedlings rather than as a ready-made storage clove. These are useful estimates for when to start inspecting the bed, not guarantees.
The Old Farmer’s Almanac and Iowa State University Extension both emphasize drying the harvest before storage. Iowa State gives a practical curing range of one to two weeks and recommends a cool, dry storage environment after the bulbs are cured. Iowa State Extension harvest and storage guidance
The Dry-Weather Check Before You Dig
Choose a dry day when the soil is workable and rain is unlikely during the first part of curing. Dry soil is easier to loosen, sheds from roots more readily, and leaves fewer wet pockets around the neck. If the crop is mature and a long wet spell is approaching, lifting before the rain is often the better trade-off.
That does not mean harvesting from baked, rock-hard soil. If the bed is too dry to loosen without force, water it lightly and wait until the surface is workable, or use a narrow hand fork carefully. The goal is soil that releases the bulbs without either mud or a struggle.
As maturity becomes obvious, avoid unnecessary irrigation. The RHS advises avoiding watering once bulbs have swollen in mid-summer because continued wetness can hurt storage performance. Earlier in the season, adequate moisture is important for leaf and bulb growth; the late-season adjustment is about allowing the crop to finish dry, not about deliberately starving it.
How to Harvest Shallots Without Bruising Them
A shallot with a nick, gouge, or crushed neck may look acceptable on harvest day and still become the bulb that starts a rotten pocket in storage. Handle each clump as if the outer skin is protective packaging: keep it intact, keep soil and water off the bulb, and avoid pulling by the leaves when the ground resists.
The Five-Step Lifting Method
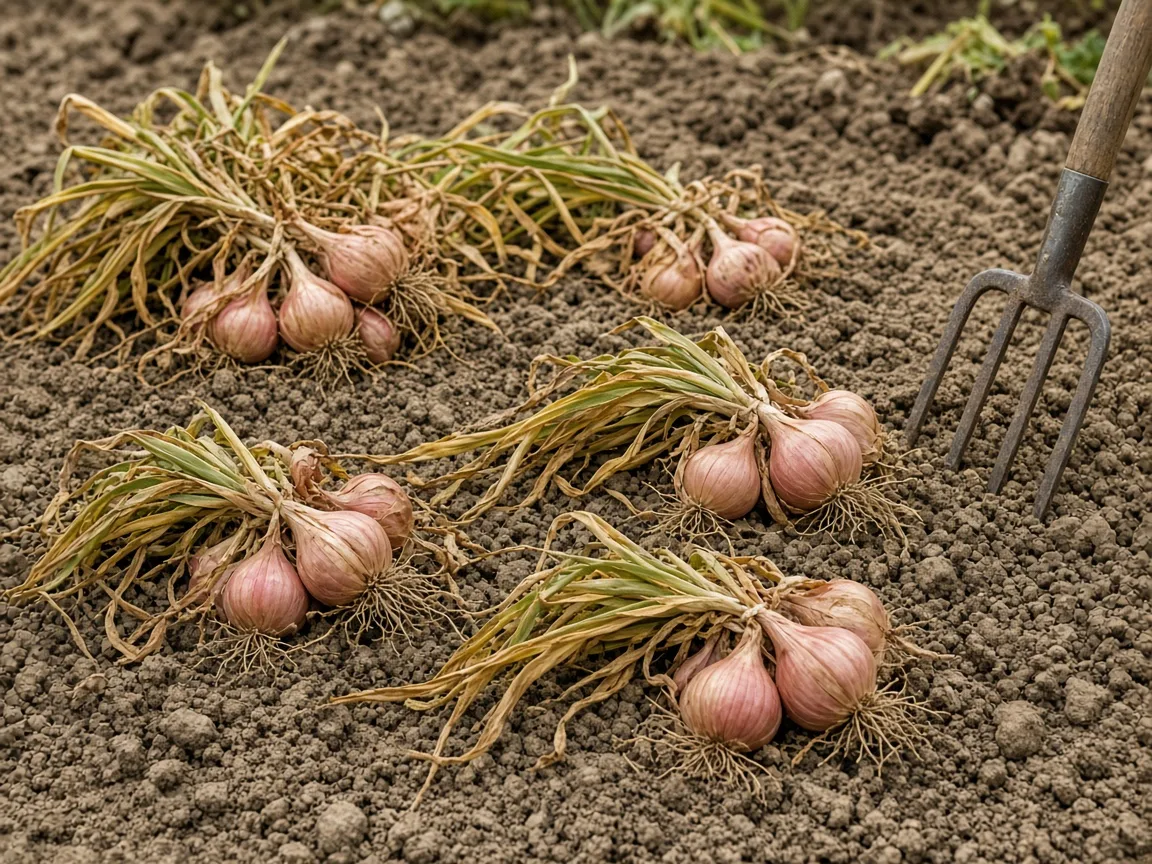
- Loosen the soil beside the clump. Insert a hand fork or garden fork several inches away from the bulbs, where the tines cannot strike them. Push down and lever the soil upward gently.
- Lift from underneath. Once the soil is loose, raise the clump from below. Work around a stubborn edge instead of forcing the tool through the center of the bulbs.
- Support the cluster. Catch the lifted clump with your other hand or let it settle onto the soil. Do not swing it by the tops or drop it into a basket.
- Shake lightly. Remove loose soil with a gentle shake. Do not scrub, hose, or wash storage shallots; trapped moisture around the neck and damaged skins invite decay.
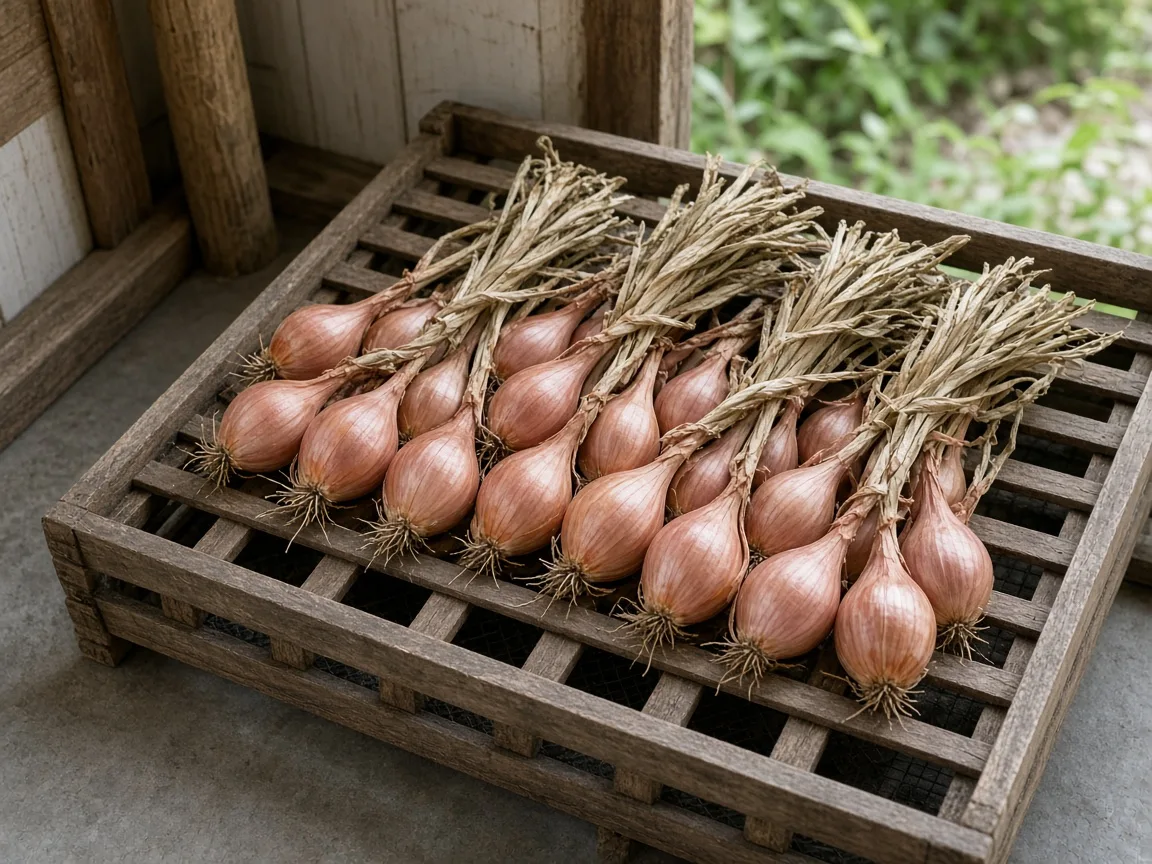
- Move them to a dry curing surface. Keep bulbs in a single layer where air can move around them. A slatted tray, wire rack, or clean mesh surface works better than a solid, damp pile.
If the bed is loose and the tops come away with almost no resistance, hand-pulling may work. Grip close to the bulb, pull steadily, and stop when the soil holds. Pulling hard on the foliage can separate the leaves from the neck while the bulb remains buried, leaving a fresh wound exactly where you need a dry seal.
Separating Clumps and Handling the Tops
Shallots grown from sets form clusters. Separate them gently after lifting if the bulbs pull apart naturally, but do not tear tightly connected tissue just to make the harvest look tidy. A small amount of attached soil is less dangerous than a broken neck or a peeled bulb.
Leave the tops attached during the first drying stage unless they are badly damaged. The foliage helps you handle the bulbs without gripping the neck itself, and it gives the neck time to dry. Once the leaves are completely dry and papery, trim them to about an inch or cut them cleanly above the bulb; you can also braid sound, long-topped shallots.
What to Do With Shallot Greens
Shallot leaves are edible before the bulbs are ready. Harvesting a few outer leaves for cooking is usually a reasonable use of the crop, but removing many leaves reduces the plant’s photosynthetic area while the bulb is still swelling. If bulb size and storage matter, treat the green tops as a limited harvest rather than cutting the whole row repeatedly.
Use green-harvested plants first. They have not completed the dry outer layers and sealed neck needed for long storage, so they belong in the refrigerator for short-term use or directly in the kitchen, not in a storage braid.
How to Cure Shallots for Storage
Curing is controlled drying, not cooking and not leaving bulbs forgotten in the ground. It allows the neck and outer leaves to dry, helps the skins become protective, and reduces the chance that surface moisture will remain around the bulb during storage.
Spread shallots in a single layer with space between clusters. Use a warm, dry, shaded or indirectly lit location with strong airflow: a covered porch in dry weather, greenhouse with ventilation, shed, garage, or airy room can work. Direct hot sun can overheat bulbs, while a closed, humid shed can preserve the very moisture you are trying to remove.
Iowa State Extension recommends curing in a warm, dry location for one to two weeks. The RHS also recommends racks or slatted trays so air can circulate beneath the bulbs and advises moving the crop under cover if weather is damp. Those ranges are starting points; the bulb’s condition is the finish line.
An Indoor Cure for Wet Weather
If rain keeps returning, do not stack the crop in a bucket or seal it in a plastic bag. Bring it under cover, spread it out, and use a fan to improve air movement if needed, keeping the fan from blasting grit directly onto the bulbs. Space matters more than dramatic heat.
Turn or rearrange the crop once during curing so shaded contact points get air. Avoid curing in a kitchen cabinet, basement corner, or any place where humidity stays high. If the necks remain cool and soft after many days, the environment is too damp or the bulbs were harvested before they had finished.
The Cure-Complete Test
A shallot is ready for storage when the neck is dry and tight, the foliage is papery, the outer skin rustles, the roots are dry, and the bulb remains firm. The skin does not need to be polished or completely spotless. It does need to be dry enough that the neck no longer feels fleshy or moist.
Do not shorten the cure because the outside looks dry after two sunny days. Cut one test bulb at the neck if you are uncertain: the neck should be dry through, not green and juicy inside. Keep borderline bulbs separate and use them soon rather than letting one questionable bulb contaminate a full basket.
Sort the Crop Before Putting It Away
Sorting is a storage step, not an aesthetic step. Put the best bulbs into long-term storage and create a “use first” group for anything that will not keep well. This simple separation often prevents one damaged bulb from becoming a hidden source of rot.
Bulbs to Use First
Cook soon any shallot that was cut by a fork, bruised, split, soft, wet at the neck, thick-necked, sprouting, or harvested while still noticeably green. Bulbs that flowered or bolted may also store less reliably, even if they look sound; mark them for earlier use.
A small bulb is not automatically a poor keeper. Size is less important than firmness, an intact skin, and a fully dry neck. Store only bulbs that pass those tests, and keep varieties with visibly different storage behavior labeled if you grew more than one.
Signs of Rot and Disease
Reject or isolate bulbs with a foul odor, soft watery tissue, spreading discoloration, fuzzy growth, or a collapsing neck. Do not wash a diseased bulb and return it to the storage pile. Gardeners’ World specifically advises using onions and shallots with neck rot, fungal damage, or insect damage straight away, and discarding alliums with white rot rather than storing them. BBC Gardeners’ World storage warnings
If several bulbs from one area show the same problem, inspect the bed and avoid replanting alliums there until you understand the cause. Storage cannot correct poor drainage, contaminated soil, or harvest damage; it only reveals those weaknesses later.
Best Storage Conditions for Cured Shallots
After curing, store shallots somewhere cool, dry, frost-free, and well ventilated. Iowa State suggests approximately 32–40°F with 60–70% relative humidity, but a home gardener without a measured storage room should prioritize the principles: low moisture, no condensation, and enough airflow that bulbs never sit in a humid pocket.
Mesh Bags, Slatted Trays, and Braids
Mesh bags keep bulbs from touching in a dense mass and make inspection easy. Slatted trays or shallow baskets work well when bulbs are spread in one or two loose layers. Braiding is convenient when the tops are long and fully dry, but hang the braid where it stays dry and does not press against a cold, damp wall.
Storage light is one place where reputable guidance differs. The RHS recommends a light, cool, dry, ventilated place because darkness can encourage sprouting, while other extension and gardening guidance favors a dark root-cellar-like location. In a typical home, the decisive variables are dryness, airflow, and temperature; choose a cool pantry or shed that is dry and inspectable, and avoid warm light if it heats the bulbs.
Never use an airtight plastic container for cured shallots. It traps moisture and turns small pockets of condensation into soft necks. Keep apples and other ripening produce separate as a practical precaution, and do not store bulbs directly on a damp concrete floor.
Checking the Storage Crop
Inspect the bag or tray every week or two at first, then at longer intervals once the crop proves stable. Remove soft, leaking, moldy, or strongly sprouting bulbs immediately. If one bulb is only beginning to sprout but is still firm, use it promptly rather than returning it to the long-term group.
Properly cured shallots can last six months or longer under favorable conditions, but storage life varies by cultivar, planting season, maturity, and room conditions. Treat that number as a reasonable target, not a promise. A crop harvested wet or bruised may fail in weeks even when a sound, well-cured crop lasts into the following season.
Common Harvest Mistakes That Reduce Storage Life
The most common mistake is using a date as a substitute for observation. Pulling green, actively growing shallots gives you edible bulbs, but it sacrifices size and storage potential; waiting indefinitely through wet soil creates a different risk.
Another mistake is digging with a wide spade directly under the cluster. A fork placed beside the bulbs and used to lift the soil is slower but far less likely to create the hidden punctures that become rot. Washing the bulbs, piling them deeply, trimming green tops immediately, and storing before the neck is dry all compound the problem.
Finally, do not mix every bulb into one storage bin. Use-first bulbs deserve a visible, separate location. This is especially important after a season with bolting, flooding, pest damage, or repeated late-season rain.
A Harvest-to-Storage Workflow You Can Follow
Start checking when the expected maturity window arrives, but wait for natural yellowing and toppling across most of the planting. Reduce late watering when bulbs have swollen, watch the forecast, and choose a day when soil is workable and the crop can move into a dry curing space.
Loosen each clump from the side with a fork, lift from underneath, shake off loose soil, and keep the bulb dry. Leave tops attached while the crop cures in a single layer with airflow. After roughly one to two weeks, test the neck and skin rather than relying on the calendar alone.
Trim or braid only fully dry bulbs. Separate bruised, bolted, thick-necked, sprouting, or suspicious bulbs for immediate use, then put sound bulbs into a breathable bag or shallow tray in a cool, dry, ventilated place. Label the harvest date and variety if you can; that small note will make next year’s timing much easier to judge.
Conclusion: Let the Crop Finish, Then Keep It Dry
Harvest shallots when the plant naturally winds down: most tops yellow, the neck softens, and the foliage falls over. The safest harvest is a dry, gentle lift that protects the bulb and neck, followed by a complete cure with space and airflow.
The cure is successful when skins rustle, roots and foliage are papery, the neck is dry, and bulbs remain firm. Store only those sound bulbs, keep damaged or bolted shallots for the kitchen, and inspect the crop regularly. That sequence—read the plant, lift carefully, cure fully, sort honestly—does more to prevent shallots spoiling than any exact harvest date.



