Does Mulching in September Help Roses Survive Winter?
Does mulching in September help roses survive winter? Learn when to mulch, how deep to go, which roses need a mound, and what to remove in spring.

Short answer: yes, but not always in September
Mulching can help roses survive winter by keeping the soil around their roots and crown from swinging rapidly between frozen and thawed conditions. It also reduces moisture loss from exposed soil and helps prevent the lifting and loosening that repeated freezing can cause. But the useful answer is not “spread a thick layer around every rose on September 1.”
September is often the month to prepare the bed, stop pushing new growth, and decide what protection a particular rose will need. The final winter layer usually belongs later, after the plant has slowed or gone dormant and your local weather is beginning to stay cold. In a mild region, a normal 2- to 3-inch layer of organic mulch may be enough. In a cold, windy site, a tender grafted rose may need a separate soil mound and a loose insulating cover after a hard frost.
Think of mulch as a temperature stabilizer, not a heated blanket. It cannot turn a tender hybrid tea into a cold-hardy shrub, and it cannot correct a waterlogged planting bed, a diseased plant, or a rose growing in a pot that is exposed to freezing air on every side.
What winter mulch actually protects
Winter mulch is aimed primarily at the root zone, crown, and graft union, not at preserving every green leaf or upper cane. A healthy rose can tolerate cold better when its roots enter winter with adequate moisture and its base is protected from abrupt temperature changes.
The University of Wisconsin–Madison Division of Extension explains that winter mulch is generally used less to stop the ground from freezing than to reduce the repeated freezing and thawing that happens through winter. Reliable snow cover can do this naturally, but a bare garden cannot count on snow arriving at the right time or staying in place.
Why freeze–thaw cycles matter more than one cold night
A single cold night is not the whole winter story. Soil and plant tissue can be stressed when a sunny thaw warms the surface, water moves through the crown, and a sharp freeze follows. That repeated expansion, contraction, and movement can heave shallow roots, loosen the soil around the plant, and expose tissue that was previously protected.
Winter wind creates a second problem. Exposed canes lose moisture while the frozen soil makes replacement water difficult to obtain. Mulch does not hydrate a rose by itself, but it can reduce evaporation and help the root zone remain more even. A windbreak or breathable cane cover may be more useful than piling additional wet material against the plant.
Why the graft union changes the plan
Look at the base of a grafted rose for a swollen, knobby joint between the roots and the flowering canes. This is the graft union, also called the bud union. The roots belong to one rose and the canes and flowers belong to the named variety you purchased. If severe cold kills the upper part while the rootstock survives, new shoots may emerge from below the union and produce different flowers.
That is why a protective mound is targeted at the union rather than applied as a tall, wet collar around every cane. The American Rose Society notes that the bud union is especially vulnerable in tender roses and describes mounding soil over the base as one of the additional protection methods used in cold regions. Protecting this one joint can matter more than wrapping the entire shrub.
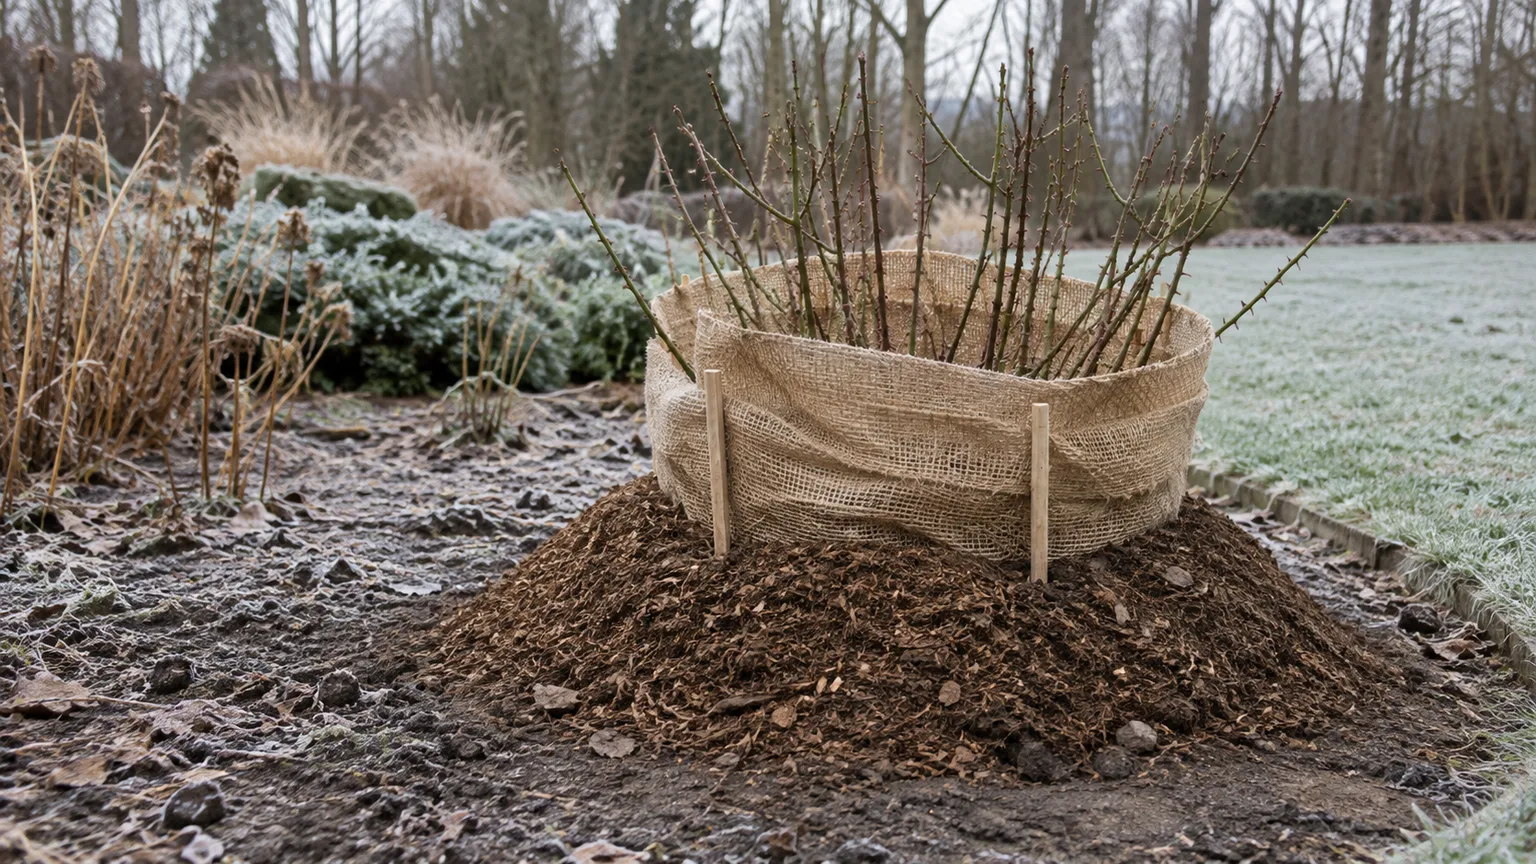
The rule has an important limit: covering the union helps reduce exposure, but it does not erase the cultivar’s hardiness limit. A rose rated for a warmer climate may still need a wire cage, leaves, a rose cone, a protected location, or a more intensive method in a colder garden.
Match the method to your rose
The same mulch depth is not right for every rose. Start with the plant’s type and whether it is grafted, then adjust for wind, snow cover, drainage, and the coldest conditions your garden actually experiences.
Hardy shrub and own-root roses
Many established shrub roses selected for your climate can overwinter with modest protection. A healthy own-root rose has no graft union to preserve, so if a few canes die back, growth from the crown remains the same variety; Epic Gardening’s comparison of own-root and grafted roses explains this distinction and why it matters after cold damage. That does not make an own-root rose indestructible: a poorly acclimated, drought-stressed, newly planted, or badly sited rose can still suffer winter injury.
For these roses, a clean bed and a broad, moderate mulch layer are often more useful than a high mound. Spread about 2 to 3 inches of loose bark, composted material, leaf mold, or another suitable organic mulch across the root zone, keeping it away from the main canes. Homes & Gardens’ September mulching guidance uses a similar 2- to 3-inch layer for roses and stresses keeping it away from the stems. If your area has dependable snow and the rose is hardy and sheltered, even that layer may be routine soil care rather than emergency winter protection.
The important exception is a newly planted rose. Its roots have not filled the surrounding soil, and the plant may not yet be anchored against heaving. Give it more attention to moisture and root-zone coverage during its first winter, especially if it was planted late in the season.
Grafted, climbing, tree, and container roses
Grafted hybrid teas, floribundas, and grandifloras are more likely to benefit from a deliberate winter setup in cold climates. If the union sits above the surrounding soil, a mound of loose soil around the base can protect it. In very cold regions, the American Rose Society describes mounds in the range of 10 to 12 inches for tender bushes, followed by additional leaf protection; that is a cold-climate method, not a universal instruction for every garden.
Climbing and rambling roses need a wind plan as much as a root-zone plan. Their long canes catch wind, rub against supports, and can break or rock the crown. Secure them to the trellis, shorten only dangerous, whipping growth after the rose has slowed, and avoid a severe fall cut if the plant flowers on older wood. The American Rose Society’s guidance for cold climates includes more intensive trench-and-cover methods for tender roses, but bending a cane is only sensible when the cultivar, flexibility, and site make it safe.
Tree roses and roses grown in small pots are exposed above and below ground. A pot can freeze from several sides even when the surrounding garden soil is insulated. For those plants, mulch spread on top of the pot is not enough: sink the container in the ground up to its rim, move it to an unheated but sheltered space, or use a protected structure that keeps the root ball cold but not repeatedly frozen and thawed.
Use weather cues, not a fixed September date
A September date is a useful reminder, not a reliable trigger. The right timing changes with latitude, elevation, rose type, exposure, and whether autumn is staying warm. The Wisconsin Extension recommends waiting until plants have had time to go dormant before applying winter mulch and notes that the ideal timing is often when the soil has just started to freeze.
What to do during September
Use September to reduce the work and risk that will follow. Stop routine high-nitrogen feeding early enough that the rose is not being pushed into a flush of soft growth just before cold weather. Fine Gardening’s fall rose guidance also recommends letting spent blooms develop into hips rather than continuing to stimulate fresh flowering growth late in the season.
Keep watering based on the soil, not on a calendar. If autumn is dry, give the root zone a slow, deep soak at the soil line and let excess water drain. If the soil is already moist several inches down, more water is not protective; a saturated crown can be more vulnerable to disease and winter damage.
September is also the right time to remove dead or diseased material, check ties, repair a trellis, and decide which roses need a cage, burlap screen, or extra soil. Rake up visibly diseased leaves rather than burying them in a protective mound. Do not make a hard “winter haircut” simply because the calendar says fall: preserve healthy structure and remove only dead, broken, diseased, crossing, or wind-dangerous wood.
When to add the winter layer
Build the final winter protection after several cold nights have slowed the plant, usually after a hard frost or when the local forecast shows a sustained move into freezing weather. The exact cue might be later October, November, or much later depending on where you garden. In a mild climate, it may be a light mulch refresh; in a cold climate, it may be a soil mound followed by leaves or straw.
Avoid covering an actively growing rose during a warm spell. Early, dense coverage can trap moisture, provide shelter for rodents, and encourage the plant to stay active when the surrounding garden is cooling. If a sudden freeze is forecast before dormancy is complete, protect a vulnerable rose with a temporary breathable cover or site-level wind protection, then apply the permanent mound when the weather settles.
Choose mulch and depth by purpose
Use clean, loose, reasonably dry organic material. Composted bark, leaf mold, shredded leaves that will not mat into a solid sheet, straw, and well-rotted compost can all work. The best choice is the material that stays airy, is available in enough volume, and does not arrive carrying weed seeds, diseased foliage, or excess moisture.
Depth depends on the job:
| Job | Typical approach | Where it belongs |
|---|---|---|
| Routine root-zone coverage | About 2–3 inches of organic mulch | Across the soil beneath the canopy, away from canes |
| Extra protection for a tender grafted rose | About 8–12 inches of loose soil or a comparable mound, adjusted to climate | Over and around the graft union, contained if needed |
| Added insulation in severe cold | Leaves, straw, or a breathable cover over the mound | Around the protected base, not packed wet against upper canes |
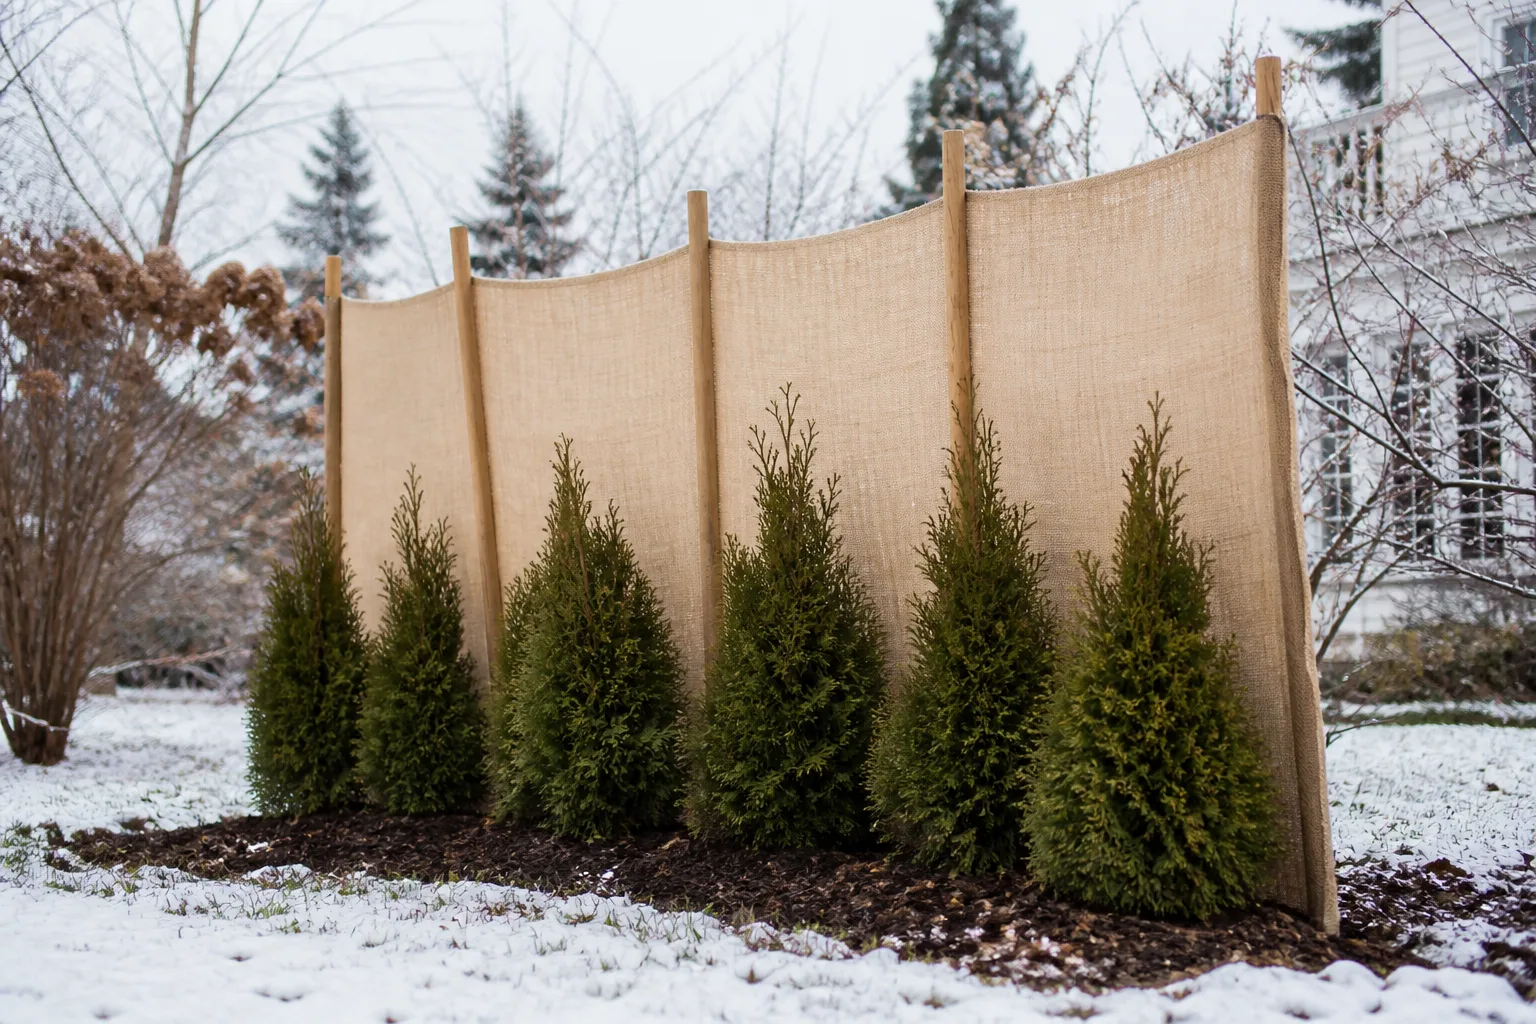
| Wind protection | Burlap screen, cage, secure ties, or a ventilated cone | Around the plant or on the windward side, without sealing in damp air |
Do not interpret the table as a promise that a particular number guarantees survival. Material texture matters: a fluffy layer of dry leaves does not behave like compacted wet leaves, and a 3-inch winter layer in a sheltered mild garden is not the same job as a 3-inch layer over a graft union in an exposed cold site.
How to mulch an in-ground rose
Follow this order for a rose planted directly in the ground. It keeps sanitation, moisture, dormancy, and protection in the right sequence.
Step 1: clean and inspect
Remove fallen leaves that show black spots or other disease symptoms, old fruit that is rotting, and dead or broken canes. The University of Minnesota Extension’s rose diagnosis guide separates winter injury and winter kill from problems such as canker, gray mold, and rodent damage, so starting with a clean plant makes spring diagnosis much easier.
Do not strip every healthy leaf from a rose that is still functioning. Remove obvious disease and debris, but let the plant finish its seasonal transition. If a long cane is likely to whip into a trellis or snap in wind, shorten it lightly after the plant has slowed; save the main shape-pruning for late winter or early spring, consistent with Fine Gardening’s winter-damage guidance.
Step 2: water only when needed
Push a finger or trowel several inches into the root zone away from the stem. If that soil is dry and the bed drains normally, water slowly at the base until the root zone is moist but not saturated. Wisconsin Extension emphasizes that landscape plants should not enter winter under drought stress, but the same guidance does not call for keeping the ground wet.
Water early enough that the surface can drain before a hard freeze. Never use a waterlogged mulch mound to compensate for a dry root ball, and do not leave a saucer-like depression around the crown where rain or snowmelt can stand.
Step 3: cover the crown without burying canes
For an established hardy rose, spread the normal 2- to 3-inch layer over the root zone. For a tender grafted rose in a cold or exposed site, bring loose soil from another part of the garden or use a suitable soil-based material to mound over the graft union after dormancy. Do not excavate soil from immediately around the rose’s roots; that can expose the plant and create a new problem.
Keep the material loose enough for air movement and shape it so rain runs away rather than pooling at the center. The union should be covered when it is the part at risk, while the upper canes should not be tightly packed in wet leaves, fresh manure, or fine compost.
Step 4: add extra wind protection only if needed
If the rose sits in a wind tunnel, tie long canes loosely and place a wire cylinder or breathable screen around the plant. Use burlap to slow drying wind, not to create an airtight bag. Anchor any cage or cover so it will not rub the canes or blow into a neighboring plant.
Snow can be helpful when it arrives as a stable, clean blanket, but heavy wet snow can break long canes. Do not shovel salty snow from a driveway onto the rose bed. After a storm, brush only the snow that is bending or breaking the canes; do not repeatedly disturb a stable layer that is insulating the soil.
Avoid these winter-mulching mistakes
The most common failures come from applying a reasonable practice at the wrong time or in the wrong place.
- Mulching by the calendar alone: September may be early in a warm autumn. Prepare materials now, then wait for dormancy and the local weather cue.
- Using one depth for every rose: A 2- to 3-inch bed layer is not the same as a cold-climate mound over a graft union.
- Piling mulch against every cane: The union may need coverage; upper stems generally need air, not a wet sleeve.
- Using fresh manure or hot compost: These materials can be wet, salty, or still active. Choose fully composted, stable material instead.
- Leaving diseased leaves in the mound: Mulch is not a safe place to hide black-spot or other visibly diseased debris. Remove it from the bed.
- Pruning hard in fall: A severe cut can remove flowering wood, stimulate tender regrowth, or leave short stubs exposed to weather. Remove hazards and wait for structural pruning.
- Fertilizing to force a final flush: Late nitrogen encourages growth that may not mature before a freeze. Let the rose acclimate naturally.
- Watering on a fixed schedule: Check the soil. Dry roots can be stressed, but saturated soil can damage roots and the crown.
- Ignoring rodents: Deep leaves and loose mulch can shelter mice and voles. Keep the area around the base observable and use physical barriers where these pests are common.
- Treating a pot like garden soil: A container’s root ball needs insulation around the pot or a protected location, not just a decorative layer on top.
Spring removal and recovery
Winter protection should come off gradually, not in one warm afternoon. When the soil has thawed and the risk of severe freezes is easing, pull back part of the outer leaf or straw layer and leave a smaller buffer in place. Remove the remaining mound once the rose is beginning to wake and the weather pattern is less likely to send the graft union into a damaging freeze–thaw cycle.
Do not wait until vigorous shoots are trapped under wet material. On the other hand, exposing a tender rose’s union during the first mild spell can encourage early activity followed by frost injury. A staged removal lets you respond to the actual forecast, and it gives you a chance to inspect whether mulch has stayed dry, shifted, or become a rodent nest.
Once the base is visible, scrape a small section of questionable cane with a clean pruner or fingernail. Green or cream-colored tissue can indicate live wood; uniformly brown, dry tissue is likely dead. Cut back to healthy tissue in late winter or early spring, making clean cuts just above a live bud. If new shoots emerge from below a graft union, identify whether they are rootstock suckers before keeping them.
A rose that fails to leaf out may have suffered winter kill, but not every dead-looking cane was killed by cold. The Minnesota Extension guide lists winter injury, winter kill, canker, rodent damage, and other causes separately. Dark streaks, sunken lesions, girdled bark, or chewing at the base point toward different problems and different next steps than evenly brown canes.
Conclusion
Mulching in September can help roses survive winter, but September is usually the beginning of the decision, not an automatic deadline for a deep mound. Use the month to stop late growth, clean diseased debris, correct dry soil, secure wind-prone canes, and identify whether your rose is hardy, grafted, climbing, tree-form, or container-grown.
Then wait for the plant and weather to provide the final cue. A normal 2- to 3-inch layer may be all an established hardy shrub needs; a tender grafted rose in a cold, exposed garden may need a loose 8- to 12-inch mound over the union plus additional wind or leaf protection. Keep the material airy, keep upper canes from staying wet, and uncover the plant gradually when spring thaw becomes dependable.
That approach makes mulch do the job it is good at: moderating the root zone and protecting vulnerable tissue from winter’s swings. It also keeps you from asking mulch to solve problems it cannot fix, such as poor drainage, the wrong rose for the climate, severe wind exposure, or a container root ball left above ground.



