How to Plant a Strawberry Pot for Evenly Watered Pockets
Learn how to plant a strawberry pot from the bottom up, fit one plant per pocket, place crowns correctly, and water every tier without guesswork.
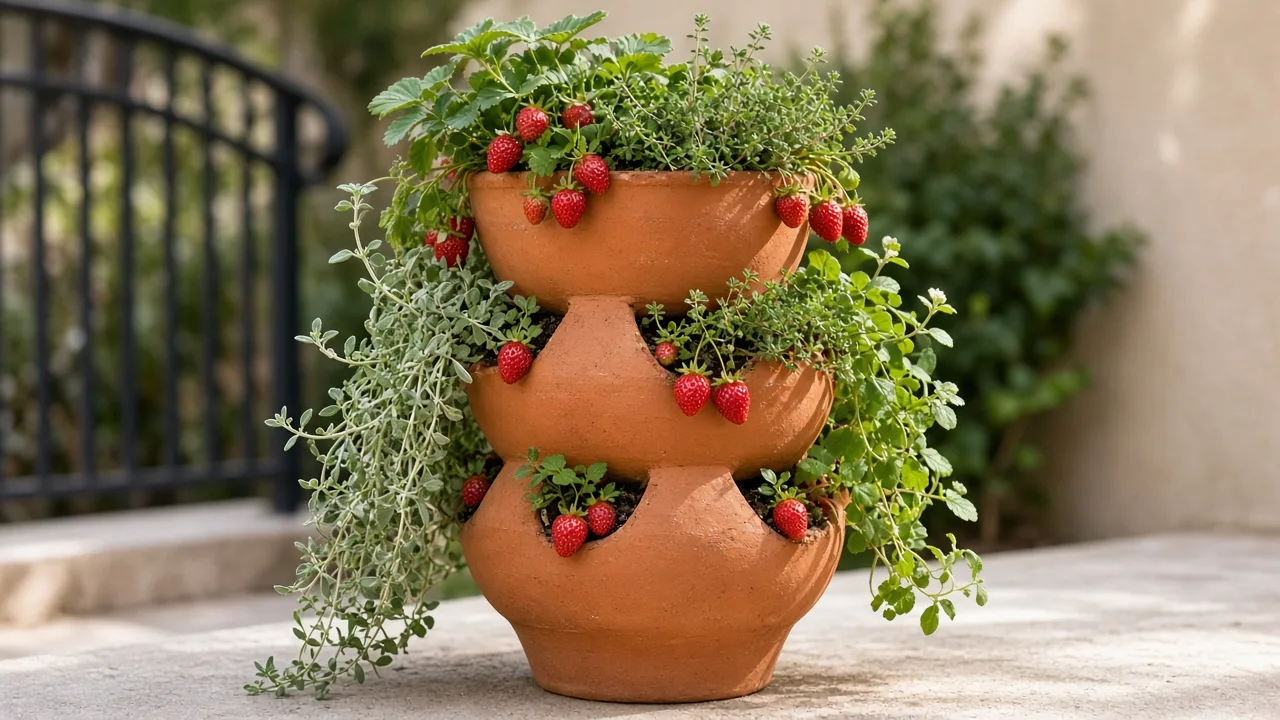
A strawberry pot is planted from the bottom up. You add a little potting mix, set one young plant into each side opening, cover its roots, and repeat at every tier until the top is full. The detail that makes the biggest difference comes after the planting: water has to reach several small pockets around the pot, not just the soil at the rim.
The classic jar saves patio space and keeps fruit hanging above the ground, but its pockets are small and can dry at different rates. A light, free-draining mix and a simple central watering tube make the job easier. Treat each opening as its own small root zone: fill in stages, settle roots at the correct depth, and test moisture across every tier.
Is a Strawberry Pot the Right Container?
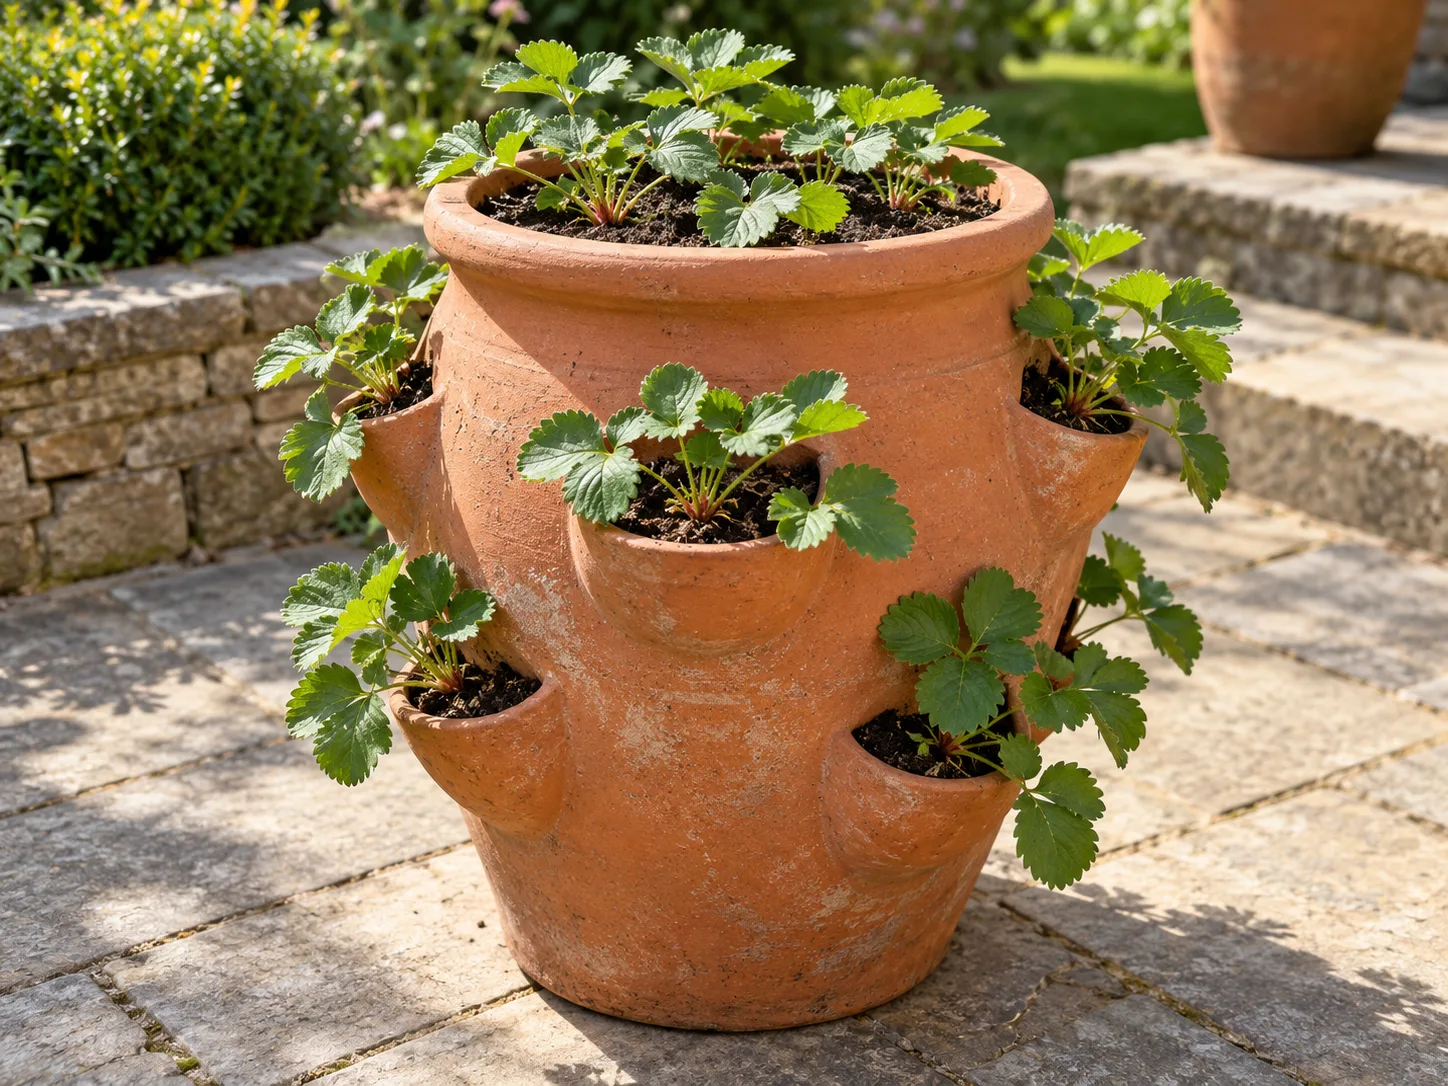
A strawberry jar is a tall planter with an open top and several planting pockets cut into its sides. Each pocket holds a plant while the leaves and fruit spill outward, so the pot uses vertical space and keeps berries off damp soil. The shape is attractive on a patio or balcony, and it can be convenient when ground space is limited.
The trade-off is that those openings divide one container into several hard-to-check growing spots. Roots have less uninterrupted room than they would in a broad pot, and water poured over the top may run past the upper pockets before it wets the lower ones. The Royal Horticultural Society notes in its strawberry-growing guide that traditional side-pocket strawberry pots can make it harder to maintain healthy, productive plants than simpler containers. If your main goal is dependable harvests with less monitoring, a wide pot or trough with drainage holes and room to space plants may be easier to manage.
Choose a strawberry pot when the compact vertical display is part of the goal and you can check moisture regularly. Choose an ordinary broad container if you travel often, live somewhere hot and windy, or want a larger root zone that is easier to water evenly. Either container can grow strawberries; the shape changes how much attention watering takes.
Choose Strawberry Plants That Fit the Pockets
The smallest healthy plants are easiest to thread through the side openings. Look for young potted starts or plug plants with flexible leaves and a compact root ball that can pass through a pocket without being torn apart. If you already have mature plants, choose only those whose root balls can fit; forcing a root mass through a narrow opening can break roots and leave the crown jammed against the rim.
Match the fruiting type to the harvest you want. June-bearing strawberries produce a concentrated crop, while day-neutral or everbearing types can provide smaller flushes over a longer period. Compact alpine strawberries make tidy, smaller berries and can suit shallow pockets, although their fruit is much smaller than that of common garden strawberries. Regional variety names differ, so buy disease-free plants recommended for your climate rather than choosing by label alone. Savvy Gardening’s container guide also recommends one plant per strawberry-pot pocket and keeping plants in full sun.
Plant when your local weather and the plant’s condition make establishment practical. Potted starts are easiest to handle in spring after severe frost is no longer likely, or in a mild region in late summer or early autumn when roots can settle before winter. Bare-root plants are often sold dormant in late winter or early spring; keep their roots moist and plant them promptly. In places with a short growing season, wait until the container can stay outdoors safely, and keep frost protection available if flowers are already open. The RHS recommends spring, late summer, or early autumn planting, with timing adjusted to climate and stock type.
Gather Supplies and Check the Pot
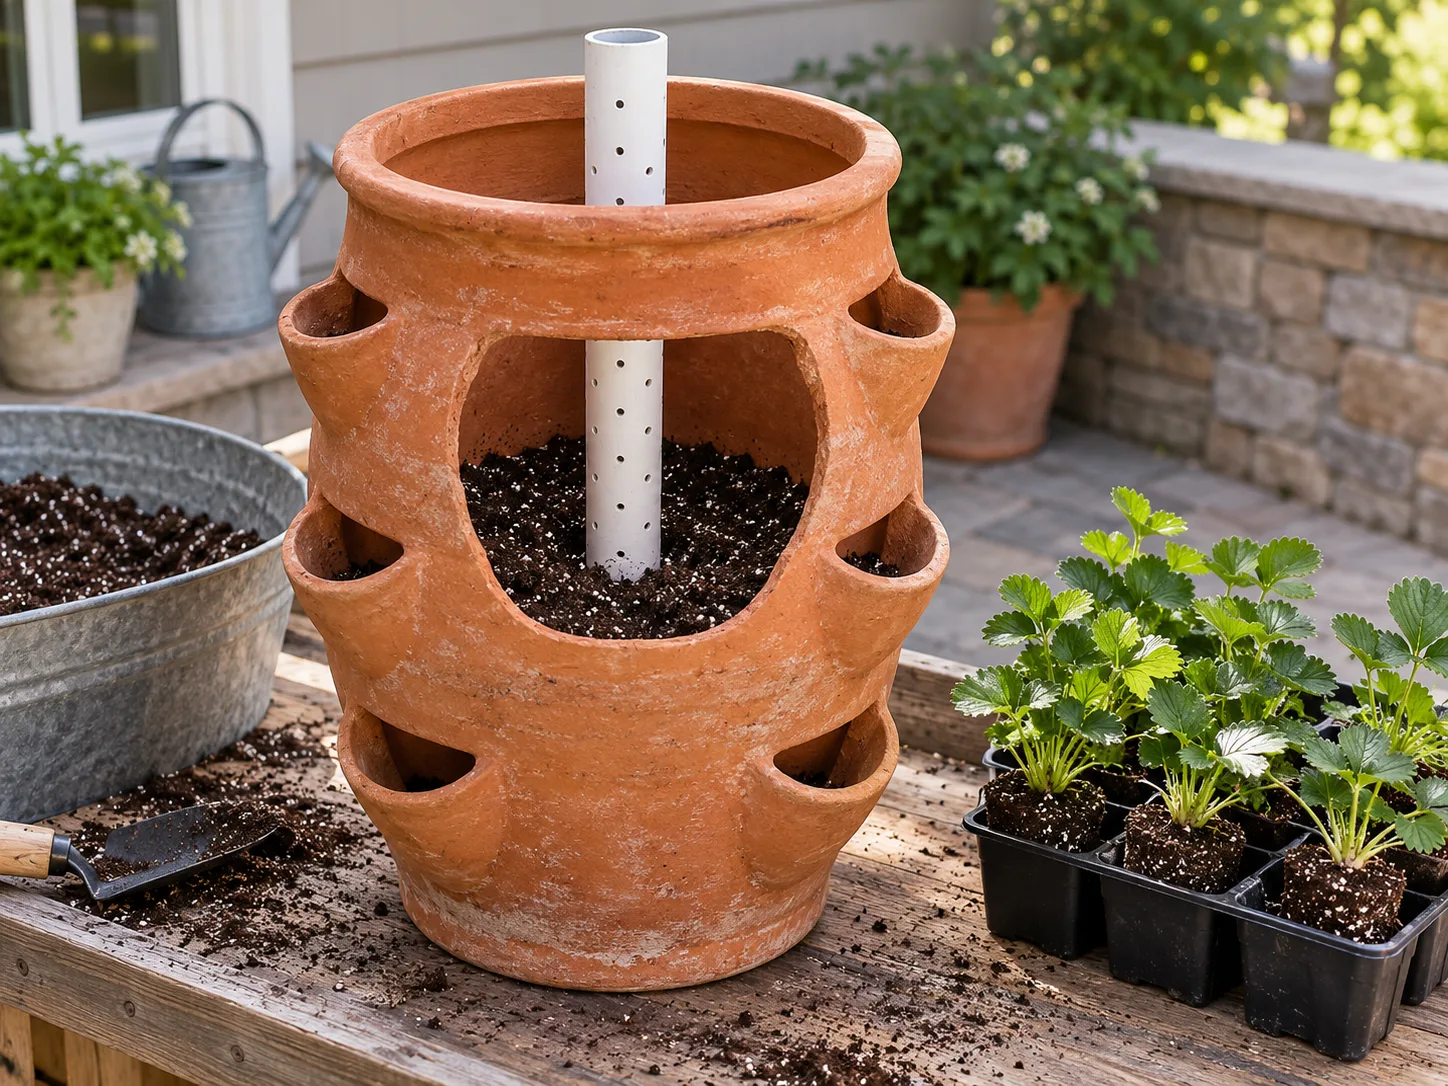
Set out the strawberry pot, plants, a lightweight container mix, a small trowel, gloves, a watering can, and a wheelbarrow or wide tub to catch falling soil. A narrow tube of PVC is optional but useful in a tall jar; it carries water toward the center so it can seep out near several levels. A drill and a small bit are needed if you are making the perforations yourself. If you use fertilizer, choose one labeled for edible container plants and follow its rate rather than guessing.
Check the empty pot before filling it. The bottom drainage opening should be clear, and the side pockets should not contain cracks or sharp chips that could damage crowns or leaves. Set the pot on a stable, level surface where excess water can drain freely. A wheelbarrow makes filling less messy, but once the planter is full of wet soil it may be too heavy to lift safely, so move it close to its final sunny position first.
Terracotta gives the traditional look and breathes through its walls, but that also means it loses moisture faster than glazed ceramic or plastic. A plastic jar holds water longer and weighs less, while fabric planters drain readily but can dry quickly. None is automatically best: pick the material you can check and water consistently. Avoid putting gravel in the bottom as a supposed drainage layer; an open drain hole and airy potting mix matter more, and extra material steals root space.
Install a Watering Column
A perforated tube is a practical way to distribute water inside a deep strawberry jar. It does not replace checking the soil at the pockets, but it reduces the chance that a quick pour over the rim will wet only the top layer.
Size and perforate the tube
Measure from the pot’s base to just below its rim, then cut the tube about an inch or two shorter than that height so it stays below the rim. A tube roughly 1½ to 2 inches wide leaves room for potting mix and roots around it in most medium-size jars. Drill small holes along the part that will sit inside the soil, spacing them roughly 1½ to 2 inches apart; a ⅛- to ¼-inch bit makes openings that let water seep out without turning the column into a large empty shaft.
Brush away plastic shavings before use. Place the tube upright in the center while the lower layer of mix is still loose, then steady it as you add soil. If water rushes straight out of the bottom during a test, a removable cap on the tube’s lower end can slow that loss; never cover or plug the strawberry pot’s own drainage hole. The test after filling matters more than the exact pipe dimensions: water should emerge gradually at more than one level, and the pot should still drain at its base.
Mix and Moisten the Potting Medium
Use a fresh, loose potting mix made for containers, not garden soil dug from a bed. Garden soil often packs tightly in pots, limiting air around roots and slowing drainage. A good container mix holds enough moisture for strawberries to keep growing between waterings but still lets excess water escape. A peat-free multi-purpose compost or quality all-purpose potting mix is a sensible base; avoid mixes that feel dense, muddy, or hard to rewet once dry.
Moisten the mix before it goes into the jar. Add water a little at a time in a tub or wheelbarrow and turn it until the mix feels evenly damp, like a wrung-out sponge, rather than wet enough to drip. Pre-moistening helps the soil stay in place behind the side openings and prevents a dry root ball from pulling water away from surrounding mix after planting.
Do not automatically add compost, garden soil, and multiple fertilizers to a prepared potting mix. Too many amendments can make the mix heavy or create a concentrated fertilizer zone against roots. If the bag already contains a starter charge or slow-release fertilizer, count that before adding more; when in doubt, wait for active growth and feed according to the product label. Strawberries favor fertile, well-drained growing media, but a simple, consistent mix is easier to manage than a homemade blend with unknown proportions.
Fill the Bottom and Plant the Lowest Row
Start with the lowest side opening. Add damp mix through the top until it reaches just below the first pocket, then settle it lightly with your fingertips. Do not press it into a hard block; roots need air and water needs a path through the column. Keep the watering tube upright in the middle as you work.
Take one plant from its nursery pot and support the root ball rather than pulling it by the leaves. If the roots circle tightly around the plug, loosen only the outer edge with your fingers. Avoid cutting away healthy roots to make a plant fit. If the root ball is too wide to pass through the pocket without being crushed, select a smaller start or use it in a wider container.
Guide the root ball into the pocket so the roots point inward and down into the mix. The leaves and crown should remain outside the opening, not pinned under the clay lip. Add more mix around the roots from above until they are covered and the plant sits firmly. A little loosened soil spilling through the opening is normal; fill gaps rather than packing the pocket tight.
Plant Side Pockets in Layers
After the first plant is in place, add mix until it reaches the next row of pockets. Stop with the soil surface just below each opening so there is room to work. Insert one plant into each pocket at that level, backfill from above, and settle the mix gently around the roots. Continue a level at a time, keeping the central tube straight and leaving the crowns visible.
This bottom-up sequence matters because filling the whole pot first leaves no easy way to reach the lower openings. If soil trickles out while you work, hold a small handful of damp mix behind the inside of the pocket until the plant is backfilled. Do not wedge a large rock or wad of paper into the opening; either can block drainage, create a dry pocket, or interfere with root growth.
Work from the inside or outside
For most young starts, work from the outside: turn the root ball sideways, slide the roots through the opening, then turn the plant so the roots rest inside the jar and the leaves are exposed outside. This keeps the crown and foliage from being dragged through the narrow edge. On some pots, it is easier to reach through the top and gently thread the leaves outward while the root ball stays inside. Use whichever direction gives the roots the least bending and pressure.
In either case, do not fold the roots sharply into a U-shape or force the crown through the hole. A plant that only fits when compressed is too large for that pocket. It is better to use fewer, comfortable root balls than fill every opening with stressed plants that cannot establish. After each tier is planted, look around the jar and confirm no plant has been buried by the next layer of soil.
Finish at the Top Without Burying Crowns
When all side openings are planted, fill the upper chamber to a little below the rim and add only enough plants to fit without crowding the tube. The top can hold one or a few plants depending on its diameter; use the same rule as the pockets and leave space for leaves to spread. A compact upright plant in the top is easier to water than several crowns pressed together.
The crown is the short, thick center of a strawberry plant where leaves emerge above and roots grow below. Set it at the surface of the mix: cover the roots but leave the crown exposed. A crown buried under damp soil can rot; one perched high with roots showing can dry out. This is the most important planting-depth check in the whole jar. The RHS gives the same soil-line rule for container strawberries, and Savvy Gardening explains that the crown should sit just above the medium rather than being covered.
Brush loose mix off the leaves and wipe the rim so no soil is trapped against the foliage. Give the jar a gentle turn and inspect every pocket. Each plant should have its roots inside, leaves outside, crown visible, and enough mix behind it to hold moisture. If the tube shifted while filling, straighten it now before roots grow around it.
Water in Stages and Check Each Tier
Water slowly after planting. Pour a small amount through the center tube, pause so the mix can absorb it, and repeat rather than filling the pipe in one fast dump. Then water the top surface and the openings lightly. When the bottom drainage hole begins to drip, the whole column has received a first soak; let the jar drain completely and empty any saucer beneath it.
Do a pocket check after that first watering. Touch the mix near one upper root ball, one middle pocket, and one lower pocket. If one area is still dry, apply water directly to that section instead of assuming the tube reached it. A watering column is a distribution aid, not a moisture meter: the holes can clog, the soil can channel water, and the top can dry before the middle.
After planting, check moisture at least once a day while the roots settle, more often during hot, dry, or windy weather. Push a finger into the mix near a pocket; water when the root zone is beginning to dry, then allow excess to drain. The surface alone is not a reliable gauge because the top may be dry while a lower tier remains damp. Terracotta and small pockets can need frequent watering, but a fixed “every day” rule can still overwater a cool or shaded pot. The RHS also cautions that containers need regular attention because their compost dries faster than ground soil.
Place the Pot for Sun and Easy Care
Put the planted jar where strawberries receive several hours of direct sun and where you can reach every side to inspect the pockets. A sunny patio or balcony is ideal if the planter is stable and sheltered from strong gusts. The RHS recommends a sheltered, sunny position, and Savvy Gardening uses six to eight hours of direct light as a practical target for container fruiting. In extremely hot climates, a spot with morning sun and some protection from punishing late-afternoon heat can help keep the root zone from overheating, but deep shade will reduce flowering and fruiting.
Think about water access before you settle on a location. You may need to carry a watering can to the pot frequently, and runoff should not stain a deck or pool around a doorway. Raise the jar slightly on pot feet or a stable stand if the base sits flat on a sealed surface; the drainage hole needs a clear route for water. Turn the pot occasionally if one side faces a wall or receives noticeably less sun, but avoid repeatedly moving a heavy, wet planter.
If a late frost is forecast while plants are flowering, move a portable pot to a sheltered place or cover it overnight, then uncover it in the morning. Flowers are more vulnerable than dormant crowns, and a planter is easier to protect than a full garden bed. Do not leave it wrapped in plastic or tucked in a dark room for long periods; the goal is temporary frost protection while preserving light and airflow.
Give New Plants a Settling-In Month
For the first few weeks, pay attention to roots and water rather than trying to maximize fruit immediately. New plants may look relaxed or droop slightly after being threaded through the pockets, but they should regain firmness once they take up water and settle into the mix. Keep the soil lightly moist, drain the pot after watering, and avoid strong fertilizer until you see new growth.
Do not remove every flower by habit. An established, vigorous potted transplant can keep a modest early bloom; a weak plant with few roots may establish better if you pinch off flowers while it recovers. The right call depends on plant vigor and type, not a universal rule. If a plant continues to flag while its mix is moist, check whether the crown was buried, the root ball is cramped, or water is bypassing that pocket.
Check the tube and each tier once or twice a week during this settling period. A slow pour through the column should wet more than one level, but also test the pockets directly with a finger. If water drains quickly without moistening the mix, the soil may have dried so thoroughly that it is repelling water; apply smaller pours directly to the pocket, allow them to soak in, and repeat. If the pot stays heavy and saturated, stop watering until the root zone begins to dry and confirm the drain hole is open.
Maintain the Pot Through the Season
Once plants are growing, keep water steady, especially while flowers are setting and berries are swelling. Strawberries dislike a cycle of drying hard and then being flooded. Water at the base or through the tube in the morning when practical, and try not to wet ripe fruit or the crowns. The RHS notes that splashing the crown or fruit can encourage fungal trouble, including gray mold, particularly when plants stay wet.
Feed lightly and consistently. A slow-release fertilizer mixed into the potting medium may cover part or all of the season; follow its label and do not layer it with repeated liquid feeds unless the label allows both. If the potting mix contains no feed, use a fertilizer labeled for strawberries or edible containers at its directed rate. The RHS recommends regular feeding for strawberries in containers and switching to a high-potassium feed as flowers begin; product instructions vary, so use the label rather than copying a rate from another fertilizer.
Trim runners if your priority is berries. Runners are long stems that form baby plants; they can make a strawberry pot look fuller, but many new plantlets compete with the parent for water and energy. Snip them close to the parent with clean scissors while they are young. If you want replacements, guide one healthy runner into a small pot nearby, let it root, then sever it after it is established rather than letting every runner crowd the jar.
Harvest berries when they are fully colored and gently pull or snip the stem instead of yanking on the crown. Remove damaged fruit and yellow or diseased leaves so they do not sit damp against the pot. Check underneath the leaves for slugs, aphids, or other pests; an elevated pot can make fruit less accessible to some ground crawlers, but it does not make plants pest-proof. Keep the foliage open enough for air to move through the pockets.
Protect the Pot Over Winter
Strawberries are perennial, but roots in a pot are less insulated than roots in the ground. In a mild-winter area, a hardy jar may remain outside in a sheltered spot if the pot itself can withstand freezing and drainage stays open. In colder climates, move it to an unheated garage, cold frame, or other protected place once plants are dormant, or insulate the outside of the container while keeping its base and drains clear.
Do not bring the pot into a warm living room to overwinter it. Warm indoor air can interrupt dormancy and dries leaves quickly, while a strawberry plant still needs a cool rest. Check the mix every few weeks in the shelter and water sparingly if it becomes very dry; do not keep the dormant roots wet. The RHS describes strawberries as hardy but warns that containers need regular watering in active growth, while Savvy Gardening notes that potted strawberries in cold regions may need a sheltered location.
In spring, inspect the crowns and drainage before returning the jar outdoors. Remove dead leaves, clear old soil from the side openings, and replace plants that are dead, crowded, or no longer vigorous. If a jar has become so root-bound that pockets cannot hold mix, refresh the planting rather than repeatedly adding fertilizer to compensate. Runners from healthy plants can supply replacements, but use clean potting mix and discard diseased material.
Troubleshoot Dry Pockets and Weak Growth
Strawberry jars usually fail in a pattern: one tier dries first, or a plant declines because water sits around a buried crown. Look at the affected pocket itself before changing the whole container’s routine. The rest of the jar may be receiving enough or even too much water.
Upper pockets dry before the bottom
Upper pockets often receive more wind and sun, and the potting mix around them may be shallow. Watering only through the central tube can miss a root ball if the tube is blocked or the mix has pulled away from the pocket. Add water slowly through the tube, then give the dry pocket a small direct pour and recheck it after several minutes. If the pot is terracotta, expect the wall to lose moisture faster than plastic; in a heat wave, a light temporary shade in the hottest hours can reduce stress.
Avoid solving dry pockets by keeping the entire jar constantly soaked. If the bottom stays wet while upper plants droop, the problem may be uneven distribution rather than too little total water. Test the tube, clear blocked holes if accessible, and water the dry level directly. If the pocket is too shallow to hold mix, replant that strawberry in a wider container instead of repeatedly packing more soil into the opening.
Plants wilt or crowns disappear
If one plant wilts but neighboring pockets look healthy, inspect the crown and root ball in that opening. A crown buried beneath fresh mix may soften or darken; gently brush soil away until the center is visible. A crown standing high with roots exposed needs mix drawn around the roots without covering the center. If the soil is soggy and the crown is soft, improve drainage and replace the plant if the crown has rotted; additional water will not repair damaged tissue.
If the entire jar wilts in hot weather, check moisture at the roots rather than judging by leaf color alone. Dry mix calls for a slow, thorough watering; wet mix calls for checking the drain hole, not more water. Persistently pale, weak growth can also result from too little sun, crowded roots, or an exhausted mix. Correct one likely cause at a time so you can tell which change helped.
Conclusion
Plant a strawberry pot one tier at a time: moisten a free-draining container mix, set a watering tube in the center if the jar is tall, cover roots as you add each plant, and keep every crown at the soil surface. Finish with a slow watering and test a pocket at each level instead of assuming the central tube soaked them all.
The planter will need more moisture checks than a wide pot because its small side pockets can dry unevenly. If you can give it sun, drainage, and regular attention, it makes a productive vertical display. If that routine does not suit your space or schedule, a broad container with fewer, more accessible plants is the simpler strawberry garden.