Alocasia Melo Care Guide: Light, Humidity, Soil
Alocasia melo
Alocasia Melo (Alocasia melo) care: bright indirect light, 65–80% humidity, chunky aroid mix, corm-safe watering, bullate leaf tips, and dormancy.
Alocasia Melo Care Guide: Light, Humidity, Soil
Start with wateringThe most common care mistake for Alocasia MeloWatering guide →Alocasia Melo care essentials
Light
bright indirect light
Water
Water when the top 2–3 cm of soil is dry; reduce sharply in winter dormancy. Avoid overwatering — the corm rots fast in wet mix.
Soil
Chunky, well-draining aroid mix with perlite and orchid bark; never use dense peat-heavy mix alone.
Humidity
65–80%
Temperature
18–26°C (65–80°F)
Fertilizer
Stop fertilizing, reduce watering to roughly every 3–5 weeks (just enough to keep the corm from desiccating), and keep the pot warm with bright indirect light.
About Alocasia Melo
Alocasia Melo is native to Borneo (Eastern Kalimantan), typically reaches 30–50 cm tall indoors; leaves 15–25 cm indoors, with slow growth. Alocasia Melo has a upright growth habit and part of the Araceae family. It is also known as Alocasia rugosa, Jewel Alocasia Melo, and Melo Jewel Alocasia.
| Detail | Information |
|---|---|
| Also known as | Alocasia rugosa, Jewel Alocasia Melo, Melo Jewel Alocasia |
| Native region | Borneo (Eastern Kalimantan) |
| Mature size | 30–50 cm tall indoors; leaves 15–25 cm |
| Growth rate | Slow |
| Growth habit | Upright |
| Scientific name | Alocasia melo |
| Family | Araceae |
Alocasia Melo Care Guide: Light, Humidity, Soil
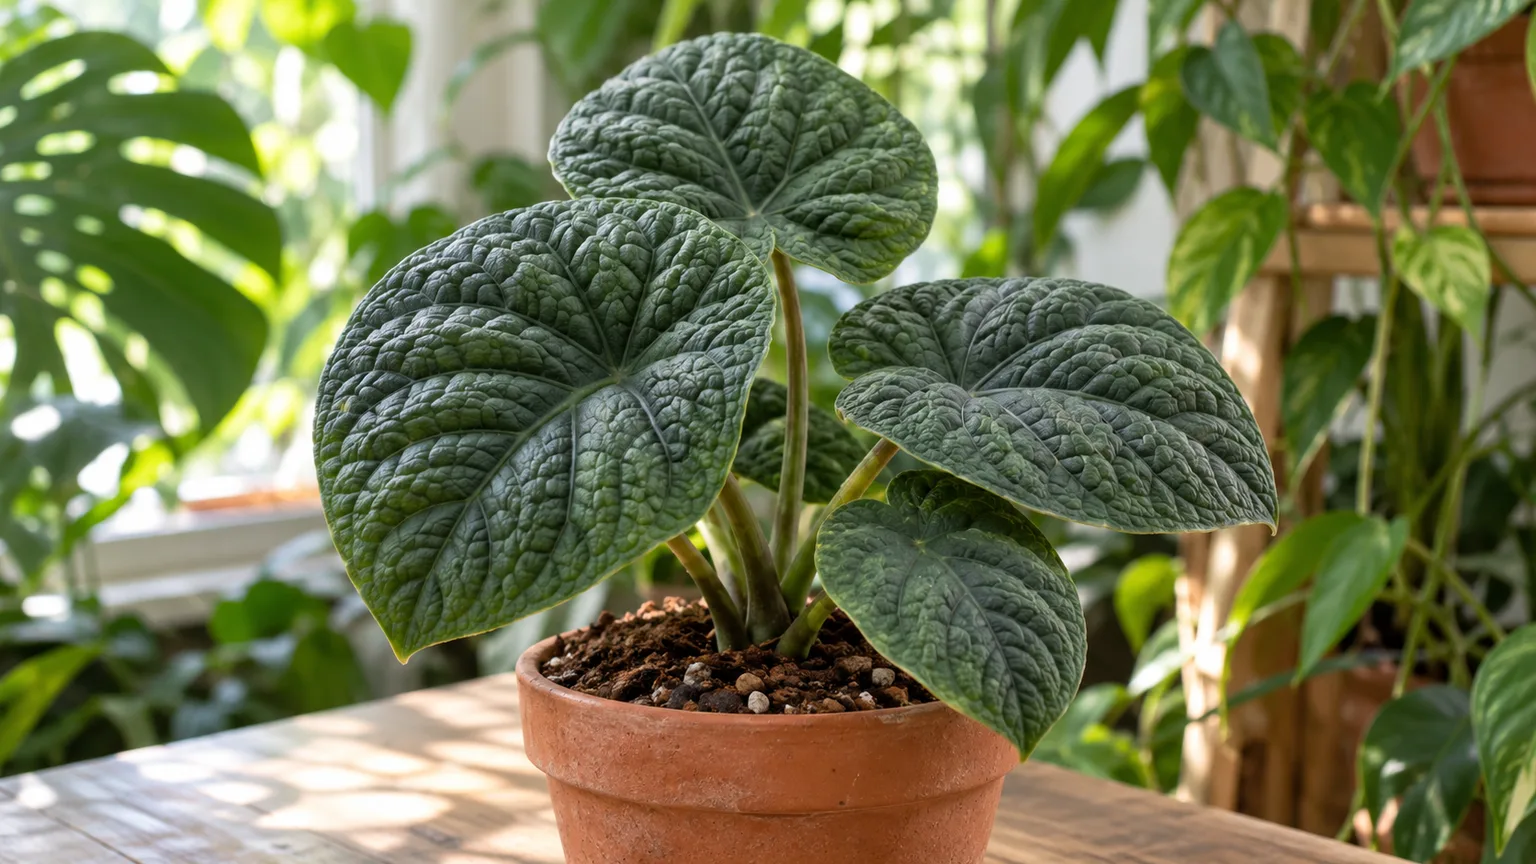
Alocasia Melo is not a beginner houseplant, but it is also not impossibly difficult. It sits in a specific middle zone: demanding about humidity, very particular about wet feet, and absolutely stunning when you get the basics right. The leaves are the giveaway: heavily corrugated, bullate leaves with a pebbled, matte surface give Melo a rugged jewel-alocasia look — a sibling cultivar to Silver Dragon and Green Dragon in the Alocasia baginda group. Get light, watering, humidity, and soil matched to a tropical understory, and the plant rewards you with a slow but steady stream of new leaves. Get any one of those badly wrong, and the same plant will sulk for months. This guide walks through everything that actually matters, with specific numbers, primary sources, and the failure modes I see most often with Alocasia baginda ‘Melo’.
Species profile: Alocasia baginda ‘Melo’
Alocasia Melo is recognized for heavily corrugated, bullate leaves with a pebbled texture — thick-leaved and slow-growing, from the same Alocasia baginda group as Silver Dragon and Green Dragon. Native to Borneo, it reaches 30–50 cm tall indoors with slow growth when light, humidity, and drainage align. Like all alocasias, it grows from an underground corm that stores energy through seasonal slowdowns — see the dormancy section below before assuming leaf drop means the plant is dead.
What Is Alocasia Melo and Where Does It Come From?
Alocasia baginda ‘Melo’ is a jewel aroid cultivar from the same species group as Silver Dragon and Green Dragon. Also sold as Alocasia rugosa in some markets, it shares the slow, corm-based growth habit of the baginda group. Kurniawan & Boyce (2011) described A. baginda from eastern Kalimantan, Borneo, as a compact understorey plant with thick, textured leaves — the species backbone behind the Melo cultivar.
In home cultivation, Alocasia Melo behaves like other corm-based alocasias: it wants bright indirect light, 65–80% humidity, and a chunky mix that dries predictably between waterings. Every habitat detail above translates directly into a care rule.
Botanical background and the Kurniawan & Boyce 2011 description
The original Alocasia baginda description, published in 2011, is the primary source for the species’ native range, growth habit, and morphological traits. It tells you three things that directly inform indoor care. First, the plant is a lowland tropical understorey species, so it expects warm temperatures, high humidity, and bright but filtered light, not direct sun. Second, the leaves are stiff and bullate rather than soft and floppy, which means they are slow to wilt and slow to recover from underwatering on Alocasia Melo - useful when reading the plant’s signals. Third, the species has not been confirmed in the wild at scale, and aroid specialists often discuss it in connection with limestone or ultramafic substrates, which is why a chunky, mineral-leaning mix performs so much better than a peat-heavy one.
Why the textured, dragon-scale leaves matter for care
The bullate leaves are the reason Alocasia Melo overview can tolerate lower light than many other aroids, and they are also the reason it fails faster than you expect in dry air. The puckered surface increases the effective leaf area, which raises transpiration and moisture demand. The matte, leathery cuticle, on the other hand, slows water loss compared with thin-leaved alocasias such as Alocasia amazonica ‘Polly’. The result is a plant that wants steady humidity, hates drying out completely, and recovers slowly if it does. Don’t mistake a pale new leaf for a chlorotic one - new leaves often emerge paler and only deepen to the mature dark green as the cuticle matures.
Light: Bright, Indirect, and Stable
Melo is an understorey plant, and it wants the light conditions an understorey plant would expect. Bright, indirect light is the target: strong enough to read a book in the leaf shadows at midday, but not direct sun on the leaves themselves. Growers’ published figures put the useful range at roughly 5,000–26,000 lux; the Epic Gardening culture sheet for Alocasia baginda sits comfortably inside that band. The Royal Horticultural Society’s general alocasia guide makes the same point: bright but not direct light, with strong sun risking scorch.
Direct sun on a Melo shows up fast as bleached patches, brown crisp edges on the sun-facing side, or sudden leaf collapse after a move. Too little light shows up slower as long, weak petioles, smaller new leaves, and a plant that holds only one or two leaves at a time instead of the small fan of four to six a healthy plant should carry. An east-facing window with morning sun, a north-facing window with bright ambient light, or a west window with a sheer curtain is usually the safest placement. Rotate the pot a quarter turn each week to keep growth symmetrical, because the leaves do lean toward the strongest light source.
If you are using grow lights, full-spectrum LED panels at 30–60 cm above the canopy for 10–12 hours a day are a good starting point. Watch the leaf temperature: if the surface feels warm to the touch, raise the light. Alocasia leaves do not sweat like a human does, so any warmth you feel is real heat stress.
Best window placement and the 5,000–26,000 lux range
The 5,000–26,000 lux figure comes from indoor grow guides that use a light meter to translate the species’ native understorey conditions into home terms. The lower end (around 5,000–10,000 lux) is roughly what you get one to two metres back from a bright east window or directly in front of a bright north window. The upper end (20,000–26,000 lux) is closer to the plant’s position right at the edge of an east window with some morning sun, or under a moderate grow light. Most home growers find a happy medium around 10,000–15,000 lux. The advantage of aiming for a number rather than a description is that “bright indirect” varies wildly from room to room.
Alocasia Melo watering guide: When the Top 2–3 cm Is Dry
The single most common cause of death for Alocasia ‘Melo’ is overwatering on Alocasia Melo. The Spruce, Epic Gardening, and most specialist aroid growers converge on the same rule: water when the top 2–3 cm of the mix is dry, water thoroughly, and never let the pot sit in runoff (Proven Winners). Garden Pals gives a workable starting interval of “every 7–14 days depending on humidity and light,” but that range is a reminder to check, not a rule.
The right way to water is to test the actual pot, not the calendar. Stick a finger, chopstick, or moisture meter to the second knuckle. If the top 2–3 cm of mix is dry and the deeper mix is just approaching dry, water. If the deeper mix is still damp, wait. When you do water, do it thoroughly: soak the entire root ball until water runs from the drainage holes, then empty the saucer or cachepot. A small daily sip is the worst pattern, because it keeps the top of the mix wet and the bottom of the pot bone dry, which is exactly the opposite of what the roots need.
Underwatering is more recoverable than overwatering. A Melo that has dried out a little will show curled leaves and crispy edges, and a thorough soak usually brings it back. A Melo that has been sitting in a wet, anaerobic mix for weeks will have mushy, dark, smelly roots, and the recovery is much harder.
How to read pot weight and chopstick checks
Pot weight is faster than any moisture meter once you learn it. Lift the pot immediately after a thorough watering and remember the weight. Lift it again the next day, and the day after. By the time the pot feels distinctly light and the top of the mix is dry to the touch, the plant is ready for water. A chopstick works the same way for people who don’t want to lift: push a clean wooden chopstick to the bottom of the pot, leave it for 30 seconds, pull it out. Dry chopstick = time to water. Damp chopstick with dark mix clinging = wait.
Humidity and Temperature: 65–80% RH and 18–27 °C
Humidity is the variable that most often separates a Melo that thrives from one that merely survives. The target is 65–80% relative humidity, which is well above what most heated or air-conditioned homes provide in winter (typically 30–50%). Epic Gardening calls humidity “arguably the most important environmental factor for this plant,” and The Spruce recommends a small humidifier placed nearby, especially in dry months. A bathroom with bright natural light is a natural fit for this plant if the light is right (NC State Extension).
Temperature should sit between 18 and 27 °C (65–80 °F) during active growth. Melo will tolerate a slow drift down to around 13 °C (55 °F) without dying, but prolonged exposure to those temperatures is the most reliable way to trigger dormancy, and below about 10 °C (50 °F) you risk permanent damage. The Royal Horticultural Society’s alocasia guide gives the same temperature floor: above 10 °C in winter, well above 16 °C during the active growing season, and never in a cold draught.
The two indoor locations that cause the most problems are the windowsill in winter (cold glass + cold draught) and the spot directly under an AC vent in summer (cold dry air blown across the leaves). Both can push the plant out of its comfort zone in hours, which is why “stable indoor temperatures” is the more useful target than a specific number.
Why misting alone is not a real humidity fix
Misting raises the relative humidity around the leaf for a few minutes at most, and it leaves the leaf surface wet, which on a textured leaf like Melo can invite fungal spotting. The Spruce and Epic Gardening both call this out explicitly: a humidifier is the most reliable solution, misting is not. Grouping plants together, placing the pot on a pebble tray above the water line, and growing the plant in a glass cabinet or terrarium are all real, measurable improvements. If you do use a humidifier, run it on a hygrometer rather than a fixed setting; overshooting 85% RH in a poorly ventilated room creates its own fungal risks.
Soil Mix: Chunky, Airy, and Slightly Acidic
Alocasia baginda is, in the wild, rooted in well-drained rocky clay and lateritic soils. The job of the indoor mix is to imitate that combination of drainage and air around the roots. Standard houseplant potting mix is too dense and too water-retentive on its own; it compacts within months and is the single fastest path to root rot on Alocasia Melo. Most specialist growers and university extension services converge on the same recipe: a chunky, airy aroid mix built around equal parts of an organic component, a drainage component, and a bark component.
The target pH is mildly acidic, around 5.5–6.5. Most peat-based or coco-coir-based mixes sit inside that range naturally, so you should not need to adjust pH for a hobbyist setup.
A reliable 1:1:1 aroid recipe
A simple, well-documented mix is 1 part coco coir (or peat-free houseplant compost), 1 part perlite, and 1 part orchid bark, by volume. The coco coir holds a thin film of moisture around the roots without staying soggy; the perlite creates air pockets and keeps the mix from compacting; the orchid bark gives larger pores that let water run through fast. The Spruce recommends this exact ratio; Epic Gardening and Garden Pals both call for the same idea even when their specifics differ.
If you want to fine-tune, the most common adjustments are: add a small amount of horticultural charcoal to buffer pH and keep the mix fresher; substitute pumice for perlite if you want a heavier, less floaty mix; or add a thin top layer of sphagnum moss to slow surface evaporation. Do not add sand to “improve drainage” - fine sand fills the air gaps between the larger particles and makes the mix worse. Do not use garden soil, and do not use a peat-heavy tropical mix on its own; pure peat holds too much water and suffocates the slow Melo root system.
Fertilizer, Alocasia Melo repotting guide, and Long-Term Root Health
Alocasia ‘Melo’ is a slow, modest feeder. A balanced water-soluble houseplant fertilizer at one-quarter to one-half of the label rate, applied every four to six weeks during active growth (spring through early autumn), is plenty. Houseplant Central and the Greenhouse Management culture sheet both note that stronger doses and frequent feeding are how growers burn roots and build up mineral salts. Always apply fertilizer to already-moist soil so the solution can move through the root zone without burning the fine root hairs.
Pause feeding during dormancy, for the first month after repotting, and any time the plant is recovering from a pest or root issue. Feeding a plant that is not actively using nutrients just adds salt to the mix.
Repot every one to two years, or whenever the pot dries much faster than it used to, roots circle the drainage holes, water runs straight through without soaking in, or the plant becomes top-heavy. Go up only one pot size at a time (about 2 cm of additional diameter). A pot that is too large holds too much water for the slow root system to use, which is the most common cause of root rot after repotting. The best time is at the start of the active growing season, when the plant can recover quickly.
Propagation: Division and Corm Harvesting
Alocasia ‘Melo’ cannot be propagated from leaf or stem cuttings. The two reliable methods are division of offsets from the mother plant and corm propagation of the small bulb-like storage organs that develop around the root system. Both methods are best done in spring or early summer when the plant is in active growth and can heal cuts quickly.
For division: unpot the parent plant, shake off loose mix, and gently tease the root ball apart. Each division needs at least one growth point, some roots, and ideally one or two healthy leaves. Pot each division into fresh, pre-moistened aroid mix at the same depth it was growing, keep it in Alocasia Melo light guide, and maintain humidity above 60% until you see new growth. Do not fertilize for the first month.
For corm propagation: unpot the plant and feel through the mix near the root mass for small, firm, marble-to-pea-sized corms. Healthy corms are pale and firm; discard any that are soft, mushy, or hollow. The Spruce method, which is also what Sprouts and Stems and Garden Pals describe, is to gently peel the brown outer tunic off each corm (this is optional but speeds rooting), then place the corm on top of moist sphagnum moss in a small container with the top of the corm exposed. Seal the container in a clear plastic bag to create a mini-greenhouse, place it in bright indirect light at 24–27 °C (75–80 °F), and open the bag once a week for 10–15 minutes of fresh air. Roots usually appear in two to four weeks, and a new shoot follows in another two to six weeks.
Do not harvest every corm from a single plant. The mother plant relies on them as a water and energy reserve, especially through dormancy. Leave at least half in place, and only harvest from a healthy, well-established plant that has produced more than a handful.
Dormancy: Why Your Plant Suddenly Drops All Its Leaves
This is the issue that panics new Melo owners more than any other. In late autumn or winter, with shorter days and cooler nights, a perfectly healthy plant can drop every leaf, leaving a pot of bare mix with a corm below the surface. This is dormancy, not death, and it is the same behaviour corm-based alocasias use when light and temperature fall in their native range during the dry season. Aroid life-cycle guides note that A. amazonica is more photoperiod-sensitive than A. baginda; Melo tolerates shorter days and cooler nights better, but it can still go dormant in heated homes where the daylength drops below about 10 hours or the temperature sits below 13 °C (55 °F) for extended periods.
During dormancy, stop fertilizing, reduce watering to barely enough to keep the corm from desiccating (typically once every three to five weeks), and keep the plant in a warm, stable spot with bright indirect light. Resist the temptation to repot, divide, or “rescue” the plant by overwatering. New growth usually appears in spring when temperatures and daylength both rise.
The Epic Gardening culture sheet is explicit: “this looks alarming but isn’t necessarily fatal. The underground tubers store enough energy to regrow when conditions improve. Reduce watering and wait for new growth to appear in spring.” If new growth does not appear by mid-spring, gently unpot the plant and check that the corm is still firm; if it is, repot, water lightly, and keep waiting.
Common Problems: Yellow Leaves, Leaf Curl, Spider Mites, Root Rot
Most Melo problems are environmental, not mysterious, and they show up as specific leaf symptoms that map to specific causes. The diagnostic order matters: check moisture first, then light, then pests.
Yellow leaves are the most common complaint. A single older leaf yellowing and dying while new growth looks healthy is normal - Melo holds only a small fan of leaves at a time, and the oldest leaf is regularly recycled. Widespread yellowing or yellowing of new leaves is almost always overwatering or a mix that holds too much moisture. The fix is to switch to a chunkier aroid mix, reduce watering frequency, and check the roots. Less common causes are nutrient deficiency, low light, mineral-heavy tap water, and pest infestation.
Leaf curl is the second most common symptom. Leaves that curl inward (sometimes called “taco leaves”) are usually responding to underwatering, very low humidity, or both. If the soil is moist and the leaves are still curling, check for cold draughts, recent light change, or heat stress from a grow light placed too close.
Brown leaf tips and edges almost always point to low humidity, salt buildup in the mix, or hard tap water with high chlorine, calcium, or magnesium. Flushing the pot with plain, low-mineral water every few months moves the salts through, and switching to filtered, distilled, or rainwater removes the chlorine and fluoride that the plant is most sensitive to.
Spider mites are the most common pest, and the bullate leaf surface makes them harder to spot than on smooth-leaved plants. Look for fine webbing along the veins on the leaf undersides, tiny moving dots, and a stippled, dusty, or bronzed appearance on the upper leaf surface. Dry indoor air, dusty leaves, and stress from inconsistent watering all favour an outbreak. The reliable treatment is to isolate the plant, rinse the foliage thoroughly (including the undersides) under a strong shower, manually wipe off visible webbing, and then apply insecticidal soap or a 1% neem oil solution to the entire plant at five-day intervals for two to three rounds. Raising humidity above 60% suppresses mite reproduction, which is one more reason the humidity target is not optional.
Root rot is the most common disease, and it is almost always caused by overwatering, a dense mix, or a pot without drainage. The early signs are yellowing leaves, soft stems at the base, and a sour or swampy smell from the mix. If you suspect rot, unpot the plant, wash the roots under running water, and cut away any mushy, dark, or hollow roots with a sterilised blade. Healthy Alocasia roots are firm and white to pale tan. Repot into fresh, dry, chunky mix, hold off on watering for a few days, and keep the plant in bright indirect light with high humidity until you see new root growth.
Toxicity to Pets and People
Every part of Alocasia baginda ‘Melo’ is toxic to cats, dogs, horses, and humans if chewed or ingested. The toxic principle is insoluble calcium oxalate, in the form of needle-like raphide crystals contained in specialised cells called idioblasts (Merck Veterinary Manual). The ASPCA’s toxic plant database lists Alocasia spp. as toxic to dogs, toxic to cats, and toxic to horses, with clinical signs including oral irritation, pain and swelling of the mouth, tongue and lips, excessive drooling, vomiting (in dogs and cats, not horses), and difficulty swallowing. The IVIS veterinary toxicology reference adds that the crystals are extruded into the mucous membranes on chewing, and that the inflammatory response is amplified by proteolytic enzymes and histamine-releasers in the plant sap.
If a pet or a child has chewed on a Melo, the ASPCA recommends calling the ASPCA Animal Poison Control Center at (888) 426-4435 or your local veterinarian immediately. Do not induce vomiting unless specifically instructed. Symptoms usually appear within minutes to hours and resolve with treatment in two to four hours, but severe swelling of the tongue or pharynx can compromise breathing, so this is a real medical situation, not a “wait and see.”
For households with cats, dogs, or small children, place the plant on a high shelf or in a closed terrarium out of reach, or simply choose a non-toxic plant instead. The RHS general alocasia guide is explicit that alocasias “contain toxic compounds, so should not be eaten, and it’s best to wear gloves when handling them.” The good news is that Melo is not attractive to most pets - the leaves are tough, leathery, and bitter. The bad news is that even a small taste produces visible pain and drooling.
Buying Tips and the First 30 Days at Home
A healthy Melo in a nursery or online listing should have firm, deeply bullate leaves with clear dark green veining and a paler, almost silvery-green interveinal surface, no visible webbing or sticky residue on the undersides, and a pot of mix that does not smell sour. A small amount of cosmetic damage on an older leaf is normal; a plant with collapsed crowns, mushy petioles, or yellow new growth is not. Specialist aroid growers (often members of the International Aroid Society) and Proven Winners’ Leafjoy collection are generally safer bets than generic big-box listings for correctly labelled plants. Note that “Silver Dragon,” “Green Dragon,” and “Dragon Scale” are three different A. baginda cultivars with different leaf colours but identical care.
In the first 30 days, do not repot, do not fertilize, and do not propagate. Quarantine the plant away from your other houseplants for at least two weeks in case it arrived with spider mites, mealybugs, or scale. Watch the pot dry-down carefully to learn the rhythm of your specific container. If the plant drops a leaf in the first week or two, that is usually a stress response, not a care failure; the corm below the surface will push a new leaf once the plant settles, provided you do not overcompensate with water. Move the plant only one variable at a time: light first, then watering, then humidity, then fertilizer. Stacking changes is the fastest way to confuse cause and effect.
Related Alocasia guides in the LeafyPixels cluster
- Alocasia Polly care guide
- Alocasia Amazonica care guide
- Alocasia Dragon Scale care guide
- Alocasia Melo problems hub
Conclusion
Alocasia baginda ‘Melo’ rewards growers who treat watering, humidity, and dormancy as one system. Keep the corm firm, the mix airy, and winter care conservative — and Melo will push new spears when conditions improve. The most important habits are the boring ones: lift the pot, check roots annually, accept winter leaf drop, and never overwater a dormant corm.
When to use this page vs other Alocasia Melo guides
- Alocasia Melo overview - Canonical hub for this species - care topics and problems branch from here.
- Alocasia Melo problems - Symptom-first path when you already know something is wrong.
Related Alocasia Melo guides
- Alocasia Melo watering
- Alocasia Melo light
- Alocasia Melo soil
- Alocasia Melo propagation
- Alocasia Melo fertilizer
- Alocasia Melo repotting
- Alocasia Melo pruning
- Root Rot on Alocasia Melo
- Spider Mites on Alocasia Melo
- Yellow Leaves on Alocasia Melo
- Brown Tips on Alocasia Melo
- Overwatering on Alocasia Melo
How to care for Alocasia Melo?
How much light does Alocasia Melo need?
bright indirect light
- bright indirect light - bright indirect light.
When should you water Alocasia Melo?
Water when the top 2–3 cm of soil is dry; reduce sharply in winter dormancy. Avoid overwatering — the corm rots fast in wet mix.
- Finger or chopstick to 2–3 cm depth; lift pot to gauge weight - Water when the top 2–3 cm of soil is dry; reduce sharply in winter dormancy.
- Drain excess water - Water when the top 2–3 cm of soil is dry; reduce sharply in winter dormancy.
What soil works best for Alocasia Melo?
Chunky, well-draining aroid mix with perlite and orchid bark; never use dense peat-heavy mix alone.
- perlite - Chunky, well-draining aroid mix with perlite and orchid bark; never use dense peat-heavy mix alone.
- orchid bark - Chunky, well-draining aroid mix with perlite and orchid bark; never use dense peat-heavy mix alone.
- peat-free potting mix - Chunky, well-draining aroid mix with perlite and orchid bark; never use dense peat-heavy mix alone.
Grower notes for Alocasia Melo
Dormancy and the corm
Alocasia Melo may drop all leaves in winter while the underground corm stays alive. Reduce watering to every 3–5 weeks, stop fertilizer, and wait for spring growth — do not discard a pot that looks empty.
Bullate leaf care for Alocasia Melo
The thick, pebbled bullate leaf surface traps water and dust like Dragon Scale and Black Velvet. Never mist foliage directly — use a humidifier instead. Wipe leaves gently with a damp microfiber cloth when dusty; avoid leaf shine products that clog stomata and dull the matte finish.
What matters most with Alocasia Melo
Alocasia Melo is easiest to grow when you judge the whole plant: new growth, root-zone moisture, light exposure, and how quickly the pot dries after watering. The care checkpoint is bright indirect light paired with chunky aroid mix in a snug pot — this slow-growing jewel alocasia rots faster than the taller Alocasia Polly hybrid when overpotted or overwatered.
Best placement in a real home
Alocasia Melo belongs where bright indirect light is realistic for most of the day. Water when the top 2–3 cm of soil is dry; reduce sharply in winter when dormancy is likely. Humidity target: 65–80%. Temperature comfort zone: 18–26°C (65–80°F). A humid bathroom with good light is often ideal.
Before you buy this plant
Choose Alocasia Melo with firm bullate leaves, clean leaf undersides, and soil that does not smell sour. Be cautious if you see collapsed crowns, mushy petioles, or a pot that stays wet in poor light. Also sold as Alocasia rugosa — verify the corrugated, matte foliage, not a mislabeled Polly or plain Dragon Scale.
First month after bringing it home
Do not repot Alocasia Melo on day one unless the mix is failing or pests are obvious. Quarantine it, learn how fast the pot dries, and keep care boring while it adjusts. If a leaf drops in week one, the corm below may still be fine — resist overwatering an empty-looking pot.
Is it pet safe?
Alocasia Melo is toxic to cats and dogs and humans.
Contains insoluble calcium oxalate crystals causing oral irritation, drooling, and vomiting if ingested.
Watering Alocasia Melo
For Alocasia Melo, finger or chopstick to 2–3 cm depth; lift pot to gauge weight and water every 7–10 days in summer; every 2–4 weeks in winter. Reduce watering 60–70% in autumn/winter when dormancy is likely; keep corm from drying out.
| Detail | Information |
|---|---|
| How often | Every 7–10 days in summer; every 2–4 weeks in winter |
| How to check | Finger or chopstick to 2–3 cm depth; lift pot to gauge weight |
| Seasonal changes | Reduce watering 60–70% in autumn/winter when dormancy is likely; keep corm from drying out |
Signs of overwatering
- yellow leaves
- mushy petioles
- soggy soil
- root rot
Signs of underwatering
- drooping leaves
- dry crispy edges
- slow growth
Soil & potting for Alocasia Melo
Use a mix of perlite, orchid bark, peat-free potting mix, coarse sand for Alocasia Melo. Fast-draining; corm must never sit in saturated soil. Target soil pH around 5.5–6.5. Repot every 1–2 years, ideally in spring.
| Detail | Information |
|---|---|
| Recommended mix | perlite, orchid bark, peat-free potting mix, coarse sand |
| Drainage | Fast-draining; corm must never sit in saturated soil |
| Soil pH | 5.5–6.5 |
| Repotting frequency | Every 1–2 years |
| Best season to repot | Spring |
Signs it needs repotting
- roots circling pot
- rapid soil drying
- stunted growth
Humidity & temperature for Alocasia Melo
Alocasia Melo prefers 65–80%, though normal home humidity is usually fine. Keep temperatures around 18–26°C (65–80°F).
| Detail | Information |
|---|---|
| Humidity | 65–80% - normal home humidity is fine. |
| Ideal temperature | 18–26°C (65–80°F) |
Fertilizer & pruning for Alocasia Melo
Use stop fertilizing, reduce watering to roughly every 3–5 weeks (just enough to keep the corm from desiccating), and keep the pot warm with bright indirect light. for Alocasia Melo.
| Detail | Information |
|---|---|
| Fertilizer type | Stop fertilizing, reduce watering to roughly every 3–5 weeks (just enough to keep the corm from desiccating), and keep the pot warm with bright indirect light. |
Common problems on Alocasia Melo
Yellow Leaves
MediumLikely cause: Common on this plant type; confirm with recent watering, light, and root checks.
Quick fix: Inspect the plant and correct the most likely care stressor before stacking treatments.
Full fix guide →Brown Tips
MediumLikely cause: Common on this plant type; confirm with recent watering, light, and root checks.
Quick fix: Inspect the plant and correct the most likely care stressor before stacking treatments.
Full fix guide →Root Rot
MediumLikely cause: Common on this plant type; confirm with recent watering, light, and root checks.
Quick fix: Inspect the plant and correct the most likely care stressor before stacking treatments.
Full fix guide →Overwatering
MediumLikely cause: Common on this plant type; confirm with recent watering, light, and root checks.
Quick fix: Inspect the plant and correct the most likely care stressor before stacking treatments.
Full fix guide →Underwatering
MediumLikely cause: Common on this plant type; confirm with recent watering, light, and root checks.
Quick fix: Inspect the plant and correct the most likely care stressor before stacking treatments.
Full fix guide →Spider Mites
MediumLikely cause: Common on this plant type; confirm with recent watering, light, and root checks.
Quick fix: Inspect the plant and correct the most likely care stressor before stacking treatments.
Full fix guide →Mealybugs
MediumLikely cause: Common on this plant type; confirm with recent watering, light, and root checks.
Quick fix: Inspect the plant and correct the most likely care stressor before stacking treatments.
Full fix guide →Aphids
MediumLikely cause: Common on this plant type; confirm with recent watering, light, and root checks.
Quick fix: Inspect the plant and correct the most likely care stressor before stacking treatments.
Full fix guide →Leggy Growth
MediumLikely cause: Common on this plant type; confirm with recent watering, light, and root checks.
Quick fix: Inspect the plant and correct the most likely care stressor before stacking treatments.
Full fix guide →Slow Growth
MediumLikely cause: Common on this plant type; confirm with recent watering, light, and root checks.
Quick fix: Inspect the plant and correct the most likely care stressor before stacking treatments.
Full fix guide →Wilting
MediumLikely cause: Common on this plant type; confirm with recent watering, light, and root checks.
Quick fix: Inspect the plant and correct the most likely care stressor before stacking treatments.
Full fix guide →Drooping Leaves
MediumLikely cause: Common on this plant type; confirm with recent watering, light, and root checks.
Quick fix: Inspect the plant and correct the most likely care stressor before stacking treatments.
Full fix guide →Low Humidity
MediumLikely cause: Common on this plant type; confirm with recent watering, light, and root checks.
Quick fix: Inspect the plant and correct the most likely care stressor before stacking treatments.
Full fix guide →Not Enough Light
MediumLikely cause: Common on this plant type; confirm with recent watering, light, and root checks.
Quick fix: Inspect the plant and correct the most likely care stressor before stacking treatments.
Full fix guide →Fungus Gnats
MediumLikely cause: Common on this plant type; confirm with recent watering, light, and root checks.
Quick fix: Inspect the plant and correct the most likely care stressor before stacking treatments.
Full fix guide →Mold on Soil
MediumLikely cause: Common on this plant type; confirm with recent watering, light, and root checks.
Quick fix: Inspect the plant and correct the most likely care stressor before stacking treatments.
Full fix guide →Curling Leaves
MediumLikely cause: Common curling leaves pattern on Alocasia Melo under indoor care stress.
Quick fix: Inspect roots, watering, light, and pests; adjust one variable and monitor new growth.
Full fix guide →Brown Leaves
MediumLikely cause: Common brown leaves pattern on Alocasia Melo under indoor care stress.
Quick fix: Inspect roots, watering, light, and pests; adjust one variable and monitor new growth.
Full fix guide →Black Spots
MediumLikely cause: Common black spots pattern on Alocasia Melo under indoor care stress.
Quick fix: Inspect roots, watering, light, and pests; adjust one variable and monitor new growth.
Full fix guide →Holes in Leaves
MediumLikely cause: Common holes in leaves pattern on Alocasia Melo under indoor care stress.
Quick fix: Inspect roots, watering, light, and pests; adjust one variable and monitor new growth.
Full fix guide →Pale Leaves
MediumLikely cause: Common pale leaves pattern on Alocasia Melo under indoor care stress.
Quick fix: Inspect roots, watering, light, and pests; adjust one variable and monitor new growth.
Full fix guide →Distorted Leaves
MediumLikely cause: Common distorted leaves pattern on Alocasia Melo under indoor care stress.
Quick fix: Inspect roots, watering, light, and pests; adjust one variable and monitor new growth.
Full fix guide →Scale Insects
MediumLikely cause: Common scale insects pattern on Alocasia Melo under indoor care stress.
Quick fix: Inspect roots, watering, light, and pests; adjust one variable and monitor new growth.
Full fix guide →Thrips
MediumLikely cause: Common thrips pattern on Alocasia Melo under indoor care stress.
Quick fix: Inspect roots, watering, light, and pests; adjust one variable and monitor new growth.
Full fix guide →Whiteflies
MediumLikely cause: Common whiteflies pattern on Alocasia Melo under indoor care stress.
Quick fix: Inspect roots, watering, light, and pests; adjust one variable and monitor new growth.
Full fix guide →Leaf Miners
MediumLikely cause: Common leaf miners pattern on Alocasia Melo under indoor care stress.
Quick fix: Inspect roots, watering, light, and pests; adjust one variable and monitor new growth.
Full fix guide →Caterpillars
MediumLikely cause: Common caterpillars pattern on Alocasia Melo under indoor care stress.
Quick fix: Inspect roots, watering, light, and pests; adjust one variable and monitor new growth.
Full fix guide →Nitrogen Deficiency
MediumLikely cause: Common nitrogen deficiency pattern on Alocasia Melo under indoor care stress.
Quick fix: Inspect roots, watering, light, and pests; adjust one variable and monitor new growth.
Full fix guide →Iron Deficiency
MediumLikely cause: Common iron deficiency pattern on Alocasia Melo under indoor care stress.
Quick fix: Inspect roots, watering, light, and pests; adjust one variable and monitor new growth.
Full fix guide →Magnesium Deficiency
MediumLikely cause: Common magnesium deficiency pattern on Alocasia Melo under indoor care stress.
Quick fix: Inspect roots, watering, light, and pests; adjust one variable and monitor new growth.
Full fix guide →Potassium Deficiency
MediumLikely cause: Common potassium deficiency pattern on Alocasia Melo under indoor care stress.
Quick fix: Inspect roots, watering, light, and pests; adjust one variable and monitor new growth.
Full fix guide →Calcium Deficiency
MediumLikely cause: Common calcium deficiency pattern on Alocasia Melo under indoor care stress.
Quick fix: Inspect roots, watering, light, and pests; adjust one variable and monitor new growth.
Full fix guide →