Damping Off on Marigold: Causes, Checks & Fixes
Quick answer
Damping off on marigold kills young seedlings in cool, wet seed-starting mix - Pythium and Rhizoctonia rot stems at the soil line. First step: remove every collapsed seedling immediately so the fungus cannot spread through shared mix to healthy neighbors.
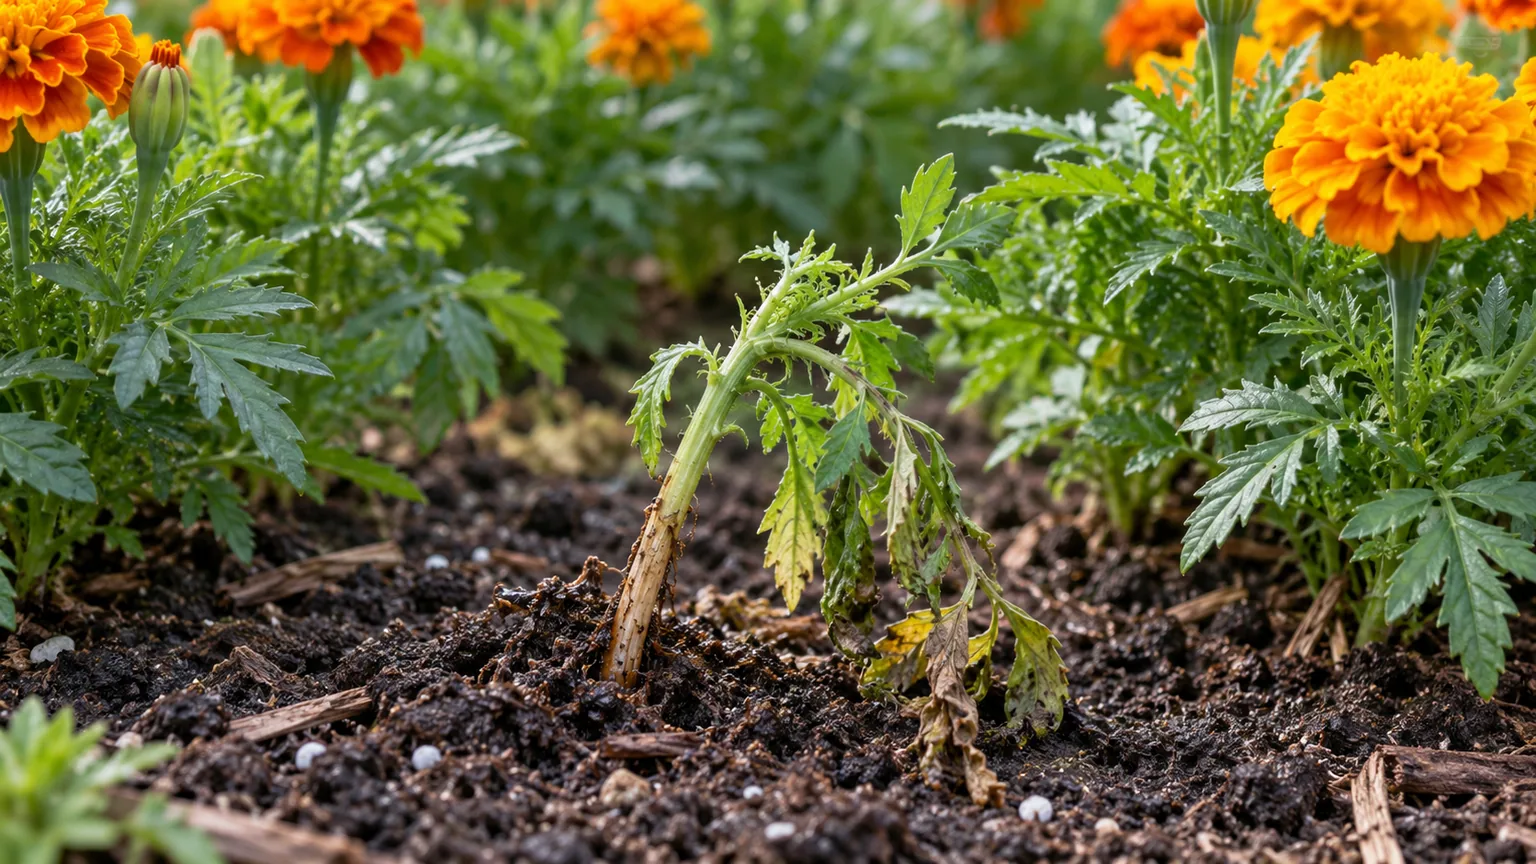
Damping Off on Marigold: Causes, Checks & Fixes
This guide covers damping off on Marigold. See also the general Damping Off guide, watering, and light pages for this plant.
Damping Off on Marigold: Causes, Checks & Fixes
Quick answer
Damping off on marigold (Tagetes erecta and Tagetes patula) strikes in the first days after germination, when cool, wet seed-starting mix lets Pythium, Rhizoctonia, and related fungi rot stems right at the soil line. For the general mechanics of how chronic wet mix damages young roots, see our damping-off guide - on marigold, the pattern usually shows up as a nursery-tray problem, not a disease of established flowering plants.
First step: remove every collapsed seedling immediately - bag and discard them, do not compost near your seed area. Infected marigold sprouts cannot recover; your job is to stop the fungus moving through shared wet mix to healthy neighbors before you adjust watering, warmth, or airflow.
What damping off looks like on Marigold
On marigold sowings, damping off appears days after the seed leaves open, not on mature garden plants. Watch for these patterns:
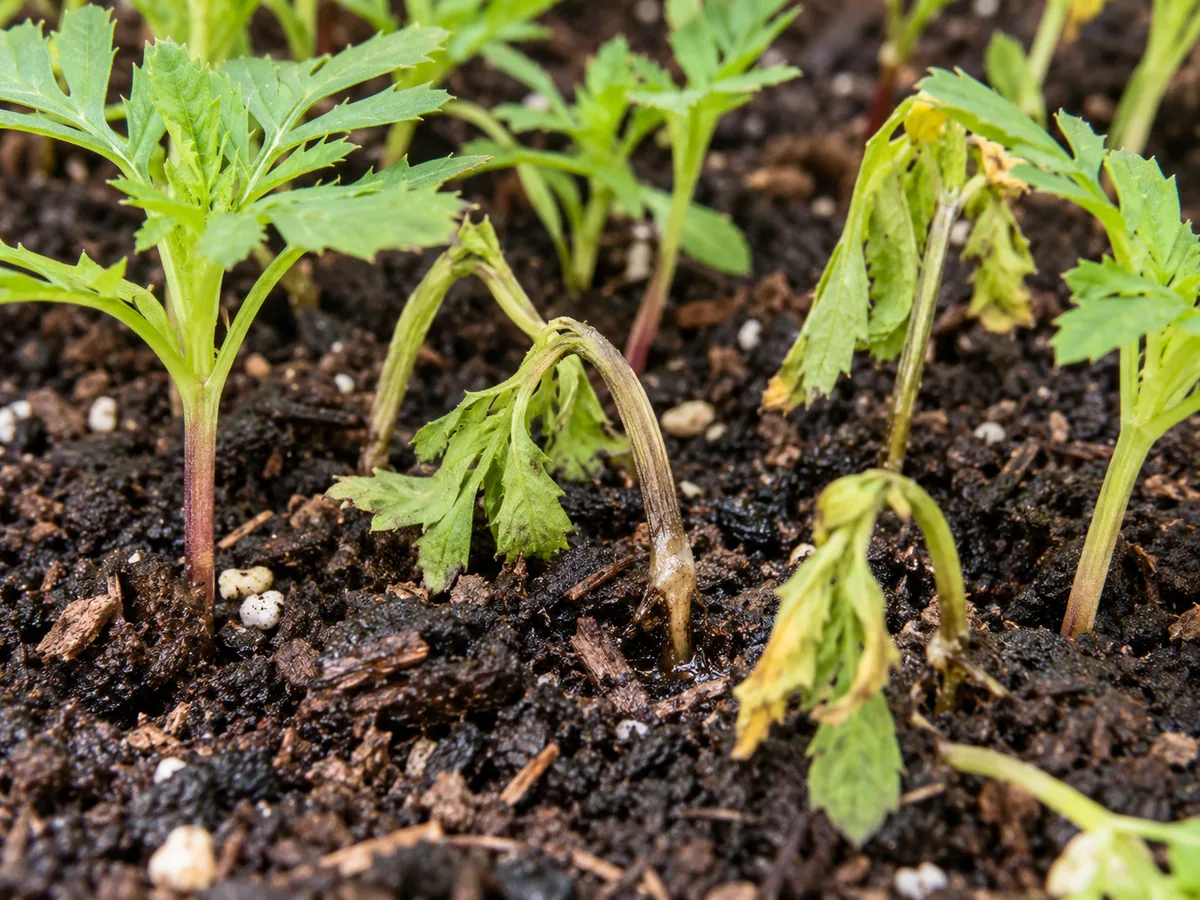
Damping-off symptoms on marigold - pinched water-soaked stem base at the soil line; compare with healthy tissue on the same plant.
Early collapse at the soil line
- Sprouts that stood upright yesterday suddenly lie flat, with stems pinched and water-soaked at the base - the classic picture is rotting stems at or near the soil line
- Lower stems turn brown, gray, or thin and thread-like where infected, while cotyledons wilt and dull from green to gray-brown
- Roots on a gently lifted seedling look stunted or absent rather than fibrous and pale
Tray-wide or bed-wide spread
- Several cells fail within the same 24-48 hour window, often clustered where water pools
- Neighbors in shared wet mix show the same pinching even if they still stand today
- Under a humidity dome or polythene cover, fluffy white cobweb-like growth may appear on stem bases in the worst cells
Pre-emergence failure
- Marigold seeds never break the surface despite correct sowing depth - seed rots in the cell before sprouting, which readers often misreport as seeds not germinating on marigold
- Patchy emergence in one tray while a duplicate tray with drier mix performs fine
Marigolds germinate fast - roughly 5 to 7 days at 20 to 25°C - so the vulnerable post-emergence window is short but easy to miss if you check nursery trays only weekly.
Why Marigold gets damping off
Marigolds are warm-season annuals usually raised from seed in nursery trays or beds, then transplanted out. Damping off is not a marigold trait - it is a seedling-stage disease tied to how the seedbed is managed.
Cool-season sowing into cold, wet mix. In North India marigolds are sown in September-October for winter flowering, when nursery beds can sit cool and damp for days. Pythium and related water molds are more likely to cause damping off in cool, wet soils, so an early cool-season sowing held too wet stays in the danger zone longer than fast marigold sprouts should.
Overhead watering and sealed covers. Misting trays or leaving humidity domes on after sprouting keeps stem bases wet for hours, and Pythium travels easily in shared irrigation water from cell to cell.
Reused mix, dirty trays, or garden soil. Damping-off fungi survive on pots, tools, and old soil, and garden soils in particular often carry them - so filling marigold cells with last season’s leftover mix or nursery-bed soil imports the problem. Dense Indian nursery-bed sowing, where hundreds of seedlings share one bed, lets one infected patch sweep outward fast.
Weak light produces slow, soft seedlings. Marigolds demand full sun once growing, and sprouts raised on a dim windowsill stretch pale and thin, staying vulnerable longer. Strong light and warmth help seedlings grow out of the susceptible stage quickly.
Fungus gnats signal trouble. Tiny flies hovering over a marigold tray usually mean the mix stays wet too long - treat them as a wetness alarm and follow your fungus gnats on marigold plan alongside the drying steps below.
Because marigolds transplant readily and resow in under a week, losing a tray hurts less than with finicky species - clean restart is a practical option, not a defeat.
How to confirm the cause
Work through these checks before treating anything:
- Timing - Did collapse begin within days of sprouting in a newly watered tray or bed? Mature marigolds with basal stem rot in the garden are a different problem (root rot on marigold or overwatering), not classic seedling damping off.
- Stem location - Pinching and rot exactly at the soil line, with tops still green at first, fits damping off. Clean cuts above the line suggest cutworms; stretched pale stems with firm bases suggest leggy seedlings on marigold from low light.
- Moisture and temperature - Push a finger into the mix. Soggy, cool media strongly supports damping off; warm, barely moist mix makes it less likely.
- Neighbor pattern - Clustered failures in one tray section point to pathogens spreading through shared water and media. Single scattered leaners with dry mix point to sowing depth or light.
- Root check - Gently lift one leaning seedling. Thread-thin discolored stems with poor roots confirm infection; firm roots and firm stems point elsewhere - compare with mold on soil on marigold if the issue is only surface growth.
- Cover history - Was a dome or polythene sheet left on after emergence? Trapped moisture around stem bases is one of the most common home triggers.
If only the surface shows white fuzz but stems stay firm and upright, you likely have surface mold from wet media rather than damping off.
First fix for Marigold
Remove and discard every collapsed or pinching seedling the moment you see them.
Use clean scissors or pinch with fingers, then bag the tissue and throw it out - do not compost it near seed-starting areas. Seedlings with damping off will die and cannot be saved; removal plus isolation of the healthy remainder is the only useful response.
After removal:
- Stop overhead misting immediately and switch survivors to bottom watering
- Let the surface of the remaining mix dry slightly before the next drink
- Remove humidity domes or polythene covers now that emergence has happened
- Increase airflow with a small fan set on low across the tray
Do not fertilize stressed survivors to push growth - wait until several true leaves develop before any diluted feed. Do not repot healthy marigold sprouts on day one unless every cell shares contaminated mix; fixing water and warmth first is usually safer.
Step-by-step recovery
Once infected plants are out, protect the remaining marigolds in this order:
- Bottom-water lightly - Set the tray in a shallow reservoir until the surface just moistens, then drain completely. Never leave flats sitting in standing water.
- Warm the mix - Hold soil near 21-24°C (70-75°F); Penn State Extension recommends bottom heat so containers sit at 70-75°F during germination and early seedling growth. Warm soil speeds marigolds past the susceptible stage fast.
- Add strong light - Provide 12-16 hours of bright grow light close to seedlings; thin seedlings as they grow for good air circulation and stouter stems rather than weak crowded sprouts.
- Run gentle airflow - A low fan reduces humidity around stem bases without blasting seedlings flat.
- Thin crowded cells - One strong marigold per cell survives better than a dense clump competing for light in a wet pocket.
- Sanitize before resowing - Wash trays with soapy water, soak in 10% bleach, rinse thoroughly, and start the next batch in fresh sterile seed-starting mix rather than reusing failed mix. Wisconsin guidance warns to never reuse plastic pots after damping-off outbreaks since they are hard to fully decontaminate.
If losses were heavy, sow a backup tray with clean supplies - marigolds emerge in under a week at the right temperature, so a fresh start usually beats nursing a sparse, stressed flat.
Recovery timeline
Collapsed marigold seedlings do not recover - expect zero turnaround on plants that have already toppled. For untouched neighbors, improvement shows over three to seven days once the mix dries slightly, warmth rises, and airflow improves: new leaves look firm, stems stay thick above the line, and no new cells collapse overnight.
Marigolds outgrow the highest risk once they develop several true leaves and a fibrous root system, since seedling susceptibility declines as plants age. Plan on roughly one to two weeks of careful flat management after germination before routine handling feels safe.
If new collapses continue daily after environmental fixes, discard the tray and restart with clean supplies rather than fighting a contaminated batch - a fresh marigold sowing at 20-25°C catches up quickly.
Lookalike symptoms to rule out
Leggy seedlings from low light - Stems stretch tall and pale but stay attached with firm tissue at the soil line. Fix light per leggy seedlings on marigold, not fungicide.
Seeds that never sprout - Old or deeply buried seed fails without any stem rot to inspect. See seeds not germinating on marigold when nothing emerges at all.
Surface mold without collapse - White fuzz confined to the mix surface with upright stems is a moisture-management issue; follow mold on soil on marigold.
Cutworm or slug damage - Stems chewed or severed, often above the line, sometimes with slime trails. The base may still look intact rather than rotted thread-thin.
Root rot on established marigolds - Older container or garden plants with basal decay after weeks of growth belong on the root rot on marigold path, not this seedling page.
Mistakes to avoid
Do not try to prop up collapsed marigold sprouts with toothpicks - the stem is rotted internally and will not heal.
Do not overhead mist a tray after you see pinching; you spread pathogens in water droplets.
Do not reuse mix from a failed tray for the next marigold sowing, even if you pick out visible mold.
Do not leave humidity domes on “to help them recover” after germination - domes trap moisture around stem bases.
Do not start marigold seed in garden soil to save money; garden soils often harbor damping-off pathogens.
Do not assume fungus gnats are harmless - they signal wet conditions and possible spore movement.
Do not transplant weak survivors into the garden immediately; harden off only sturdy seedlings with several true leaves.
Marigold care cross-check
Damping off is a seedbed disease, but the habits that cause it overlap with everyday marigold care. Marigolds want well-drained soils in full sun and tolerate dry conditions better than chronic wetness - so a tray that never dries on top is already outside this plant’s comfort zone. Align routine care with the marigold watering guide, keep mature plants in true full sun per the light guide, and use an open soil mix per the soil guide so containers and beds drain instead of holding cold water around stems.
How to prevent it next time
Start clean. Use fresh pasteurized or sterile seed-starting mix and trays washed with soapy water, then sanitized - Penn State Extension advises starting seed only in pasteurized soil or soilless mix with sterile flats or pots.
Sow warm and shallow. Surface-sow or cover thinly, and hold soil near 20-25°C so marigolds emerge in days rather than stalling in cool mix.
Water from below. Keep mix moist but not soggy with drainage holes in every container; warm water beats cold tap water on young seedlings.
Light and airflow from day one. Strong light plus a gentle fan after emergence mimics greenhouse conditions that discourage fungal growth.
Time outdoor sowings. Direct-sow or move nursery stock out only once beds are warm and draining - skipping cold, waterlogged beds removes the highest-risk window.
Consider treated seed. If damping off repeats despite clean culture, fungicide-treated seed can reduce losses on ornamentals; follow label directions and local rules.
Thin marigolds to proper spacing after true leaves appear so stems are not crowded in wet pockets.
When to worry
Treat the first collapsed marigold sprout as urgent - waiting until half the flat fails makes saving any cell unlikely. Escalate immediately if:
- Multiple seedlings topple overnight in the same tray or bed section
- White cobweb-like growth appears on stem bases
- Seeds fail to emerge in large numbers while mix stays wet and cool
- Fungus gnats are dense and collapses continue after you dry the surface
You can stop worrying once marigolds have several true leaves, firm stems, and no new pinching for a full week. At that stage shift focus to light, spacing, and hardening off - not damping-off rescue.
Conclusion
Damping off on marigold is a seedbed problem, not a curse on the variety. Collapsed stems at the soil line in cool wet mix mean remove infected sprouts now, dry and warm the environment for survivors, and restart with sterile supplies if spread continues. Fast marigold germination at 20-25°C with bright light and bottom watering is your best ally - get sprouts through the fragile first weeks cleanly, and the disease largely disappears from your season.
When to use this page vs other Marigold guides
- Marigold watering guide - Use for routine moisture checks before assuming damping off is the main issue.
- Leggy Seedlings on Marigold - Use when sprouts stretch pale and flop without stem rot at the soil line.
- Seeds Not Germinating on Marigold - Use when nothing emerges at all rather than seedlings collapsing after sprouting.
- Marigold problems hub - Browse all common issues on this species.
- Damping-off hub - Use for the general disease reference across all plants.