Holes in Leaves on Rubber Plant: Causes, Checks & Fixes
Quick answer
Holes in Rubber Plant leaves are damage, not a natural leaf pattern—indoor Ficus elastica keeps whole stiff glossy blades. First step: examine the hole edge and inspect every red-sheathed new leaf at the stem tip under bright light before you change watering or spray.
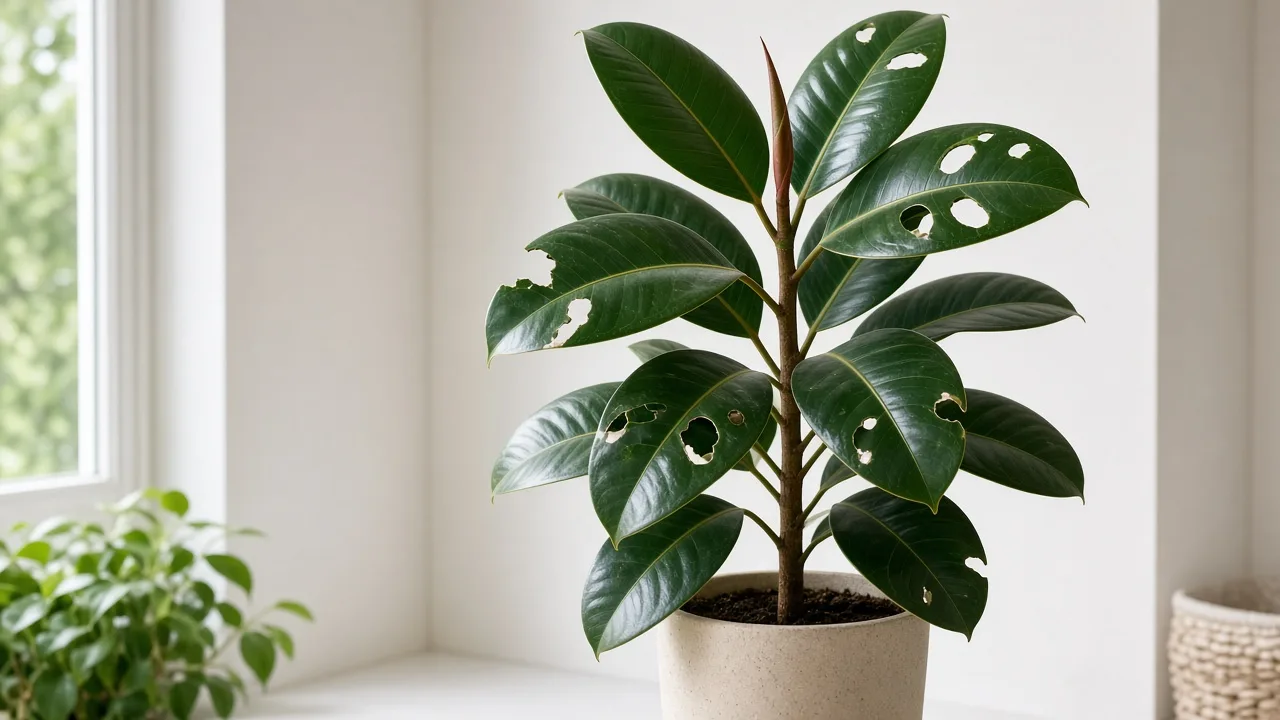
Holes in Leaves on Rubber Plant: Causes, Checks & Fixes
This guide covers holes in leaves on Rubber Plant. See also the general Holes in Leaves guide, watering, and light pages for this plant.
Holes in Leaves on Rubber Plant: Causes, Checks & Fixes
Quick answer
Holes in Rubber Plant leaves (Ficus elastica) mean something removed or tore tissue—chewing insects, leaf miners, physical snags on stiff glossy blades, stuck unfurling leaves in dry air, pet damage, or dried fungal spots that fell out. Unlike split-leaf monsteras, indoor rubber plant keeps whole oval leaves up to a foot long. Any open hole is damage, not a natural fenestration pattern.
For how chewing pests and mechanical tears work in general, see our holes in leaves guide. On Rubber Plant, the diagnostic clue is usually at the upright stem tip—soft new tissue still wrapped in bright red sheaths is where caterpillars hide, thrips scar blades before they open, and dry air can split thick glossy foliage as it unfurls.
First step: examine the hole edge, then inspect every red-sheathed new leaf and glossy underside along the woody stem under bright light.
When to use this page vs other Rubber Plant guides
| Pattern | Start here | Or route to… |
|---|---|---|
| Ragged holes with dark frass on new growth | This page | Caterpillars |
| Serpentine tunnels inside the blade | Leaf miners | This page if holes are full-thickness |
| Silver streaks, black specks, scarred red sheaths | Thrips | — |
| Brown halos before tissue drops out | Black spots | — |
| Sticky honeydew, no ragged chew | Scale insects or mealybugs | — |
| Fine stippling with silk on undersides | Spider mites | — |
| Crispy margins only, no open holes | Low humidity | Brown leaves |
What holes in leaves look like on Rubber Plant
Healthy rubber plant holds large, stiff, glossy oval leaves on an upright woody stem—often 8–12 inches long indoors—with new growth emerging from bright red sheaths at the tip. When you see a hole, sort it by pattern:
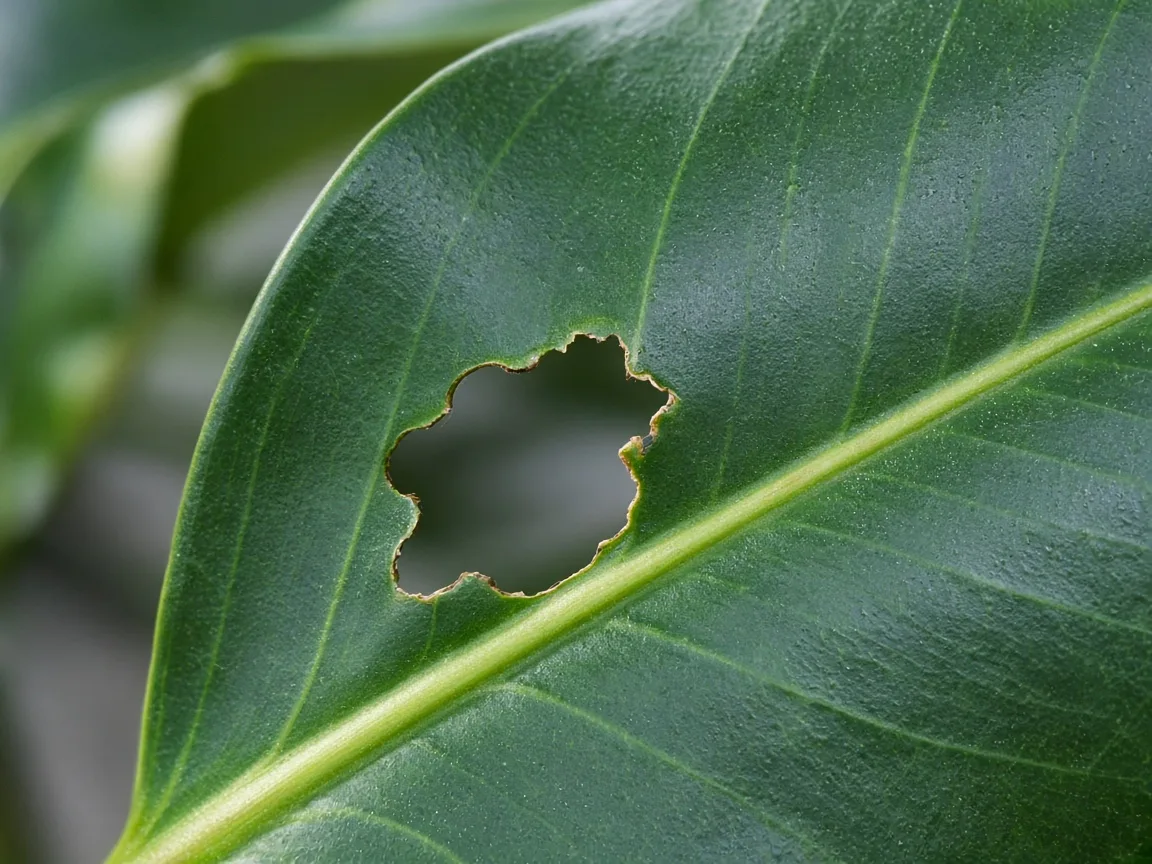
Irregular chew holes on stiff glossy Rubber Plant tissue—compare ragged feeding margins with the smooth intact blade around them.
Caterpillar chewing — Irregular holes and notched margins through thick glossy tissue, often on soft leaves still inside red sheaths. Dark frass pellets on blades, stems, or the pot rim below. See caterpillars on Rubber Plant.
Leaf miner trails — Winding pale or brown tunnels inside the stiff blade with only a small exit hole—not a large ragged chew. Hold the leaf to a window; mines show as bordered trails between the glossy surfaces. See leaf miners.
Thrips rasping — Silvery or bronze scrape marks, black varnish-like specks, and scarred tissue on new leaves before they fully emerge from red sheaths. Full-thickness holes are less common than stippling, but heavy feeding can punch through soft tips. See thrips.
Mechanical tears on stiff blades — Clean linear splits or one-time holes on large lower leaves that brush door frames, shelf lips, or neighboring plants. Damage stays on the same leaf after you reposition the pot; no frass, no internal trails.
Unfurl tears in dry air — Small holes or splits at the center of a newly opened glossy leaf where the thick blade stuck together while unfurling from a red sheath. Often paired with crispy margins in winter rooms. See low humidity.
Pet chewing — Torn sections on lower, accessible leaves without insect signs. Rubber Plant is toxic to cats and dogs if ingested—isolate the plant and contact your veterinarian if you suspect chewing; this guide does not replace medical advice.
Shot-hole from fungal spotting — Dark spots with yellow margins may be fungal leaf spot; dried centers sometimes drop, leaving small round holes—usually with preceding brown halos, unlike clean mechanical tears. Route persistent spotting to black spots.
Reading holes on stiff glossy rubber plant blades
Rubber plant leaves are very large, leathery, and stiff—with a raised pale midrib underneath and a waxy cuticle that makes chew marks look unusually crisp. That anatomy changes how holes read:
Margin-first notching: Caterpillars often start at the thick outer edge because the center tissue is harder to chew. Irregular bites along one margin with frass below point to feeding—not a humidity split through the center.
Red-sheath feeding: Damage on tissue still inside the bright red sheath at the stem tip means an active feeder is working on the softest growth. This pattern is urgent even if older lower leaves look fine.
Lower-canopy blind spots: On a tall upright rubber tree, overlapping large blades hide glossy undersides and thick petiole bases where mealybugs and scale settle. Holes on lower leaves with cottony wax or hard bumps nearby are pest-related even when the top canopy looks clean.
Red-sheathed new growth and unfurl tears (rubber plant only)
Rubber plant pushes new leaves rolled tight inside bright red protective sheaths at the growing point. Caterpillars and thrips often damage tissue before the blade fully opens, leaving holes or scars that only become obvious once the sheath drops.
In dry winter air below the 40–60% humidity range rubber plant tolerates best, the unfurling thick blade can stick to itself and split as it emerges, leaving a small hole or linear tear through the center. No frass, no night feeding, and damage limited to the newest one or two leaves on a dry-room plant points here—not caterpillars.
Upright woody stems and dust-covered undersides (rubber plant only)
Unlike trailing vines, rubber plant concentrates soft new growth at one upright stem tip while lower woody sections carry mature glossy blades that rarely get inspected. Dust on large stiff leaves blocks light and makes early pest colonization harder to spot until chew holes appear on blades you can see from across the room.
When you inspect, work from the red sheath downward: peel back sheaths gently, check where thick petioles meet the woody stem, then lift the lowest large leaves to view glossy undersides. Caterpillars and mealybugs often shelter in these joints while the damage you noticed sits higher on a different blade.
Why Rubber Plant gets holes in leaves
Chewing pests are the most common cause of true holes indoors. NC State lists mealybugs, scales, and spider mites on Ficus elastica, and caterpillars or leaf miners arrive episodically when eggs hitchhike on nursery stock, patio placements, or open windows. Caterpillars chew ragged full-thickness holes; leaf miners tunnel between leaf surfaces.
Large stiff leaves are hard to move without tearing. Rubber plant reacts to placement change before slow nutrient decline. Dragging a pot past a doorframe or letting a heavy glossy blade rest on a sharp shelf edge can punch a clean hole that looks like insect feeding until you trace the contact point.
Outdoor summer brings eggs indoors. Rubber plants on shaded patios pick up moth eggs; damage often appears weeks after the plant returns to a windowsill. One larva can chew through several tender red-sheathed leaves in sequence because rubber plant concentrates soft growth at a single stem tip.
Dry air splits unfurling tissue. Low humidity causes brown tips and edges on houseplants; on rubber plant it can also tear new leaves apart as they open from red sheaths. This is not infectious and does not spread leaf to leaf like pest feeding.
Pets reach floor-level pots. Cats bat at stiff glossy blades; dogs chew accessible lower leaves. Tears at pet height on multiple plants suggest placement, not insects.
Fungal leaf spots can fall out. Dried lesion centers sometimes drop, leaving small shot-hole appearance—usually with preceding brown halos, unlike clean mechanical tears.
Rubber plant does not develop natural perforations indoors the way mature Monstera deliciosa fenestrates. If someone suggests “your rubber plant is supposed to have holes,” that advice applies to different species—not this plant.
How to confirm the cause
Work through these checks in order:
- Edge test — Ragged, irregular margin with chew marks → insects. Clean linear tear → mechanical or unfurl snag. Serpentine trail visible when you backlight the stiff blade → leaf miner.
- Frass or slime — Dark pellets on leaves or below the pot → caterpillars. Shiny slime on the rim → slugs or snails (rare indoors). Neither → consider mechanical, pet, or dry-air unfurl tears.
- Stem tip first — Peel back red sheaths and inspect the backs of the newest leaves and the woody junction above each hole. Active feeding usually hits soft tissue at the tip before older leathery blades lower on the stem.
- Night patrol — Check red sheaths and glossy undersides with a flashlight after dark. Caterpillars feed when room lights are low.
- Shake test — Hold white paper under a suspect new leaf and tap the petiole. Slow-moving worms confirm caterpillars; quick jumping specks point to thrips.
- Timeline — New holes on different leaves weekly signal active feeding. One unchanged tear for a month suggests past snag or pet contact.
- Placement trace — Note which large lower blades contact walls, shelves, or neighboring plants. Isolated damage along that path needs repositioning, not spray.
- Humidity check — If only the newest leaf on a dry-room rubber plant has a center split and margins are crispy, raise humidity before treating for pests.
First fix for Rubber Plant
Photograph the holed leaf, examine the hole edge, then inspect every red sheath and glossy underside along the woody stem before you spray, repot, or change watering.
| Confirmed pattern | First fix |
|---|---|
| Caterpillar or frass found | Isolate and hand-pick larvae into soapy water; see caterpillars |
| Serpentine trail inside leaf | Prune off and bag affected blades; see leaf miners |
| Silver streaks + live thrips on shake test | Isolate and rinse every glossy underside; see thrips |
| Clean tear on one large lower leaf along a wall path | Reposition the pot or trim the snagged leaf—no pesticide |
| Center split on newest leaf in dry air | Raise humidity to 40–60%; see low humidity |
| Pet chewing suspected | Move rubber plant out of reach; seek veterinary advice if ingestion occurred |
Do not change watering or fertilize a holed rubber plant before you know whether insects are active. Stressed plants are more susceptible to pests. Do not compost mined or infested leaves indoors where insects can disperse.
Wear gloves when trimming damaged tissue—milky latex sap irritates skin and the plant is toxic to pets.
Step-by-step recovery
After the first targeted fix:
- Re-inspect every three to five days for two weeks—one missed caterpillar or miner can open new holes on the next red-sheathed leaf.
- Hold isolation until no new damage appears on emerging tips. Tall rubber plants on shared shelves brush neighbors easily.
- Wipe dust from large glossy leaves monthly during weekly care—NC State recommends wiping leaves to keep them clean and improves your view of new damage.
- Prune only when necessary — Remove leaves more than half destroyed after pests are gone. Partial holes on green blades still photosynthesize on this large-leafed species.
- Adjust placement — Route stiff blades away from traffic paths, heating vents, and sharp shelf edges that tear unfurling tissue.
- Scout after outdoor time — Rinse and quarantine patio rubber plants before mixing them back into your collection.
For a small starter plant with mines or caterpillars on every leaf, rooting a firm stem cutting may be faster than fighting entrenched pests—see the Rubber Plant overview for propagation basics once the plant is stable.
Recovery timeline
| Phase | Timing | Good sign | Bad sign |
|---|---|---|---|
| After first fix | Days 1–5 | No new holes on red-sheathed tips | Fresh chew marks on new leaves |
| New growth | Weeks 2–4 | Clean glossy leaves unfurling from sheaths | Frass returns or trails spread |
| Cosmetic | Ongoing | Old holed leaves stable | Multiple stem sections declining |
Holed tissue does not fill in. Judge recovery by clean new leaves at the stem tip, not by old perforated blades. Rubber plant in bright indirect light with stable watering and well-drained mix often outgrows light mechanical damage within two to four weeks once the cause is removed.
Lookalike symptoms to rule out
Yellow lower leaves without holes point to overwatering or not enough light—not chewing.
Brown crispy margins without open holes suggest low humidity or brown leaves from dry air, drafts, or root stress—not caterpillars.
Sticky honeydew without ragged holes suggests scale insects or mealybugs—sap feeders, not chewers.
Fine stippling and webbing suggest spider mites in dry rooms—not large irregular holes.
Natural fenestration does not apply to rubber plant. Missing splits on a monstera is a different problem; Ficus elastica leaves should stay whole indoors.
Mistakes to avoid
Do not spray insecticide before confirming live pests—mechanical tears and dry-air unfurl splits do not need chemical treatment.
Do not assume one holed leaf means the problem is solved. Follow the woody stem and check red sheaths and petiole bases on lower sections.
Do not stack repotting, heavy pruning, and pesticide on the same day on a rubber plant already stressed by damage—rubber plant reacts poorly to sudden care changes.
Do not use homemade dish soap on rubber plant without understanding leaf burn risk; commercial insecticidal soaps are formulated for foliage when pests are confirmed.
Do not place large stiff blades where they scrape the same sharp edge daily—a recurring tear is not a mystery pest.
How to prevent holes next time
- Quarantine new rubber plants two to three weeks before mixing collections.
- Rinse patio plants before winter bring-in; inspect red sheaths and woody stem joints.
- Route large glossy leaves away from doorways, shelves, and walls they scrape daily.
- Keep humidity at 40–60% during heating season to protect unfurling tips—see low humidity.
- Keep out of pet reach; rubber plant is toxic if chewed.
- Wipe dust from stiff glossy blades monthly to catch early pests at stem tips.
- Water from soil dryness, not leaf appearance—stressed rubber plant in wet soil is more vulnerable to secondary problems.
When to worry
Escalate when:
- Fresh holes appear on multiple large leaves within a week
- Leaf-miner trails spread through several new red-sheathed leaves
- Frass accumulates across a tall plant despite handpicking
- New tips stop unfurling because tissue is stripped or mined
- Pet ingestion is suspected—contact a veterinarian promptly
A single old tear on one lower leaf, with firm woody stems and clean new growth at the tip, is usually not an emergency. Discard and restart from a cutting only when every leaf is mined or stripped, repeated treatment failed, and the plant has no clean stem sections left to salvage.
Conclusion
Holes in rubber plant leaves always mean damage—chewing, mining, tearing, or spotting—not a natural leaf pattern. Read the hole edge, inspect red sheaths and glossy undersides along the woody stem, and match the pattern before you spray or repot. Rubber plant recovers steadily from light hits once the cause is gone; focus on clean unfurling foliage, quarantine discipline, and keeping large stiff blades away from snags and dry-air splits.
Related Rubber Plant guides
- Rubber Plant overview — placement, growth habit, and care baseline
- Rubber Plant watering — dry-down rhythm for large pots
- Rubber Plant light — bright indirect light without scorch
- Rubber Plant soil — drainage that keeps roots healthy
- Caterpillars on Rubber Plant — ragged holes with frass
- Leaf miners on Rubber Plant — tunnels inside thick blades
- Thrips on Rubber Plant — silver streaks on new growth
- Black spots on Rubber Plant — shot-hole from fungal lesions
- Rubber Plant problems hub — all common issues on this species
Related tool
Use the Plant Problem Diagnosis Tool to narrow causes for holes in leaves on this plant before changing multiple variables at once.