Sponge Gourd Pruning Guide: Trellis Training & Thinning
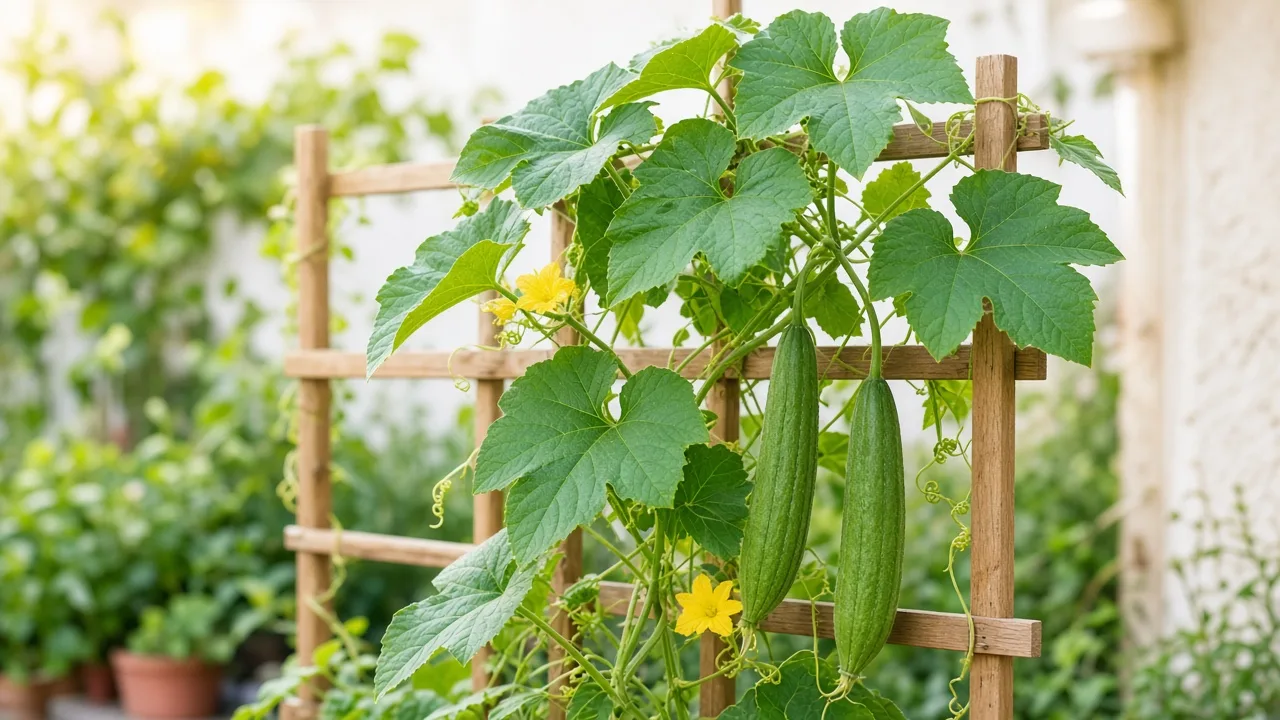
Sponge Gourd Pruning Guide: Trellis Training & Thinning
Sponge Gourd Pruning Guide: Trellis Training & Thinning
First, snip only yellow, brown, or clearly damaged leaves at the base of each petiole with clean bypass pruners or scissors. Do not pinch the main growing tip or remove side shoots until the vine has reached your trellis and at least a few healthy leaves are drawing energy from full sun. For growth habit, harvest goals, and trellis setup, see the Sponge Gourd overview.
Quick answer
Sponge gourd (Luffa cylindrica) is a fast annual tendril vine, not a woody shrub—pruning means training, thinning, and cleanup, not hard rejuvenation. After removing yellow or damaged lower foliage, your next decisions depend on harvest goal: pick young nenua often and keep airflow, or leave chosen fruits to mature for loofah fiber and thin competitors so those gourds size up. RHS lists formal pruning as unnecessary, yet growers routinely pinch crowded growth, redirect stems to a trellis, and limit fruit load so large gourds do not rub and rot. Work during active warm-season growth; avoid heavy cutting during cold snaps or right after transplant shock.
What pruning does for sponge gourd
Left alone on fertile soil, sponge gourd can send out multiple stems and climb several metres on support (RHS cites roughly 2.5–4 m height on a trellis). Long internodes, heavy leaves, and bulky fruit make airflow and trellis access the main reasons to trim—not cosmetic shaping.
Pruning and training on this crop usually serves four jobs:
Cleanup removes yellow lower leaves and damaged tissue so you can see stem health and reduce damp, crowded foliage that favors powdery mildew on cucurbits. Trellis training guides tendrils onto wires or mesh so fruit hangs clear of wet soil (The Spruce notes ground-grown luffa tends to curve and stay wetter). Early stem thinning concentrates vigor into fewer sturdy leaders when seedlings push multiple shoots (Gardening Know How). Fruit and flower thinning opens space for remaining gourds and, late in the season, can push energy into fruits you are drying for sponge fiber (The Spruce).
Pruning cannot fix deep shade, drought stress, or waterlogged roots—correct light and watering first if vines are pale, wilted, or dropping blossoms.
Kitchen harvest vs loofah sponge goals
The same species follows two pruning rhythms:
| Goal | Pruning emphasis | Fruit on the vine | Typical outcome |
|---|---|---|---|
| Kitchen nenua/galka | Moderate side-shoot control; harvest young fruit often | Many small pickings; skin still soft | Steady kitchen supply; fewer sponges mature |
| Loofah sponges | Thin clusters; protect 2–4 chosen gourds; late flower pinching | Selected fruits left to brown and dry on the vine | Larger fiber skeleton; needs a long warm season |
RHS notes young fruits are edible while green and cylindrical, while mature fruits yield fibrous sponge after the skin is removed—mixing both goals on one plant works, but heavy young harvest reduces how many fruits reach sponge quality.
Why RHS says “no pruning required”
RHS plant guidance states “No pruning required” in the cultivation sense: the vine does not need annual hard cutting like a fruit tree. That is not permission to ignore a 6 m tendril on a terrace. In practice, Indian and subtropical growers still pinch tips, remove lower side shoots, and thin fruit—the same discretionary training used for cucumber-family vines (USDA Plants classifies sponge gourd as an annual vine in the cucumber family).
When to prune sponge gourd
Early training window
Start discretionary cuts once seedlings are established outdoors (or in a large final pot) and you have trellis lines in place—usually two to four weeks after transplant, when multiple stems or congested lower growth appear. Gardening Know How recommends waiting until young plants show at least four stems before cutting those early shoots back to the main stem to promote orderly growth toward the trellis.
Pinch or prune during morning dry weather so large leaves dry quickly. Avoid trimming the same day you move a root-bound seedling; stabilize soil moisture and repotting stress first.
Mid-season thinning and height control
Through peak summer growth, revisit vines every two to three weeks: remove new side shoots that escape the trellis plane, tuck or clip tendrils that wrap competing stems, and thin touching fruits so each retained gourd has air space. If the main vine races past reachable height, pinch the tip above a leaf node once the leader is trained to the top wire—this redirects energy to lateral fruiting stems rather than endless length (The Spruce describes pinching tips to manage size).
Late season for sponge-quality fruit
For sponge harvest, fruits need a long frost-free run—often on the order of 150–200 warm days from sowing to dry fiber (The Spruce; RHS emphasizes a long season for mature fruits). About two months before your expected first frost (or before cool nights stall growth), consider pinching new flowers and tiny fruits so the plant finishes sizing gourds already on the vine (The Spruce). In frost-free tropical climates, use slowing vine growth and fruit color change as your cue instead of a calendar frost date.
What to check before cutting
Spend a minute on these checks:
- Trellis attachment — can the next 30–60 cm of growth reach support without snapping?
- Flower types — narrow male flowers on long stalks often open first; female flowers on short stalks with a tiny fruit shape behind the bloom need bees or hand pollination before you remove nearby foliage.
- Moisture stress — midday wilt from dry soil is not fixed by pruning; water deeply per your watering guide before structural cuts.
- Disease pattern — powdery white patches on leaves mean prioritize airflow and sanitation, not aggressive defoliation.
- Harvest plan — decide whether this stem feeds the kitchen or a reserved sponge fruit before you pinch its tip.
If vines are pale and stretched with few flowers, improve full sun (overview and light guide) before heavy thinning—cutting a weak vine often yields fewer fruit, not more.
The first cut to make
After your inspection, the first cut remains one yellow or damaged lower leaf (or a small cluster of them), sliced at the petiole base without nicking the main stem. Bag diseased foliage instead of composting it when mildew is present.
Only after that cleanup—and after the vine touches the trellis—should you consider pinching the first male flowers or thinning an extra side shoot. Gardening Know How suggests pinching early male blooms so the plant invests in stem and leaf growth before fruit load rises; skip this if bee activity is already strong and you want early kitchen picks.
How to prune sponge gourd step by step
Use sharp bypass pruners wiped with alcohol between plants. Wear gloves if stems irritate your skin; RHS flags harmful if eaten except young fruit and warns against bitter fruit for people and pets—discard bitter gourds rather than tasting.
Early stem consolidation on young plants
When several shoots emerge from the base:
- Choose one or two strongest stems to carry the crop.
- Cut weaker starter shoots back to the main stem junction, not flush with soil (leave a small stub to avoid crown damage).
- Guide the keeper stems to the trellis with loose ties; let tendrils grip first.
Gardening Know How describes cutting all first stems back to the main stem when at least four are present—a aggressive but effective way to tame early bushiness before length explodes.
Side shoots and lower growth
Many growers remove side branches and flowers in the lowest 40–50 cm (16–20 in.) [Flagged: clearance height is practice-based grower guidance, not stated on the RHS Luffa profile] so airflow improves around the crown and slugs stay away from young fruit—especially on ground-level beds. Above that zone, retain side shoots that sit on the trellis plane and remove those growing inward or crossing.
When a leader grows past your support height, pinch the tip above a node and allow one well-placed lateral to continue upward in a “renewal” pattern if you need continued length in a long season.
Flowers, fruit clusters, and tip pinching
- Male flowers first — optional pinch while the vine is still climbing; stop pinching males once female flowers set fruit reliably.
- Crowded clusters — remove the smallest fruit in a tight group so neighbors can reach full length without scarring.
- Kitchen track — harvest young tender gourds frequently; this is harvest pruning and replaces some manual fruit thinning.
- Sponge track — mark chosen fruits with ribbon; remove competing large fruit on the same node that would shade or deform your keeper.
Where to cut on the vine
Cut side shoots just above a node where a leaf meets the stem, angling the blade so the stub does not hold water. For leaf cleanup, cut petioles at the stem without gouging green bark. Fruit thinning uses a knife or pruners on the fruit stalk (peduncle), not on the main vine.
Avoid stripping every leaf along a fruiting section—leaves feed developing gourds. Target shaded, diseased, or duplicate foliage first.
How much you can safely remove
Treat one session as “light to moderate”:
- Cleanup only — any number of fully yellow or damaged leaves is fine.
- Structural thinning — avoid removing more than roughly one-third of live leaf area on a single stem at once.
- Fruit thinning — taking many young kitchen gourds is normal for vegetable production; for sponge mode, keep two to four fruits per strong plant in short seasons unless you have exceptional length and fertility (fertilizer timing still matters more than brute pruning).
If the vine wilts for more than a day after a heavy cut, shade lightly, restore even moisture, and pause further trimming for 10–14 days.
What not to cut
- The only main stem on a young plant before a lateral is established.
- All leaves around a developing sponge fruit you intend to keep through maturity.
- Female flowers on plants with poor fruit set until you confirm pollination (look for swelling behind the bloom within days).
- Bitter fruit for tasting—remove and discard; bitterness in cucurbits can signal compounds unsafe to eat (RHS).
Do not prune as a substitute for pest control or fungicide when mildew is advanced—remove the worst leaves, improve airflow, and consider whether the plant is too crowded for the space.
Pruning yellow, damaged, or diseased leaves
Lower yellow leaves are common as the canopy lifts. Remove them promptly. Leaves with powdery mildew should be bagged and binned; sanitize tools before moving to other cucurbits. After cleanup, morning watering at the soil line keeps remaining foliage drier than overhead sprays.
Aftercare and recovery
After any non-cleanup session:
- Water deeply if soil was dry; do not flood the crown.
- Check trellis ties so new growth does not constrict stems.
- Resume light fertilizer only when new tendrils and leaves are actively expanding—nitrogen right after heavy defoliation can push leaves at the expense of fruit.
- Watch for new shoots at nodes below a tip pinch within 7–14 days in warm weather.
Signs pruning helped
- Fruits hang separated on the trellis with fewer rub marks and rot spots.
- Air moves through the leaf canopy when you wave your hand at the base.
- New lateral growth appears after tip pinches instead of a single endless leader.
- Kitchen harvests stay tender because you pick before gourds turn fibrous.
- Sponge fruits swell steadily and begin browning on the vine toward season end.
Mistakes to avoid
- Pruning before installing support — long stems snap when dragged.
- Removing too many leaves during heat waves — sunscald and wilt follow.
- Pinching all flowers on under-pollinated plants — zero fruit is worse than crowded fruit.
- Chasing sponge size while picking every young gourd — the plant cannot do both maximally on one stem.
- Composting mildewed vines in humid monsoon climates — spores persist; hot compost or disposal is safer.
- Ignoring bitterness — treat unexpected bitter flavor as a discard signal, not a cooking challenge.
When not to prune
Delay structural thinning when:
- Nights are cool and growth has stalled.
- The seedling was just transplanted or repotted within the last week.
- Soil is waterlogged after heavy rain—roots need oxygen, not more stress.
- You lack bee activity and have not hand-pollinated—preserve flowers until fruit set improves.
RHS lists the species as tender (H1C); frost kills the vine outright—there is no dormant-season hard prune, only end-of-season removal.
Using trimmings
Soft young tips removed early in the season are sometimes cooked in cucurbit-growing regions, but only if flavor is mild—never eat bitter trimmings. Tough stems and mildewed leaves belong in the bin, not the compost pile near next year’s vine bed. Mature sponges are processed from marked fruits, not from random pruned gourds.
Conclusion
Sponge gourd pruning is optional in name but practical in the garden: start with damaged leaf cleanup, train stems to a sturdy trellis, thin crowded shoots and fruits for airflow, and align pinching with whether you want tender nenua or dry loofah fiber. Light, frequent judgment beats one severe chop in mid-summer.
Related Sponge Gourd guides
- Sponge Gourd overview — harvest goals, mature size, and pet caution
- Light — full sun and stretched growth
- Watering — moisture for fruit swell and recovery
- Soil and fertilizer — fertility without excessive leafiness
- Propagation — sowing, pollination, and saving seed from non-bitter fruit