How to Grow and Care for Cup Plant
Grow cup plant in sun and moist soil, start it from seed, and manage its vigorous spread. Learn about spacing, watering, pruning, and wildlife value.
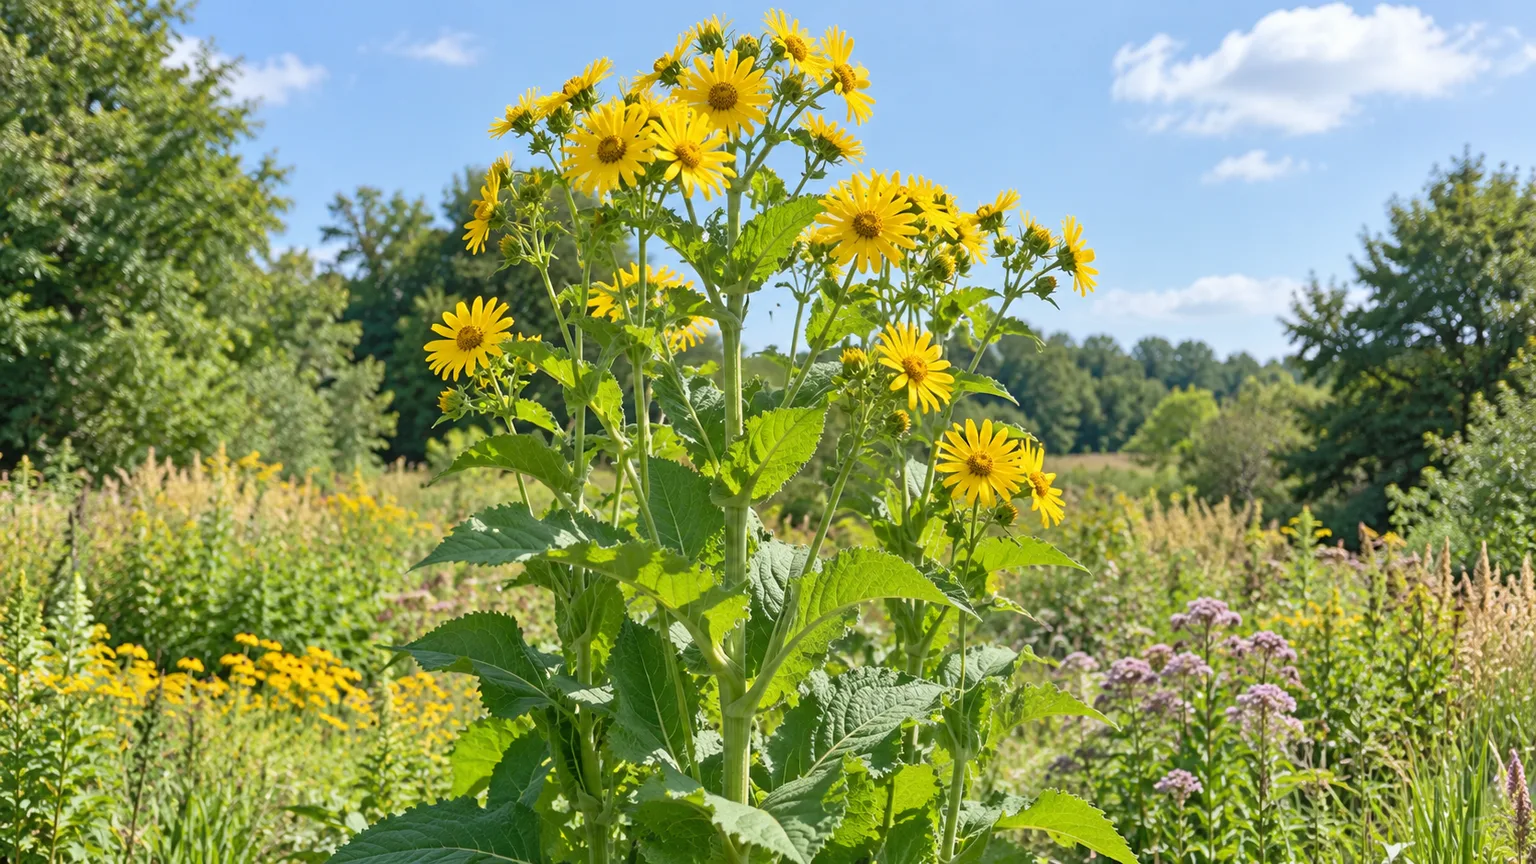
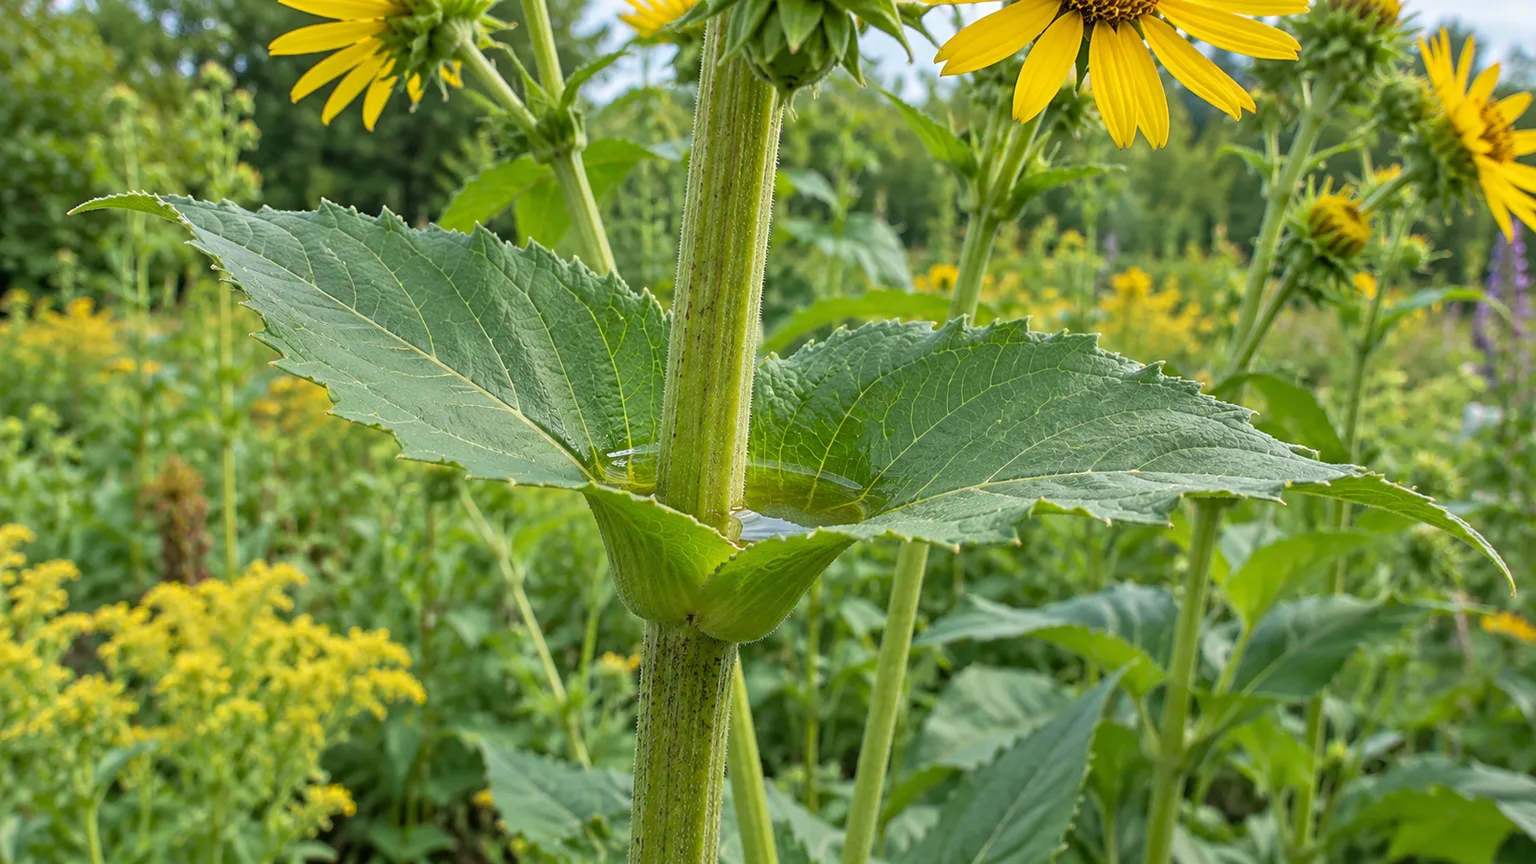
Cup plant (Silphium perfoliatum) is a tall, yellow-flowering native perennial with an unusually useful feature: opposite leaf pairs join around the stem and hold rainwater. It is also a plant that can quickly dominate a small bed. Before you buy seed, decide whether you can give it a sunny, roomy place where its height and seedlings will be welcome.
| Care point | What to provide |
|---|---|
| Light | Full sun is best; a little shade is tolerated, but tall stems may need support |
| Soil | Moist, reasonably fertile soil; it tolerates clay and occasional flooding once established |
| Water | Keep young plants evenly moist; water mature plants during extended dry spells |
| Mature size | Commonly 6–8 feet tall; favorable sites may produce taller stems |
| Spacing | Allow at least 3 feet for an individual plant and more when you want a distinct, accessible clump |
| Bloom | Yellow, daisy-like flower heads from summer into early fall; timing varies by region |
| Main upkeep | Control volunteers, stake only if needed, and cut stems down after they die back |
Is Cup Plant Right for Your Garden?
Choose cup plant when you want a bold back-of-border perennial, a native meadow component, or a large plant for a rain-fed edge that stays moist without being permanently submerged. The yellow flowers, unusual leaf cups, and seeds can make it an appealing wildlife plant: North Carolina State Extension reports that bees and other insects use the flowers, while birds may use the leaf cups and eat the seeds. The plant is not subtle; it is best treated as a structural feature rather than a filler between small flowers. (NC State Extension, Morton Arboretum)
Skip it for a narrow foundation bed, a formal border that must remain precisely contained, or a site where you cannot reach seedlings. A mature plant commonly rises 6 to 8 feet and may grow taller in favorable conditions. Its large leaves can shade neighbors, and its seeds can produce new plants beyond the original clump. Those traits are useful in a meadow with room to naturalize; they are a maintenance cost in a small mixed border.
“Native” also needs a location attached to it. Cup plant is native across parts of eastern and central North America, but its natural range is patchy at the edges; NC State notes that it is rare and geographically restricted within North Carolina. If supporting local habitat is your priority, check whether the species is native to your county or ecoregion and choose regionally appropriate seed when available. A plant can be native somewhere in the continent and still be a poor ecological fit for a particular garden. (NC State Extension, Morton Arboretum)
How to Identify Cup Plant and Understand Its Growth
Look for a thick, usually four-sided stem and pairs of broad, rough-edged leaves arranged opposite one another. The leaf bases fuse around the stem, making a shallow basin that can hold rainwater; this is the quickest way to distinguish cup plant from other tall yellow-flowered perennials. The leaves often cross at right angles from one level to the next, and the branching flower stalks carry many daisy-like yellow heads. (Morton Arboretum, GrowItBuildIt)
Cup plant grows from a substantial root system, not a shallow annual root ball. A new seedling may look modest in its first spring, then build height and flowering stems as it establishes. NC State Extension says seed-grown plants may not flower until their second season; some growers report earlier blooms under favorable conditions, so treat first-year flowers as a bonus rather than a promise. A young start is also far easier to move than a mature plant with deep roots. (NC State Extension, GrowItBuildIt)
Choose a Site Before You Plant
The right site solves most cup plant problems in advance. Choose a sunny place with enough vertical clearance, a root zone that stays reasonably moist, and an edge where you can inspect for seedlings. Do not place it where a seasonal gust will push flower-laden stems into a walkway, or behind plants that need uninterrupted sun. The Morton Arboretum lists cup plant for full to partial sun and moist soil, while NC State and Fine Gardening emphasize its tall habit and need for room. (Morton Arboretum, Fine Gardening)
Think in terms of the mature plant, not the small nursery pot. Give a solitary specimen about 3 feet or more of working space on all sides if you want to reach the base and remove volunteers; use a wider allowance if you want it to read as a separate architectural clump. In a naturalized planting, several stems can be allowed to merge into a colony, but place the colony behind shorter species or at a meadow edge where spread is manageable. This is a landscape-design decision, not just a spacing number.
Light: Give It Sun and Room to Rise
Full sun produces the strongest flowering and usually sturdier stems. Cup plant tolerates some partial shade, but less light can reduce flowering and make an already tall plant more likely to lean toward open sky. If your garden is windy, choose the sunniest sheltered position available rather than a narrow exposed corner; the Royal Horticultural Society specifically notes that staking may be needed on shady or windy sites. (NC State Extension, Royal Horticultural Society)
Do not try to solve shade by feeding the plant. Fertilizer will not replace the light needed for sturdy growth, and extra nutrients may make a lush, top-heavy plant more difficult to support. If a nearby shrub or tree has grown over the bed, move a young cup plant while it is still manageable or accept reduced flowering; avoid digging up an established root system unless you are prepared for a major excavation.
Soil: Moisture Matters More Than Perfect Texture
Cup plant performs in moist soils and tolerates clay, wet sites, and occasional flooding. It does not require a special potting blend or a highly engineered native-plant bed. Ordinary garden loam is fine, and you can improve compacted soil across a broad planting area with modest organic matter rather than filling a small planting hole with a pocket of loose compost. The latter can hold water differently from the surrounding clay and does little to improve the full root zone. (NC State Extension, Morton Arboretum, Fine Gardening)
“Tolerates wet soil” does not mean the crown should sit in stagnant water year-round. A moist, well-drained site gives the plant dependable growth while allowing oxygen to reach the roots; a wet meadow edge or rain garden can work if it drains between storms. Conversely, cup plant can survive some drought after establishment, but long dry spells can cause lower leaves to drop, buds to brown, and flowers to abort. A dry site is a compromise, not the condition to choose for maximum bloom. (NC State Extension, Morton Arboretum)
Plant a Nursery-Grown Cup Plant
Plant a container-grown start in spring after the ground is workable, or in early fall while there is time for roots to settle before freezing weather. Water the pot first, slide the root ball out, and loosen only roots that are circling tightly. Set the crown—the point where stems emerge from the roots—at the same depth it grew in the pot. Backfill with the native soil, firm it gently, and water slowly so the root ball and surrounding ground make contact.
Water the new plant whenever the upper few inches of soil begin to dry during its first growing season. That does not mean keeping it saturated: check the root zone after rain and wait if it is still wet. A wide, shallow mulch layer can reduce competition while the plant establishes, but keep mulch away from the crown and remove weeds before their roots intertwine with the young cup plant. Set a stake at planting time only if the site is exposed; adding a stake later can damage the growing root mass.
Grow Cup Plant From Seed
Seed is often the easiest way to find cup plant, and sowing it directly avoids the stress of transplanting a seedling with a developing root system. The seed is a small, flat, winged achene. Harvest ripe heads only when they have dried and the seeds release readily; wear gloves if the mature stalk is rough, then store cleaned seed in a labeled paper envelope in a cool, dry place until sowing. For local habitat work, use seed with a known regional source rather than collecting from a wild population where collection is restricted or ecologically unwise.
Fall sowing is the simple choice: the seed stays outdoors through natural winter temperature changes, and the gardener does not have to manage a refrigerator bag or an indoor seedling tray. Spring sowing can work too, but cold-moist stratification improves the odds for seed lots that need it. Published recommendations vary: an Ontario agricultural profile and a USDA NRCS plant guide call for about 12 weeks, while experienced native-plant growers often use roughly two months. Follow the seed supplier’s instructions when available; a cold-moist period in the 8-to-12-week range is a reasonable starting point when no lot-specific directions are provided. (Ontario Ministry of Agriculture, Food and Rural Affairs, USDA NRCS Cup Plant Plant Guide, GrowItBuildIt)
Fall Sowing: Let Winter Do the Chilling
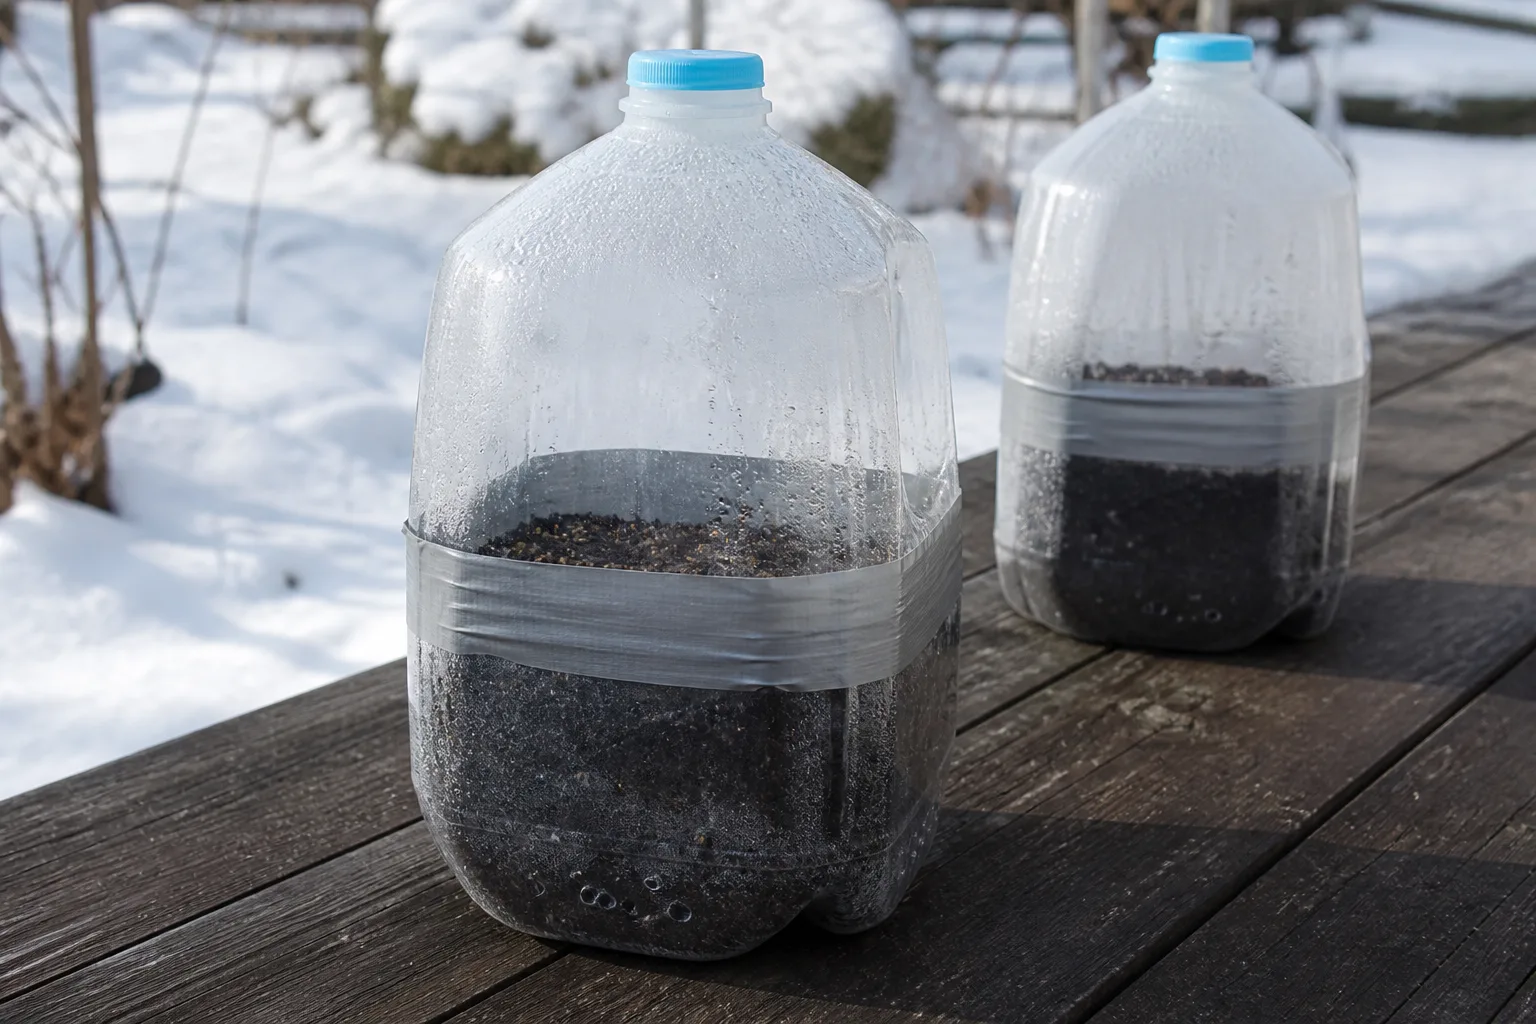
Clear weeds and thick thatch from a permanent, well-drained seed bed in late fall, after the main weed flush has slowed but before the soil freezes solid. Press seeds lightly into the surface and cover them only as directed on the packet; do not bury them under a deep layer of soil or mulch. Mark the spot with a durable label and leave it undisturbed. Natural rain and winter cold provide the seasonal cycle while the marker prevents you from mistaking the small spring seedlings for weeds.
If birds or runoff are a concern, sow into outdoor pots or a protected nursery bed rather than scattering seed into a finished border. Keep the seed mix lightly moist, not waterlogged, and check containers periodically during spring; move seedlings to their final positions while still small. Winter sowing in ventilated outdoor containers follows the same logic, provided the containers do not dry out as the weather warms. (USDA NRCS Cup Plant Plant Guide, GrowItBuildIt)
Thin seedlings after they are easy to identify, leaving the strongest plant where you want a permanent clump. Do not transplant every volunteer. Cup plant grows large, and keeping extra starts “just in case” is how a controlled patch turns into a crowded bed. In the first season, water during dry weather and keep competing weeds back; the plant may spend more energy establishing roots than making flowers.
Spring Sowing: Cold-Moist Stratify First
To start seed in spring, mix it with a small amount of barely damp, clean sand or seed-starting medium, place the mix in a labeled closed container or bag, and refrigerate it for the period recommended by the supplier. The mix should feel cool and moist, not drip when squeezed. Check it weekly for drying, mold, or premature sprouts; if seeds begin to germinate in the refrigerator, sow them promptly rather than letting their roots grow into the storage medium.
After chilling, sow in deep cells or individual pots so roots have room and seedlings can be moved with minimal disturbance. Keep the medium evenly moist and put the containers in bright light once seedlings emerge. Harden them off before planting outside, then set them in their permanent location while they are still young. The USDA NRCS guide advises transplanting young plants because established cup plant roots are difficult to move. (USDA NRCS Cup Plant Plant Guide, NC State Extension)
Water During Establishment, Then Respond to Weather
Newly planted cup plant needs consistent moisture while roots spread beyond the nursery root ball. Water deeply when the root zone begins to dry, adjusting for rain and soil texture; sandy soil may need a closer check than clay. A slow soak is more useful than frequent surface sprinkling because it reaches the developing roots. Once the plant has put on steady growth and its roots are established, reduce routine irrigation and water during extended hot, dry weather.
Use the plant and soil together to diagnose stress. Lower leaves naturally fade or drop as the plant matures, so a few bare lower nodes near flowering are not automatically a problem. If many leaves brown while the soil is dry, water deeply and check again. If the bed is already wet, adding more water is the wrong response; inspect drainage, stems, and leaf undersides for other stressors. NC State Extension notes that drought can cause leaf loss, stunted growth, browned buds, and dropped flowers. (NC State Extension)
Fertilizer: Skip Routine Feeding
Cup plant is vigorous without regular fertilizer in a typical garden soil. If growth looks weak, check whether it is shaded, dry, crowded by weeds, or still in its establishment year before adding nutrients. Feeding a healthy plant is unlikely to improve its garden role and may encourage excessive height or soft growth. If a soil test identifies a real deficiency, correct that specific issue at a modest rate; otherwise, leave the soil alone or use a thin layer of finished compost over the bed. Fine Gardening describes the plant as adaptable in moderately rich soil, not as a perennial that needs a fertilizer schedule. (Fine Gardening)
Keep Tall Stems Upright
Sturdy stems can still lean or topple when a tall plant is grown in shade, exposed to strong winds, or carrying heavy flower clusters. Start with placement: a sunny spot protected from the strongest gusts is better than tying every stem upright after it bends. If a young plant needs support, set a discreet stake early and loosely tie the stem with a soft garden tie, leaving room for it to thicken. A wide, open support ring can hold several stems without pinching them together.
Do not cut a healthy plant in half as a routine height-control trick. That can remove flower buds, produce awkward side growth, and does not solve poor placement. If height is consistently a problem, move or remove the plant while young, or choose a shorter species for that site. The RHS recommends staking cup plant in partial shade or windy exposure; the Morton Arboretum also lists wind-related leaning among the plant’s practical concerns. (Royal Horticultural Society, Morton Arboretum)
Control Self-Seeding and Local Spread
Cup plant can seed freely. That is useful if you want a broad native patch and inconvenient if seedlings appear among smaller perennials. The easiest control point is before the seed heads dry: remove spent flowering stems when you have had enough blooms, or leave a selected portion for wildlife and seed collection. In spring, pull unwanted seedlings while their roots are small and the soil is moist. A quick weekly check during the seedling flush is usually easier than trying to excavate a mature plant later. (NC State Extension, GrowItBuildIt)
Descriptions of its spread do not always emphasize the same mechanism: many garden profiles stress self-seeding, while some regional references describe creeping rootstocks as well. Plan for seedling pressure regardless, and look for shoots emerging just beyond the main clump. Deadheading prevents new seed; it will not stop an underground root from extending. If the patch is too large, cut unwanted shoots and dig out the crown and connected roots while they are still young, then return to the edge over the next growing season. Avoid relying on mowing alone in a mixed border, because it can damage neighboring plants and may miss the root system.
Deadhead Only When You Want Fewer Seedlings
Removing every flower head sacrifices late-season nectar and the seed crop that birds may use. A practical middle ground is to let the first flush bloom, then deadhead enough stems to limit seed while leaving selected heads standing. If the plant is growing in a contained meadow and you want it to naturalize, let more heads mature and thin seedlings selectively the next spring. If it is close to a lawn, path, or vegetable bed, cut the fading flower heads before the achenes dry and scatter.
Propagate or Move a Plant While It Is Young
Seed is the simplest propagation method for most home gardeners. Division is possible, and the Royal Horticultural Society lists both seed and division, but digging an established cup plant is hard work because the root system becomes deep and difficult to remove. If you want to move a plant, act while it is a small seedling or young offshoot. Lift as much root as practical, replant promptly at the same depth, water well, and keep it evenly moist until new growth resumes. Expect some transplant setback.
Do not divide a mature clump just because it is large. If the actual goal is containment, remove the outer volunteers or shoots you do not want rather than trying to relocate a large piece of the parent. When disposing of unwanted material, remove ripe seed heads from the garden so they do not dry in the compost pile and spread later. (Royal Horticultural Society, NC State Extension)
Troubleshoot the Few Problems That Matter
Cup plant is generally resilient, but it is not immune to stress. Red aphids may gather on the undersides of leaves; check whether they are causing meaningful damage before taking action, because many insects around the plant are pollinators or predators. Tall stems can fall in wind, especially in shade or after flowering. The Morton Arboretum also records flower-head clipping weevils and fungal blight as possible issues, although serious pest or disease pressure is not typical in most home landscapes. Avoid treating the whole plant based on one damaged leaf or clipped head. (NC State Extension, Morton Arboretum)
When leaves brown, check three things in order: whether the soil is dry, whether the browning is limited to older lower leaves, and whether stems or flower heads show localized damage. Dry soil plus widespread leaf loss points toward drought stress; lower-leaf decline as flowering begins may be normal; a damaged flower head may have been clipped by an insect or broken by wind. Correct the cause you can confirm instead of immediately applying fertilizer or pesticide. If a spreading fungal problem affects many stems, remove affected material and seek local extension guidance for diagnosis before using a treatment.
Seasonal Care Through the Year
Late fall and winter: Sow seed in a permanent bed or outdoor containers if you want natural cold stratification. Leave healthy stems standing if you value seed for birds and winter structure, but mark the plant’s location so spring seedlings are not mistaken for weeds.
Early spring: Remove dead stems before new shoots become tall. Identify and pull unwanted seedlings while small, then transplant only the young starts you have a clear place for. Apply water during dry spells while seedlings establish.
Late spring and summer: Check the soil during prolonged heat, not on a fixed weekly schedule. Add support before stems lean if the site is exposed. Enjoy the flower heads as they open; local bloom timing varies, with many references placing flowering from midsummer into early fall. (NC State Extension, Morton Arboretum)
After flowering: Decide how much seed you want before the heads dry. Cut selected stems for a tidier bed or fewer volunteers, or leave some seed heads for wildlife. Once the stems die back, cut them to the ground and remove any diseased debris. Keep the young plantings around the cup plant visible and uncrowded so you can spot new seedlings next year.
Conclusion
Cup plant is easiest to grow when you plan for the plant it becomes: a tall, sunny-site perennial with large leaves, summer-to-fall flowers, and the capacity to seed beyond its first footprint. Give it moist soil, establishment water, and a location where a colony will be welcome; do not plant it in a tight bed and hope pruning will make it compact.
For the lowest-effort start, sow seed outdoors in fall or follow the supplier’s cold-stratification directions for spring. Keep young plants weeded and watered, then manage mature growth mainly by checking seedlings and choosing which seed heads to leave. If you make the space decision first, cup plant can be a striking, wildlife-supporting part of a native garden rather than an annual containment project.



