How to Repot an Orchid Plant Step by Step
Learn how to repot an orchid without tearing healthy roots. See how to handle aerial roots, old moss plugs, root pruning, plant orientation, and stabilization.
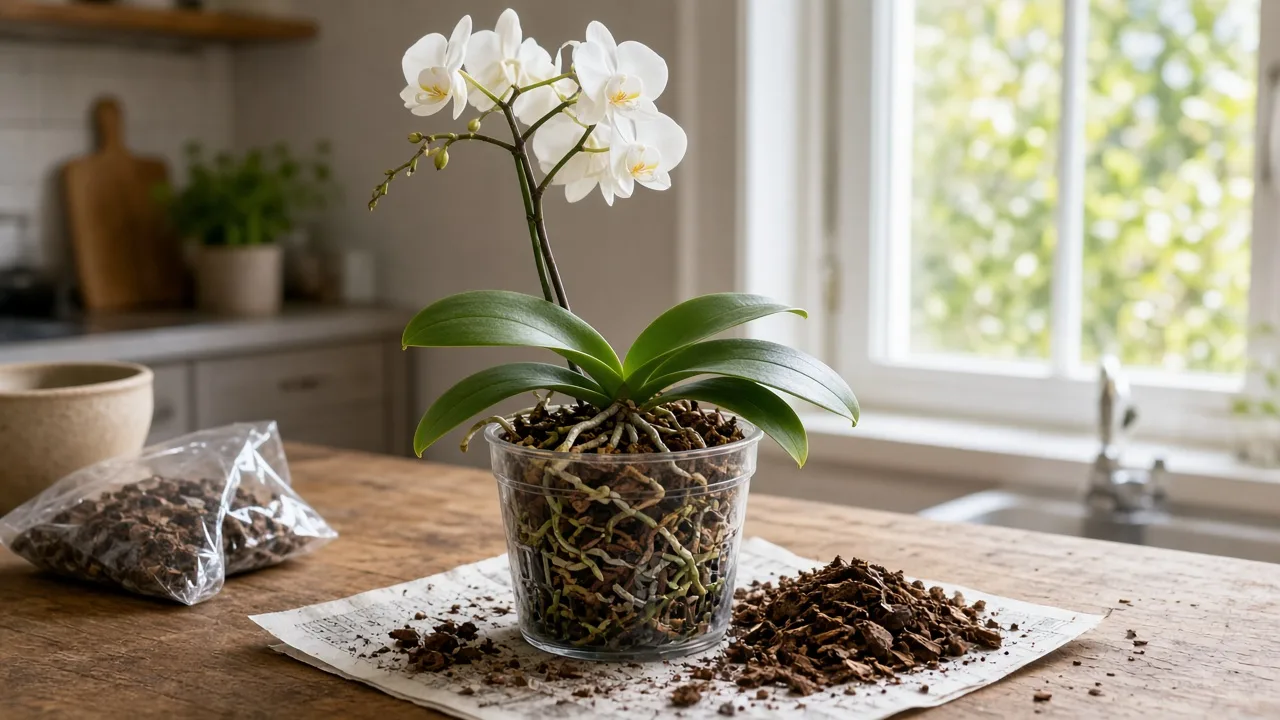
The difficult part of repotting an orchid is working around its roots. Some are threaded through pot slots, some wrap tightly around the inside wall, and some rise into the air instead of growing down into the medium. The safest approach is to move the container and loose medium away from the roots wherever possible, rather than forcing the root mass to conform to the new pot.
This guide focuses on the hands-on decisions that come up once you start handling the plant: how to free it, how to tell which roots to keep, what to do with a dense nursery plug, and how to place the crown or rhizome without burying it. For the separate question of whether a healthy orchid should be repotted now or after bloom, use the guide to when to repot orchids.
Map the Orchid’s Growth Pattern Before You Pull
Before disturbing the pot, find the plant’s growth point. Most grocery-store orchids are Phalaenopsis, which grow upward from one central crown; Cattleya, Oncidium, and Cymbidium commonly grow sideways along a rhizome, adding pseudobulbs one after another. The distinction matters because a Phalaenopsis is placed upright, while a sympodial orchid needs open space in front of its newest growth.
Orchid roots are not just anchors hidden below the leaves. Their spongy outer layer, called velamen, absorbs water quickly and helps the root grip a surface, and the American Orchid Society explains that orchid roots also contribute to gas exchange. A tightly compressed root bundle can therefore be harmed even when it is surrounded by moisture (American Orchid Society).
Phalaenopsis: Protect the Central Crown
Find the point where the leaves meet; this is the crown. Hold the plant at the firm base of the leaves while supporting the root ball from beneath, and keep fingers away from new root tips. Do not use a leaf, the flower spike, or a single exposed root as a handle.
Plan for the crown and lower leaf joints to remain above the new medium. If the plant is leaning, rotate the root mass to balance its weight over the pot, but do not twist the crown just to make every root face downward. A few roots left outside are safer than a plant forced into an unnatural position.
Sympodial Orchids: Keep the Rhizome Moving Forward
A sympodial orchid’s newest pseudobulb tells you which way the plant is advancing. Place its oldest growth toward the back edge and direct the newest growth toward open space, leaving room for the next section of rhizome to extend. The rhizome should remain at or just above the surface, not buried below a thick cap of bark.
Routine repotting does not require dividing the plant. If division is your separate goal, follow guidance for that genus and retain enough established growth on each division; the American Orchid Society recommends at least three mature pseudobulbs per division. Otherwise, keep the plant in one piece and use the new container to give its next growth direction somewhere to go (American Orchid Society).
Set Up a Clean Release Station
Work over a sink, washable tray, or paper-covered surface. Set out a clean draining pot, the orchid’s usual fresh medium, lukewarm water, sharp clean snips, a blunt chopstick or wooden skewer, and a stake or orchid clip. A blunt tool can move loose bark from between roots; a sharp point tends to puncture velamen when you use it as a lever.
Pre-moisten dry bark and drain it before use. It becomes easier to move around roots and sheds dust, but it should not be dripping wet while you pot. Clemson Extension recommends pre-moistening orchid mix and placing the largest bark pieces near the bottom of the pot; do not substitute ordinary houseplant soil or a gravel layer for drainage (Clemson Extension).
Read Visible Root Clues Through the Pot First
If the orchid is in a clear or slotted pot, inspect the root mass before lifting it. Note which roots are firm, where they emerge, whether a plug of moss is visible in the center, and whether roots have grown through an opening. This quick scan helps you decide where to loosen the pot and where cutting the plastic may be safer than pulling.
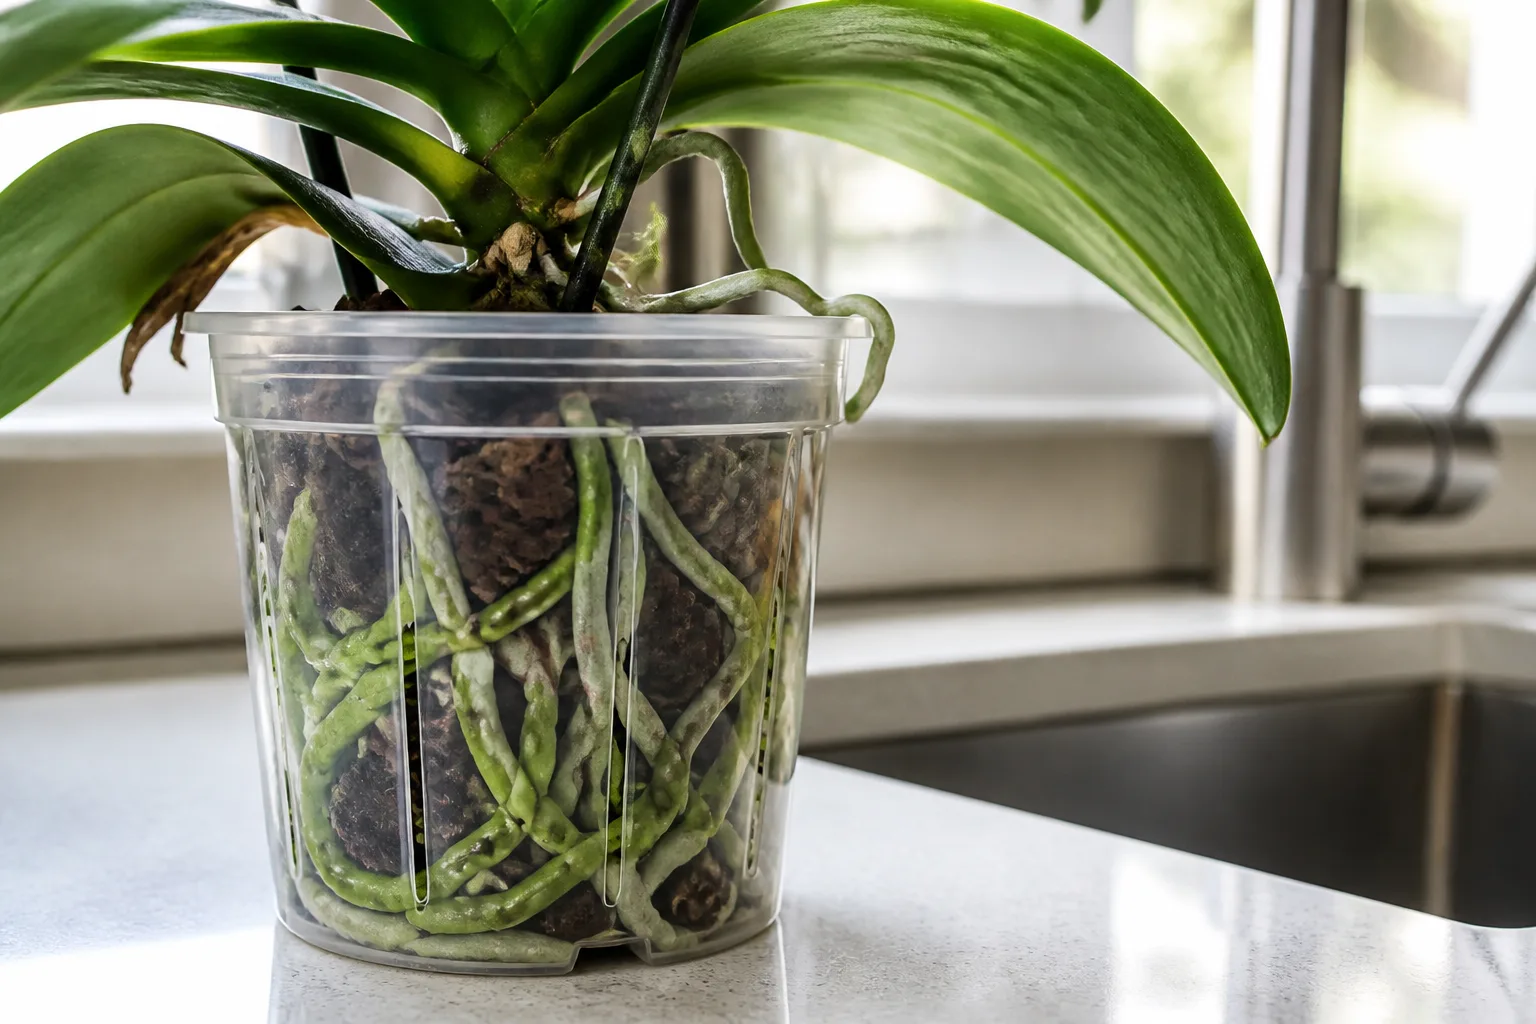
Roots that press against the pot wall do not all need to be moved inward. A firm root touching the plastic can remain where it is; the immediate goal is to free the plant with minimal tearing, not to make the roots look evenly distributed before they have even been inspected. A clear pot is useful because it lets you see that structure before you begin.
Remove the Container Around the Root Mass
If the medium is dry and roots seem brittle, water the orchid the day before you plan to work. Moist roots tend to flex more easily, but do not soak an already saturated, foul-smelling root ball; more water will not release a plug that is holding the plant tightly. Take a few minutes to feel where the pot gives before applying more force.
With a flexible nursery pot, squeeze and rotate its sides to break the grip between plastic and roots. Ease the root mass outward while supporting it underneath. If the root ball stays put, slide a blunt label between the container and medium, or cut the inexpensive pot into strips and peel the strips away one at a time.
Free Roots Caught in Drainage Slots
A root growing through a slot should not be pulled backward through the same narrow opening. Flex the pot away from the root, then widen or cut around the slot so the root can stay in its natural direction. If the plant has several roots threaded through the base, removing the bottom of the disposable pot may be quicker and safer than trying to release them one by one.
Do not clip a sound root just because it is hard to free. If the root is firmly wedged and the container can be cut, sacrifice the pot; if the root tip is already damaged, remove only the portion that has collapsed or torn. Treat each snag as a decision about which material is expendable—the plastic or the root—not as a test of how much force the plant can withstand.
Release Roots Attached to a Rigid Pot
Roots can cling to porous terracotta, old clay, or a rough inner liner. If the pot exterior can be wetted safely, soak it briefly to loosen the contact, then rotate the pot instead of twisting the plant. When a small inexpensive pot is not worth saving, breaking or cutting it away can be gentler than peeling a root off its surface.
If an orchid is nested inside a decorative cachepot, remove that outer vessel first and check for roots that have grown through the inner pot and into the gap. Keep any attached root supported as you separate the two containers. Never pull the orchid up by its leaves to free a root that is stuck below.
Remove Old Medium in Stages
Start at the outside of the root mass, where loose bark usually falls away with a light touch. Turn the plant slowly and pick away only pieces that release without scraping the roots. Rinse with lukewarm water if compacted media hides the root surface, but use a gentle flow; the aim is to reveal the roots, not scour the velamen clean.
You do not have to remove every fragment. If one small piece of old bark or moss is wrapped around a firm root and resists release, leave it rather than tearing the root’s outer layer. A partial removal that preserves living tissue is better than a spotless root ball with avoidable wounds.
Find and Loosen the Hidden Nursery Plug
Many mass-produced orchids have a dense plug of sphagnum, foam, or compressed growing material under the crown. It may be surrounded by coarse bark, which means the center can stay wet long after the outside looks dry. Once the orchid is out of the pot, look for a difference in texture and gently open a path to the center instead of assuming the whole root ball is one uniform medium.
Moisten a dry plug so it softens, then tease it loose in small pieces. If a mesh sleeve holds it together, snip the mesh open and remove sections while supporting any roots threaded through it. Do not rip the plug away as one lump; if a root is woven through it and remains firm, preserve the root and remove the material you can reach without tearing.
The University of Connecticut Home and Garden Education Center notes that orchids are often sold with roots packed in sphagnum for shipping and advises carefully removing that moss when repotting. Clemson Extension also describes replacing retail moss with bark mix for a better-aerated root zone (UConn Home and Garden Education Center; Clemson Extension).
Decide Which Roots Are Still Viable
Use a gentle pinch rather than color alone. A living root feels firm and springy; when it is wet, its velamen can look green, while a dry root may look silver, white, or gray. A root that is hollow, papery, collapsed, slimy, or mushy has lost structure and will not become firm again after potting.
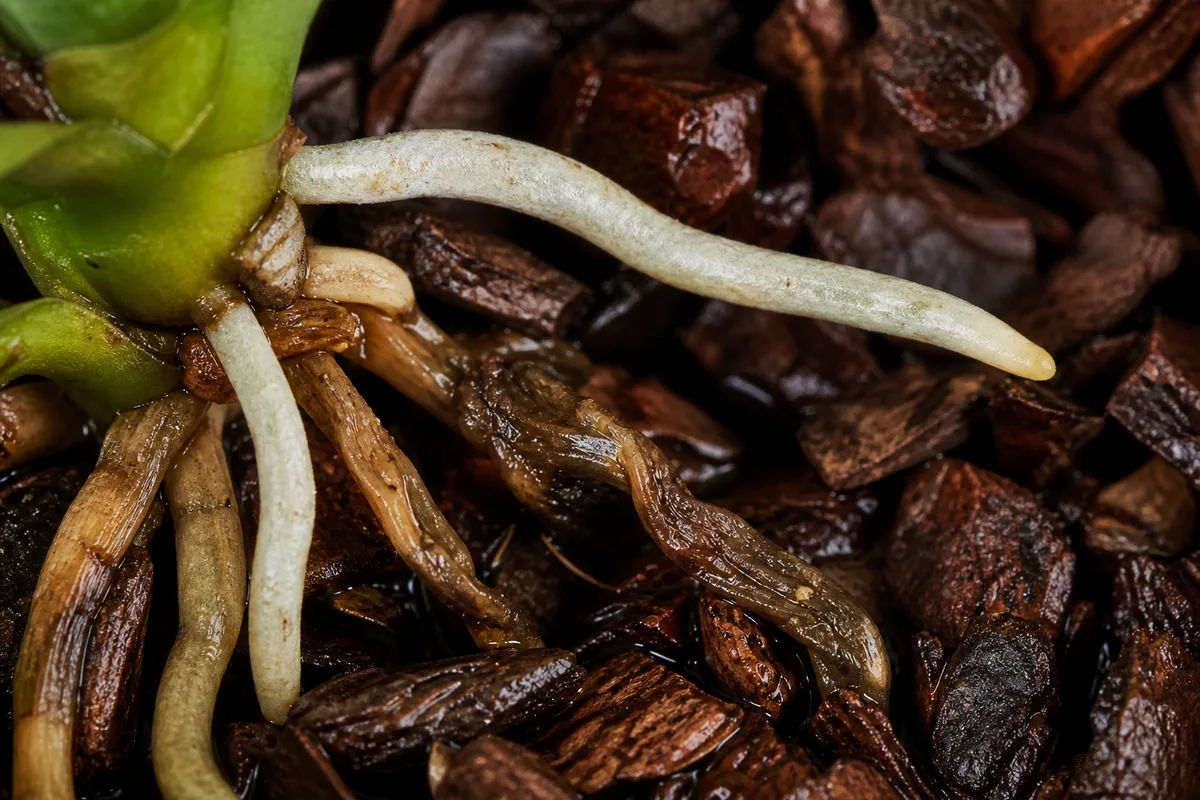
The root close-up illustrates the tactile distinction: a functional root stays substantial, while a rotten section flattens or sheds its outer layer under light pressure. A root can be partly healthy and partly dead, so follow it from the base toward the tip before deciding where to cut. If the color looks unusual but the root remains firm, leave it in place and reassess when it dries.
Prune Only Tissue That Cannot Recover
Use clean, sharp snips to remove a root that is clearly hollow or decayed. When the end is rotten but the section nearer the stem is firm, cut away only the failed part and stop at sound tissue. Clemson Extension’s repotting directions call for sterile snips and dead-root removal; they do not require stripping every imperfect-looking root (Clemson Extension).
Do not cut a root because it is long, silver, kinked, or inconvenient to fit. Roots that are still firm can help hydrate or anchor the plant even if they are older or grow sideways. Clean the tool between orchids, and keep it clear of the crown, where a careless cut can damage the plant’s growing point.
Manage Aerial Roots Without Forcing Them
An aerial root is a normal root growing outside the medium. Leave firm ones outside when they point upward or sideways; exposed roots are common on Phalaenopsis and other epiphytic orchids. Epic Gardening likewise distinguishes normal aerial roots from crowding inside the pot, which is a separate condition to assess.
If an exposed root is flexible after watering, you can guide it toward the pot opening and let it settle where it naturally curves. Stop if you feel a firm bend, hear a crack, or see the velamen whiten along a sharp fold. There is no benefit to forcing every root under the bark simply to make the finished plant look tidy.
Use stability as the deciding test. If the crown or rhizome can be supported while some roots remain outside, keep them outside; if the plant tips because too little root mass is inside the pot, add a stake or clip instead of burying the stem deeper. Cutting healthy aerial roots is not a shortcut for fitting the orchid to a container.
Set the Root Mass at the Right Depth and Direction
For a Phalaenopsis, set the plant upright with the crown visible above the medium and the leaf bases clear of damp bark. Place the roots in their natural arcs, aiming some downward into the pot without folding them sharply against its wall. A low crown can trap moisture between the leaves, while a plant perched too high may wobble.
For a sympodial orchid, put the oldest pseudobulbs near the back edge and point the newest growth into open space. Keep the rhizome at the surface so it can continue growing forward rather than being smothered. The direction of the newest growth is more useful than centering the plant by its flower stems.
Before adding bark, view the plant from the side and above. Confirm the crown or rhizome is visible, the root ball has a stable seat, and any aerial roots you cannot bend are still outside. If the plant is mounted rather than potted, do not strip it from its mount to follow a potting sequence that does not fit its current system.
Backfill Around Roots Without Crushing Them
Hold the orchid in position and add moistened bark in small handfuls. Rotate the pot and guide individual pieces into open spaces with a blunt skewer; use the tool to place a piece, not ram it down. Tap the side of the pot lightly so chunks settle without collapsing into a dense layer.
Some open space is normal in chunky orchid medium. The plant needs enough contact to stay put, but a tightly packed root ball loses airflow and makes water move differently through the pot. Clemson Extension cautions against pressing too hard because mix components can break down; stop when the orchid is supported and the crown remains clear (Clemson Extension).
Stabilize the Orchid With a Stake or Clip
Test the plant gently by nudging its base while holding the pot still. The plant should move with the pot rather than pivot independently, but do not tug hard to prove it is secure. If the root mass is too small to grip the bark, insert a stake along the pot wall and attach the stem or pseudobulb with a soft clip or loose tie.
Place support where it steadies the plant without crossing a new root tip or flower spike. For a sympodial orchid, stabilize older growth while leaving the newest growth aimed toward its open growing space. A heavy decorative outer pot can help balance a top-heavy specimen, but water should never collect around the inner pot after irrigation.
Savvy Gardening’s Phalaenopsis repotting instructions also emphasize keeping the bottom leaf above the container edge and watering the newly potted orchid well, useful reminders when you make the final height and stability checks (Savvy Gardening).
Adjust the Plan When Few Healthy Roots Remain
A plant with substantial root loss needs a smaller, more stable setup, not a larger pot filled with extra wet medium. Cut only the parts that are mushy or hollow, then choose a draining container that holds the remaining roots close enough to support the crown. Stake the orchid so movement does not repeatedly strain the small number of roots that remain.
If nearly all roots are gone, expect recovery to be uncertain and slow. Keep the crown above the medium, give the plant gentle airflow and bright indirect light, and let the root zone dry appropriately for the mix. More watering cannot replace missing roots; repeatedly pulling the orchid back out to inspect it can make recovery harder.
Water Once, Drain, and Verify the Final Position
When the medium is in place, water it thoroughly with lukewarm water and let all excess drain from the pot. UConn recommends soaking the newly potted bark and draining the pot, and Clemson Extension also advises watering copiously after potting; neither instruction means the same future interval will suit every home (UConn Home and Garden Education Center; Clemson Extension).
Check that the plant did not sink as bark settled, that no water remains in the crown, and that the root mass does not rock. Add a few pieces of bark if the mix dropped, but do not press a dense cap over the top to correct a loose stem. Let the pot drain fully before placing it inside a decorative cover.
Conclusion
A careful orchid repot is mostly a series of small decisions about what not to force. Cut away a disposable pot instead of yanking a root through a slot, loosen a hidden nursery plug in pieces, preserve firm roots even when their color looks unfamiliar, and leave aerial roots outside if they resist bending. Then place the crown or rhizome at the surface, settle bark loosely around the roots, and secure the plant with a stake if the root mass cannot hold it yet.
When you finish, the orchid should sit steadily, drain freely, and keep its growth point clear of the medium. Those checks matter more than a perfectly arranged root ball; the healthy roots will continue adapting once the plant is back in its growing conditions.