How to Use Crushed Pine Needles as Mulch
Learn how to use crushed pine needles as mulch, how deep to spread them, whether they change soil pH, and when another mulch is a safer choice.

Pine needles can help a garden, but their main job is to protect the soil surface—not to act as a fast-acting plant food. Spread as a loose mulch, they can reduce evaporation, soften temperature swings, slow some annual weeds, and gradually contribute organic matter. Those effects can make the root zone more stable, which supports healthy growth; they do not guarantee faster growth or replace the right light, water, and nutrients.
The short version: use clean fallen needles around established shrubs, perennials, trees, and some vegetable transplants; leave them mostly whole; start with a loose layer about two inches deep; and keep the material off plant crowns and trunks. Choose something heavier or noncombustible instead where wind, slopes, foot traffic, wildfire guidance, or a need for stronger weed suppression makes pine straw a poor fit.
Quick answer: treat pine needles as mulch, not fertilizer
Pine straw is the common gardening name for fallen pine needles used as a soil covering. It is an organic mulch, like shredded leaves or bark, and its value comes from what happens at the soil surface: less direct sun and wind reach the soil, rain hits it less forcefully, and weed seeds have a harder time finding open ground. N.C. Cooperative Extension describes mulch in these functional terms—moisture conservation, temperature moderation, and weed control—and notes additional benefits such as reduced erosion and soil crusting in its discussion of pine straw.
That makes needles especially useful where the soil is exposed between plants or beneath established trees and shrubs. They will break down and add organic matter, but the pace and nutrient contribution vary with needle type, climate, moisture, and how the material is managed. If a plant is pale, stunted, or failing, don’t assume mulch will correct a nutrient deficiency; check the soil and the plant’s growing conditions instead of adding more needles.
What pine needle mulch can do for the soil
A soil-covering layer helps reduce evaporation from bare ground. It can keep the surface from drying and crusting as quickly between rains or irrigation, while the loose needle structure allows water to pass through. That is useful during hot or dry weather, but it does not mean a mulched bed never needs watering: check moisture beneath the layer and water when the root zone is actually dry.
Mulch also moderates the soil’s exposure to day-to-night temperature shifts. A surface cover can cushion roots from abrupt changes, and organic mulch can reduce runoff and soil movement on exposed beds. In its practical guide, Epic Gardening describes pine needles as a light, airy material that can limit erosion and evaporation; N.C. Cooperative Extension likewise explains why organic mulches benefit soil and plants as they break down.
Weed suppression is real but incomplete. A continuous layer can make it harder for many annual weed seeds to germinate, especially if you remove existing weeds first and maintain the cover. Pine needles are not a weed-proof membrane: light can still reach some openings, and established perennial weeds can grow through or around the layer. The goal is fewer easy germination sites and less exposed soil, not a maintenance-free bed.
The material is also convenient when it is already on your property. A pine tree can shed a recurring supply that costs nothing to collect, and commercial pine straw is easy to spread compared with heavier bagged mulch. But “free” doesn’t erase the work of raking, carrying, sorting, and topping up; if the supply is small or far from the bed, another locally available organic mulch may be the better use of your time.
Where pine straw works best
Pine needles suit established landscape beds where a light, natural-looking, permeable cover is useful. Think under shrubs, around mature trees, through perennial borders, or on a garden path where the needles will stay in place and won’t create a slick walking surface. They are also reasonable in vegetable beds once transplants are established, especially where a surface cover helps limit soil splash onto lower leaves or fruit.
The University of Maine Cooperative Extension recommends leaving pine needles and other leaves beneath shrubs rather than exposing compacted soil around a ninebark. That advice is a good fit for many existing beds: if needles are already falling under a healthy tree, you may be able to leave them in place, remove only thick clumps that smother plants, and tidy the edge rather than raking the ground bare every fall.
Pine straw can be useful in places where you want a loose, breathable cover and can inspect the bed periodically. It is less attractive as a mulch for tiny seedlings, fresh direct-sown rows, or spots where weeds have already taken over. Wait until young plants are large enough to emerge above the layer, then apply carefully around them. If you have just sown small seeds, leave the seed row uncovered until germination and early growth are established.
When another mulch is a better fit
Pine needles are light. That makes them comfortable to carry and quick to distribute, but it also means wind can shift them out of an exposed bed. A short, dry slope, a windy corner, or a high-traffic edge may need a heavier material that stays put. Needles can also be slippery underfoot, particularly after rain; don’t use them as a walking surface on steps, steep paths, or a route where people need secure footing.
Choose another material when you want a thicker weed barrier with fewer openings. Bob Vila’s guide to pine straw notes that the lightweight needles do not suppress weeds as strongly as some other mulches and can blow around. If your priority is a stable, more opaque cover, shredded bark or wood chips may be a better match; if your bed already has plentiful leaves, shredded leaf mulch may be simpler and more local.
Fire context matters too. Dry plant material is fuel, and the right guidance depends on local wildfire risk, structures, and defensible-space rules. Near a home in a fire-prone area, don’t choose pine straw just because it is available; check local fire-authority recommendations first. A fire-safe landscape may call for noncombustible ground cover in the area nearest a building, not a different depth of pine needles.
Do pine needles make soil acidic?
This is the most common reason gardeners hesitate, and it is often overstated. Freshly fallen needles can be acidic as material, but acidity of the needles is not the same as a lasting, harmful change in the soil beneath a surface mulch. N.C. Cooperative Extension explains that soil microbes, climate, other organic matter, and the soil’s own buffering capacity affect how the needles break down; its horticulture agent reports that pine straw used as mulch does not meaningfully acidify garden soil compared with other organic mulches.
That distinction matters: leaving needles on top of the soil is not the same as mixing a large quantity of fresh needles into it. Even when mixed into soil, a small pH shift would not automatically damage plants, but there is no good reason to till a mulch layer into a bed when its purpose is to cover the surface. Use a soil test if pH affects a crop or ornamental you are trying to grow, then follow the test’s recommendations. Don’t use pine needles as a substitute for a measured amendment when a soil test calls for a pH change.
The same caution applies in reverse: pine mulch is not a reliable way to make soil acidic for blueberries, azaleas, or other acid-preferring plants. It can protect the bed surface, but it cannot promise a target pH. Soil type, irrigation water, and existing conditions matter more than the name of the mulch.
Should you crush pine needles before using them?
Usually, no. The term “crushed” may suggest that pine needles need to be ground up before they can work, but whole needles are already a practical mulch. Their overlapping shape creates a loose cover while preserving air spaces, and they are easier to rake, collect, and spread without an extra processing step. In its pine-needle guide, Epic Gardening advises leaving the needles intact for mulch because their outer coating helps them last longer.
If you want to shorten a very long, tangled batch, test a small amount first rather than running everything through a mower. Fine fragments can be harder to place evenly and may disappear into existing mulch faster; the reason to chop material is usually to speed decomposition in compost, not to make a bed mulch more effective. For a garden bed, separate needles that are matted or clumped, then lay them loosely by hand or with a rake. Don’t grind them into powder or pack them into a dense felt-like sheet.
If the needles are wet, muddy, moldy, or mixed with a lot of trash, sort them before they reach a planting bed. A little cone or twig debris is easy to pick out as you spread; a batch full of diseased plant material, roadside grit, or unknown chemical treatment is not worth saving just because it is free.
Collect clean needles and sort the material
Use a leaf rake or gloved hands to gather dry needles from a clean area under pine trees. You do not need to strip every needle from the ground; leaving some litter in a natural area is useful, and the goal is to collect enough for the bed rather than create bare ground beneath the tree. If collecting from public land or another person’s yard, get permission and check local rules before removing natural material.
Before spreading, remove cones, twigs, and compacted clumps that would leave gaps or uneven mounds. The longest needles may tangle together, while shorter needles may make a finer-looking cover; both can be useful as mulch if they are clean and evenly distributed. If you purchase baled pine straw, check that the bale is dry and free of moldy sections, invasive seed heads, or obvious contaminants. Store a dry bale under cover so rain does not turn it into a heavy, compacted bundle.
Start with one small bed if you are uncertain about appearance or coverage. Pine needles have a distinctive copper-brown color and a lighter, more textured finish than bark chips. A test area lets you see whether the color suits the bed and whether wind moves the needles before you spend an afternoon covering a larger landscape.
Choose a depth and estimate how much you need
For established garden beds, a loose layer around two inches deep is a practical starting point; some horticulture guidance uses a two-to-three-inch range. N.C. Cooperative Extension reports a two-inch reference for a 40-pound bale covering about 100 square feet, while Epic Gardening recommends two to three inches. Because bale size, needle length, compression, and the amount of settling vary, treat coverage figures as estimates and let the actual bed condition guide the final layer.
Measure the depth after spreading rather than judging from the height of a fluffy pile. Needles naturally leave gaps, so they may look taller before they settle. The right layer should cover most exposed soil without burying low-growing plants, blocking new shoots, or forming a thick dam that sends runoff around rather than through the bed.
A simple coverage calculation
Measure the bed’s length and width in feet, then multiply to get the area. For example, a bed that is 10 feet by 10 feet has 100 square feet of surface area. If you are aiming for two inches, convert that depth to feet—two inches is one-sixth of a foot—so 100 square feet multiplied by one-sixth of a foot is about 16.7 cubic feet of loose material. This is a volume estimate, not a promise about the number of bales: pine straw compacts differently from one supplier to another.
If buying by the bale, check its stated coverage and compare that with the area you measured. Buy a little less if you are only topping off an existing layer; buy more only when the soil is genuinely exposed. Then spread a small test patch and measure it. If the layer looks thin after it settles, add a small amount; don’t solve every bare spot by making the whole bed much deeper.
Apply pine needle mulch in five steps
- Remove existing weeds. Pull or cut weeds before mulching, especially perennial weeds with roots or runners. Needles can make the bed easier to maintain, but burying established weeds rarely removes them.
- Check the soil moisture. If the bed is dry, water it before covering the surface. Mulch helps slow later evaporation; it does not replace the first deep watering a dry root zone needs.
- Open the needles. Break up dense handfuls and spread the material rather than dropping it in heavy clumps. Aim for an even layer around two inches deep, adjusting thinner around small plants or young seedlings.
- Leave plant bases clear. Pull the needles back from stems, crowns, trunks, and the visible root flare. A donut-shaped gap is more useful than a pile pressed against the plant.
- Inspect after settling. Check that rain can reach the soil, the layer has not blown into a mound, and there are no bare channels through the bed. Add material only where the cover is thin.
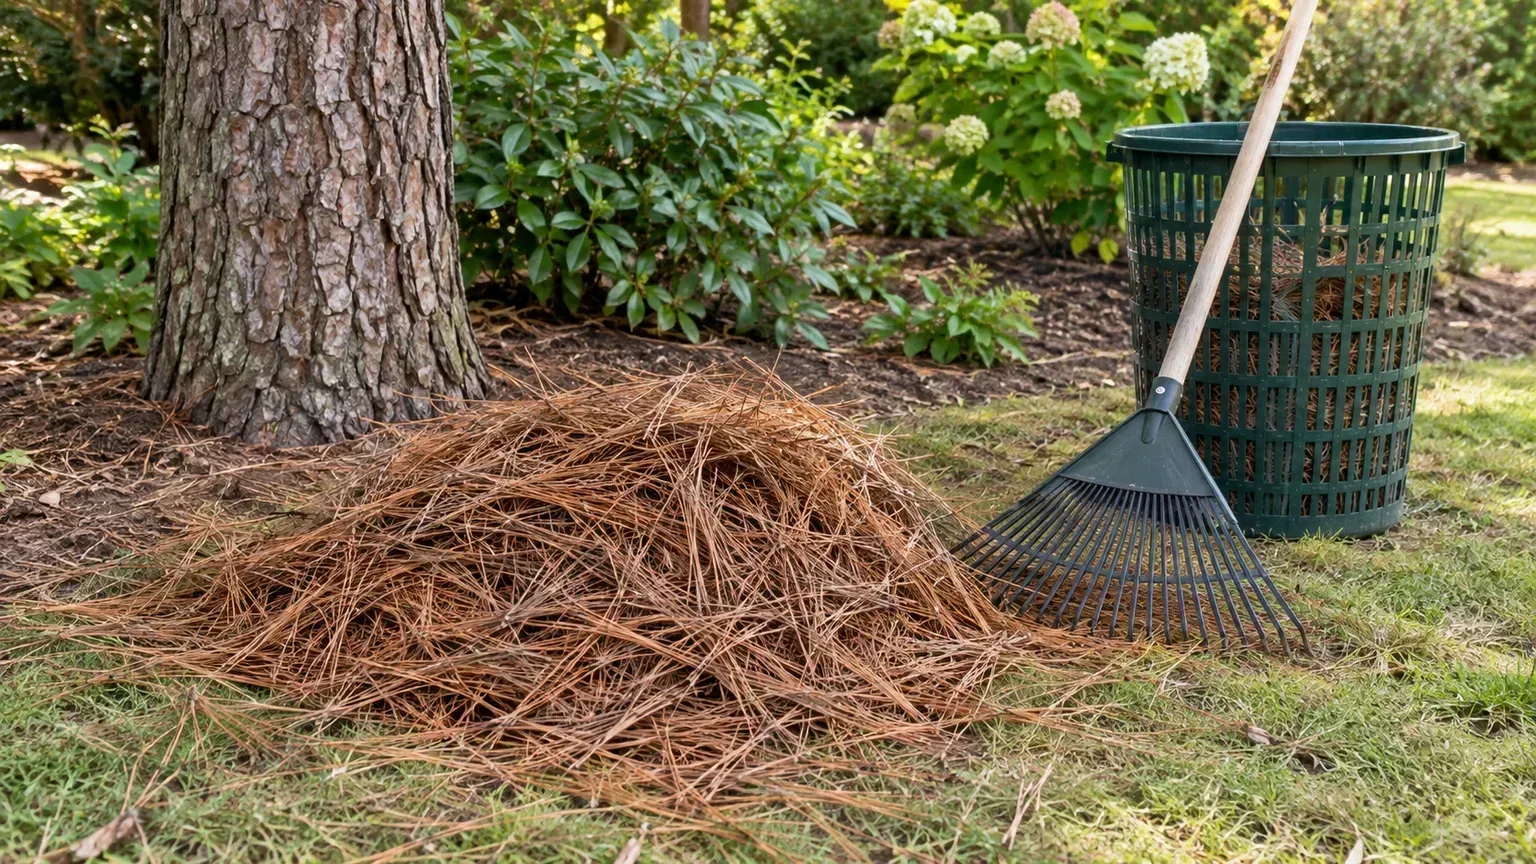
The photograph shows the material you want to start with: clean, dry needles that can be loosened and spread. A leaf rake is enough for most home quantities; a mower or shredder is optional, not a requirement. If needles keep blowing into the lawn, collect smaller batches and spread them closer to established plants rather than making a deep pile that can be carried away at once.
Keep crowns, stems, and trunks uncovered
Mulch should cover soil, not plant tissue. Leave a visible ring around herbaceous crowns and stems, and keep needles away from the trunk flare of trees and woody shrubs. Material piled against bark or a crown stays in contact with tender tissue, hides problems, and may keep the base too wet. The University of Maine’s ninebark guidance is a useful reminder that the goal is to protect the soil while letting the plant itself remain exposed.
New seedlings need special care because a two-inch layer can physically shade or obstruct them. Mulch between rows or around the outside of a transplant’s root zone only after it is established, and keep the surface clear where small seeds must emerge. If you are using needles in a vegetable bed, keep the mulch out of the planting furrow until the crop is up and growing well.
Water, inspect, and refresh the bed
After mulching, water the bed as you normally would if the soil is dry, then check below the needles in the days that follow. Push the mulch aside with a finger or trowel and feel the soil near the active roots; the top layer can look dry while the soil below is moist, or look damp after rain while the root zone remains dry under a canopy. The soil, not the color of the needles, tells you whether the plant needs water.
Pine straw does not have a fixed replacement date. Sun, rainfall, slope, traffic, and local wind determine how quickly a layer thins or shifts. Once a month during the active growing season—or after a heavy rain or wind event—scan for bare soil, displaced piles, weeds, and material creeping onto crowns. If the layer still covers the soil and plants are healthy, leave it alone; if it has thinned in a few spots, top up only those places.
As needles decompose, they become part of the organic surface layer. There is no need to rake out healthy old material just to apply a new layer. First loosen the existing cover and inspect the depth; if it is already thick, remove or redistribute some rather than stacking fresh needles on top. Annual touch-ups are often enough, but the bed’s actual condition matters more than a calendar reminder.
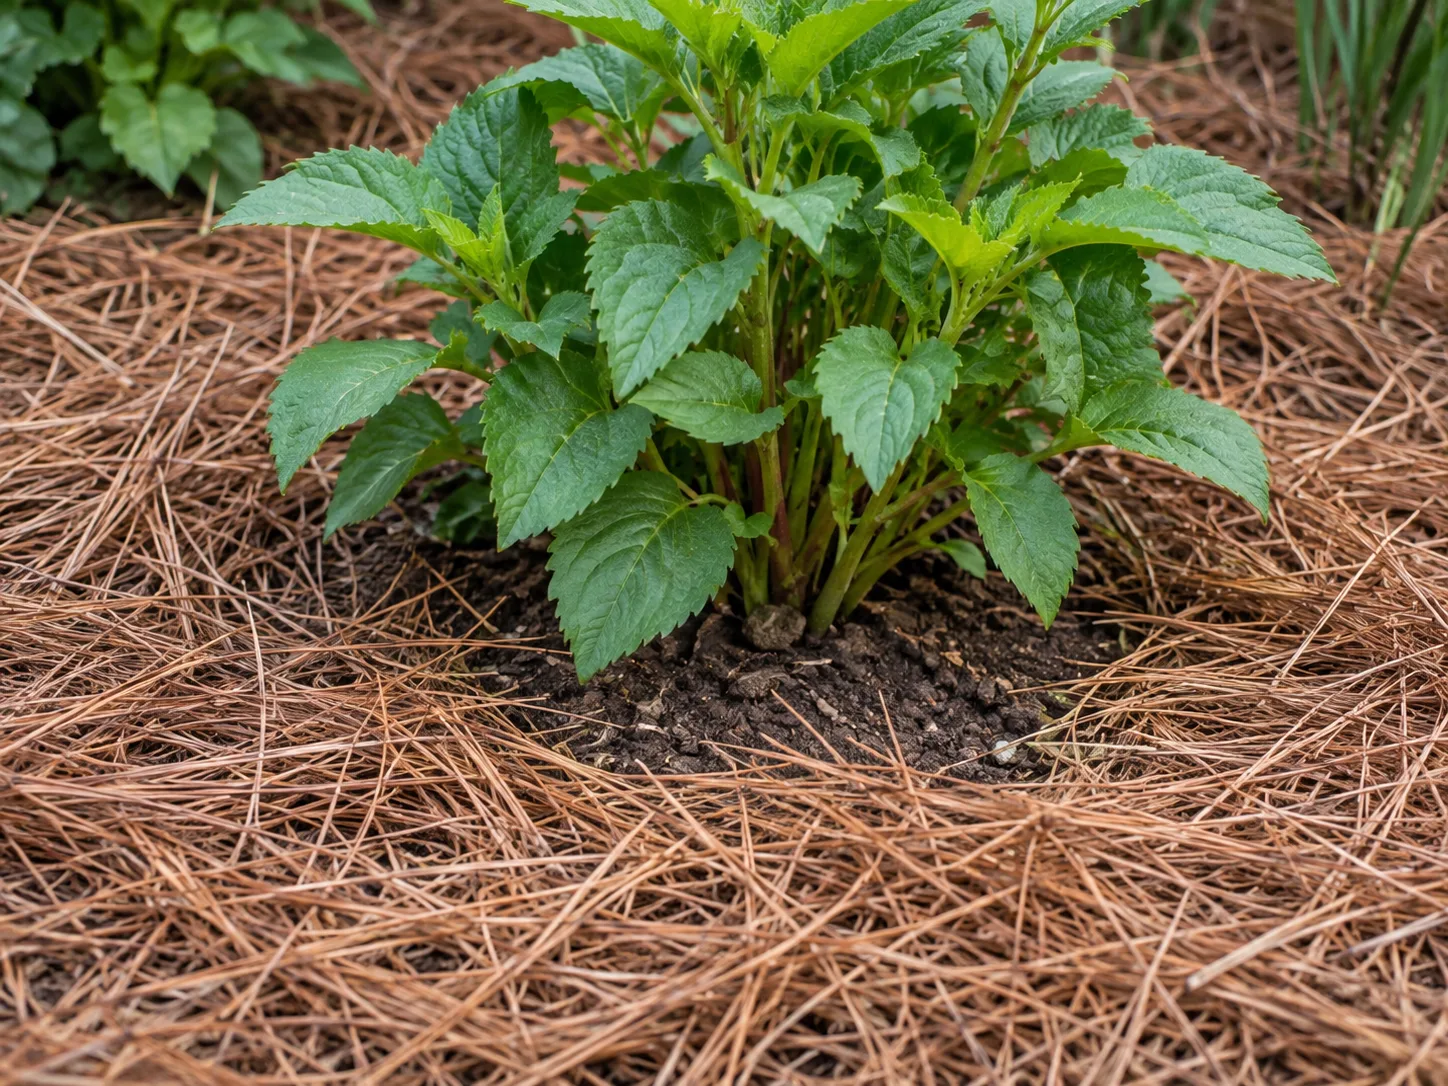
The most helpful visual check is simple: soil is covered, needles are loose, and the plant base remains open. If rainwater runs off a thick mat or seedlings disappear beneath the layer, pull material back before adding anything else.
Pine needles compared with bark, leaves, and straw
Pine needles are one choice among several organic mulches; the best one is the material that performs safely and consistently at the exact bed. Use this quick comparison as a selection rule, not a claim that one material is always superior.
| Material | Strong fit | Main limitation |
|---|---|---|
| Pine needles | A clean local supply for established beds; light, loose coverage | Can shift in wind, suppress weeds less completely, and create a fire concern in some locations |
| Shredded leaves | A free fall resource that breaks down into a fine organic cover | Whole leaves can mat; shredding and occasional fluffing help maintain air flow |
| Bark or wood chips | A heavier, longer-lasting surface for beds where movement and weed pressure matter | Often purchased and can be too coarse around tiny seedlings or tight spaces |
| Cereal-grain straw | Vegetable rows and paths when clean straw is available | It is a different material from pine straw; check for seed heads and use a suitable depth |
Pine needles can be a particularly convenient option under trees because there may already be a supply on site. Leaves are often better where deciduous trees provide them in quantity, while heavier bark may be easier to contain near an exposed border. For wildfire-prone sites, the comparison changes: Fire Safe Marin recommends keeping pine needles and several other combustible mulches out of the area within 30 feet of structures in its region. That is a local recommendation, not a universal rule, so check the fire authority serving your address.
Mistakes that reduce the benefits
The first mistake is expecting a surface mulch to solve a root-zone problem. Pine needles won’t correct underwatering, poor drainage, insufficient light, compaction, or a nutrient deficiency. If a plant struggles, diagnose that condition separately; adding another layer may hide the soil without fixing what is wrong.
Another common error is using too much material at once. A thick blanket can obstruct seedlings and low plants, conceal the soil, and make it harder to judge moisture. Start around two inches, leave space around plant bases, and measure again after the layer settles. If an old layer is still deep, redistribute or remove some before you top it up.
A third is expecting complete weed control or pest repellence. Needles may reduce the number of annual weeds that germinate, but they do not eliminate established weeds or all seedling growth. Nor should a gardener count on the sharp texture or scent to repel insects or animals; the extension and horticulture sources reviewed support soil-cover benefits, not a dependable pest-control effect.
Finally, don’t grind every needle because the title of a gardening tip says “crushed.” The intact material is already usable and tends to last longer; crushing adds a step and can make the mulch less distinct from other fine organic matter. If you have a specific reason to chop a batch, test it in a small bed first and keep the layer loose.
Fire, slopes, and other situations to reconsider
Pine needles are dry, fine organic material, so wildfire-prone sites need a different decision than an ordinary backyard bed. Fire Safe Marin draws on local research and recommends that pine needles not be used within 30 feet of structures in its region, while favoring noncombustible materials closest to buildings. Distances and rules vary by jurisdiction, terrain, and code; follow your local fire authority or defensible-space program rather than treating a number from another region as universal.
Avoid using the needles on a surface where they become a slip risk or where water will carry them into a drain. On a steep bank, make sure any mulch you use will stay in place and won’t create a slick route beside a walkway. A heavier, erosion-control material or living ground cover may be more suitable, depending on the site.
Use judgment when the needles come from a treated or contaminated area. If you don’t know whether a lawn, utility strip, or neighboring property was treated with chemicals, don’t assume those clippings are safe for a bed where you grow food. Collect from a clean place, keep the source separate, and choose a known mulch if its history is uncertain.
Conclusion
Crushed pine needles can be useful in a garden, but there is usually no need to crush them for mulch. Clean, whole pine straw is a light organic cover that can reduce evaporation, moderate the soil surface, limit some annual weeds, and contribute organic matter as it breaks down. Its effect is supportive rather than magical: plants still need appropriate watering, light, soil, and nutrition.
Start with one established bed, clear the weeds, water dry soil, and spread an even, loose layer about two inches deep. Keep crowns and trunks clear, then inspect after the material settles. If the needles stay put and the bed remains easy to water and weed, expand the practice; if wind, footing, fire guidance, or persistent weeds make the material a poor fit, use a heavier or noncombustible mulch instead.



