How to Make Soil Blocks and Start Seeds Successfully
Learn how to make soil blocks, choose the right size and mix, sow seeds at the correct depth, and keep seedlings evenly moist without crumbling or guesswork.
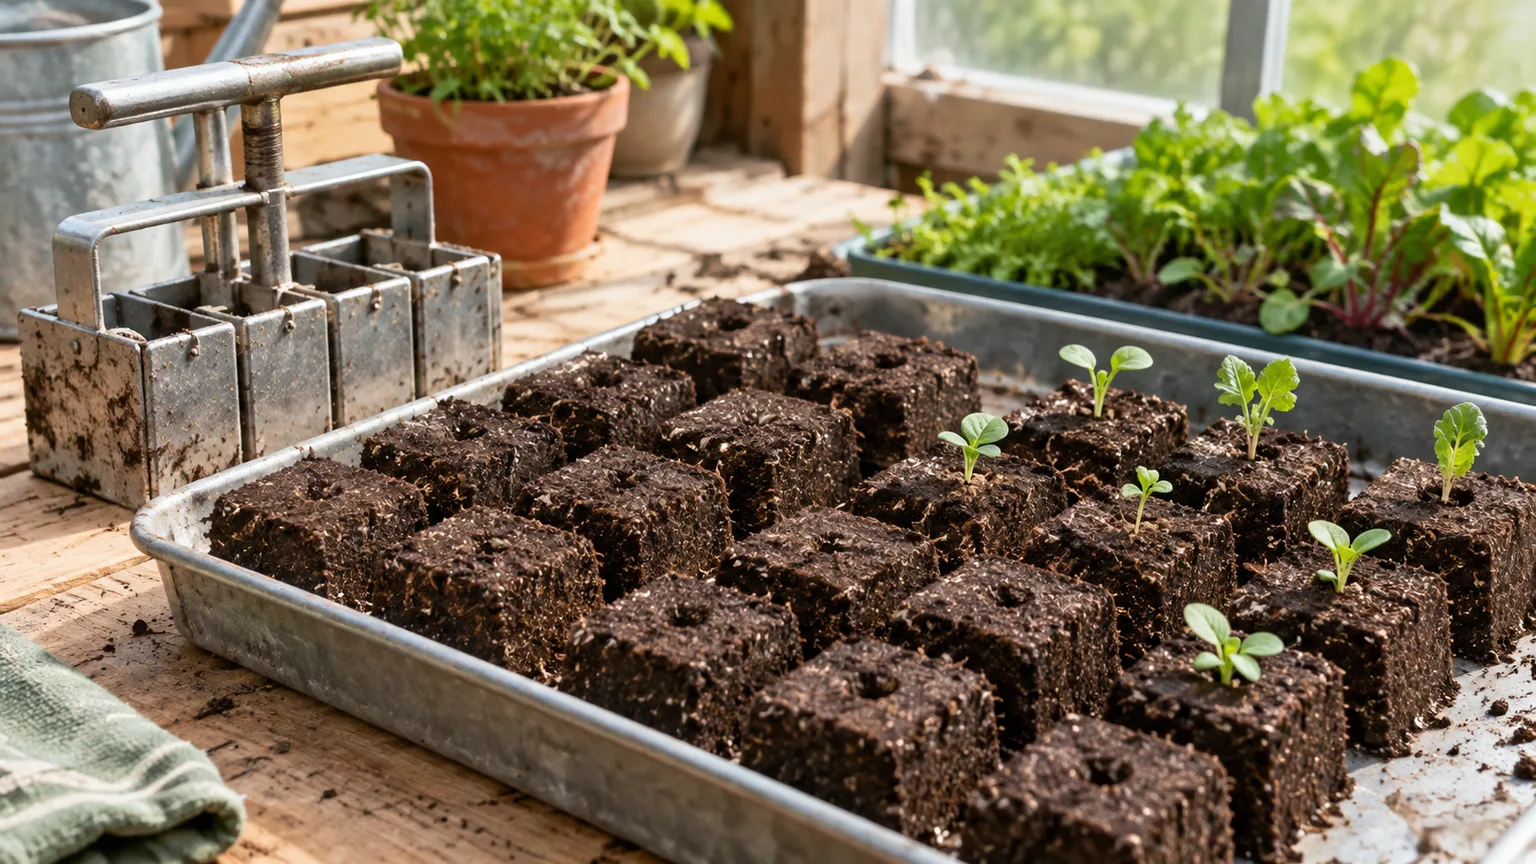
Soil blocking is a way to start seeds in compact cubes of growing mix that stand on their own, without an individual pot around each seedling. It can limit roots circling against a cell wall and make transplanting less disruptive, but it asks you to pay closer attention to moisture than many plastic trays do.
The method works best when you match the block size to the crop’s growing time, use a mix that holds together while still draining, and follow the seed packet for planting depth and germination conditions. If you are curious, make one small batch before replacing every tray in your seed-starting setup.
What soil blocking is, and why roots respond differently
A soil block is a molded cube of damp seed-starting medium. A hand-held blocker presses the mix into one or more cells, often leaving a small indentation called a dibble for a seed. The block itself becomes both the container and the root environment; it sits in a tray for support and watering, but it has no pot wall around its sides.
That open edge changes how roots encounter their growing space. In a solid-sided cell, a root that reaches the wall may turn and grow along it. In a block, a root tip at the exposed edge meets air and may stop extending there, while roots continue growing within the moist mix. Penn State Extension describes this as natural root pruning and notes that it can reduce root circling and root disturbance at transplanting. It is a useful advantage, not a promise of a bigger harvest or a guarantee that seedlings will never suffer transplant stress.
Blocks also let you start many seedlings without a separate cell for each one, and the blocker can be reused season after season. The trade-off is that you still need a sturdy tray, a suitable mix, room for the blocks, and a way to keep them from drying out. The technique replaces some containers; it does not make seed starting maintenance-free or plastic-free.
Decide whether soil blocking fits your seed-starting setup
Soil blocking is a good fit when you raise transplants indoors, want to reduce root circling, or need to fit many young plants into a limited starting area. It is especially handy when you expect to move seedlings into a garden bed or a larger growing space while they are still young. The block can go into the planting hole intact, so there is no need to pull a root ball out of a tight cell.
It is less compelling if you only start a few seedlings, already have reusable plug trays that work well, or cannot check moisture regularly. Soil blocks expose more of their surface to air than a closed cell does. That can help roots develop at the edge, but it also means a warm, bright, breezy shelf can dry them sooner.
| Method | A good choice when | Main trade-off |
|---|---|---|
| Soil blocks | You want freestanding starts and an easy move into the next block or garden | Mix and moisture take some practice; small blocks dry quickly |
| Reusable cell tray | You want a familiar, low-effort setup and predictable spacing | Roots may reach and follow the cell walls if plants stay too long |
| Direct sowing | The crop is normally sown where it will grow, or transplanting adds little value | Outdoor soil and weather determine when you can start |
When a cell tray or direct sow is simpler
The best seed-starting method is the one that fits the crop and your schedule. A reusable tray is perfectly reasonable if you already own one and can pot seedlings up before roots become crowded. Soil blocking is not a requirement for healthy transplants; timely watering, enough light, appropriate temperature, and careful planting matter in either system.
Some seeds are most easily sown in their final growing place, especially when a crop’s seed packet recommends direct sowing or the seedling is likely to be disturbed during transplanting. In that case, blocks add a step without solving a meaningful problem. Conversely, if your season is short and you need to raise warm-season seedlings indoors, blocks can give you a compact way to start them before outdoor conditions are suitable.
Choose a block size that matches the next step
Choose size by asking how long the seedling will stay in the block and what you will do with it next. A tiny block uses little mix and fits close together, but it holds less water and leaves little room for a seedling that grows for weeks. A larger block is easier to manage for a longer indoor stage, though it takes more mix and shelf space.
Mini blocks, standard blocks, and potting up
Blocker dimensions vary by model, so check the tool’s stated size rather than relying on a generic label. Common home-garden options include small blocks around three-quarter inch, standard blocks around two inches, and larger blocks around four inches. Some systems have inserts that let a smaller block fit into a dibble pressed into a larger one. Cornell Small Farms describes mini blocks for tiny, slow-germinating, or heat-loving seeds, then moving emerged seedlings into a two-inch block; its grower also uses four-inch containers when longer-season transplants need more room.
| Block size | Best use | Watch for |
|---|---|---|
| About ¾ inch | Small seeds, compact starts, or the first stage before potting up | Dries quickly; move emerged seedlings on before they crowd the block |
| About 2 inches | A versatile starting size for many flowers, herbs, and vegetables | Check roots and leaves if a seedling will remain indoors for several weeks |
| About 4 inches | A longer holding stage for larger seedlings before hardening off | Uses more mix and space; unnecessary for quick starts planted out young |
For a first attempt, a standard block is usually the most forgiving all-purpose size. Use a mini block when the crop’s seedling will be moved soon after germination or when you need to economize on a warm germination area. Plan that next move in advance: a seedling that emerges in a mini block should not be left there simply because the tool made a tidy cube.
Build a mix that holds together without staying soggy
The mix needs to do two jobs at once: hold its shape when pressed and let roots access air and water after planting. A very light, chunky potting mix may spill apart; dense garden soil can pack too tightly. Look for a seed-starting or soil-blocking mix with fine, fibrous material, moisture retention, drainage, and some organic matter. Sift out long bark pieces, hard clods, and other chunks that prevent the blocker from filling evenly.
Peat moss and coconut coir are common fibers that help bind a block and hold moisture. Perlite or coarse sand can add drainage, while mature screened compost contributes organic matter and some nutrients. Recipes differ, and the proportions need to suit the ingredients you can get. Better Homes & Gardens publishes one home-scale recipe with six cups of peat or coir, four cups of perlite or coarse sand, two cups of soil, and four cups of screened compost; treat it as a starting point rather than a universal formula.
A small-batch recipe and peat-free choices
For a manageable test batch, measure ingredients by volume and make only enough to fill a tray or two. The published mix above totals about one gallon before water is added. If you want to avoid peat, coir is a commonly used substitute, but it often comes compressed and must be fully rehydrated before measuring. A coir-based mix may behave differently from a peat blend, so judge it by the finished block rather than assuming identical water needs.
| Ingredient | Example amount | What it contributes |
|---|---|---|
| Peat moss or hydrated coir | 6 cups | Fine fibers that help a block bind and retain moisture |
| Perlite or coarse sand | 4 cups | Space for drainage and air |
| Clean soil | 2 cups | Mineral material in this particular recipe |
| Mature compost, sifted | 4 cups | Organic matter and some nutrients |
This is one published formulation, not a requirement to add every amendment found in a gardening recipe. Lime, fertilizer, and mineral products change a mix’s chemistry; add them only when the recipe and the product label support their use. If you use a bagged seed-starting mix, press a test block before sowing. Some mixes are made to stay loose in a cell and may need more fibrous material to make a stable block. Epic Gardening also recommends a purpose-made seed-starting mix that holds when compressed, with fiber for moisture retention, perlite or sand for drainage, and compost for organic matter.
Avoid using fresh or unfinished compost, uncomposted manure, or an unknown soil blend for a small indoor batch. Mix quality affects both block structure and seedling health. University of Minnesota Extension notes that excess salts in some potting media can inhibit germination, so adding fertilizer to an already enriched mix is not a reliable shortcut to stronger seedlings.
Gather a blocker, tray, and basic supplies
You need a soil blocker, a shallow tray with a flat base, the mix, water, and seeds. A dibble may be built into the blocker; otherwise, a clean pencil end or similar rounded tool can make a planting indentation. A waterproof tray catches water and keeps the blocks upright, while a tray with drainage holes can sit inside it if you want excess water to drain away after bottom watering.
Labels matter because blocks look nearly identical once the seedlings emerge. Write the crop and variety on a plant label or on a map of the tray before sowing. Keep a small amount of dry mix nearby to correct a batch that is too wet, and use a fine-mist bottle for seeds that need gentle surface watering. You do not need a heat mat or grow light for every seed: use those only when the crop and your indoor conditions call for them.
Make firm blocks with the right moisture
Hydrate dry peat or coir first, then add water to the rest of the mix gradually. A mix for blocking is wetter than a loose filling mix, but it should not pour like mud. The practical test is to squeeze a handful firmly: it should form a cohesive ball and feel evenly damp; a little moisture may show at the surface, but a stream of water means it is too wet. Cornell Small Farms describes its mix as peanut-butter-like, while Penn State compares the target to concrete or putty mix. These are tactile guides, not exact recipes.
If the ball falls apart when you open your hand, add water a little at a time and remix. If it slumps, smears, or releases a lot of water, fold in a little of the reserved dry mix and test again. Give coir time to absorb water throughout; a dry center can make the mix seem ready on the surface even though it will not bind consistently.
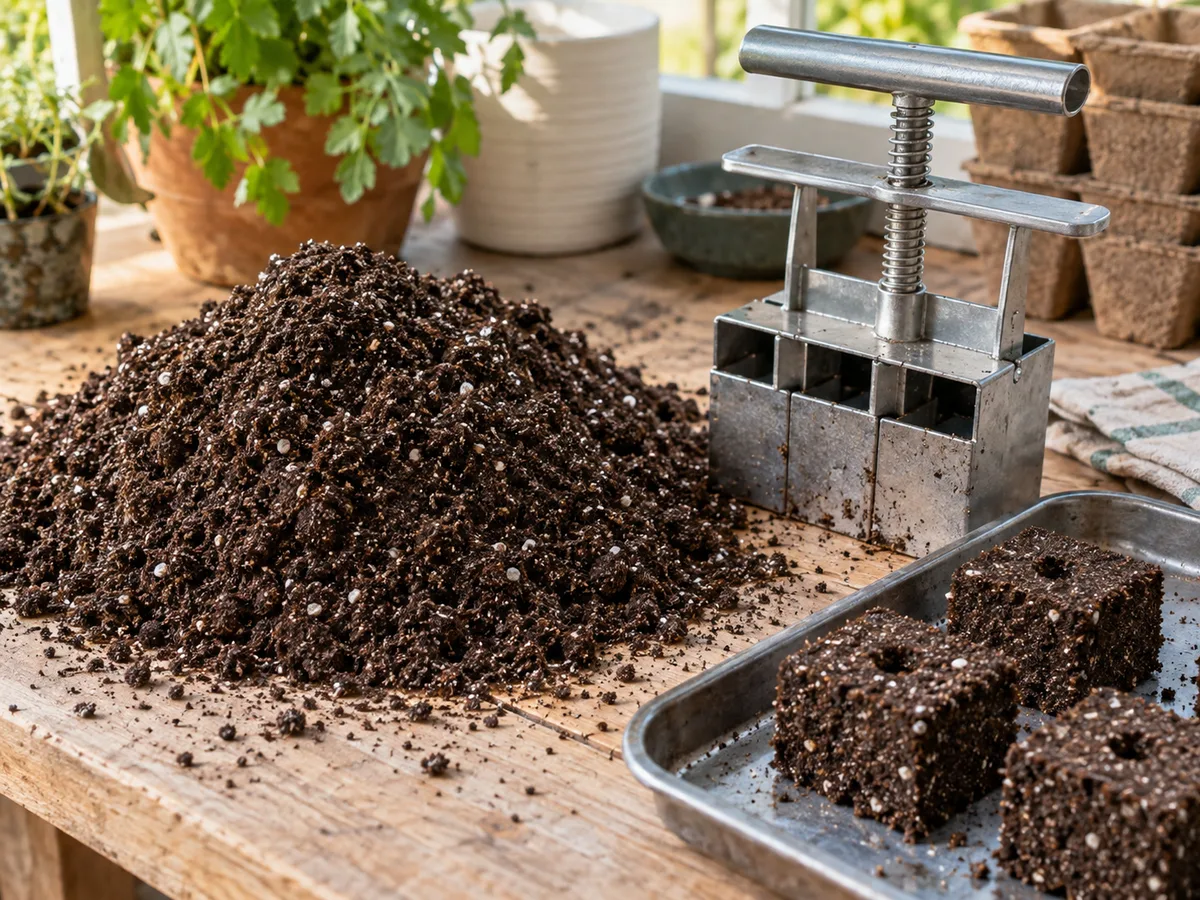
To form the blocks:
- Set the tray on a stable, level surface and make a mound of damp mix deep enough to fill the blocker.
- Push the blocker into the mix, rock or twist it slightly, and press again so each cell fills completely.
- Pack the mix into corners, especially in small blocks or around narrow dibble inserts. A full-looking mold can still contain voids that weaken the block.
- Scrape excess mix from the base so the block will sit level, then position the tool on the tray.
- Press the release evenly and lift the blocker straight up. Leave a little space between blocks for airflow; about a quarter inch is a useful starting point.
Cornell Small Farms recommends checking that every cell is packed and retrying any block that crumbles. The first batch is a test, not a failure: put a weak block back into the mix, adjust moisture or packing, and press again. Rinse the blocker between batches if mix sticks in the cells, since residue can make the next set uneven.
Sow seeds at the depth on the packet
Use the dibble to make a planting spot, then follow the seed packet for depth and light requirements. Some seeds need light to germinate and should sit on the surface; others need a thin cover. Soil blocking does not change those species-specific instructions. Press the seed gently into contact with the moist mix, and cover only when the packet calls for it.
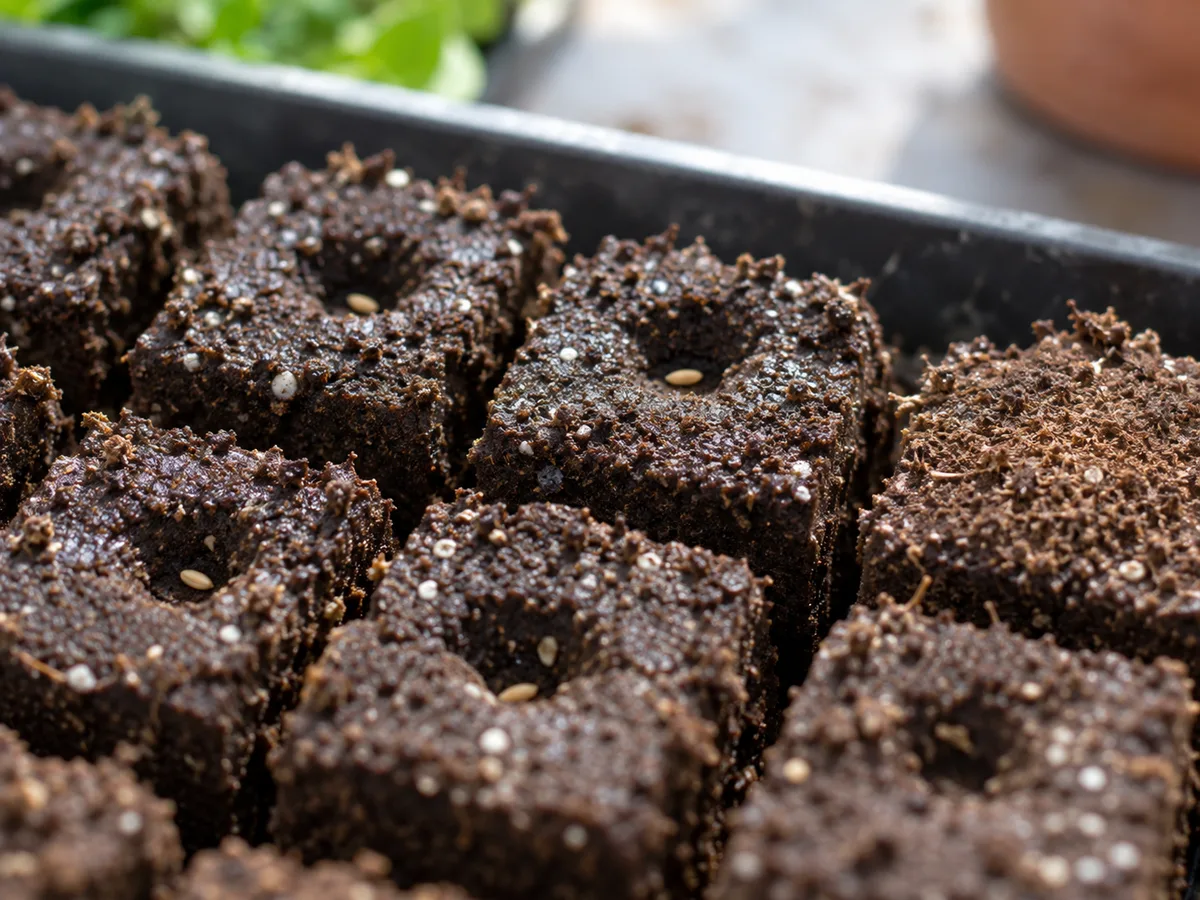
One seed per block is efficient when the seed is fresh and germination is expected to be good. If a packet is old or its germination rate is uncertain, sowing two gives you a backup; thin the weaker seedling by snipping it at the mix surface rather than pulling it and disturbing the neighbor’s roots. For very small seeds, use a damp toothpick or the tip of a pencil to place them in the dibble without scattering them across the block.
Label as you sow, not after you have filled the whole tray. If using a clear cover to retain humidity, leave a way for excess moisture to escape and check it daily. Remove the cover once seedlings emerge so the surface and foliage are not kept continuously wet.
Manage germination and the first week after emergence
Warmth, moisture, and light requirements belong to the crop, not to the soil-blocking technique. A heat mat can help with seeds that germinate best in warm media, but it is not a universal setting. Follow the packet’s temperature range and remove or reduce supplemental bottom heat after emergence if the plant no longer needs it.
Once a seedling appears, move it promptly into bright light. A south-facing window may not provide enough intensity in winter or on cloudy days; a grow light can help, positioned according to the fixture’s instructions. University of Minnesota Extension’s seedling guidance warns that low light makes seedlings stretch toward a light source, producing weak stems. If the seedling is tall and leaning, improve light before assuming it needs more fertilizer or water.
Air movement also helps the surface dry between waterings. Do not aim a strong fan directly at fragile seedlings, but avoid enclosing damp blocks under a dome long after germination. Small blocks near a heat mat, a sunny window, or a warm vent can dry much sooner than the same blocks in a cooler, still room, so inspect them rather than relying on a calendar.
Water blocks without washing away their edges
Keep blocks evenly moist while seeds germinate, then water when the surface begins to lighten and the blocks feel less damp. They should not be allowed to dry through, but constantly saturated blocks can limit oxygen around roots and encourage algae or disease. The right interval changes with block size, room temperature, airflow, light, and the mix itself.
Bottom watering is a reliable default once the blocks are set in their tray. Pour a shallow amount of water into the tray and allow the blocks to wick it upward; then drain or tip out what remains rather than leaving the blocks standing in deep water. This wets the block from below and avoids a forceful stream that can erode its sides. The tray should be wettable and stable, but the block itself does not need a drainage hole.
Newly sown seeds may need a very gentle mist on the surface, especially if their planting instructions call for shallow sowing. After that, use bottom water when practical. Cornell Small Farms recommends letting the very top surface dry slightly between waterings to discourage algae, while still keeping the block moist below. Do not let the seed zone dry during germination; use a loose humidity cover and careful misting if surface seeds need extra protection.
Check the whole tray, not just its center. Blocks at the outside edge may dry first, and a shallow tray can distribute water unevenly if it is tilted. If a block dries once, rewet it gently from below and allow time for the mix to absorb the water. Repeated dry-outs make seedlings wilt and can cause a block to crack; repeated saturation is not the fix for a weak or poorly formed block.
Feed seedlings only when the mix needs it
Seed-starting mixes vary: some contain compost or a small amount of starter fertilizer, while others are deliberately low in nutrients. Read the bag before adding anything. If a seedling looks healthy and the mix includes nutrients, extra fertilizer at sowing can create excess salts without solving a real problem. University of Minnesota Extension identifies high salt levels in some potting mixes as a cause of poor germination.
After true leaves appear, consider feeding only if the mix is low in nutrients and growth suggests the seedlings need it. Cotyledons are the first seed leaves; true leaves follow and resemble the plant’s more mature foliage. Use a complete fertilizer labeled for seedlings and follow its directions for dilution and frequency. Yellowing is not automatically a fertilizer problem: first check moisture, light, temperature, root space, and whether the mix is staying soggy.
Pot up or plant out before blocks become undersized
A block is ready for the next step when the seedling has developed beyond its initial leaves, roots are visible along the sides or base, or growth is slowing because the cube no longer supplies enough room and moisture. Do not wait for a dense mat of roots or for the block to break apart. A seedling may not need potting up if it is healthy, the block holds together, and outdoor planting time is close.
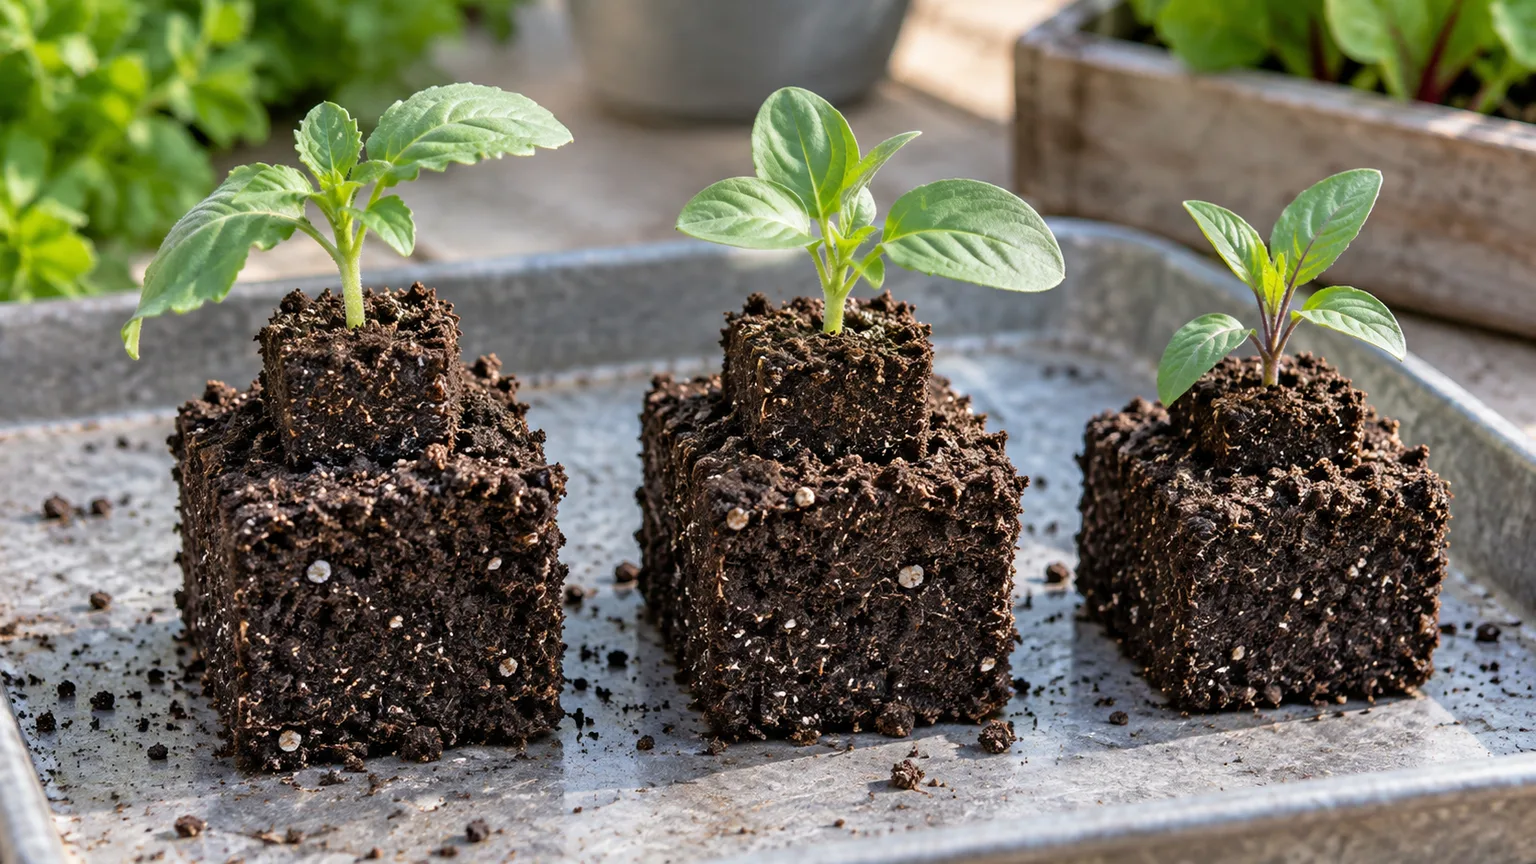
To move a small block into a larger one, first make a matching dibble in the new block. Set the smaller cube into that space with its top level with the surrounding mix, then gently firm the larger block around it. Do not pull the seedling out of the original block or tease apart healthy roots. Keep the new block moist and return the plant to the right light and temperature for its crop.
Before planting into a bed, check the seed packet and local frost timing. Harden off indoor-grown seedlings by gradually exposing them to outdoor light, wind, and temperature over several days; do not take a tender seedling straight from a protected shelf to a full day outdoors. The exact schedule depends on weather and crop tolerance, so lengthen the transition during cool, windy, or unusually bright conditions.
When planting, water the block first if it feels dry, make a hole that fits it, and set it at the depth appropriate for that crop. Firm soil around the cube so there are no large air gaps, then water the planting area. A block is still a small volume of mix: if its top is left exposed above dry bed soil, it can wick moisture away and dry faster than the surrounding ground.
Harden seedlings off before outdoor planting
Hardening off is a gradual transition, not a single watering or a fixed date. Start with a sheltered, shaded outdoor spot for a short period, then increase exposure over successive days if the leaves remain firm and the forecast is suitable. Bring seedlings back under cover when nights are too cold for the crop or when strong wind and intense sun could desiccate young leaves.
Keep the blocks moist during this period, but do not leave trays in standing water. If plants droop after an outdoor session, move them back to shelter and check whether the block is dry or the exposure was too abrupt. Resume the transition once they recover. A well-rooted block can make handling easier, but it does not replace hardening off.
Fix common soil-block problems
Use the shape and feel of the block to diagnose the problem before changing the recipe. Add water or dry mix in small increments, and alter one part of the routine at a time. If seedlings are affected, check light and root space along with watering; not every weak seedling needs fertilizer.
| What you see | Likely cause | What to do |
|---|---|---|
| Block falls apart as it leaves the tool | Mix is too dry, not fibrous enough, or loosely packed | Add water gradually, hydrate coir fully, pack the mold into its corners, and press a test block |
| Block slumps on the tray | Mix is too wet, too coarse, or unevenly filled | Fold in reserved dry mix, sift large pieces, and make sure the base is flat |
| Surface turns green | The top stays wet for long periods, often with little airflow | Reduce standing water, improve gentle airflow, and let the surface dry slightly between waterings without drying the seed zone |
| Seedlings wilt although the tray was watered | A block may be dry inside, water may not reach it evenly, or roots may be crowded | Feel the block itself, bottom-water slowly, check outside rows, and pot up if the cube is full of roots |
| Seedlings stretch and lean | Not enough light after emergence | Move the grow light closer within its safe operating range or provide stronger light; keep seedlings from overheating |
| Seedlings collapse at the soil line | Possible damping off, especially in persistently wet conditions | Remove affected starts, clean trays and tools, use clean seed-starting medium, and improve drainage and airflow |
| Seeds fail to emerge | Planting depth, temperature, seed age, moisture, or excess salts may be wrong | Recheck the seed packet, test the mix and moisture, and try fresh seed if the conditions are correct |
University of Minnesota Extension describes damping off as seedling collapse at the stem base and recommends clean media, trays, pots, and tools. If a seedling has a pinched, dark stem at the soil line, more water will not repair the damaged stem; remove the affected plant and correct the conditions before sowing another. If roots are simply appearing at a block’s edge, that can be normal. Pot up when the seedling is outgrowing its space, not at the first visible root tip.
Conclusion: Start with a small, well-timed batch
Soil blocking is most useful when you want compact, freestanding seedlings and can give them regular attention. The key is a mix that binds, blocks pressed firmly enough to hold their shape, and moisture kept even without leaving the tray waterlogged. Correct block size and seed-packet directions matter as much as the tool.
Start with one tray and a few crops you already know how to grow. Test the mix, label each block, and note how quickly the edges dry in your room. If the blocks remain firm and the seedlings reach transplant size on schedule, expand the method next time; if frequent watering becomes a chore, a reusable cell tray may suit your setup better.



