White Spots on Marble Queen Pothos: Causes, Checks & Fixes
Quick answer
Most white spots on Marble Queen Pothos are one of four things: normal marbled variegation, cottony mealybugs in leaf axils, powdery mildew film, or hard-water residue. First step: wipe one spot with a damp cloth and open two leaf axils on the same vine — variegation is flat inside the leaf and never wipes off, while residue, mildew, and pests all sit on the surface.
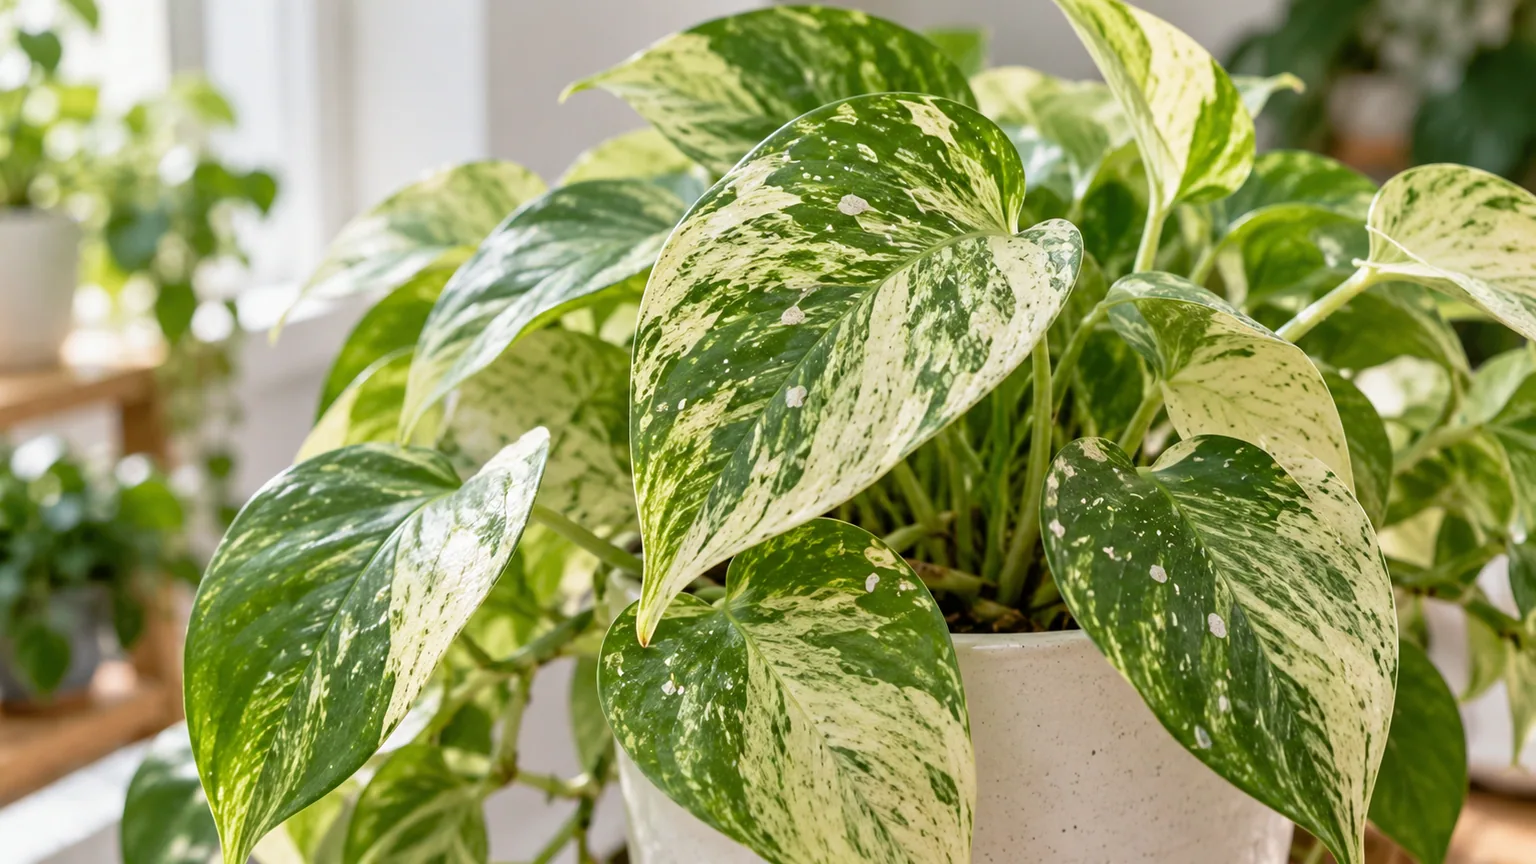
White Spots on Marble Queen Pothos: Causes, Checks & Fixes
This guide covers white spots on Marble Queen Pothos. See also the general White Spots guide, watering, and light pages for this plant.
White Spots on Marble Queen Pothos: Causes, Checks & Fixes
Quick answer
On Marble Queen Pothos, half of all “white spot” scares turn out to be the plant’s own marbling — creamy-white leaf sectors that are simply part of this cultivar. The other half splits between three surface problems: cottony mealybugs tucked into leaf axils, a dry powdery film of mildew, and chalky hard-water residue from misting or overhead watering. For the general mechanics of this symptom across houseplants, see our white spots guide. On Marble Queen, the pattern usually shows up as texture on top of the leaf, while variegation is flat inside it.
First step: wipe one spot with a damp cloth, then open two leaf axils on the same vine and look inside. If the white wipes away, it is residue or mildew, not the plant. If you find cottony wax in the axils, mealybugs are confirmed. If the white is smooth, flat leaf tissue that never budges, it is variegation and needs no treatment at all.
What white spots look like on Marble Queen Pothos
Marble Queen leaves are heart-shaped and marbled with irregular white, cream, and green sectors. That marbling is your baseline: it follows the leaf veins, has exactly the same texture as the green tissue, and never rubs off. Every abnormal white spot breaks that rule by adding texture, sitting in the wrong place, or spreading over days.
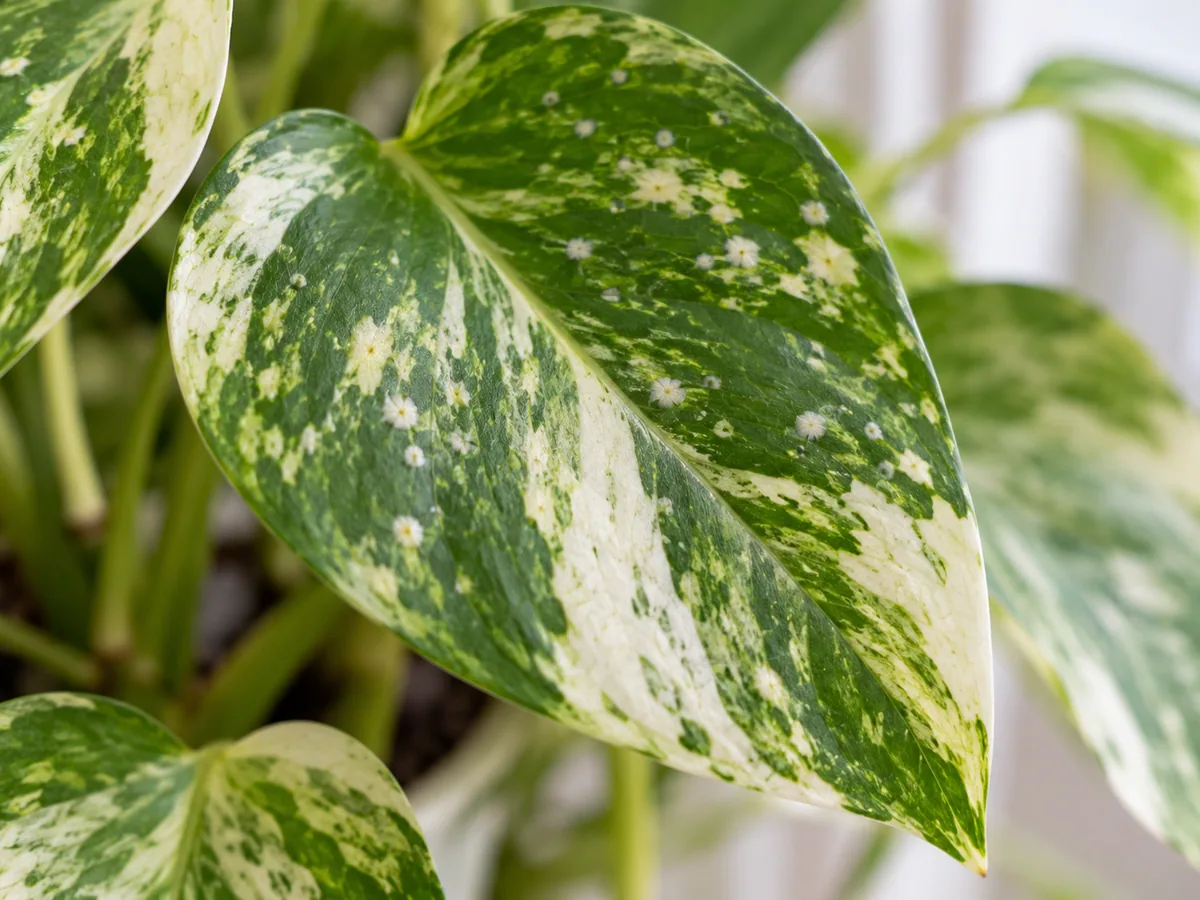
Macro comparison: flat marbled variegation inside the leaf versus powdery, crusty, or cottony spots sitting on the surface.
- Flat marbling (normal): smooth white or cream sectors within the leaf, same gloss as green areas, present since the leaf unfurled
- Powdery film: dry, talcum-like dusting across leaf faces that smears when rubbed — young leaves develop small circular white powdery spots that slowly enlarge
- Cottony clumps: three-dimensional fluffy wax packed into leaf axils, node sheaths, and stem joints rather than spread across leaf faces
- Chalky dots: hard white specks where water dried, often in splash patterns on leaves nearest the watering direction
- Sticky sheen: tacky honeydew on upper leaf surfaces, especially noticeable on pale marbled sections, sometimes with black sooty mold
Because this cultivar grows slowly, new marbled leaves emerge over weeks rather than days — which means a spreading surface problem can cover existing foliage faster than the vine can replace it.
Normal variegation versus problem spots
This is the section that saves most Marble Queen owners an unnecessary treatment. New owners frequently mistake heavy white marbling for mildew or pest damage, especially on leaves that are more white than green.
Variegation on Marble Queen is structural: the white sectors carry little chlorophyll by design, which is also why this cultivar wants bright indirect light and grows more slowly than solid-green Golden Pothos. Those sectors feel identical to green tissue, sit at exactly leaf level, and match the leaf’s vein pattern. They never appear overnight on a previously green leaf.
Run this three-point test before treating anything:
- Touch it. Variegation is perfectly smooth. Mildew feels dry and dusty, mineral crust feels gritty, and mealybug wax feels soft and cottony.
- Wipe it. A damp cloth removes residue and smears mildew but does nothing to variegation.
- Date it. Variegation was there when the leaf unfurled. Anything that appeared over days on a previously clean leaf is acquired, not varietal.
One caution in the other direction: heavy white variegation does make early mildew harder to see, since a faint powdery film blends into pale tissue. Check white sectors at an angle under good light rather than head-on.
Why Marble Queen Pothos gets white spots
Mealybugs are the most consequential cause. Marble Queen’s long trailing vines create exactly the sheltered crevices these insects prefer — leaf axils, node sheaths, and overlapping leaves on dense trailers. NC State Extension notes that pothos should be monitored for mealybugs and scales indoors, and Clemson lists mealybugs among the few pests that bother indoor pothos. Because the vine trails for feet across shelves, crawlers walk from an infested stem onto neighboring pots before the owner notices the first cotton. Confirm with our Mealybugs on Marble Queen Pothos guide if axils hold fluffy wax.
Powdery mildew suits Marble Queen’s typical indoor placement: warm rooms with still air and leaves that stay dry on the surface while humidity swings around them. The white sections show the film less clearly than green ones, so infections often read as “the plant looks dusty” for a week before the classic powder becomes obvious. Dense, unpruned trailers with poor air movement between overlapping leaves are the highest-risk arrangement.
Hard-water and spray residue is the most common benign cause. Misting, overhead watering, or foliar feeds leave calcium and magnesium salts that dry into white specks — chalky dots that wipe away cleanly with a damp cloth. Marble Queen owners mist more often than the plant needs, partly to “help” the variegation, which deposits more residue on exactly the pale leaves where it shows most.
Low light plus chronic damp mix does not create white spots directly, but it sets up both pests and mildew. Low light can cause loss of variegation and weakens new growth, while wet, soft tissue near stem bases is easier for sap feeders to colonize. If spots keep returning on new growth, the vine’s placement — not the spots themselves — is the underlying problem. Review the Marble Queen Pothos light guide and watering guide before assuming repeat spots are a new infestation.
How to confirm the cause
Work the vine in order, from fastest test to slowest:
- Wipe test — Dampen a soft cloth and rub one spotted area. Chalky residue lifts immediately. Mildew smears into a streak. Mealybug wax crushes into a moist smear with pale insect bodies inside. Variegation does nothing.
- Axil inspection — Lift each trailer and open the pockets where petioles meet stems, plus node sheaths and the soil line. Cottony masses here confirm mealybugs even when leaf faces look only mildly spotted.
- Honeydew check — Rub an upper leaf surface. Fresh honeydew feels tacky; dried honeydew hosts black sooty mold that smears dark on a finger. Either confirms sap-feeding insects above.
- Spread pattern — Residue appears where water lands and never expands on its own. Mildew expands across leaf faces over days. Mealybug colonies multiply at joints and along stems. Variegation never spreads after a leaf matures.
- Neighbor scan — Check plants a trailing vine touches, shared saucers, and recent cuttings. Pests travel; residue and variegation do not.
- Care cross-check — Confirm whether the pot dries on schedule. A heavy pot that stays wet for days plus recurring spots points to a placement problem feeding pest or mildew pressure — see Overwatering on Marble Queen Pothos if the mix never dries.
If the wipe test plus axil inspection give you a clear answer, treat that cause. Do not apply fungicide and insecticide together “just in case” before confirming.
First fix for Marble Queen Pothos
Wipe the affected leaves with a damp soft cloth, then isolate the plant only if you found cottony wax or live insects in the axils.
Wiping is diagnostic and therapeutic at once: it removes mineral residue completely, strips early mildew film so you can see whether it returns, and clears honeydew that feeds sooty mold. Use plain water or a drop of mild soap, support each leaf from beneath, and let the foliage dry in gentle air movement the same day. If every spot wiped away and axils are clean, you are done — switch to watering the mix instead of misting and the spots will not return on new growth.
If axils hold cottony masses, isolation comes first because crawlers walk to neighboring plants along touching vines. Follow the full dab-and-repeat routine in the mealybug guide rather than improvising a spray schedule here.
Step-by-step recovery
Match the follow-through to the confirmed cause:
- Residue confirmed — Wipe all affected leaves, flush the pot once so excess salts drain freely, and water the mix directly from here on. Consider filtered water if chalky dots reappear within two weeks.
- Mildew confirmed — Remove the worst-coated leaves, space the vine so air moves between trailers, and avoid wetting foliage. Where infection is limited, prune out and discard diseased tissue as soon as it appears; reserve sulfur or horticultural oil for spreading cases and follow label intervals.
- Mealybugs confirmed — Dab every visible colony with 70% isopropyl alcohol on a swab, repeat every five to seven days for at least three cycles, and step up to insecticidal soap or horticultural oil if colonies persist. Rinse honeydew off marbled leaves between treatments.
- Variegation confirmed — No treatment. If the leaf is mostly white and you want greener growth, raise light gradually per the light guide rather than feeding or spraying.
- Recheck new tips weekly for three to four weeks. Recovery on this slow cultivar reads at the vine tips: clean, well-marbled new leaves mean the cause is resolved even while older spotted leaves still show marks.
Do not fertilize during recovery hoping to push clean growth. Tender new tissue is mealybugs’ preferred food, and excess nitrogen on a stressed variegated vine causes more harm than the spots did. If the pot stays soggy through all of this, fix drainage per the soil guide before any further treatment.
Recovery timeline
Wiped residue looks clean the same day and stays clean if watering habits change — the fastest resolution of the four causes. Mildew film stops expanding within a week of improved airflow and leaf removal, with visibly cleaner new foliage over the following two to three weeks.
Mealybugs take longest: expect two to four weeks of repeated treatment before fresh cotton stops appearing, then another few weeks before vine tips push clean marbled leaves. Marble Queen replaces foliage more slowly than Golden Pothos, so patience here is structural, not failure. Old leaves dulled by honeydew or heavy feeding rarely regain full gloss; they can be trimmed once the vine is stable and growing.
Lookalike symptoms to rule out
| What you see | More likely | Where to go |
|---|---|---|
| White marbling flat in the leaf, smooth, present since unfurling | Normal variegation, not damage | Faded Leaves on Marble Queen Pothos if marbling is actually disappearing |
| Yellow all-over leaves with no surface texture | Watering or nutrient issue | Yellow Leaves on Marble Queen Pothos |
| Fine webbing plus stippled pale dots, worst in dry air | Spider mites, not mealybugs | Spider Mites on Marble Queen Pothos |
| Brown crispy patches, worst on white sectors | Sun scorch through a bright window | Sunburn on Marble Queen Pothos |
| Brown soft margins plus heavy wet pot | Overwatering decline | Overwatering on Marble Queen Pothos |
| Powdery or cottony residue in the wipe pattern | Pests or mildew, not fading | Stays on this page — white spots hub |
Mistakes to avoid
Do not spray fungicide or insecticide on heavy white marbling that was never diagnosed. Variegation cannot be treated off, and unnecessary sprays burn the low-chlorophyll white sectors faster than green tissue.
Do not stop mealybug treatment after one clean-looking week. Wax-protected egg sacs in node sheaths hatch over several weeks, and a single skipped cycle restarts the colony.
Do not mist the leaves daily to “raise humidity.” Marble Queen holds at 40–60% ambient humidity without misting, and each misting deposits fresh mineral residue while keeping foliage damp enough to favor mildew.
Do not place a spotted vine in direct midday sun to “burn off” mildew. White-marbled tissue scorches quickly; improve air movement instead.
Wear gloves and keep treated vines away from pets that chew plants. All Epipremnum aureum varieties contain calcium oxalate crystals toxic to cats and dogs; move floor-trailing vines out of reach until sprays dry.
Marble Queen Pothos care cross-check
While resolving spots, hold baseline care steady:
- Light: Bright indirect light keeps marbling strong and new growth firm. Dim corners slow replacement leaves and stretch recovery time.
- Water: Allow the top 3–5 cm of mix to dry before watering. Saucers should never hold standing water — chronic wet mix weakens the vine while you fight pests or mildew.
- Soil and pot: Standard potting mix with 20–30% perlite, pH 6.0–6.5. If the pot stays heavy for days after watering, the root environment is part of the problem.
- Airflow: Gentle circulation that dries wiped or rinsed leaves within hours. Avoid heat vents blasting directly onto wet foliage.
Fix the confirmed surface cause first. Repotting, relocating, and fertilizing can wait until spots stop spreading and new tips look clean.
How to prevent white spots next time
Water the mix, not the leaves. Bottom-water or direct soil watering with room-temperature water keeps mineral deposits off the foliage entirely, and filtered water ends chalky buildup if your tap runs hard.
Quarantine every new plant for two weeks and inspect Marble Queen axils monthly — open two or three nodes per vine during routine watering. Long trailers hide early colonies where a glance across the room never reaches.
Keep trailers separated so vines do not rest on neighboring foliage, and wipe dust from leaves a few times a year so new residue, film, or wax stands out against the marbling. Prune congested sections lightly to let air move between overlapping leaves, disinfecting scissors between plants.
When to worry
Treat as urgent when cottony clusters cover most nodes on several vines, a powdery film spreads across multiple leaves within days despite airflow fixes, new marbled leaves emerge distorted or sticky, stems soften at the base, or ants swarm the pot and saucer. These patterns mean active pests or advancing infection, not residue.
A few chalky dots that wipe off, or a faint film on one leaf that never spreads after a wipe and airflow fix, is routine maintenance. Watch the vine tips — clean new marbled growth is the all-clear even when older leaves keep their marks.
Conclusion
White spots on Marble Queen Pothos reward a two-minute diagnosis before any treatment, because the plant’s own marbling is the most common lookalike. Wipe one spot, open two axils, and the texture tells you which of the four stories you are in: flat variegation needs nothing, chalky residue needs a watering change, powdery film needs airflow and pruning, and cottony axil wax needs isolation plus repeated alcohol dabs. That order fits a slow-growing variegated trailer far better than spraying first and diagnosing later.
When to use this page vs other Marble Queen Pothos guides
- Marble Queen Pothos problems hub — Browse all common issues on this species when spots come with other symptoms.
- Marble Queen Pothos overview — Start here for general placement, watering rhythm, and variegation basics.
- Mealybugs on Marble Queen Pothos — Use when axils hold cottony wax; the full dab-and-repeat protocol lives there.
- Yellow Leaves on Marble Queen Pothos — Different entry point when leaves yellow without surface texture.
- Faded Leaves on Marble Queen Pothos — Different entry point when marbling itself is disappearing rather than gaining spots.