Black Spots on Marble Queen Pothos: Causes, Checks & Fixes
Quick answer
Black spots on Marble Queen Pothos most often mean wet foliage feeding bacterial or fungal leaf spot, or scorched white tissue after sun, cold, or fertilizer excess. First fix: isolate the plant, snip the worst spotted leaves with clean scissors, and keep water off the leaves while the top 3-5 cm of mix dries.
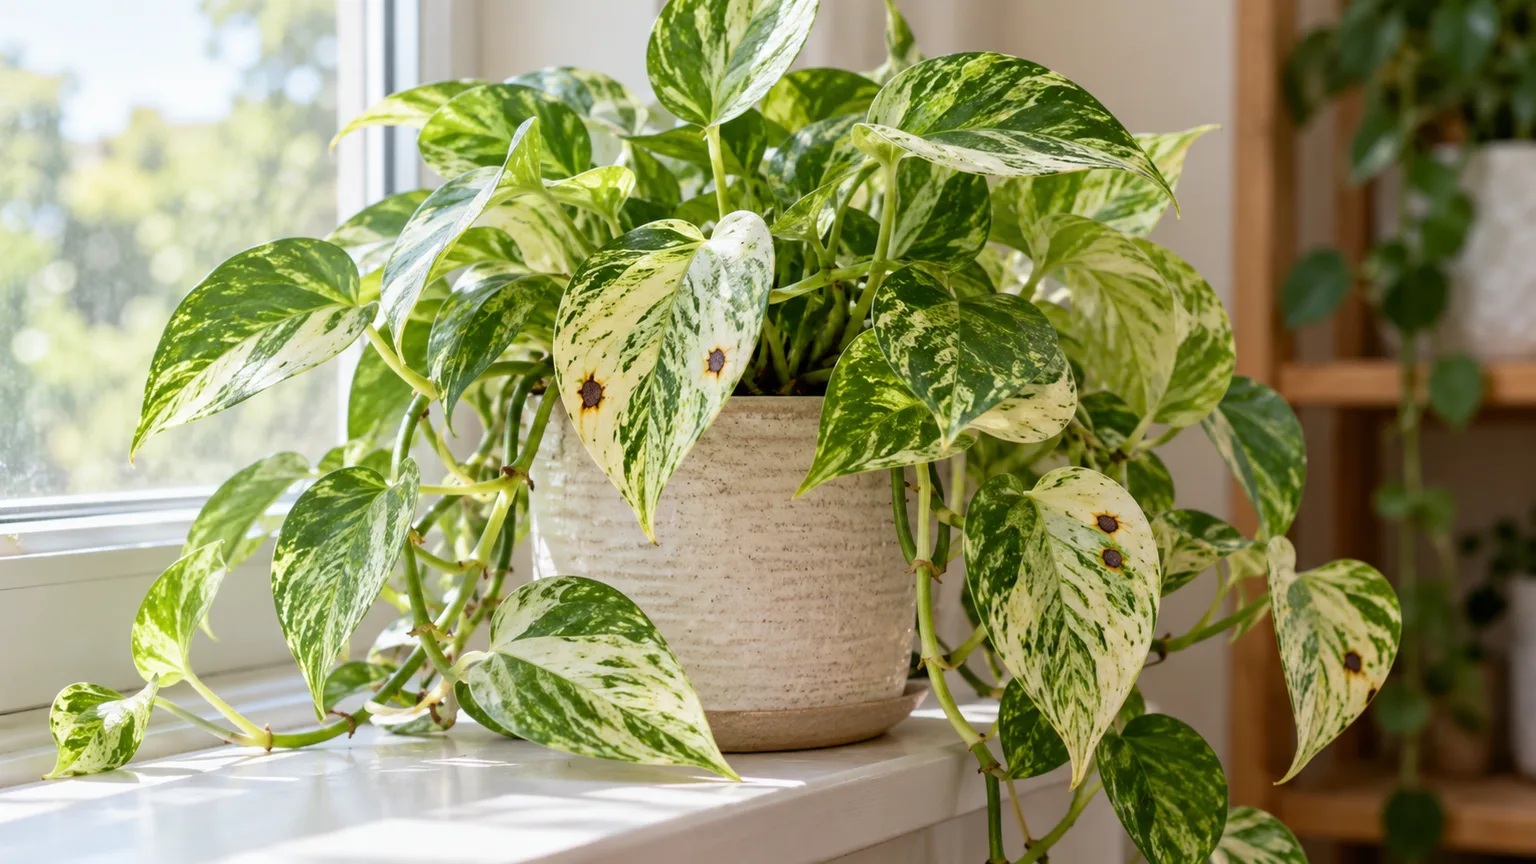
Black Spots on Marble Queen Pothos: Causes, Checks & Fixes
This guide covers black spots on Marble Queen Pothos. See also the general Black Spots guide, watering, and light pages for this plant.
Black Spots on Marble Queen Pothos: Causes, Checks & Fixes
Quick answer
Black spots on Marble Queen Pothos (Epipremnum aureum ‘Marble Queen’) usually come from one of two directions: wet leaves feeding bacterial or fungal leaf spot, or injury to the pale tissue from strong sun, cold air, or fertilizer excess. The white marbled sections carry little chlorophyll, so they scorch and collapse first while neighboring green tissue still looks fine. First fix: isolate the plant, cut away the worst spotted leaves with disinfected scissors, and water only at soil level until the top 3–5 cm of mix is dry. For the cultivar baseline behind this guide, see the Marble Queen overview.
What black spots look like on Marble Queen Pothos
On this cultivar, spots rarely scatter evenly. They cluster on the creamy-white marbling first, then creep into green borders as the damage advances. Fresh bacterial spots look dark, slightly sunken, and water-soaked with a yellow halo; older ones dry to crisp black centers that may crack. Fungal spots tend to stay rounder with tan middles. Scorch and cold injury, by contrast, appear as dry papery patches with no halo, usually on the leaves that faced the window or the draft.
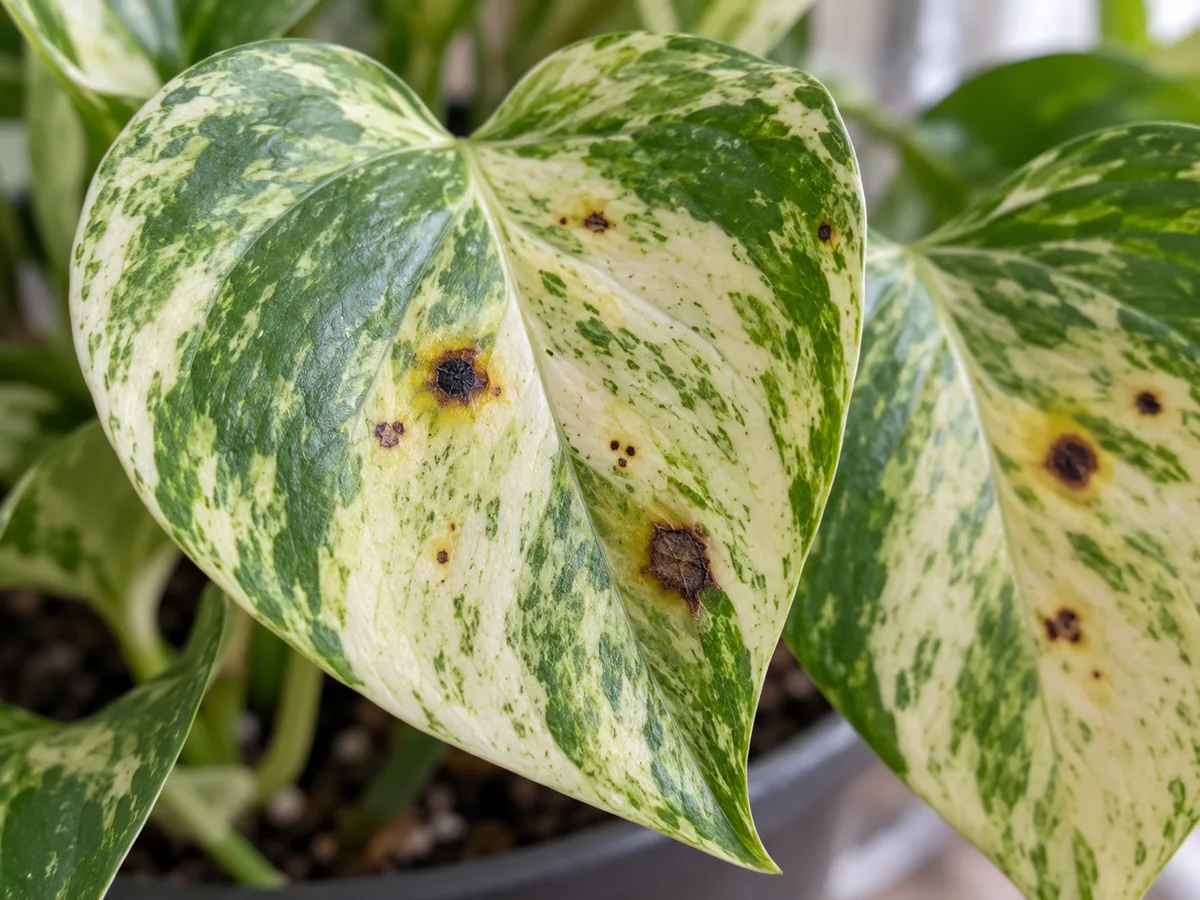
Close-up of black spotting on Marble Queen Pothos: note whether lesions sit in the white marbling, carry yellow halos, or look dry and papery.
Because this plant trails, read the spots along the vine: damage confined to the oldest leaves near the pot often reflects past stress or natural shedding, while spots appearing on young leaves near the tips signal an active, ongoing cause. NC State Extension notes pothos prefers bright, indirect light and a well-drained potting medium that dries out between waterings — leaves that stay wet in dim, still air break both of those conditions at once. For the general mechanics of how leaf spots form on any houseplant, see the black spots hub; everything below is about how they behave on Marble Queen specifically.
Why the white marbling spots first
Marble Queen’s signature is also its weak point. The white and cream zones contain almost no chlorophyll, so they photosynthesize poorly, heat up faster in direct sun, and chill faster near cold glass. A light level that a solid-green pothos tolerates can bleach and then blacken Marble Queen’s pale patches within a day — which is why this cultivar is often described as needing more careful placement than its green relatives, a point also reflected in the sunburn guide.
The same thin-chlorophyll tissue is slower to wall off infection. Once bacteria or fungi enter through a wet pore or a tiny tear in a soft white section, the lesion expands with less resistance than it would in dense green tissue. That is why crowded Marble Queens with leaves pressed against each other — holding moisture between overlapping blades — develop clusters of spots exactly where leaves touch. Good spacing and airflow matter more for this cultivar than for thicker-leaved plants.
The most likely causes on this cultivar
Wet foliage plus still air (bacterial or fungal leaf spot). Misting, showering the plant, or leaves that stay damp overnight give pathogens the moisture window they need, and fungal diseases are among the most common causes of black spots on pothos. Extension guidance on bacterial leaf spot describes the classic signature: small water-soaked spots that turn dark brown or black, often with yellow halos. If your spots match that description and are multiplying on new leaves, treat this as the leading hypothesis.
Chronically wet root zone. Overwatering is a leading trigger for black spotting on pothos, because oxygen-starved roots cannot support foliage and stressed leaves succumb to secondary infection. Marble Queen is a slower grower than Golden Pothos, so the same weekly pour keeps its mix soggy longer. If the pot feels heavy days after watering and spots arrive alongside yellowing lower leaves, suspect the roots first — the overwatering guide walks through the dry-down check.
Sun scorch on white sections. A sudden move to a south-facing sill or unfiltered afternoon sun bleaches white patches to tan, then black. Unlike disease, scorch stops appearing once the plant is moved — old marks stay, new leaves emerge clean. Compare with the brown leaves and brown tips patterns before deciding.
Cold damage. Marble Queen prefers 18–29°C and suffers below about 10°C. Leaves touching cold windowpanes or sitting in a winter draft develop dark waterlogged-looking patches that blacken as tissue dies. Cold injury appears within days of exposure and affects whichever side faced the chill.
Fertilizer or salt burn. Full-strength feeds scorch the low-chlorophyll white zones first, leaving crisp dark margins and speckles. Salt crust on the mix surface is the giveaway. Cross-check the fertilizer burn pattern if you fed recently.
How to confirm the cause
Work through these checks in order, on the plant as it sits today:
- Touch and lift. Push a finger 3–5 cm into the mix and lift the pot. Heavy, damp mix days after watering points to root-zone trouble; light, dry mix rules it out.
- Map the spots. Are they in white tissue only (scorch, burn, cold), haloed and spreading (bacterial), round with tan centers (fungal), or limited to leaves that touched glass (cold)?
- Smell and squeeze. Sour mix odor or soft stems at the nodes means rot is involved — read the root rot guide next.
- Check the undersides. Sticky residue or fine webbing implicates pests rather than disease; see spider mites and sticky leaves.
- Review the last two weeks. New fertilizer, a moved pot, a cold night, overhead watering, or misting usually names the culprit.
| Pattern you see | Most likely cause | Next step |
|---|---|---|
| Water-soaked dark spots with yellow halos, spreading to new leaves | Bacterial leaf spot | Sanitize and isolate; keep foliage dry |
| Round spots with tan centers in humid, crowded growth | Fungal leaf spot | Improve airflow; water at soil level |
| Dry papery blackening on sun-facing white sections | Sun scorch | Move to filtered light; see sunburn |
| Dark patches on the side that touched glass or a draft | Cold injury | Move away from cold; prune dead tissue |
| Crisp dark edges after feeding, salt crust on mix | Fertilizer or salt burn | Flush soil; see fertilizer burn |
| Spots plus heavy wet pot and yellowing lower leaves | Wet roots with secondary infection | Fix drainage; see overwatering |
| Spots plus webbing or sticky film | Pest-linked sooty mold or damage | Inspect undersides; see mold on soil for humidity clues |
The first fix to try
Remove the disease pressure, not the whole plant. With disinfected scissors, cut off the three to five worst spotted leaves at the base of each petiole, bag them, and wash your hands and tools. Then move the plant to bright indirect light with gentle air movement and commit to watering only at soil level. Extension guidance for bacterial leaf spot centers on exactly this combination: remove affected leaves promptly and switch away from overhead watering. One targeted correction lets you read whether new spots stop forming over the next week.
Step-by-step recovery
After the first fix, follow this sequence over the next two to three weeks:
- Dry the canopy. Stop misting entirely. If you shower plants, keep this one out of the rotation until new growth is clean. Leaf-spot guidance for ornamentals stresses keeping foliage dry and improving air movement: avoid overhead watering and give plants airflow so leaves dry.
- Stabilize the root zone. Let the top 3–5 cm dry between waterings and empty any cache pot so the nursery pot never sits in water. If the mix stays soggy past ten days, the wrong soil mix page covers the airy repot.
- Prune in rounds, not all at once. Remove badly spotted leaves over two sessions a few days apart so the plant keeps enough foliage to photosynthesize. Never strip more than a third of the leaves in one go.
- Hold fertilizer. Skip feeding until two or three new leaves unfurl cleanly; fertilizer on damaged tissue burns the very white sections you are trying to save.
- Consider node cuttings as backup. Pothos vines root readily in water from stem nodes, so if a long vine is heavily spotted, snip a healthy tip with two nodes and root it separately while the mother plant recovers.
Track progress by new growth: clean marbled leaves unfurling at the vine tips mean recovery. Spots appearing on leaves that emerged after your fix mean the cause is still active — recheck foliage wetness and drainage rather than pruning harder.
Mistakes to avoid
- Showering the plant to “clean” the spots. Wetting infected foliage spreads bacteria and restarts the moisture window you just closed.
- Spraying copper or neem on day one without a diagnosis. Scorch, cold, and fertilizer burn do not respond to sprays, and coating stressed white tissue can add chemical burn. Confirm spreading haloed lesions first.
- Stripping every spotted leaf at once. Marble Queen grows slowly; defoliating it stalls recovery for months. Remove the worst, keep the rest, reassess weekly.
- Repotting, moving, pruning, and feeding in the same afternoon. Each change is a stress event. Fix foliage dryness first, drainage second, and feeding last.
- Handling barehanded around pets. All golden pothos types contain insoluble calcium oxalates that irritate mouths, so wear gloves when pruning spotted leaves and keep trimmings away from cats and dogs.
Marble Queen Pothos care cross-check
Black spots recur when baseline care drifts. Confirm the plant gets bright indirect light rather than deep shade or harsh direct sun — review the light guide if new leaves are reverting to green. Check the mix against the soil guide: standard potting mix with 20–30 percent perlite that drains freely. Revisit the watering guide rhythm of every 7–14 days by dryness, not calendar, and keep humidity in the 40–60 percent range with air movement rather than misting.
How to prevent it next time
Water in the morning at soil level so any splashed foliage dries within hours, and space vines so leaves do not press together and trap moisture. Quarantine new plants for two weeks before placing them beside your Marble Queen, since leaf-spot bacteria travel on wet shared surfaces. Wipe scissors with alcohol between plants, clear fallen leaves from the pot surface — fallen infected debris keeps spores near the plant — and feed at half strength only during active growth. A yearly check of drainage holes and mix compaction, covered in the compacted soil guide, keeps the root zone from turning a foliage problem into a root problem.
When to worry
Most cases resolve with sanitation and dryness. Escalate when spots double across the plant within a week despite dry foliage, when stems soften at multiple nodes, or when the mix smells sour — that combination means infection plus root failure, and you should take healthy node cuttings immediately as insurance. If the whole root ball is black and mushy with no firm white roots, the mother plant is unlikely to recover; focus on the cuttings.
When to use this page vs other Marble Queen Pothos guides
- Marble Queen Pothos problems hub — browse all common issues on this cultivar when you are unsure black spots is the right match.
- Brown leaves on Marble Queen Pothos — use when damage is broad browning rather than distinct dark spots.
- White spots on Marble Queen Pothos — use when marks are pale, powdery, or pest-related rather than dark lesions.
- Rust disease on Marble Queen Pothos — use when pustules look orange-brown and powdery rather than black and water-soaked.
- Root rot on Marble Queen Pothos — use when stems soften and the mix smells sour alongside the spots.
Related Marble Queen Pothos guides
- Marble Queen Pothos overview
- Marble Queen Pothos watering
- Marble Queen Pothos light
- Marble Queen Pothos soil
- Overwatering on Marble Queen Pothos
- Root rot on Marble Queen Pothos
- Yellow leaves on Marble Queen Pothos
- Brown leaves on Marble Queen Pothos
- Sunburn on Marble Queen Pothos
- Marble Queen Pothos problems hub