Overwatering on Moringa: Taproot Rot Signs, Soil Checks &
Quick answer
Overwatering on Moringa causes widespread yellowing and shedding of lower compound leaves, translucent water-soaked leaflets, and a soft stem base due to taproot hypoxia in saturated soil. Immediately halt irrigation, confirm pot drainage, aerate wet soil, and allow the top 5–7 cm to dry before watering again. If the stem collar softens or soil smells sour, unpot to inspect and prune rotted taproot tissue.
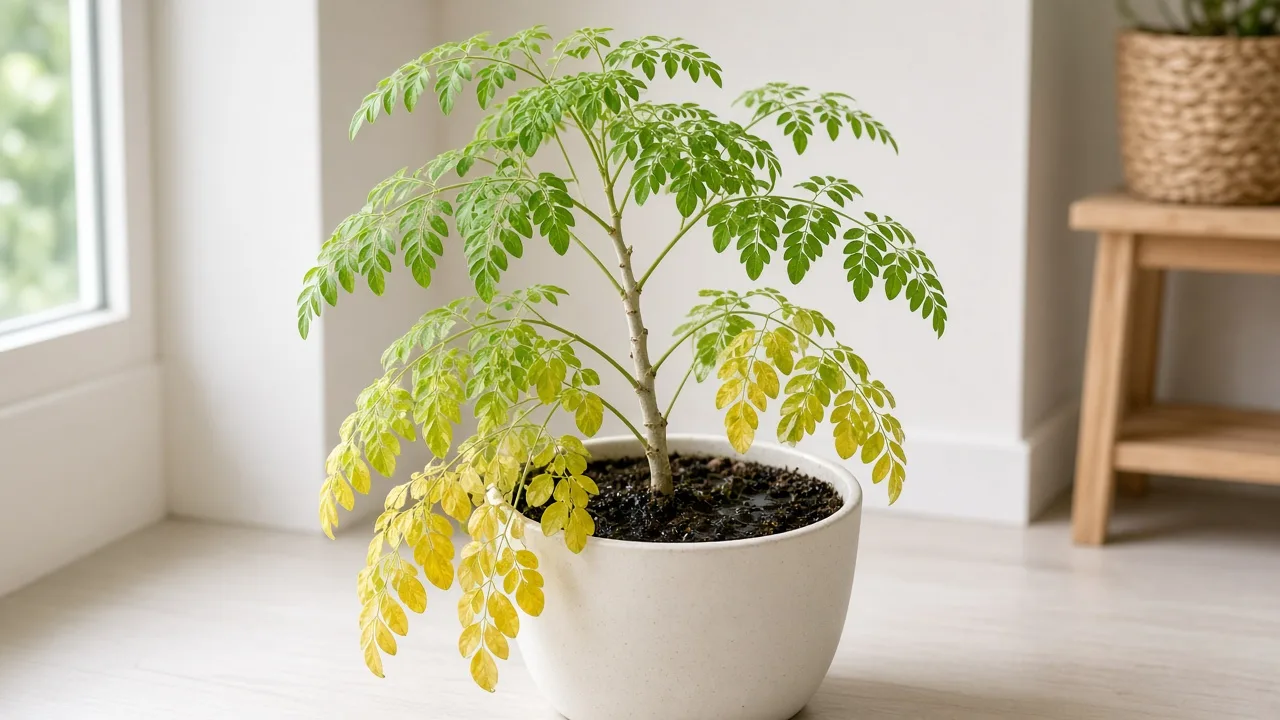
Overwatering on Moringa: Taproot Rot Signs, Soil Checks & Fixes
This guide covers overwatering on Moringa. See also the general Overwatering guide, watering, and light pages for this plant.
Overwatering on Moringa: Taproot Rot Signs, Soil Checks & Fixes
Quick answer
Overwatering on Moringa oleifera (drumstick tree, sahjan, or horseradish tree) is the single fastest killer of container-grown trees. Unlike moisture-loving foliage houseplants, moringa evolved in dry, semi-arid subtropical regions of the Indian subcontinent. It develops a large, fleshy, tuberous taproot specialized in storing reserves during long seasonal droughts. When grown in heavy, waterlogged media, this starch-rich storage organ is quickly deprived of atmospheric oxygen, triggering rapid taproot hypoxia, cellular collapse, and bacterial soft rot.
The hallmark symptoms of an overwatered moringa are widespread yellowing and premature shedding of lower tripinnate compound leaves, delicate leaflets that appear water-soaked or translucent before dropping, a soft or spongy stem collar near the soil line, and the wilt paradox—the upper canopy droops limp while the pot feels heavy, cold, and drenched.
Your first action: stop all watering immediately. Empty any standing water from saucers or cachepots, move the container into full sun, and probe the top 5–7 cm of substrate. If the soil remains soggy or emits a sour marshy odor, aerate the root zone immediately. If the base of the trunk feels mushy, escalate to our Moringa root rot protocol without delay.
For a broader understanding of how waterlogged soil suffocates root systems across species, explore our universal overwatering guide. On moringa, however, successful treatment requires understanding the tree’s unique tuberous root morphology.
Botanical biology: why moringa’s tuberous taproot drowns in wet soil
To keep Moringa oleifera healthy, you must look beneath the soil surface. According to botanical data from Purdue University NewCROP, moringa is an exceptionally fast-growing, drought-resistant tree that thrives naturally on sandy, loamy, free-draining alluvial soils. Even as a young seedling, moringa puts tremendous energy into developing a thick, succulent taproot that resembles a white carrot or horseradish root.
This tuberous taproot is filled with parenchymal storage cells designed to hoard water and nutrients during arid dry spells. However, this exact evolutionary advantage becomes an acute liability in an enclosed container:
- High cellular respiration in storage parenchyma: Fleshy root tubers require continuous gas exchange. Healthy roots absorb oxygen ($O_2$) from soil air pores (macropores) to drive cellular respiration and synthesize ATP.
- Rapid oxygen depletion (hypoxia): When dense potting soil is watered too frequently, water displaces all air from the pore network. As documented by Missouri Botanical Garden, oxygen moves through water thousands of times slower than through open air pores. Within 24 to 48 hours of saturation, the root zone becomes anoxic.
- Cell membrane rupture and fermentation: Deprived of oxygen, root cells switch to anaerobic fermentation, producing ethanol and toxic metabolic byproducts. Cell membranes rupture, releasing stored starches and sugars directly into the damp substrate.
- Opportunistic fungal and bacterial colonization: Weakened root tips and ruptured tubers are readily attacked by opportunistic water molds (Pythium, Phytophthora) and soft-rot bacteria (Pectobacterium). The firm white taproot rapidly degenerates into a brown, water-soaked, foul-smelling pulp.
As Feedipedia underscores, while moringa can endure precipitation as low as 400 mm annually, it has virtually zero tolerance for waterlogging. A single prolonged saturation event during cloudy weather can destroy months of root development.
What overwatering looks like on Moringa
Moringa displays unmistakable visual indicators when its subterranean taproot is drowning. Because moringa produces intricate bipinnate to tripinnate compound leaves composed of dozens of miniature leaflets, moisture stress manifests differently than on large broadleaf aroids.
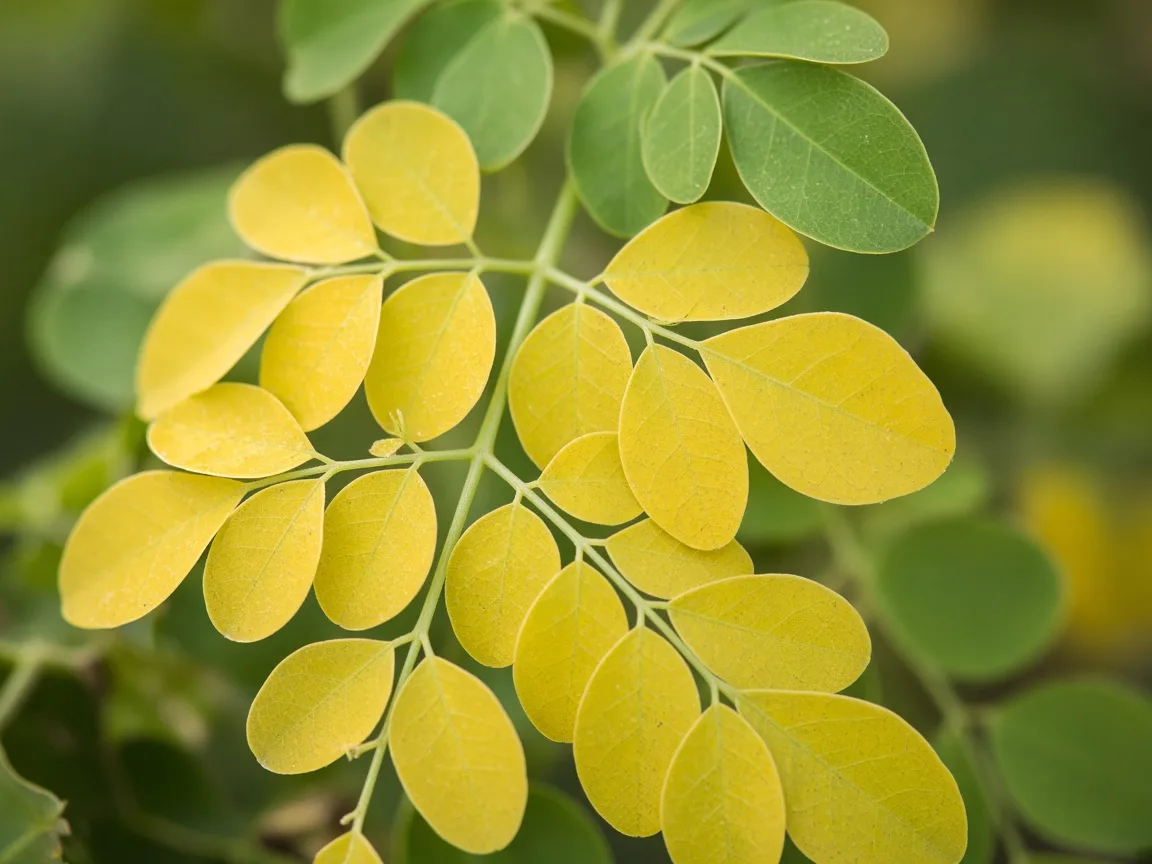
Translucent chlorosis and leaflet shedding on Moringa oleifera—early signs that root hypoxia is choking water and nutrient delivery.
Early warning signs
- Translucent, water-logged leaflets: Before turning yellow, individual leaflets on the lowest compound branches take on a pale, glassy, water-soaked appearance as cellular turgor ruptures internal walls.
- Lower compound leaf chlorosis: The oldest leaves at the lower third of the trunk turn a uniform golden-yellow, starting from the leaflet margins and progressing inwards toward the petiolule and rachis.
- Persistent pot heaviness: The container remains heavy, cold, and dark for 4 to 7 days after watering, indicating that the tree has ceased moisture uptake.
- Foliage shedding at the lightest touch: Brushing against an overwatered branch causes dozens of yellow and pale green leaflets to shower down onto the rim of the pot.
Advanced distress signals
- The wilt paradox: The tender growing tips and upper compound fronds wilt and droop limply even though the pot is drenched. Because the fine feeder root tips have rotted, the tree can no longer pump water upward to meet the transpiration demand of the crown.
- Spongy or mushy stem collar: The green base of the trunk where it penetrates the soil line softens. When gently squeezed between your thumb and forefinger, the bark feels hollow, slippery, or watery rather than firm and fibrous.
- Sour, swampy container odor: Anaerobic decay produces a distinct fermented or marshy smell escaping through the drainage holes.
- Complete defoliation: In acute cases, the tree sheds entire leaf stalks (rachises), leaving behind a bare, greenish-gray trunk that looks like a dead stick.
When to use this guide vs other Moringa problem guides
Yellowing foliage and limp growth on moringa can arise from multiple environmental triggers. Use the diagnostic matrix below to determine whether overwatering is your primary culprit or if you need a specialized sibling guide:
| Observed Symptom Pattern | Soil Moisture & Pot Weight | Most Likely Cause | Primary Guide |
|---|---|---|---|
| Yellow lower compound leaves, translucent leaflets, limp shoots | Pot is heavy, cold, and soggy 5–7 cm deep | Overwatering & taproot hypoxia | Stay on this guide |
| Crispy brown leaflet edges, dry soil, entire branch curling | Pot is featherweight, mix is bone-dry and cracked | Underwatering | Moringa Underwatering Guide |
| Yellowing leaves, foul odor, black mushy taproot tissue | Soil is permanently saturated; trunk collar soft | Advanced Root Rot | Moringa Root Rot Guide |
| Diffuse yellowing across old foliage, firm green stems, dry-down normal | Soil dries on normal 2–4 day rhythm | Nutrient deficiency | Moringa Yellow Leaves Guide |
| Stretched, pale, weak stems with widely spaced compound leaves | Variable; often damp due to slow transpiration | Insufficient sunlight | Moringa Light Guide |
| Fine webbing under leaflets, stippled yellow foliage | Soil dries normally; high heat and low humidity | Spider mites | Moringa Spider Mites Guide |
| Persistent wet feet despite careful watering | Pot drainage holes clogged or mix is dense clay | Inadequate potting mix | Moringa Soil Guide |
Diagnostic inspection: the 4-step root zone check
Before applying treatments, confirm overwatering with this hands-on diagnostic sequence:
1. The 5–7 cm depth dowel test
Do not judge moisture by looking at the soil crust. The surface of a porous mix can appear dry within hours in hot sun while the bottom 15 cm remains completely waterlogged. Push an untreated wooden chopstick or dowel 5 to 7 cm (2 to 3 inches) deep into the root zone midway between the stem and the pot wall.
- Overwatered: The stick emerges dark, cool, and coated in wet, clinging soil particles.
- Ready for water: The stick emerges clean, pale, and dry.
2. The container heft check
Lift your container. A healthy moringa pot that has completed its dry-down cycle feels surprisingly lightweight. If the pot feels like an anchor days after watering, the perched water table is smothering the taproot.
3. Trunk collar squeeze test
Gently pinch the main trunk directly at the soil line. A healthy moringa has a firm, resilient stem that resists compression. If the collar gives way with a spongy, soft sensation, waterlogging has penetrated the vascular cambium, requiring urgent surgical triage.
4. Drainage hole drainage sniff
Tilt the pot and inspect the drainage holes. Sniff the base of the root ball. A healthy root zone smells like fresh woodland humus. A sour, ammonia-like, or sulfurous smell indicates active anaerobic bacterial decomposition.
Step-by-step triage & recovery protocol
If your moringa is suffering from overwatering, follow this structured four-phase rescue protocol. Do not fertilize, do not prune green foliage, and do not water again until recovery is underway.
+-------------------------------------------------------------+
|              MORINGA OVERWATERING TRIAGE PATHWAY            |
+-------------------------------------------------------------+
                               |
                [Examine Pot Weight & Soil Depth]
                               |
            +------------------+------------------+
            |                                     |
   [Firm Collar / Damp Mix]              [Mushy Collar / Sour Odor]
            |                                     |
    PHASE 1: MOISTURE SHUTOFF            PHASE 2: UNPOTTING & ROOT SURGERY
    - Stop irrigation entirely           - Unpot tree immediately
    - Elevate pot on pot feet            - Wash away anaerobic mix
    - Wick water with towels             - Cut soft, brown taproot tissue
    - Move to full sun & warmth          - Dust wounds with sulfur powder
            |                                     |
            +------------------+------------------+
                               |
                   PHASE 3: SOIL REMEDIATION
                   - 50% coarse sand/pumice + 50% peat/loam
                   - Clay/terracotta pot with large drain holes
                   - Replant collar proud of soil line
                               |
                   PHASE 4: REGULATED RECOVERY
                   - Withhold fertilizer until new growth
                   - Warm temperatures (>22°C / 72°F)
                   - Resume soak-and-dry watering
Phase 1: Emergency moisture evacuation & root aeration
For mild to moderate cases where the stem collar remains firm:
- Stop watering immediately: Discontinue all supplemental irrigation.
- Eliminate perched water: Remove the nursery pot from any decorative outer cachepot. If the pot rests on a saucer, elevate it on pot feet or wooden shims so air circulates beneath the drainage holes.
- Wick excess water: Set the container onto a thick pad of corrugated cardboard or folded cotton towels. The capillary action will draw gravity-trapped water out through the drainage holes within a few hours.
- Surface aeration: Take a sterilized chopstick and gently poke several vertical holes into the top 5 cm of potting mix around the perimeter of the pot. Avoid jabbing the central taproot. This opens oxygen channels into the suffocating substrate.
- Maximize warmth and sunlight: Move the plant to the warmest, sunniest location available. Winrock International notes that moringa requires full sun exposure for vigorous metabolic activity. High light stimulates transpiration, pulling trapped water out of the pot.
Phase 2: Unpotting and surgical root triage (if rot has started)
If the stem base is soft, the mix smells foul, or yellowing spreads uncontrollably:
- Carefully extract the tree: Gently tilt the container and slide the moringa out. Do not pull violently on the trunk, as a waterlogged taproot snaps easily.
- Wash the root system: Submerge the root ball in a bucket of tepid water to rinse away old, anaerobic soil. Inspect the swollen white taproot and lateral feeder roots.
- Excise decayed tissue: Healthy moringa taproots are firm, ivory-white, or pale cream inside with a crisp texture. Decayed root tissue is water-soaked, spongy, dark brown, or black. Using a razor or pruning shears sterilized in 70% isopropyl alcohol, prune away all rotted root segments back to firm, clean, white tissue.
- Antimicrobial treatment: Dust the cut root surfaces with powdered horticultural sulfur or ground cinnamon. Allow the bare root tree to rest on clean paper towels in a shaded, warm room for 4 to 8 hours so the cut surfaces can form a protective callus.
Phase 3: Soil remediation & repotting
Never put a recovering moringa back into the same heavy soil:
- Formulate a gritty mineral mix: Moringa requires an extremely porous medium. Blend:
- 40% Coarse horticultural sand or fine gravel
- 20% Pumice or coarse perlite
- 40% High-quality peat moss or coco coir blended with aged compost For detailed soil formulas, consult our comprehensive Moringa soil guide.
- Select the right container: Use an unglazed terracotta pot with ample bottom drainage holes. Terracotta breathes through its porous walls, facilitating rapid evaporation. Avoid oversized containers; choose a pot that accommodates the taproot with only 3–5 cm of space around the root mass.
- Plant high: Position the tree so the root flare (crown collar) sits slightly proud—about 1 cm above the surrounding soil level. This prevents standing moisture from pooling directly against the softwood trunk.
- Do not water immediately: Settle the dry-to-barely-damp mix around the roots. Withhold water for 2 to 3 days to let trimmed root ends heal without moisture pressure. Then give a light drink around the pot rim.
Phase 4: Light, warmth, and regulated recovery
- Temperature: Keep ambient temperatures between 24°C and 35°C (75°F to 95°F). Moringa growth stalls in temperatures below 18°C (65°F), prolonging wet soil hazards.
- Fertilizer moratorium: Never fertilize an overwatered moringa. Damaged root hairs cannot process fertilizer salts, and applying nitrogen to compromised roots causes osmotic shock and severe root burn. Wait until the tree has produced two sets of healthy, fully expanded compound leaves before reintroducing a diluted balanced fertilizer per our Moringa fertilizer guide.
Lookalike symptoms and differential diagnosis
Before assuming yellowing foliage is solely caused by overwatering, rule out lookalike cultural stressors using this comparison table:
| Visual Appearance | Primary Location | Stem Collar Texture | Distinguishing Characteristics | Confirmed Stressor |
|---|---|---|---|---|
| Translucent leaflets turning bright yellow; rapid drop | Lowest compound leaves first | Spongy, soft, or water-soaked | Pot stays wet 5+ days; soggy soil smell; limp canopy on wet dirt | Overwatering (Hypoxia) |
| Crispy, parchment-dry leaflets curling inward | Whole plant, starting at leaf margins | Rigid, dry, fibrous | Pot is featherweight; soil pulls away from pot edges; rapid perk-up after soak | Underwatering |
| Stretched stems, sparse foliage, slow yellowing | Lower leaves drop; upper internodes long | Slender, weak, but firm | Stems lean toward light; soil dries slowly due to lack of photosynthetically active radiation | Low Light Stress |
| Uniform pale green/yellow leaflets without leaf drop | Older leaves uniformly pale | Firm, healthy, normal | No mushy tissue; veins and blades lighten evenly; responds to mild nitrogen | Nitrogen Deficiency |
| Fine yellow speckling, dusty leaf undersides | Random leaflets across canopy | Firm | Microscopic mites and silk webbing visible under magnification | Spider Mites |
| Sudden leaflet drop without color change | Entire canopy overnight | Firm | Follows exposure to cold drafts or temperatures dropping below 10°C (50°F) | Cold Shock |
Critical mistakes to avoid with an overwatered Moringa
- The “thirsty wilt” trap: Seeing limp leaves and pouring on more water is the primary cause of moringa mortality. Always verify pot weight and soil depth before watering a wilting plant.
- The daily sip routine: Giving small splashes of water every morning keeps the topsoil perpetually damp, suffocating surface feeder roots and inviting fungus gnats, while leaving the lower taproot in an unhealthy perched moisture zone.
- Retaining standing saucer water: Leaving runoff pooled in saucers or outer cachepots for more than 20 minutes turns your container into a swamp. As Plants For A Future notes, moringa requires free-draining ground without stagnant water.
- Repotting into an oversized container to “give roots room to dry”: Large volumes of potting soil act like a damp sponge. Extra soil without roots to drink it stays saturated for weeks, accelerating taproot rot.
- Misting the foliage: Moringa is an arid-to-subtropical tree that thrives in dry heat. Misting does not hydrate roots; it promotes fungal leaf spots on compromised leaflets.
Long-term prevention & seasonal watering rhythm
Preventing overwatering requires synchronizing your watering schedule with the natural growth cycles of Moringa oleifera:
Summer peak growth (March – June / High heat)
When temperatures exceed 30°C (86°F) and the tree is in full sun, transpiration is fierce. Young potted trees may require a deep drench every 2 to 3 days. However, you must always verify that the top 5 to 7 cm of soil is dry before applying water. Use the deep-soak method: apply water slowly until it runs freely from the bottom holes, then discard all runoff.
Monsoon season (July – September / High humidity)
High ambient humidity and cloudy skies drastically slash transpiration rates. Move outdoor container moringas under roof eaves or patio covers to shield them from continuous torrential downpours. Never water on a schedule during monsoon; inspect the soil depth with a dowel, and withhold irrigation as long as high atmospheric humidity keeps the root zone damp.
Winter dormancy (November – February / Cool weather)
In temperate regions or subtropical winters, moringa growth slows dramatically, and trees may naturally shed a portion of their compound foliage. During this period, water consumption plummets. Water only every 10 to 20 days, or just enough to keep the tuberous taproot from shriveling completely. The soil must dry almost completely between waterings. Review our detailed Moringa watering guide for full seasonal moisture charts.
Related tool
Take the guesswork out of container moisture. Use our custom watering calculator to determine exact watering frequencies based on your container size, pot material, sun exposure, and local climate:
Open the Plant Watering Calculator for Moringa
Related Moringa care & problem guides
Deepen your cultivation knowledge with our comprehensive care guides and symptom resources:
- Moringa Care Hub — Complete overview of growing Moringa oleifera indoors and in patio containers.
- Moringa Watering Guide — Detailed soak-and-dry techniques, dry-down depth indicators, and seasonal moisture dials.
- Moringa Soil Guide — Sandy, mineral-rich potting mix recipes that ensure free drainage and protect the taproot.
- Moringa Root Rot Guide — Advanced surgical triage, fungicide options, and taproot rehabilitation protocols.
- Moringa Repotting Guide — Safe transplanting methods to step up container size without causing taproot shock.
- Moringa Yellow Leaves Guide — Differentiating between nutritional chlorosis, normal leaf drop, and water stress.
- Moringa Light Guide — Full-spectrum sun requirements to boost canopy transpiration and fuel root health.
- Moringa Underwatering Guide — Recognizing true drought stress, leaf curl, and rapid recovery methods.