Underwatering on Moringa: Causes, Checks & Fixes
Quick answer
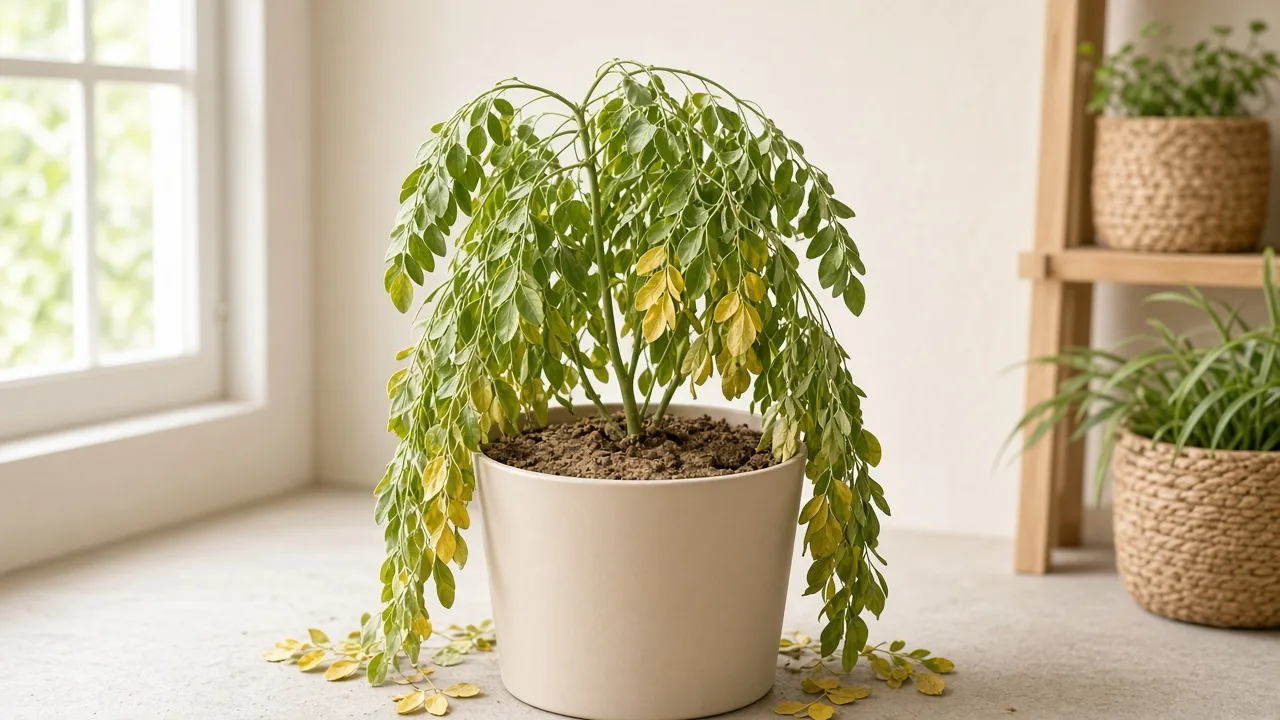
Underwatering on Moringa oleifera triggers drought-deciduous leaf shedding: lower leaflets turn pale yellow and drop cleanly, branch tips droop, and soil contracts from the container rim. Although established trees store water in a swollen tuberous taproot, container saplings exhaust pot moisture fast under heat and wind. Fix with a slow, thorough saturation until water drains freely, then mulch the root zone and resume watering when the top 5–7 cm dry.
Underwatering on Moringa: Causes, Checks & Fixes
This guide covers underwatering on Moringa. See also the general Underwatering guide, watering, and light pages for this plant.
Underwatering on Moringa: Causes, Checks & Fixes
Quick answer
Underwatering on Moringa oleifera (drumstick tree, horseradish tree, or Sahjan) produces a distinct survival reaction: drought-deciduous leaflet drop. Lower, mature leaflets turn uniform golden yellow and drop cleanly off their central rachis at the slightest touch. Tender growing tips and succulent branch petioles lose internal turgor and droop, while the potting mix shrinks tightly away from the container rim.
Although Moringa is botanically famous for thriving in semi-arid zones thanks to its massive tuberous taproot, potted saplings and container-grown trees possess a very small moisture buffer. High ambient heat, relentless sunshine, and intense transpiration rapidly exhaust the finite water held within a pot.
To resolve acute underwatering:
- Rehydrate deeply and slowly. Deliver water in gradual passes or bottom-water for 20 to 30 minutes until water saturates the core and drains freely from the pot base. Always discard runoff from saucers after 30 minutes.
- Mulch the container surface. Apply a 5 cm (2-inch) layer of coarse organic mulch across the soil, maintaining a 2–3 cm gap around the trunk root collar to stop rot while halting rapid surface evaporation.
- Re-establish a soak-and-dry watering rhythm. Check soil depth rather than following calendar schedules: water thoroughly whenever the top 5–7 cm (2–3 inches) feel completely dry.
For broad diagnostic principles across all cultivated species, see our comprehensive guide to underwatering.
Understanding Moringa’s Drought Paradox: Tuberous Roots vs. Container Reality
Moringa oleifera is celebrated in agronomy and agroforestry as an extraordinarily drought-resilient tree. Ecological profiles from Purdue University NewCROP and Winrock International note that wild and field-grown Moringa trees survive in regions receiving as little as 250 to 400 mm of annual rainfall. The plant achieves this hardiness through an underground survival organ: an expansive, swollen, tuberous taproot packed with water-storing parenchyma cells.
In an open landscape, this taproot drills deep into the subsoil to access subterranean moisture reserves inaccessible to shallow-rooted flora. However, when growers cultivate Moringa on a balcony, patio, or indoors, this biological advantage encounters strict physical boundaries:
- Root space is restricted: In a container, the taproot cannot descend meters into the earth. It circles the bottom or thickens within a restricted substrate volume.
- Transpiration rates are massive: Moringa produces delicate, bipinnate to tripinnate compound foliage. Each leaf contains dozens of tiny leaflets designed for rapid gas exchange and explosive photosynthetic growth under full sun. On hot, breezy afternoons, transpiration pulls water out of the foliage at an astonishing rate.
- Limited water reservoir: A 20- to 40-liter container holds only a fraction of the water a rapidly growing Moringa tree transpires in a single sunny day.
When water uptake cannot match atmospheric moisture demand, the root ball dries completely. Even with water stored in its fleshy roots, a potted Moringa must sacrifice foliage to keep its vascular cambium alive.
What Underwatering Looks Like on Moringa
Diagnosing moisture deficit on Moringa oleifera requires observing how compound leaves behave under moisture stress.
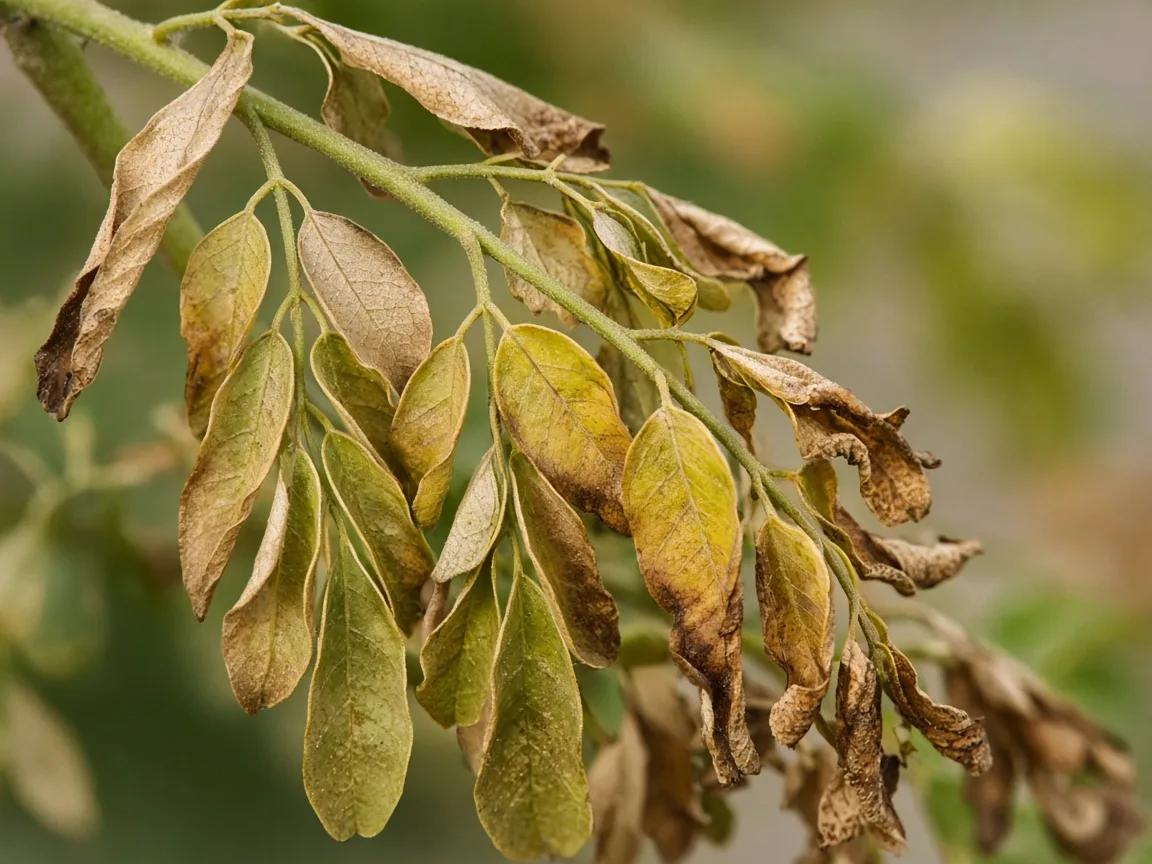
Underwatering on Moringa oleifera triggers drought-deciduous leaf drop, where individual leaflets turn bright yellow and drop cleanly while green petioles wilt.
Key symptoms indicating acute or chronic underwatering include:
- Clean Leaflet Abscission (Drought-Deciduous Shedding): Unlike houseplants that retain brown, crispy leaves attached to stems, Moringa actively drops its foliage to survive drought. The tree synthesizes abscisic acid, forming an abscission zone at the petiolule base. Basal leaflets turn uniform yellow, dry quickly, and shower the floor when the pot is nudged.
- Drooping Branch Terminals and Tender Petioles: The tender green petioles carrying compound leaves lose hydraulic turgor pressure. They bend downward in an umbrella-like posture. Young vegetative apical tips bow over, appearing limp and listless.
- Soil Contraction and Rim Gaps: As moisture departs the potting mix, organic components (peat moss, coco coir, decomposed bark) shrink. A visible 0.5 to 1.5 cm gap forms between the soil perimeter and the inside wall of the container.
- Featherweight Container: Lifting or tilting the pot reveals virtually no gravitational heft. The container feels hollow and light, confirming the total absence of moisture in the lower third of the root ball.
- Loss of Foliar Sheen: Prior to leaflet drop, healthy vibrant lime-green foliage turns dull, matte, and slightly grayish-green as stomata seal shut to conserve remaining internal hydration.
Why Container Moringa Gets Underwatered
Underwatering rarely happens because a gardener neglects their tree entirely; more frequently, it arises from environmental imbalances and misunderstandings of Moringa’s growth dynamics.
1. High Transpiration in Intense Light
Moringa requires 6 to 8+ hours of direct sun to thrive, as detailed in our Moringa light guide. Placed against reflective south-facing walls or elevated windy balconies, ambient thermal load escalates leaf temperature. Stomata release water vapor continuously, emptying pot moisture within 24 to 48 hours during summer heat waves.
2. Hydrophobic Substrate Development
Potting mixes formulated for fast drainage—containing peat, coco peat, and pine bark as recommended in the Moringa soil guide—become hydrophobic when allowed to dry past a critical threshold. Once dry, these organic fibers repel water molecules. When water is poured from a watering can, it sheets across the hardened top crust, flows straight down the outer gap between soil and pot wall, and drains into the saucer within seconds. The central root core remains bone-dry despite water exiting the drainage holes.
3. Fear of Overwatering (The “Sip Watering” Trap)
Because gardening literature heavily emphasizes Moringa’s hatred for soggy soils and root rot, caregivers often become overly cautious. They pour a cup or two of water around the stem collar every few days. This “sip watering” wets only the top 2–3 centimeters of substrate, never reaching the active lower root zones where the taproot and primary feeding roots reside.
4. Rapid Root Binding
Moringa saplings develop at astonishing speed, often growing 1 to 2 meters in their first season. Within months, the root system fills the pot cavity, displacing soil volume with dense root mass. A root-bound Moringa holds significantly less water than a newly potted specimen, requiring frequent adjustments in pot volume via the techniques in our Moringa repotting guide.
How to Confirm Underwatering: Step-by-Step Diagnostic Check
Before pouring water onto a distressed plant, eliminate lookalike issues with this five-step confirmation protocol:
[Is the pot heavy or light?]
    ├── Heavy + Wet Soil ──> Suspect Overwatering or Root Rot
    └── Very Light + Dry Soil
            │
[Check soil depth at 5–7 cm]
    ├── Moist / Cool ──> Look at Heat Stress or Pests
    └── Bone Dry / Crumbly
            │
[Examine leaf shedding pattern]
    ├── Mushy, dark yellow, clinging leaves ──> Waterlogging
└── Clean, dry yellow leaflet drop + limp tips ──> CONFIRMED UNDERWATERING- Perform the Pot Lift Test: Grip the container rim and tilt or lift it. An underwatered Moringa container feels featherlight. If the pot feels heavy and dense, do not add water—refer instead to our guide on overwatering on Moringa.
- Probe 5 to 7 Centimeters Deep: Insert a clean wooden skewer, chopstick, or your index finger 5 to 7 cm (2 to 3 inches) deep into the root zone midway between the trunk and the pot wall. If the skewer emerges completely clean, dry, and free of adhering soil particles, the root zone is parched.
- Examine Stem and Trunk Firmness: Firmly squeeze the trunk base just above the soil line. On an underwatered tree, the stem remains firm, woody, or fibrously rigid despite wilting leaf tips. If the stem base feels spongy, mushy, or discolored brown-black, fungal pathogen damage is present.
- Inspect Leaflet Detachment: Gently shake a wilting branch. If yellow leaflets drop immediately with clean, dry detachment scars at the petiolule joint, the tree is executing programmed drought-deciduous abscission.
- Conduct the 6-Hour Rehydration Test: After applying a deep soak, observe the plant. An underwatered Moringa with viable roots will re-inflate leaf petioles and straighten its branch tips within 4 to 12 hours. A plant suffering from root rot will remain limp because decayed roots cannot absorb water.
First Fix: The Deep Rehydration Protocol
When your Moringa is severely underwatered and the soil has pulled away from the container rim, dumping a single bucket of water over the top will fail because water bypasses the hydrophobic root core. Use one of these two proven rehydration methods:
Method A: The Multi-Pass Top Soak (For Large Containers)
For trees in large patio planters (30+ liters) that cannot be easily moved:
- Loosen the Soil Surface: Take a blunt wooden chopstick and gently aerate the top 3–5 cm of hardened soil crust, puncturing dry channels without tearing major taproot structures.
- First Pass (Surface Wetting): Slowly pour 1 liter of room-temperature water evenly across the entire soil surface. Wait 10 to 15 minutes. This breaks the initial surface tension of the organic mix.
- Second Pass (Core Penetration): Pour a second volume of water slowly around the drip line (the circumference midway between trunk and pot rim). Allow it to sink in for 10 minutes.
- Third Pass (Deep Saturation): Apply water until a steady stream of runoff drains from the bottom drainage holes, proving the entire vertical soil column is saturated.
- Empty the Saucer: After 30 minutes, dump all runoff standing in the catchment saucer. Never let a Moringa sit in stagnant runoff.
Method B: Immersion Bottom-Watering (For Small-to-Medium Pots)
For nursery pots and containers under 25 liters:
- Place the entire pot into a larger tub, bucket, or sink filled with 8 to 12 cm of room-temperature water.
- Allow capillary action to draw water upward through the bottom drainage holes into the root core.
- Leave the pot submerged for 20 to 30 minutes until the top surface of the soil feels cool and moist to the touch and the pot regains heavy heft.
- Remove the pot and allow excess water to drain freely for 15 minutes before returning it to its saucer.
Mulching and Root Collar Care
Container-grown Moringa trees lose vast quantities of soil moisture through surface evaporation under direct sunlight. Mulching is the single most effective cultural practice to stabilize container moisture.
       [Open Air / Sunshine]
                 │
  ┌──────────────┴──────────────┐
  │ 5 cm Coarse Organic Mulch   │ <── Buffers solar heat & slows evaporation
  ├─────────────────────────────┤
  │    2–3 cm Bare Buffer       │ <── Air gap prevents stem collar fungal rot
  │     вокруг Root Collar      │
  ├─────────────────────────────┤
  │ Well-Draining Potting Soil  │ <── Maintains steady moisture around taproot
  └─────────────────────────────┘
How to Apply Mulch Correctly:
- Use Coarse Organic Materials: Spread a 5-centimeter (2-inch) layer of shredded hardwood bark, coarse pine bark nuggets, or chopped coconut husk chunks across the potting surface. Coarse textures allow air exchange while shading the root zone.
- Maintain the Root Collar Gap: Keep the mulch pulled back at least 2 to 3 cm away from the woody trunk and root flare. Piling moist mulch directly against the root collar creates an anaerobic, humid microclimate that fosters collar rot (Phytophthora and Fusarium fungi).
- Benefits: Mulching reduces container watering frequency by up to 40% during midsummer heat waves, moderates peak soil temperatures, and stops the top crust from baking into a water-repellent shell.
Step-by-Step Moringa Recovery Plan
Reviving an underwatered Moringa requires methodical care to avoid shocking stressed roots. Follow this recovery roadmap:
1. Rehydrate Deeply
Perform the multi-pass top soak or immersion method described above. Ensure water reaches the bottom taproot zone.
2. Provide Temporary Light Filtering
While Moringa is an obligate sun lover, a severely dehydrated tree with damaged foliage cannot process intense, midday ultraviolet radiation. Move the container to bright, indirect light or provide 30% shade cloth for 48 to 72 hours while hydraulic turgor stabilizes. Return it to full direct sun once leaves perk up.
3. Remove Fallen Debris and Bare Rachises
Clear fallen yellow leaflets off the soil surface immediately. In warm, moist environments, decomposing leaf debris attracts fungus gnats and mold. If a compound leaf has lost all its leaflets, you may use sterilized shears to snip the bare, yellowing petiole flush with the main branch, following the principles outlined in our Moringa pruning guide.
4. Halt All Fertilizer Applications
Never fertilize an underwatered plant. Drought stress causes mineral salts to concentrate in the remaining moisture, stressing root membranes. Introducing synthetic or organic fertilizers onto recovering roots causes immediate chemical root burn. Hold all feedings until vigorous new green leaflets emerge and active growth resumes, referencing our Moringa fertilizer guide.
5. Establish Consistent Soil-Depth Monitoring
Do not rely on memory or arbitrary days of the week. Commit to testing soil depth with your finger or a moisture probe every 2 to 3 days in summer.
Recovery Timeline: What to Expect
| Timeframe | Plant Response & Physiological Changes | Required Grower Action |
|---|---|---|
| Hours 1–12 | Hydraulic turgor re-enters vascular bundles. Limp branch tips lift upward; wilted green petioles straighten. | Verify pot drained completely; discard saucer standing water. |
| Days 1–3 | Leaflet shedding ceases. Partially yellowed leaflets finish dropping cleanly; remaining green foliage firms up. | Keep tree in bright light; do not add more water while soil is damp. |
| Days 4–7 | Root hairs re-establish contact with moist substrate particles. Transpiration stabilizes. | Check upper soil depth; prepare to water only when top 5 cm dry out. |
| Weeks 2–3 | Latent axillary buds along nodes on the trunk and primary branches swell and break dormancy. | Reintroduce full direct sun exposure; apply organic mulch layer. |
| Weeks 4+ | Fresh bipinnate compound leaf clusters expand rapidly. Normal canopy volume restores. | Resume light feeding at half strength according to seasonal growth. |
Lookalike Symptoms and Common Misdiagnoses
Several environmental conditions and pests mimic underwatering on Moringa oleifera. Review these differentials before intervening:
1. Overwatering and Root Rot
- How it looks: Leaves turn yellow and drop; foliage wilts despite moist soil.
- Key distinction: In overwatered Moringa, the container is heavy, the soil smells sour or musty, and yellow leaves feel limp, watery, and soft rather than dry and papery. Root rot destroys root tips, preventing water uptake and causing a physiological drought even in saturated soil. For severe cases, consult our guide on root rot on Moringa.
2. Spider Mite Infestations
- How it looks: Leaflets develop fine chlorotic stippling, turn bronze or yellow, and drop prematurely.
- Key distinction: Spider mites flourish in the same hot, dry conditions that cause underwatering. Inspect leaflet undersides for microscopic moving specks and fine silk webbing around branch forks. Learn treatment steps in spider mites on Moringa.
3. High Heat Scorch (Sunburn)
- How it looks: Leaf tips and margins turn bleached, tan, or crispy brown.
- Key distinction: Sunscald damages the exposed upper foliage facing direct south or west sun, while shaded lower leaves remain green. True underwatering causes widespread lower leaflet yellowing and full-plant wilting.
4. Cold Shock and Seasonal Deciduousness
- How it looks: Sudden massive leaf yellowing and complete defoliation.
- Key distinction: Moringa is native to tropical and subtropical zones. According to Missouri Botanical Garden and Feedipedia, growth halts when temperatures drop below 15°C (59°F), and temperatures below 10°C (50°F) trigger complete cold-induced dormancy defoliation, regardless of soil moisture.
Mistakes to Avoid When Reviving an Underwatered Moringa
- Avoid “Drown-and-Starve” Cycling: Do not swing from extreme drought to leaving the pot submerged in a water-filled saucer for days. Moringa roots suffocate quickly in stagnant water.
- Do Not Fertilize Immediately: Applying nitrogen or high-phosphorus fertilizers to a recovering tree burns damaged root hairs. Wait 3 to 4 weeks until new vegetative shoot clusters form.
- Do Not Repot During Acute Wilt: Repotting an acutely wilted tree damages dehydrated roots and exacerbates transplant shock. Rehydrate the tree, let it stabilize for 2 weeks, and only then up-pot into a larger container if root-bound.
- Do Not Cut Down Green Stems: Even if all compound leaves drop, scratch the trunk bark gently with a thumbnail. If the underlying cambium is bright green and moist, the tree is alive. Water properly and new leaves will emerge from dormant nodes within two weeks.
- Avoid Surface Misting: Spraying water on Moringa leaves does not alleviate root drought and can encourage fungal leaf spotting during humid evenings. Water the root zone, not the canopy.
Potted Moringa Care Cross-Check
To ensure your watering corrections hold long-term, cross-reference your growing setup against Moringa’s baseline botanical requirements:
- Pot Depth and Size: Moringa requires vertical root room for its taproot. Choose containers that are deeper than they are wide—ideally a minimum of 30 to 45 cm deep with multiple open drainage holes.
- Substrate Mix: Use an ultra-porous, gritty blend: 50% premium potting soil, 30% coarse perlite or pumice, and 20% coarse horticultural sand. Avoid heavy, moisture-retentive garden soils. Read more in our Moringa soil guide.
- Sunlight: Provide at least 6 to 8 hours of unfiltered sunlight daily. Full sun drives healthy transpiration and root growth.
- Temperature: Maintain temperatures between 21°C and 35°C (70°F–95°F). Shield container roots from freezing conditions.
- Routine Moisture Rhythm: Water deeply until runoff appears, then wait until the top 5–7 cm of mix are dry before repeating. Discover complete seasonal practices in the Moringa watering guide.
How to Prevent Underwatering in Moringa Going Forward
Preventing recurrent drought stress comes down to anticipating the tree’s rapid growth and environmental water demand:
- Check Soil by Touch, Not Calendar: Check the pot every 2 days in hot summer weather. As described by Plants For A Future, continuous moisture stress significantly reduces leaf yield and vigor.
- Upgrade Pot Size Annually: Because Moringa saplings grow at exceptional rates, repot your tree into a container 5 to 10 cm larger each spring to maintain an adequate soil-to-root volume ratio.
- Replenish Mulch Periodically: Maintain an active 5 cm mulch blanket throughout spring and summer to protect root zone moisture.
- Use Irrigation Scheduling Tools: When growing conditions fluctuate across seasons, estimating evaporation rates can be tricky. Use the Plant Watering Calculator to tailor watering frequency specifically to your pot volume, soil type, and regional climate.
Related Moringa Guides and Resources
Expand your care knowledge with our dedicated Moringa resources and diagnostic problem guides:
- Moringa Care Overview — Complete cultural requirements for Moringa oleifera from seedling to mature tree.
- Moringa Watering Guide — Detailed breakdown of soak-and-dry schedules, seasonal shifts, and water quality.
- Moringa Soil Guide — Recipes for high-drainage, taproot-friendly container substrates.
- Moringa Repotting Guide — Step-by-step instructions for root management and taproot protection.
- Moringa Fertilizer Guide — Feeding schedules, micronutrient needs, and when to pause fertilizing.
- Moringa Problems Hub — Index of common pests, nutrient deficiencies, and environmental stresses affecting Moringa.
- Overwatering on Moringa — How to distinguish waterlogged roots from underwatering symptoms.
- Yellow Leaves on Moringa — Diagnostic guide for chlorosis, nutrient shortages, and seasonal leaf loss.
- Wilting on Moringa — Turgor loss, thermal stress, and vascular wilt diagnosis.
Related tool
Prevent damaging moisture deficits by calculating an optimal hydration schedule based on your pot dimensions, substrate texture, and sun exposure:
Use our Plant Watering Calculator to customize irrigation frequency for your Moringa tree.