Root Rot on Moringa: Taproot Decay Signs, Surgery & Recovery
Quick answer
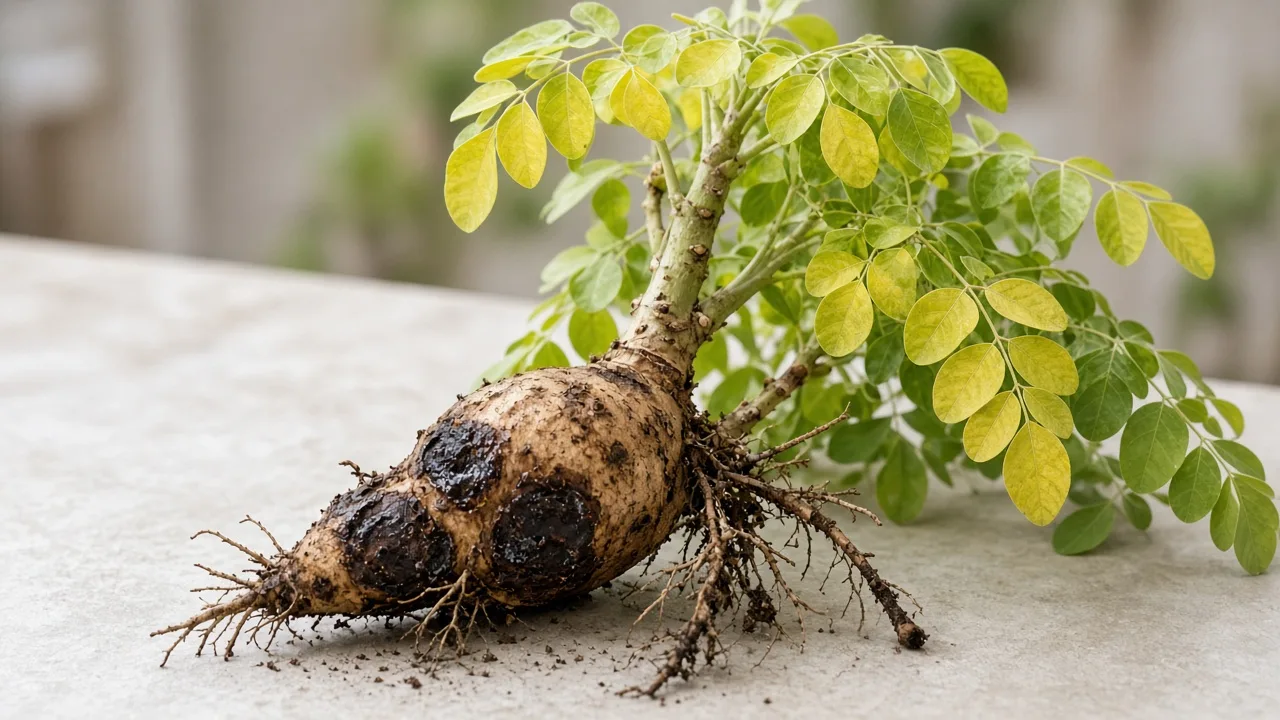
Root rot on Moringa (Moringa oleifera) is a lethal condition caused by soilborne water molds and fungi rotting its succulent, tuberous taproot in waterlogged soil. First step: Stop watering immediately, unpot the tree to inspect the taproot, surgically excise all blackened, mushy tissue back to firm white flesh, treat cuts with 3% hydrogen peroxide or copper fungicide, and repot in an ultra-gritty, fast-draining substrate while withholding water until active budbreak resumes.
Root Rot on Moringa: Taproot Decay Signs, Surgery & Recovery
This guide covers root rot on Moringa. See also the general Root Rot guide, watering, and light pages for this plant.
Root Rot on Moringa: Taproot Decay Signs, Surgery & Recovery
Quick answer
Root rot on Moringa (Moringa oleifera) is the single most destructive, rapidly fatal condition this fast-growing tropical tree can encounter. Unlike fibrous-rooted indoor foliage plants that display slow, gradual decline over several weeks of damp care, a containerized Moringa stores extensive moisture and dense carbohydrate reserves inside an enlarged, succulent, tuberous taproot. When trapped in dense, waterlogged, or oxygen-starved potting mix, this swollen taproot turns from a resilient drought-storage organ into an open target for virulent soilborne pathogens—principally Pythium ultimum, Rhizoctonia solani, and Fusarium oxysporum. Within days, the tuberous core dissolves into a water-soaked, black, foul-smelling mush, severing the vascular pipelines that supply the canopy.
First step: Stop watering immediately, unpot the tree, and inspect the taproot. Do not let the plant sit in soggy soil for another afternoon hoping it will perk up on its own. If the root exhibits soft, spongy, or blackened tissue, you must perform emergency root surgery: excise every millimeter of rotted pulp back to clean, crisp white flesh, disinfect the wound with 3% hydrogen peroxide or a copper fungicide solution, dust with sulfur or cinnamon, and pot into bone-dry, ultra-gritty substrate. Keep the container warm and dry until active budbreak resumes.
For broader botanical perspective on the cellular mechanics of root suffocation across houseplant species, read our foundational root-rot guide. This comprehensive guide is dedicated specifically to the unique anatomy, emergency triage, surgical excision, and clinical recovery protocols for Moringa oleifera.
The botanical paradox: Drought titan vs. wet-root casualty
To successfully prevent and treat root rot on Moringa, one must appreciate its specialized evolutionary biology. According to botanical profiles from Purdue University NewCROP, Moringa oleifera evolved in rocky, gravelly, highly permeable alluvial soils subjected to erratic monsoon rains followed by months of intense heat and drought. The plant thrives under these harsh conditions because of its subterranean storage strategy: a massive, tuberous, fleshy taproot that develops almost immediately upon seed germination.
In seedlings as young as two months, this taproot swells into a pale, carrot-like or turnip-shaped storage caudex. This tissue is packed with starches, free sugars, moisture, and glucosinolates (mustard oil glycosides) designed to sustain rapid vegetative flushes during dry periods. However, this same storage architecture makes Moringa exceptionally fragile when grown in artificial container environments:
- High Root-Zone Oxygen Demand: The metabolically active cells of the tuberous taproot require continuous aerobic respiration to fuel the tree’s lightning-fast growth rate. As documented by the Missouri Botanical Garden, when water fills every capillary pore, root cells suffer from acute oxygen starvation within 24 to 48 hours, causing feeder root hairs to collapse.
- Cellular Asphyxiation & Membrane Breakdown: Deprived of oxygen, root cells can no longer synthesize adenosine triphosphate (ATP). Anaerobic fermentation sets in, lowering intracellular pH and causing cell membranes to rupture. This process, known as cellular lysis, causes intracellular sugars, amino acids, and water to leak directly into the surrounding soil.
- Virulent Pathogen Infiltration: Soilborne oomycetes (Pythium) and necrotrophic fungi (Rhizoctonia, Fusarium) detect these nutrient exudates through chemotaxis. They produce pectolytic, cellulolytic, and hemicellulolytic enzymes that digest the plant’s cell walls. Because Moringa’s taproot cortex is soft, juicy, and unlignified compared to temperate woody trees, the infection spreads longitudinally and radially through the entire root core in 48 to 72 hours.
Understanding this biological mechanism is critical: you cannot “dry out” an active fungal infection in a succulent taproot by simply withholding water while the plant remains in old soil. The pathogens reside inside the living vascular cylinders. Physical surgical excision of the infected tissue is the only method to stop systemic collar decay.
What root rot looks like on Moringa
Because the primary destruction occurs below the soil line, growers often fail to recognize root rot until catastrophic canopy collapse takes place. Learning to distinguish early vascular distress from late-stage systemic decay can mean the difference between saving the tree and losing it completely.
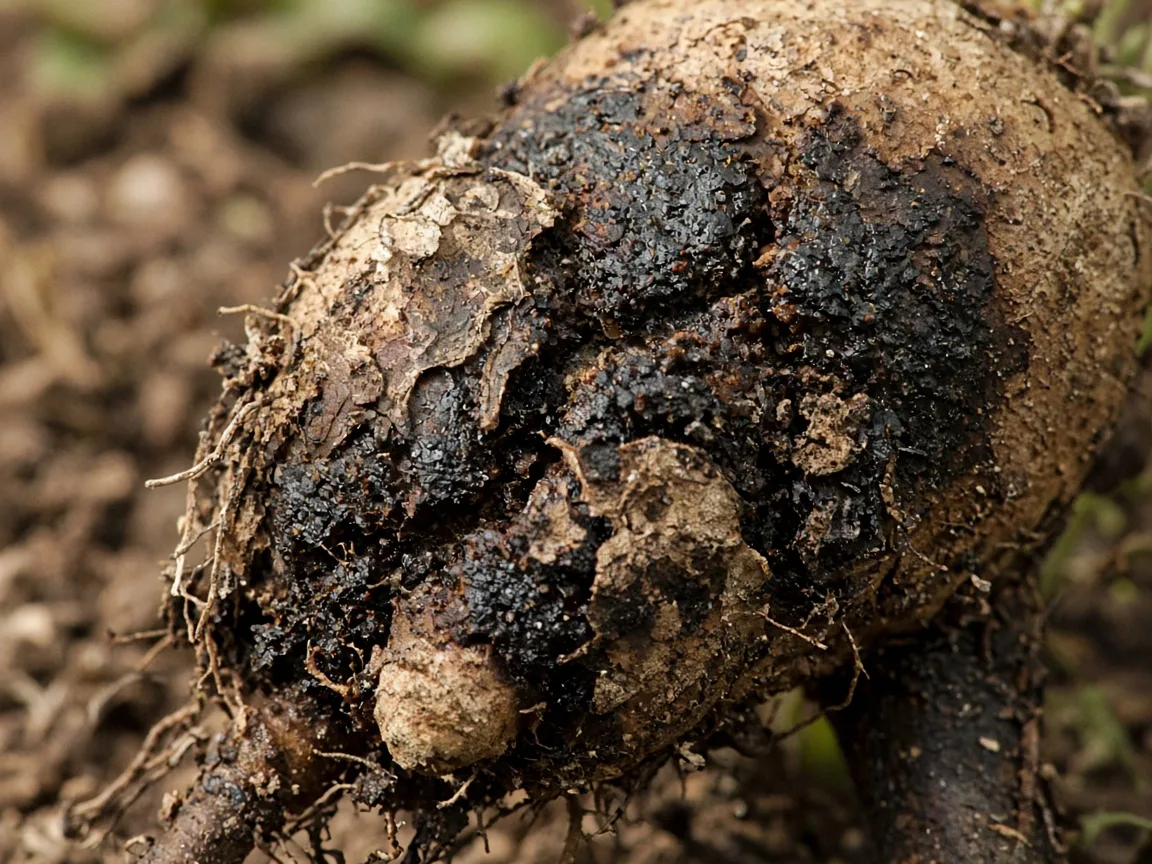
Diagnostic check: A rotted Moringa taproot turns spongy, black, and slimy, losing its firm white core and shedding its outer skin when pressed.
1. The classic “wet wilt” paradox
The hallmark symptom of Moringa root rot is a tree that wilts dramatically despite sitting in saturated, damp, or heavy potting mix. Species assessments by Plants For A Future confirm that Moringa demands sharp drainage and sandy, porous soil, collapsing quickly if root zones remain saturated. Growers unaware of root physiology assume the drooping leaves indicate water deficiency and pour more water into the container. This mistake is catastrophic. The leaves wilt because the decayed xylem vessels in the taproot have lost their hydraulic conductivity; they can no longer transport water upward to match transpiration loss.
2. Rapid compound leaf chlorosis and leaflet drop
Moringa foliage consists of delicate, feathery, tripinnate compound leaves carrying hundreds of tiny leaflets. When root rot destroys water uptake, the plant triggers rapid ethylene synthesis and petiole abscission to reduce surface area. The leaflets turn uniform chlorotic yellow—starting at the bottom of the branches—and drop in showers at the slightest touch. Within three to five days of root collapse, a magnificent leafy canopy can be reduced to bare, skeletal green branches.
3. The “glove test”: sloughing root cortex
When examining the root system, a clear diagnostic test is the gentle pull test. On a healthy Moringa, lateral feeder roots and the outer root sheath (rhizodermis and cortex) are firmly bound to the central stele. On an infected root, the decayed cortex sloughs off between your fingers like a wet paper sleeve, leaving behind a thin, stringy, thread-like vascular core.
4. Taproot softening and collar constriction
The taproot should feel as firm, solid, and resistant to thumb pressure as a crisp raw carrot or daikon radish. Under rot invasion, the tuberous body becomes soft, spongy, water-soaked, or hollow. Pressing the trunk collar right at the soil line reveals whether the rot has ascended into the stem. A healthy stem is stiff and woody; an infected stem feels squishy and bruised, often showing dark olive, water-soaked lesions under the green outer bark.
5. Foul, sour, anaerobic odor
Healthy Moringa roots emit a sharp, pleasant, peppery scent identical to freshly grated horseradish. In sharp contrast, a rotting Moringa root ball emits an unmistakable sour, swampy, sulfurous stench produced by anaerobic bacteria (such as Clostridium species) decomposing organic starches in the absence of oxygen.
Diagnostic triage: Root rot vs. lookalike issues
Before unpotting your tree for surgery, evaluate the symptom complex against other common cultural problems using the matrix below:
| Symptom Pattern | Soil Moisture | Root Condition | Primary Cause | Immediate Action |
|---|---|---|---|---|
| Limp leaves, sudden drop, stem base firm | Bone dry, light pot | Ivory-white, crisp, firm | Underwatering | Deep soak; see watering guide |
| Sudden wilt, yellowing leaves, damp pot | Heavy, saturated, wet | Black/brown, squishy, foul odor | Root Rot (Pythium / Fusarium) | Emergency unpotting & surgical excision (this page) |
| Lower leaves pale yellow, upper canopy vigorous | Moderately moist | Healthy, cream-colored | Normal seasonal shed or low nitrogen | Adjust feeding; see yellow leaves |
| Total leaf drop in late autumn/winter | Slightly dry, cool mix | Firm, intact taproot | Cold-induced dormancy (<15°C) | Move to warm spot, withhold water; see overview |
| Leaf scorch, crispy edges, rapid droop | Wet or dry soil | Intact roots, white salt crust | Fertilizer burn / salt stress | Flush mix with rainwater; see soil guide |
If the plant exhibits saturated soil accompanied by yellowing leaves but the roots remain firm and fragrant upon inspection, the tree is suffering from early-stage waterlogging rather than structural decay. Consult our Moringa overwatering guide and Moringa wilting guide to reverse moisture stress before fungal pathogens colonize the tissue.
Primary causes of Moringa root rot
According to agricultural assessments from Feedipedia, Moringa oleifera has zero tolerance for waterlogged soils or anaerobic root-zone conditions, which trigger rapid cortical collapse and taproot decay. In pots, root rot is almost never an isolated accident; it is the direct consequence of four compounding cultural mistakes:
1. Water-retentive soils and peat-heavy mixes
Standard commercial potting soils rely heavily on sphagnum peat moss, fine vermiculite, and coconut coir. While these ingredients support moisture-loving houseplants, they are lethal to Moringa oleifera. Peat moss holds up to twenty times its dry weight in water and compacts into an airless, suffocating matrix. Moringa requires an open, gritty, aggregate-dominated mix where gravity purges all excess water within seconds. Review custom soil blend formulations in our dedicated Moringa soil guide.
2. Sealed cachepots and standing saucer water
Placing a nursery pot inside a decorative ceramic container without drainage holes creates a death trap. Excess irrigation water collects at the base of the pot, creating a permanent perched water table. Even if the top two inches of soil feel dry, the bottom third of the root ball—where the tuberous taproot tip resides—sits submerged in stagnant water. Allowing drained runoff to linger in saucers causes identical capillary re-saturation.
3. Oversized containers and disproportionate soil volume
Beginners frequently transplant small Moringa seedlings into huge 10- or 15-gallon pots to accommodate their rapid potential growth. However, a small root mass cannot transpire water from a massive volume of damp soil quickly enough. The uncolonized soil remains cold and waterlogged for weeks, providing the ultimate incubation chamber for water molds. Pot sizes must be increased gradually in tandem with root expansion, as detailed in our Moringa repotting guide.
4. Cool indoor temperatures and winter irrigation
Moringa is an obligate tropical plant whose growth slows drastically below 20°C (68°F) and ceases entirely below 15°C (59°F). In cool autumn or winter conditions indoors, water consumption drops by over 90%. If a grower maintains a summer irrigation frequency while the tree sits in low winter light, the soil remains cold and wet indefinitely. Without intense light to drive transpiration, root suffocation is inevitable. Check indoor lighting thresholds in the Moringa light guide.
Emergency surgical protocol: Step-by-step rescue
When root rot strikes, delay is fatal. Follow this rigorous surgical protocol to excise infected tissue and give your Moringa the highest probability of regeneration.
Emergency Action Steps:
1. Extract the tree gently; wash away all contaminated soil.
2. Sterilize cutting tools with 70% isopropyl alcohol.
3. Surgically excise all soft, discolored tissue back to clean white flesh.
4. Disinfect wounds with 3% hydrogen peroxide or copper fungicide.
5. Balance canopy by pruning away 40-60% of top foliage.
6. Allow cut taproot to air-dry and callus for 12 to 24 hours.
7. Repot into bone-dry, gritty pumice/sand mix and withhold water for 5-7 days.
Step 1: Extraction and root washing
- Move the tree to a clean workspace away from other plants.
- Gently tap the perimeter of the container to loosen soil cohesion. Support the main trunk near the soil line and ease the plant out sideways. Never pull or jerk the tree by its upper branches, as the rotted taproot can easily shear off at the collar.
- Submerge the entire root ball in a bucket of tepid water or rinse it under a gentle garden hose stream. Strip away all original potting mix until the bare root structure is completely visible. Immediately bag and discard the old soil to prevent contaminating other garden tools or containers.
Step 2: Surgical excision of necrotic pulp
- Disinfect a sharp grafting knife, utility blade, or bypass pruners with 70% isopropyl alcohol.
- Inspect the tuberous taproot. Healthy tissue is crisp, fibrous, and pristine ivory-white inside. Rotted tissue is soft, brown, black, water-soaked, or hollow.
- Excise all rotted tissue aggressively. Make your cuts 5 to 10 millimeters into completely healthy, white, solid wood. If any discolored, water-soaked vascular rings remain visible on the cut face, make another deeper cut. Leaving even a trace of fungal mycelium will cause the rot to resume inside the new substrate.
- If rot has consumed the lower portion of the taproot, make a clean, horizontal transverse cut straight across the sound portion of the tuber. As documented by Winrock International, Moringa possesses exceptional adventitious root regeneration capabilities and can produce a vigorous new network of lateral roots from callused taproot wounds once drainage is restored.
- Wipe your blades with alcohol between every cut to prevent spreading pathogen spores to healthy sections.
Step 3: Antiseptic wash and wound sealing
- Submerge or thoroughly spray the remaining root system with a 3% hydrogen peroxide solution (diluted 1:2 with clean water) for 3 to 5 minutes. The peroxide will foam actively as it oxidizes pathogen cells and injects oxygen into the wound surface.
- Alternatively, apply a broad-spectrum copper fungicide spray or drench the roots with a biofungicide containing Bacillus amyloliquefaciens or Streptomyces lydicus.
- Dust the cut surfaces generously with agricultural sulfur, crushed horticultural charcoal, or pure ground cinnamon. These substances act as powerful natural drying agents and antifungal barriers.
Step 4: Canopy balancing (compensatory pruning)
Because you have removed a substantial portion of the tree’s root infrastructure, the remaining root mass cannot absorb sufficient water to hydrate a full canopy. If left unpruned, the leaves will transpire moisture into the air until the trunk collapses from complete dehydration.
- Prune back the main branches and secondary shoots by 40% to 60% using clean shears.
- Remove all wilted, yellowing, or damaged compound leaves entirely.
- Retain several healthy, green dormant nodes along the woody trunk to stimulate emergency hormonal budbreak.
Step 5: The mandatory callusing phase
Never repot a freshly cut Moringa taproot into damp mix. Place the bare-root tree horizontally on a clean layer of paper towels or cardboard in a warm, dry, shaded, well-ventilated room (22°C–27°C / 72°F–80°F) for 12 to 24 hours. This brief drying period allows the severed plant cells on the cut face to form a dry, suberized callus layer that seals the vascular bundles against soil microbial invasion.
Step 6: Repotting into ultra-gritty substrate
- Select an unglazed terracotta pot or fabric container with multiple open drainage holes. The container should be sized modestly around the trimmed root system—never overpot.
- Fill the pot with an ultra-porous, sterile, mineral-heavy substrate composed of:
- 40% coarse horticultural pumice, perlite, or volcanic grit (3–6 mm particle size)
- 30% coarse horticultural sand or calcined clay (Turface)
- 30% light peat-free potting compost or coco coir
- Position the tree so that the root flare sits flush with or slightly above the rim of the pot. Work the dry gritty substrate between the lateral roots, tapping the pot sides to settle air pockets.
- Do not water the plant. Leave the substrate completely dry.
The extreme salvage protocol: Hardwood stem truncheons
In catastrophic cases where waterlogging went unnoticed for weeks, you may discover that 100% of the underground taproot has liquefied all the way up to the soil line. Is the tree lost? Not necessarily. Moringa oleifera possesses remarkable vegetative propagation potential from thick hardwood cuttings (truncheons).
If the upper trunk above the soil line is still firm, green beneath the bark, and structurally sound:
- Cut the trunk horizontally 2 to 3 inches above the rotted crown into clean, solid, green wood. Ensure there are zero brown vascular streaks inside the pith.
- Strip all remaining foliage from the stem.
- Dip the bottom cut in rooting hormone powder (IBA) combined with sulfur.
- Allow the cut end to air-dry and callus for 48 hours.
- Insert the bottom 3 to 4 inches of the trunk into a pot filled with 100% coarse perlite or horticultural pumice.
- Keep the setup warm (26°C–32°C / 78°F–90°F) in bright, filtered light. Mist the cutting occasionally to maintain stem hydration without soaking the substrate. Within 3 to 5 weeks, the truncheon will generate adventitious roots and push fresh shoots.
Post-operative recovery timeline and water management
The critical survival window spans the first four to six weeks following surgery. The paramount management rule during this recovery period is simple: withhold irrigation until new shoots prove that root function has resumed.
Week 1: Total water fasting and warmth
Place the newly potted tree in a warm, sheltered location with bright, indirect light (24°C–30°C / 75°F–86°F). Protect it from direct midday sun, cold drafts, and rain. Do not apply a single drop of water to the pot. Adding moisture while the severed root has no functional root hairs will instantly trigger secondary rot. The plant will sustain its metabolic baseline using the moisture and nutrients stored in the remaining tuber and trunk.
Weeks 2 to 3: The first cautious moisture
Examine the nodes along the trunk daily. Around day 10 to 14, you should see green vegetative buds begin to swell. This bud enlargement indicates that the callus zone has organized root primordia and is beginning to push delicate lateral rootlets into the gritty substrate.
- Provide a very modest drink: drizzle half a cup of room-temperature water around the outer perimeter of the pot, near the container wall.
- Never pour water directly over the trunk collar or the center of the root ball. Moisture at the perimeter stimulates the new roots to extend outward.
Weeks 4 to 6: Budbreak and vascular re-establishment
When new feathery compound leaves emerge and expand to 2 to 3 inches in length, celebrate: your Moringa has successfully regenerated its root system! Active foliage expansion is physiological proof that functional vascular connections have re-established between the regenerated root network and the canopy.
- Gradually move the plant into direct morning sunlight over a 7-day acclimation period.
- Transition to a standard soak-and-dry irrigation routine: water thoroughly until runoff streams from the bottom drainage holes, then allow the top 2 to 3 inches (5–7 cm) of substrate to dry out fully before re-watering.
Five fatal mistakes to avoid during recovery
- Watering immediately on repot day: This is the single most common cause of rescue failure. Fresh surgical cuts exposed to damp substrate will re-infect within hours.
- Applying chemical fertilizers to “help it bounce back”: Stressed, healing root tissues cannot process dissolved mineral salts. Fertilizer salts cause osmotic desiccation, burning fragile new root initials. Withhold all fertilizer until the tree has developed multiple mature compound leaves (8 to 10 weeks post-surgery).
- Placing a rootless plant in scorching midday sun: Without active roots to draw up replacement water, direct solar radiation will cause rapid thermal stress, baking the trunk and desiccating the stems. Provide bright, filtered shade during initial rooting.
- Using moisture-retentive potting soils or peat blends: Heavy, moisture-retentive soils pack tightly around recovering roots, cutting off oxygen and guaranteeing a relapse.
- Planting the trunk too deeply: Burying the root flare or green trunk bark below the soil surface invites stem collar rot (Phytophthora nicotianae). Keep the root flare slightly elevated above the substrate line.
Cultural prevention: How to protect Moringa forever
Preventing root rot is infinitely simpler than conducting emergency taproot surgery. By aligning your care habits with the tree’s native arid physiology, you can ensure your Moringa remains healthy and rot-free for years.
1. Master the dry-down cycle
Never water a Moringa according to an arbitrary calendar schedule (such as “every Sunday”). Water consumption varies dynamically based on ambient temperature, photoperiod, relative humidity, and pot size. Always test soil moisture manually by inserting your finger 2 to 3 inches into the mix or feeling the heft of the container. If the soil feels cool and damp, withhold water. Soak thoroughly only when the upper layers have dried out completely.
To calculate customized irrigation intervals calibrated specifically to your pot volume, soil texture, and ambient indoor/outdoor climate, use our interactive tool:
Calculate your plant’s precise needs: Use the Moringa Watering Calculator to dial in exact dry-down intervals and irrigation volumes based on pot size, substrate composition, and seasonal temperatures.
2. Choose porous unglazed terracotta containers
Plastic, resin, and glazed ceramic pots retain moisture for prolonged periods because water can only evaporate from the exposed top surface. Unglazed terracotta is micro-porous; it breathes, allowing air to circulate throughout the root zone while wicking excess moisture outward through the pot walls.
3. Elevate pots on pot feet
Always position container-grown Moringas on pot feet or raised wooden slats. When containers sit flat on solid concrete, saucer bottoms, or patio surfaces, water tension blocks the drainage holes, preventing excess moisture from draining freely. Elevating the pot by half an inch ensures clean gravitational drainage and healthy air circulation under the container base.
Related Moringa care and diagnostic guides
Expand your knowledge of Moringa oleifera cultivation and troubleshoot related symptoms with our specialized cluster resources:
- Moringa Care Overview – Complete species botany, growth characteristics, and native habitat profiles.
- Moringa Watering Guide – Seasonal irrigation rhythms, water quality considerations, and dry-down testing.
- Moringa Soil Guide – Optimal gritty potting formulas, aeration ratios, and substrate pH requirements.
- Moringa Repotting Guide – Safe pot transitions, root-pruning strategies, and pot dimension guidelines.
- Moringa Light Guide – Photoperiod benchmarks, outdoor sun acclimation, and winter grow-light configurations.
- Moringa Overwatering Guide – Early warning signals to catch moisture saturation before structural rot begins.
- Moringa Yellow Leaves Guide – Differentiating water stress, nutritional chlorosis, and seasonal leaf shed.
- Moringa Wilting Guide – Triage protocols for sudden foliage droop in indoor and patio containers.
Related tool
Calculate your plant’s precise watering schedule based on pot volume, soil type, and room conditions using the Plant Watering Calculator before adjusting watering cycles.