How to Grow and Care for Alocasia Frydek Indoors
Learn Alocasia Frydek care with clear advice on filtered light, humidity, watering, airy soil, propagation, dormancy, pests, and root-rot warning signs.
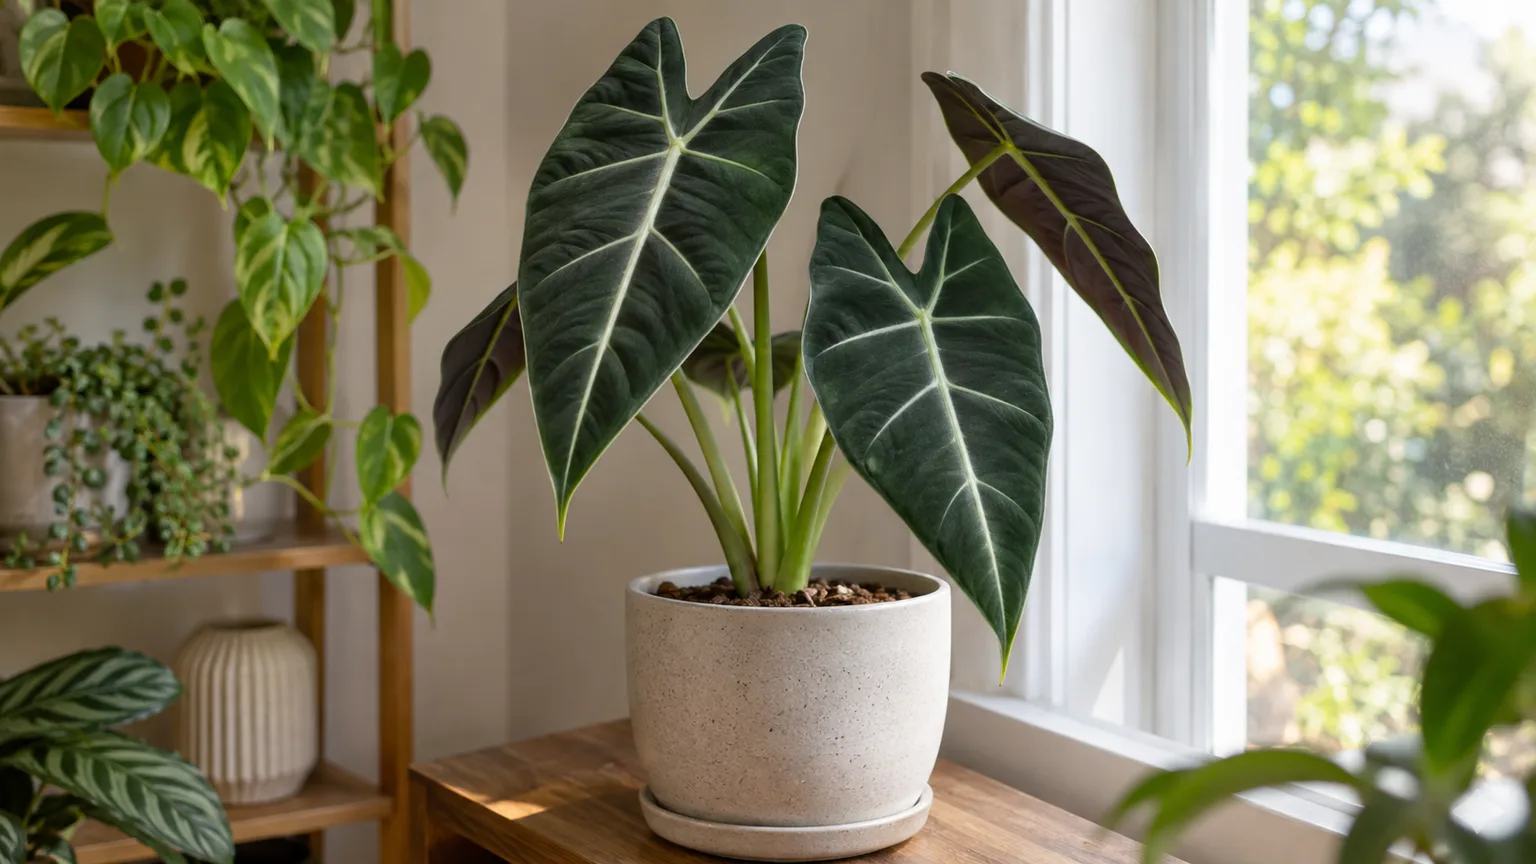
Alocasia Frydek earns its place in a collection with deep green, velvety, arrow-shaped leaves crossed by pale veins. It is also less forgiving of cold, dim rooms, dense potting mix, and water that sits around the roots than many foliage plants. Give it steady warmth, bright filtered light, and a mix that holds some moisture while letting air reach the roots; then change watering with the plant’s actual growth and the season.
The most useful care habit is to diagnose before reacting. A drooping leaf can mean dry soil, saturated roots, or a cold draft, so watering on sight can make the wrong problem worse. Use the conditions below as starting points, then let the pot, roots, and new growth tell you what needs adjusting.
What Alocasia Frydek is—and what the name means
The plant sold as Frydek is usually labeled Alocasia micholitziana ‘Frydek’ or simply Alocasia Frydek. Kew’s Plants of the World Online accepts A. micholitziana as a species native to Luzon in the Philippines. North Carolina State Extension lists ‘Frydek’ among the cultivars of Alocasia. In botanical writing, the species name is italicized and the cultivar name stays in roman type inside single quotation marks.
“Green Velvet Alocasia” is a common name for the same familiar plant in the nursery trade, but labels are not perfectly consistent. Look for dark, matte-to-velvety leaves with a pointed, shieldlike outline and contrasting pale veins, rather than relying on a common name alone. The similar-looking Alocasia ‘Polly’ is a different hybrid, generally with glossier, more sharply scalloped leaves; both need warm, bright conditions, though individual plants vary.
Given steady light and warm conditions, a mature indoor plant can become roughly 2 to 3 feet tall and wide, though pot size and growing conditions change the result and a small nursery plant may take a long time to fill out. Mature plants can also produce an aroid flower made of a spadix and surrounding spathe. It is usually less showy than the foliage; flowering by itself is not a problem, and removing the bloom is optional rather than a required care step.
Frydek is a tropical, tuberous perennial, not a plant that needs to be kept permanently wet to imitate a rainforest. Forest-floor conditions combine warmth and moisture with shade from the strongest sun and a loose root zone. That combination—not a waterlogged pot or a steamy room—is the useful model indoors. The North Carolina State Extension Plant Toolbox describes the genus as tropical and subtropical, suited to moist, well-drained soil and protected shade outdoors.
Build its setup before adjusting the care routine
Place Frydek close enough to a bright window to receive strong ambient daylight, while shielding the leaves from prolonged hot sun. Keep it away from air-conditioning outlets, heaters, and cold glass in winter. A pot with open drainage holes and a loose mix makes the watering decision easier because excess water has a way out and roots can receive oxygen between waterings.
| Need | Practical starting point | What to observe |
|---|---|---|
| Light | Bright, indirect or filtered | Compact new leaves and steady growth |
| Temperature | Warm and stable; avoid cold drafts | Growth slows in cool, dim conditions |
| Humidity | Moderate to high, with moving air | Crisp margins may have several causes |
| Water | Keep the mix lightly moist in active growth | Water after the upper layer begins to dry |
| Pot and mix | Drainage holes; airy, moisture-holding mix | Water should drain freely, not pool |
Use the table as a starting setup, not a set of targets that must be forced with equipment. If your room is dry, improving general humidity can help, but it will not compensate for compact soil or a pot that stays wet. Make one adjustment at a time and watch new growth; older leaves may not recover even after the cause is corrected.
Light: bright and filtered
Bright, indirect light gives Frydek enough energy to hold its leaves and make new ones without scorching the velvety surface. An east-facing window is often an easy fit. A south- or west-facing exposure can also work if the plant sits back from the glass or receives a sheer curtain during the hottest part of the day. In a dim room, move the plant closer to the window before trying to solve slow growth with extra fertilizer.
Signs of too little light include long gaps between leaves, stems leaning toward the window, smaller new leaves, and a mix that stays wet longer because the plant is using less water. Strong direct sun can bleach or crisp the area it strikes, especially after a sudden move outdoors or from a dim shelf to a sunny sill. Increase exposure gradually over a week or two. Turn the pot a little each time you water if the plant consistently leans toward one side.
Warmth, humidity, and airflow
Frydek grows best in warm indoor conditions and dislikes abrupt drops in temperature. Aim for a comfortable room that stays warm through the night; protect the plant from cold drafts and avoid leaving it against a chilly window. A short cool period may slow growth, while prolonged cold combined with wet soil raises the risk of root damage. If the room becomes noticeably cooler, reduce watering only after checking how slowly the mix is drying.
Higher humidity can help leaves unfurl and reduce edge crisping, but there is no single percentage that guarantees perfect foliage. A room humidifier near a group of plants is more dependable than repeated misting, which wets leaf surfaces briefly without keeping the room humid. A pebble tray may make a small local difference; keep the pot above the waterline and do not let its drainage holes sit in water. Leave enough space for air to move around the leaves so humid conditions do not become stagnant.
Choose a mix that stays moist but breathes
Use a loose aroid-style mix that absorbs water evenly and then drains. A practical blend is roughly equal parts quality houseplant potting mix, orchid bark, and perlite or pumice. If your home is very dry or the mix dries within a day, add a little more moisture-retentive potting mix; if it remains heavy and wet for many days, increase the coarse bark and mineral component. Frydek needs moisture at the roots, but oxygen-starved roots are vulnerable to rot.
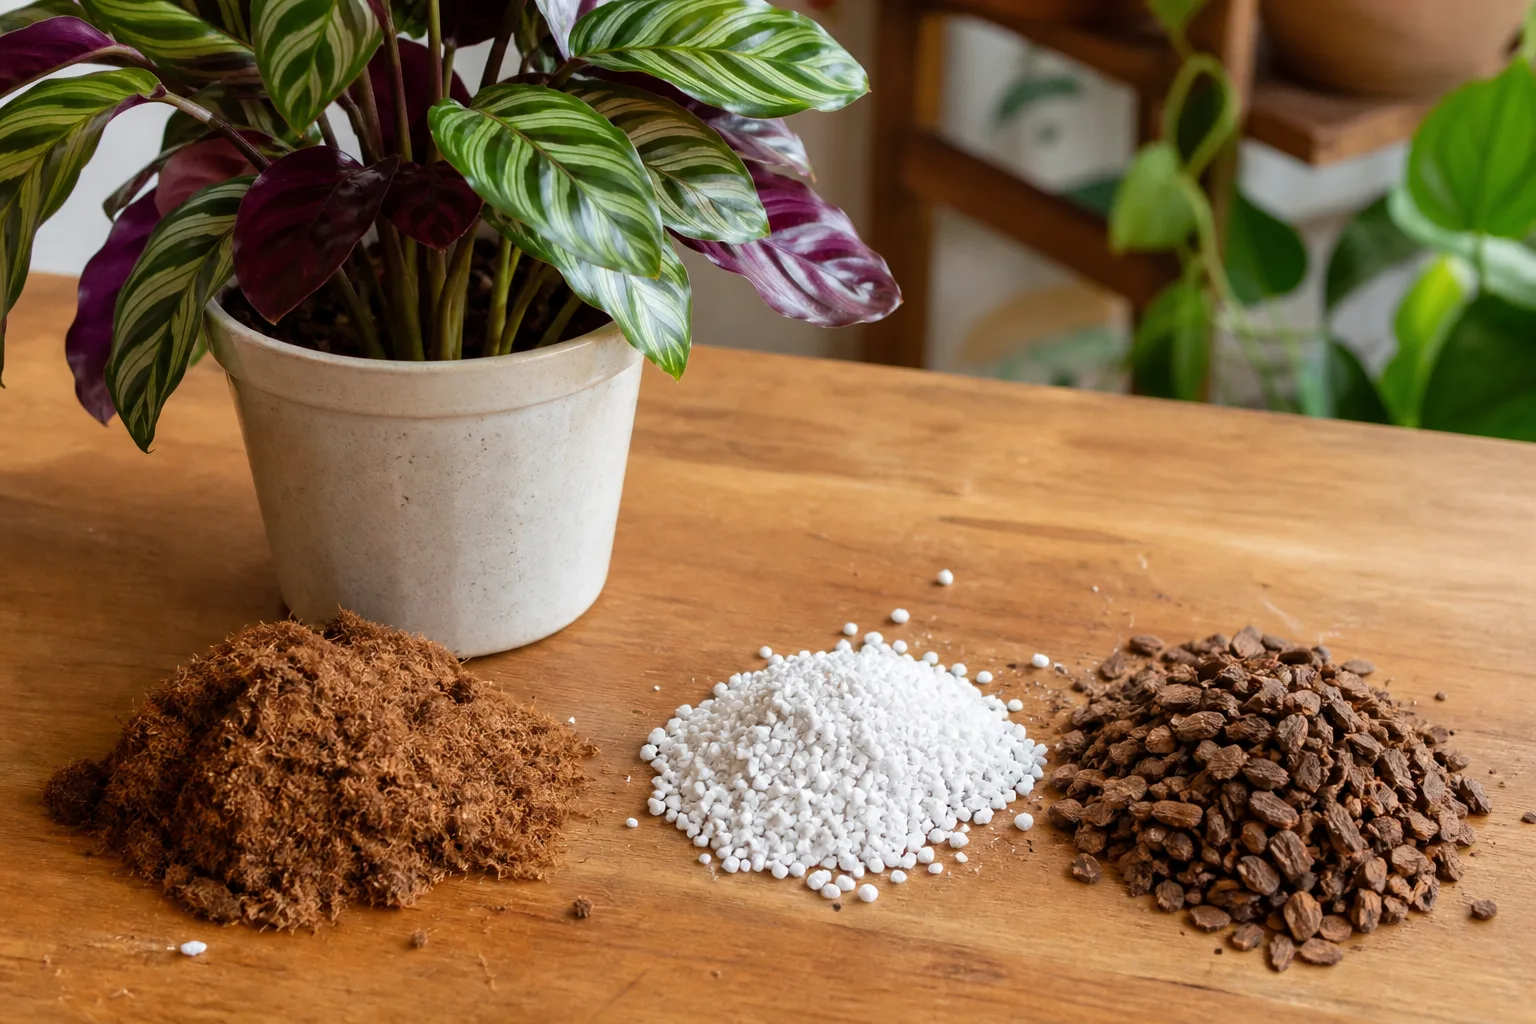
Choose a pot with several unobstructed drainage holes. A plastic nursery pot inside a decorative cachepot is easy to monitor: lift out the inner pot after watering and empty any collected water. Terracotta can dry faster, which may suit a warm, humid space or a grower who tends to overwater, but it can demand more frequent checks in a hot, dry room. Pot material matters less than drainage, mix structure, and your room’s drying rate.
Avoid adding a layer of stones at the bottom as a substitute for drainage; it reduces the depth available to roots and does not make dense soil airy. Do not add sand or fine garden soil to “hold” the mix together. Fine particles can fill the larger air spaces and make the pot stay wet. If water runs down the sides without wetting the center, the mix may have become hydrophobic; soak it slowly from above and consider refreshing it at the next appropriate repotting.
Water by root-zone moisture, not by schedule
During active growth, keep the mix evenly and lightly moist, with a short drying interval at the surface. Check the top inch or two with a finger or a wooden stick. When that upper layer feels dry and the lower mix is only slightly moist—not saturated—water thoroughly until excess runs from the drainage holes. Let the pot finish draining before returning it to its cachepot or saucer.
That check is more reliable than watering every seven days. A small Frydek in a bright, warm room may use water quickly; a larger plant in a cool, dim room may take much longer. Pot size, root density, mix ingredients, airflow, and season all change the interval. If the pot feels heavy and the mix is still wet, wait. If it feels unusually light and the mix has pulled from the pot edges, water deeply rather than giving repeated sips.
Use room-temperature water if convenient, and do not leave the pot standing in runoff. Bottom watering can work when the mix resists wetting from above, but remove the pot once the root ball has absorbed moisture and let it drain. If your tap water leaves a hard mineral crust or the leaf tips repeatedly brown despite good moisture, try rainwater or filtered water if practical; first rule out fertilizer buildup, sun scorch, and dry roots.
In winter, light and growth may fall, so the plant often uses less water. Continue checking the mix rather than following a “winter schedule.” Reduce watering when the plant has stopped growing or is dormant, but do not leave an actively growing plant bone-dry for long periods. A change in watering should follow a change in drying speed or growth—not the calendar by itself.
Feed lightly while the plant is growing
New leaves require nutrients, but heavy feeding does not make Frydek grow faster if light, roots, or temperature are limiting it. During steady spring and summer growth, use a balanced liquid houseplant fertilizer at the diluted rate on its label, often less frequently than the maximum recommended for fast-growing outdoor crops. Apply it to already moist soil rather than to a dry root ball.
Pause or reduce feeding when growth slows, the plant is dormant, or roots are damaged. Nutrients left unused in a nearly dry or inactive pot can accumulate as salts and contribute to brown tips or a crust on the mix. If you see that crust, stop fertilizing and flush only if the pot drains well; if the medium is already waterlogged, fix drainage and root health before adding more water. Avoid fertilizer spikes or concentrated “boosts” as a rescue treatment.
Read its seasonal growth rhythm
Frydek usually makes its most visible growth when warmth and daylight are plentiful. A new leaf may appear while an older outer leaf yellows and declines; one aging leaf at a time can be normal, especially when the plant is actively replacing foliage. Track whether a healthy leaf is emerging and whether the loss is limited to the oldest growth.
When shorter days arrive, indoor plants may slow down, pause, or lose several leaves. The response varies with the plant, room temperature, light, and watering, so complete dormancy is possible but not inevitable. A plant kept warm under bright light may continue growing through winter. Avoid making a major change just because the season changed; respond to what the plant is doing.
Dormancy or stress: tell the difference
If all leaves die back, inspect the base before discarding the plant. A firm, healthy corm can remain alive below the soil after the foliage disappears. Keep it warm, give it bright indirect light when new growth resumes, and water sparingly enough that the corm does not sit in cold, soggy mix. Resume ordinary active-growth watering only as a new shoot develops.
Leaf loss is more concerning when the corm or stem base is soft, the mix smells sour, or the plant is declining quickly while the soil stays wet. Sudden changes in temperature, light, or watering can also trigger leaf drop without true seasonal dormancy. Note what changed in the previous few weeks; that timeline often narrows the cause better than applying several remedies at once. Recovery is possible when the corm is firm, but it is not guaranteed.
Repot only when the roots or mix call for it
Repot in spring or early summer when roots crowd the container, emerge from drainage holes, or the mix has broken down and no longer drains predictably. A pot that dries extremely fast despite sensible watering can also signal a root-filled container. If the plant is growing steadily and the mix remains open, there is no benefit to moving it on an arbitrary annual schedule.
Choose a pot only one size larger than the root ball, with drainage holes. A very large pot surrounds the roots with unused wet mix that takes longer to dry, which can contribute to rot. Loosen only the roots that are circling tightly; preserve the healthy root ball rather than washing it bare. Set the corm at about its existing depth, fill around it with fresh mix, and water enough to settle the medium and drain the pot.
After repotting, return the plant to its usual bright, warm spot and avoid fertilizer until you see resumed growth. A little droop after disturbing roots can happen, but persistent decline calls for a check of moisture, temperature, and drainage. Do not repot a resting plant just to inspect it unless there is a strong reason to suspect rot or the container has failed.
Propagate from offsets or corms
Frydek can be propagated by separating a rooted offset during repotting or by starting corms. Division produces a more established plant sooner when the offset already has leaves and roots. Corms are a slower project, and not every small corm will sprout. The Sprouted in Soil Frydek guide and the GrowTropicals Alocasia guide both describe division and corm propagation as the practical routes for Alocasia.
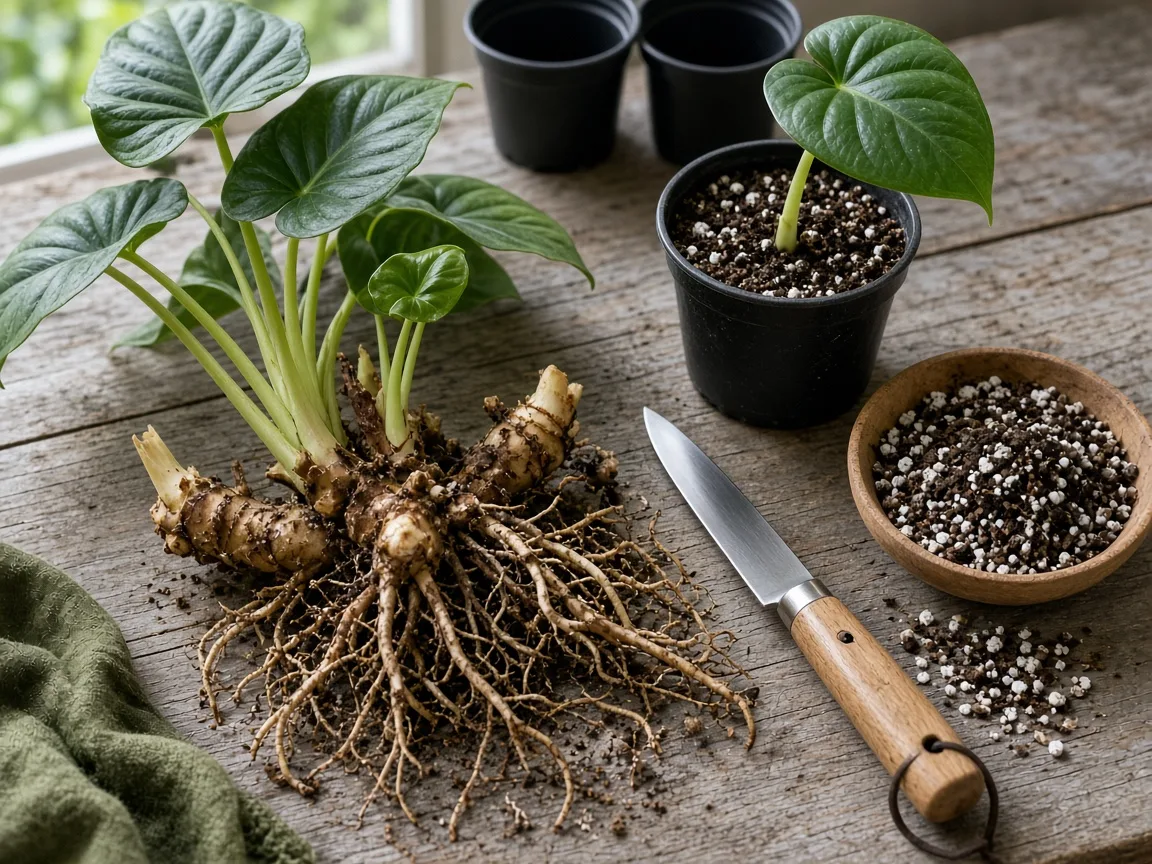
Work during active growth in warm conditions, ideally when you are already repotting. Wear gloves if your skin is sensitive, use clean tools, and keep sap away from children and pets. Prepare small pots or a propagation container before unpotting so roots and corms spend as little time exposed as possible.
Divide only offsets with their own roots
Remove the root ball gently and brush away enough mix to see where the offsets join the mother plant. Choose a small side shoot that has its own growing point and roots. Use a sterilized knife to separate it cleanly; do not split a single stem or cut through the central corm just to make two plants. If an offset has no roots, treat it as a corm-like propagation attempt rather than expecting it to establish as a ready-made division.
Pot each rooted offset in a container just large enough for its roots, using the same airy mix. Keep it warm in bright indirect light and slightly moist while it establishes. Water thoroughly only when the upper layer begins to dry, and avoid letting the small pot remain saturated. A division can pause after separation; look for fresh growth over the following weeks before deciding it has failed.
Start corms warm, moist, and ventilated
Small firm corms are often attached to the root system or hidden among the roots. Remove only those that detach cleanly, or use corms that come away during repotting; do not strip every corm from a plant you want to keep growing. A corm that is mushy, hollow, or badly shriveled is less promising, and appearance alone cannot guarantee viability.
Set a corm on damp sphagnum moss or perlite in a clean, shallow container, with the pointed growth end oriented upward if it is clear which end that is. The medium should feel moist, not drip when pressed. Cover loosely with a clear lid or bag to hold humidity, then provide warmth and bright indirect light. Open the cover regularly for fresh air and remove any corm that turns soft or develops spreading mold. Keeping the corm submerged in water can encourage rot and is unnecessary.
Wait patiently; a corm may take weeks or longer to send out a shoot, and some never do. When it has a visible shoot and roots, move it into a small pot of airy mix and keep the root zone gently moist while it adapts. Avoid up-potting into a large container or fertilizing a corm before it has roots able to use the nutrients. These steps improve the conditions for sprouting; they cannot promise a successful plant.
Prevent pests and place this toxic plant safely
Inspect the undersides of leaves, petioles, and the central growth point when you water or wipe dust away. Spider mites are a frequent indoor problem: fine pale stippling can appear before the webbing is obvious. Mealybugs look like small white cottony clusters, while thrips may leave silvery scarring or black specks. A new plant should be kept apart from the collection for a short observation period so hitchhiking pests are easier to catch.
If you find insects, isolate the plant and identify the pest before treating it. Rinse accessible leaves, wipe off small clusters, and repeat inspections because eggs or hidden insects can survive the first cleanup. For a persistent infestation, use only a product labeled for that pest and indoor ornamentals, follow its directions, and test it on a small area first; some products can mark sensitive leaves. Keep treatments away from pets, children, and food surfaces, and do not use a pesticide merely as a preventive ritual.
Alocasia also needs careful placement around animals. The ASPCA’s Alocasia listing identifies the genus as toxic to cats and dogs because it contains insoluble calcium oxalates; chewing can cause mouth pain and swelling, drooling, vomiting, or difficulty swallowing. Put the plant where pets cannot reach the leaves or fallen pieces, and contact a veterinarian or animal poison-control service promptly if a pet bites it. Do not wait for symptoms or try a home treatment unless a veterinary professional directs you.
Diagnose leaf changes and root problems
Frydek’s leaves are useful signals, but single symptoms rarely identify one cause. Check the moisture and smell of the mix, the temperature near the plant, recent light changes, and the underside of leaves before choosing a fix. Change one condition at a time when the plant is otherwise stable, then judge progress by new growth rather than by expecting damaged leaves to turn green again.
Yellow leaves, drooping, and crispy edges
One old lower leaf turning yellow while a fresh leaf emerges can be routine replacement. Several leaves yellowing together deserve a closer look: persistently wet soil points toward overwatering or poor drainage; a very dry, light pot suggests thirst; low light, cold drafts, pests, or a recent move can also contribute. If yellowing continues after the moisture is corrected, inspect the roots instead of repeatedly adjusting water from the surface.
Drooping is similarly ambiguous. Feel the mix: if it is dry well below the surface, water thoroughly and let the pot drain; if it is wet, wait and look for drainage problems before adding more. A cool draft can make the plant sag even when the soil is adequately moist. Brown, crisp patches on the sun-facing side suggest excess direct light, while dry tips may reflect low humidity, hard water, or fertilizer salts; compare the pattern and recent changes before changing the whole setup.
When a leaf is fully yellow, brown, or damaged, remove it at the base of its petiole with clean, sharp shears. Leave partly green leaves in place when possible; they still contribute energy while the plant recovers, and pruning alone will not correct the cause of repeated leaf damage.
Confirm root rot before cutting roots
Yellow leaves and drooping alone do not prove root rot. Stronger clues include mix that stays wet for too long, a sour smell, dark soft roots, and a base that feels mushy rather than firm. Healthy roots are generally firm; color can vary with the growing medium, so texture and odor matter more than a single shade.

If those signs line up, slide the plant from the pot and inspect the root ball. Remove only roots that are soft and collapsing, using clean scissors or a knife; keep firm roots even if they are stained. Discard the saturated, degraded mix, clean the pot, and repot into fresh airy medium in a suitably sized container with drainage. Do not automatically remove healthy leaves or wash the roots aggressively.
Afterward, keep the plant warm in bright indirect light and water carefully as the remaining roots recover. Do not keep the mix bone-dry for weeks, but let the upper layer dry more than usual before the next thorough watering. If the base is fully soft or nearly all roots are gone, recovery is uncertain; a healthy offset or corm may be the only viable part to save. Root-rot remedies cannot revive tissue that has already collapsed.
Grow Alocasia Frydek outdoors only in dependable warmth
In a frost-free tropical or subtropical climate, Frydek can grow outside in a sheltered spot with bright shade or filtered light and rich, moist, well-drained soil. It is vulnerable to harsh midday sun, wind damage, cold snaps, and waterlogged ground. North Carolina State Extension notes that Alocasia can be grown outdoors during warm months in containers or borders and should be protected before frost; conditions for the genus are a guide, not a guarantee for every cultivar.
In cooler regions, move a potted plant outdoors only after nights have become reliably warm. Acclimate it gradually: begin in shade, then increase morning light over several days while watching for bleached or crisp patches. Bring it inside before temperatures fall, check the leaves and pot for insects, and avoid moving a cold, wet plant into a heated room without time to drain. A container makes this seasonal move practical, while a protected patio offers humidity and airflow without committing the corm to winter soil.
Conclusion
Alocasia Frydek is easiest to manage when its root zone gets both moisture and air. Give it bright filtered light, stable warmth, a draining pot, and an airy mix; water when the upper layer begins to dry rather than following a fixed interval. Feed only while it is actively growing, and let seasonal slowdown guide the pace of care.
When something looks wrong, inspect the soil and roots before treating the leaves. Propagate only firm corms or rooted offsets, isolate pests early, and keep the plant inaccessible to pets because Alocasia contains insoluble calcium oxalates. Those habits will not eliminate every leaf loss, but they give Frydek the conditions and careful response it needs to grow well indoors.



