How to Grow Crocosmia: Planting, Care, and Flowering
Grow crocosmia with practical advice on corm depth, sunlight, drainage, containers, flowering, winter protection, and keeping vigorous clumps in bounds.
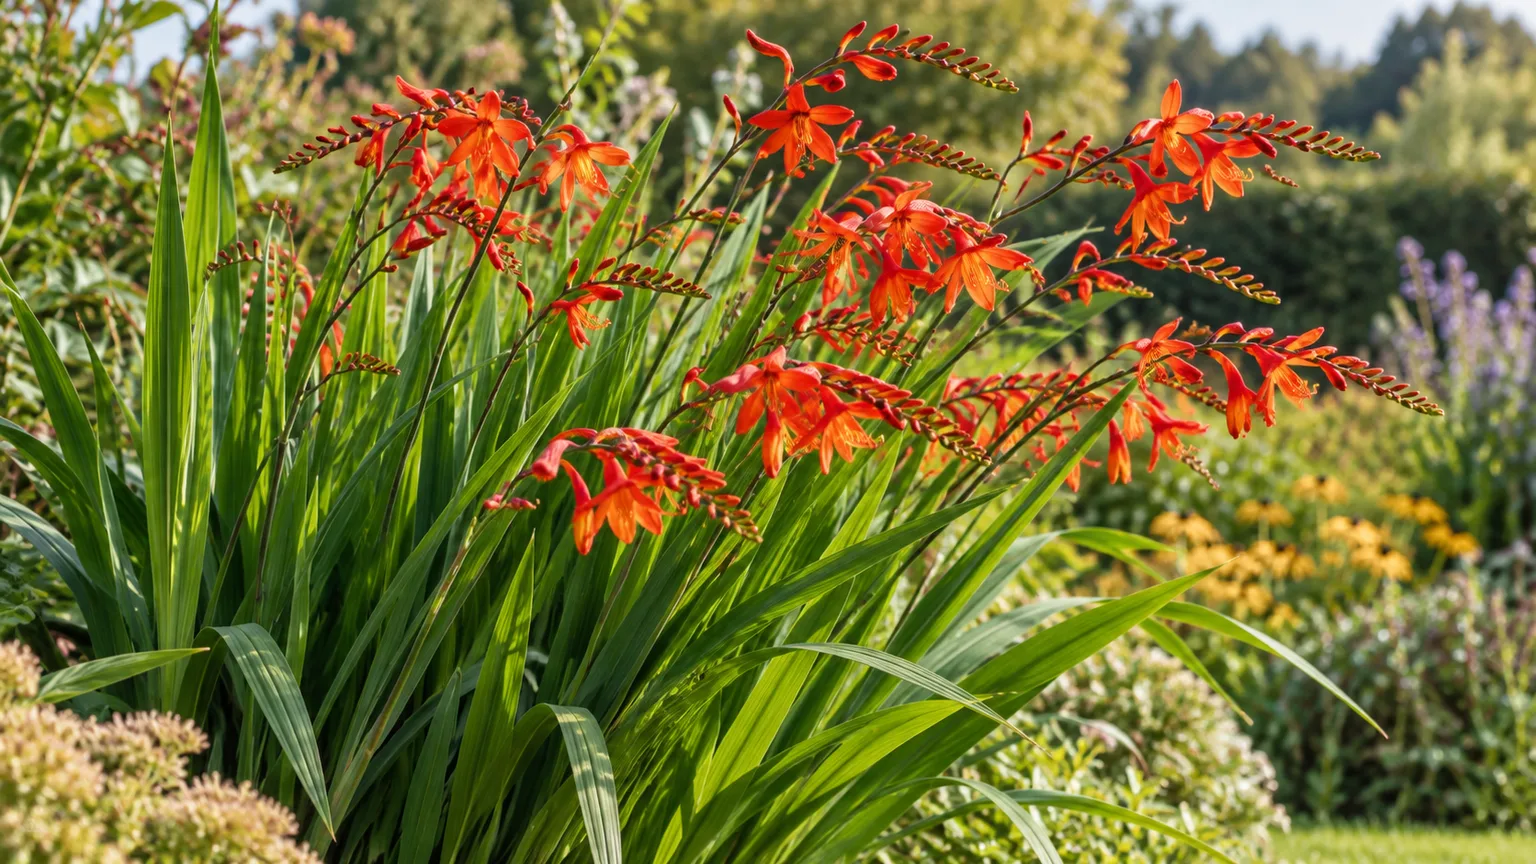
If you want bright late-summer color that returns from year to year, plant crocosmia where its corms get warmth, reliable moisture during active growth, and soil that drains before winter. Most failures trace back to one of three choices: planting into cold or soggy soil, giving a tall cultivar too little sun or support, or letting a vigorous type spread where it cannot be controlled.
Crocosmia is often sold as a “summer bulb,” but it grows from a corm, a compact stem base that stores energy. Once you understand how that storage organ grows and how different cultivars behave, the care is straightforward: plant in spring, water while the clump establishes, leave the leaves in place after flowering, and divide only when the planting becomes crowded or too large. It is an outdoor perennial rather than a long-term houseplant: even a pot-grown specimen needs strong outdoor light and a seasonal growth cycle.
Crocosmia at a glance
| Need | Practical starting point |
|---|---|
| Best light | Full sun in most gardens; light afternoon shade in very hot areas |
| Soil | Moisture-retentive but well-drained; do not leave corms in winter-wet ground |
| Planting time | Spring, after the soil begins to warm and hard frost risk has passed |
| Corm depth and spacing | About three times the corm’s depth; roughly 4 to 8 inches apart |
| Bloom season | Usually mid- to late summer into fall, depending on cultivar and climate |
| Main maintenance | Water while establishing, keep green leaves after bloom, divide crowded clumps |
| Main caution | Some montbretia forms spread much more readily than selected garden cultivars |
These are useful defaults, not a rigid calendar. Crocosmia height, flower time, winter hardiness, and spread vary with the cultivar, drainage, and local climate; use the nursery label for the named selection and adjust to your site.
What crocosmia is and what to expect
Crocosmia, also called coppertips or montbretia, is a South African perennial in the iris family. Its pleated, sword-shaped leaves rise in a fan, then arching or branched stems carry rows of small tubular flowers that open progressively, usually from the bottom upward. The color range includes scarlet, orange, red, yellow, and softer peach tones. It is especially useful when spring flowers have faded and a border needs a strong late-season focal point.
A crocosmia corm is a swollen underground stem, not a true bulb with concentric rings. Each growing season, the plant builds new corms and offsets that gradually enlarge the clump; that is why a healthy planting can return and increase for years. The UF/IFAS Extension fact sheet on crocosmia explains the corm distinction and describes the plant’s late-season flowers, swordlike foliage, and value to hummingbirds.
Treat the plant’s height as a design decision, not just a label detail. The Royal Horticultural Society’s growing guide notes that crocosmias range from about 2 feet to more than 6 feet tall; a tall selection belongs toward the back of a border where its stems can rise above lower perennials without blocking them.
Choose a cultivar for your space
Start with mature height and spread, then pick a flower color. ‘Lucifer’ is a popular tall choice with vivid scarlet-red blooms and strong vertical presence; it can reach around 4 feet in good conditions, so give it room and consider discreet support in a windy or rainy garden. Its height makes it effective behind shorter flowers or in a pollinator border, but it is not the best option for a small pot or narrow bed.
For a compact border or container, look for ‘Emily McKenzie’ or another cultivar sold with a modest mature height. The RHS lists ‘Emily McKenzie’ among smaller types around 2 feet tall, while UF/IFAS describes it as an orange flower with maroon markings. ‘Solfatare’ is chosen as much for its bronze-toned foliage and soft yellow-orange flowers as for bloom color; ‘George Davidson’ offers a smaller yellow-flowered option. Names and descriptions can vary among suppliers, so check the specific plant label rather than assuming every crocosmia sold as “montbretia” behaves alike.
If spreading is a concern, ask for a named clump-forming cultivar with a known local track record. The RHS recommends checking mature dimensions before buying, and its guidance notes that some forms spread more readily than others. A small, well-behaved selection can still form a dense clump over time, so leave enough space to lift and divide it.
Find the right planting site
Crocosmia flowers most reliably in full sun: aim for roughly six hours of direct light, especially in a cool-summer region. In a hot climate, morning sun with some afternoon shade can reduce heat stress without leaving the plant in deep shade. A site with bright light, shelter from drying wind, and room for arching flower stems is a better bet than a very exposed corner where tall spikes repeatedly lean.
The soil should hold enough water for growth but release excess after rain. A fertile loam is convenient, but crocosmia can grow in several soil types if drainage is good; persistent winter saturation is more dangerous than a soil that is not perfectly amended. NC State Extension’s plant toolbox entry lists moisture and good drainage as preferred conditions and flags both wet and very dry soils as poor fits.
Before planting into heavy clay, test the site after a rain. If water remains in the planting area for hours, use a raised bed, a slope with runoff, or a large container instead of trying to solve the problem with a small amount of sand mixed into one planting hole. Add compost across a broader bed to improve structure; do not bury corms in a rich pocket that stays wetter than the surrounding soil.
When to plant crocosmia
Plant dormant corms in spring once the ground has warmed and the hard-frost period is past. In cold regions, waiting a little longer is safer than planting into chilled, waterlogged soil: corms do not need to be rushed into the garden before conditions support root growth. The RHS recommends spring for dormant corms; nursery-grown plants can go in during a wider spring-to-autumn window, but avoid hot, dry weather while they are trying to establish.
If your winters are mild and your soil drains freely, a garden-center plant may settle in during spring or early fall. In a region with severe winters, early planting gives roots time to establish before cold weather, but the cultivar’s own hardiness matters more than a single species-wide zone number. When the plant label is unclear, ask the supplier which winter temperatures the named selection has tolerated locally.
Buy firm, plump corms rather than shriveled, soft, or moldy ones. Keep them dry and ventilated until planting, and avoid soaking them overnight unless the supplier specifically instructs you to do so; a corm sitting wet before it has roots can begin to rot.
Plant corms at the right depth and spacing
The RHS crocosmia guide recommends planting corms at about three times their own depth, spaced 4 to 8 inches apart. That proportional rule works better than forcing every corm into one fixed depth: a small corm goes shallower, while a larger one sits deeper. Plant with the slightly pointed growing tip upward and the root end down; if you cannot identify the top confidently, lay the corm on its side rather than planting it upside down.
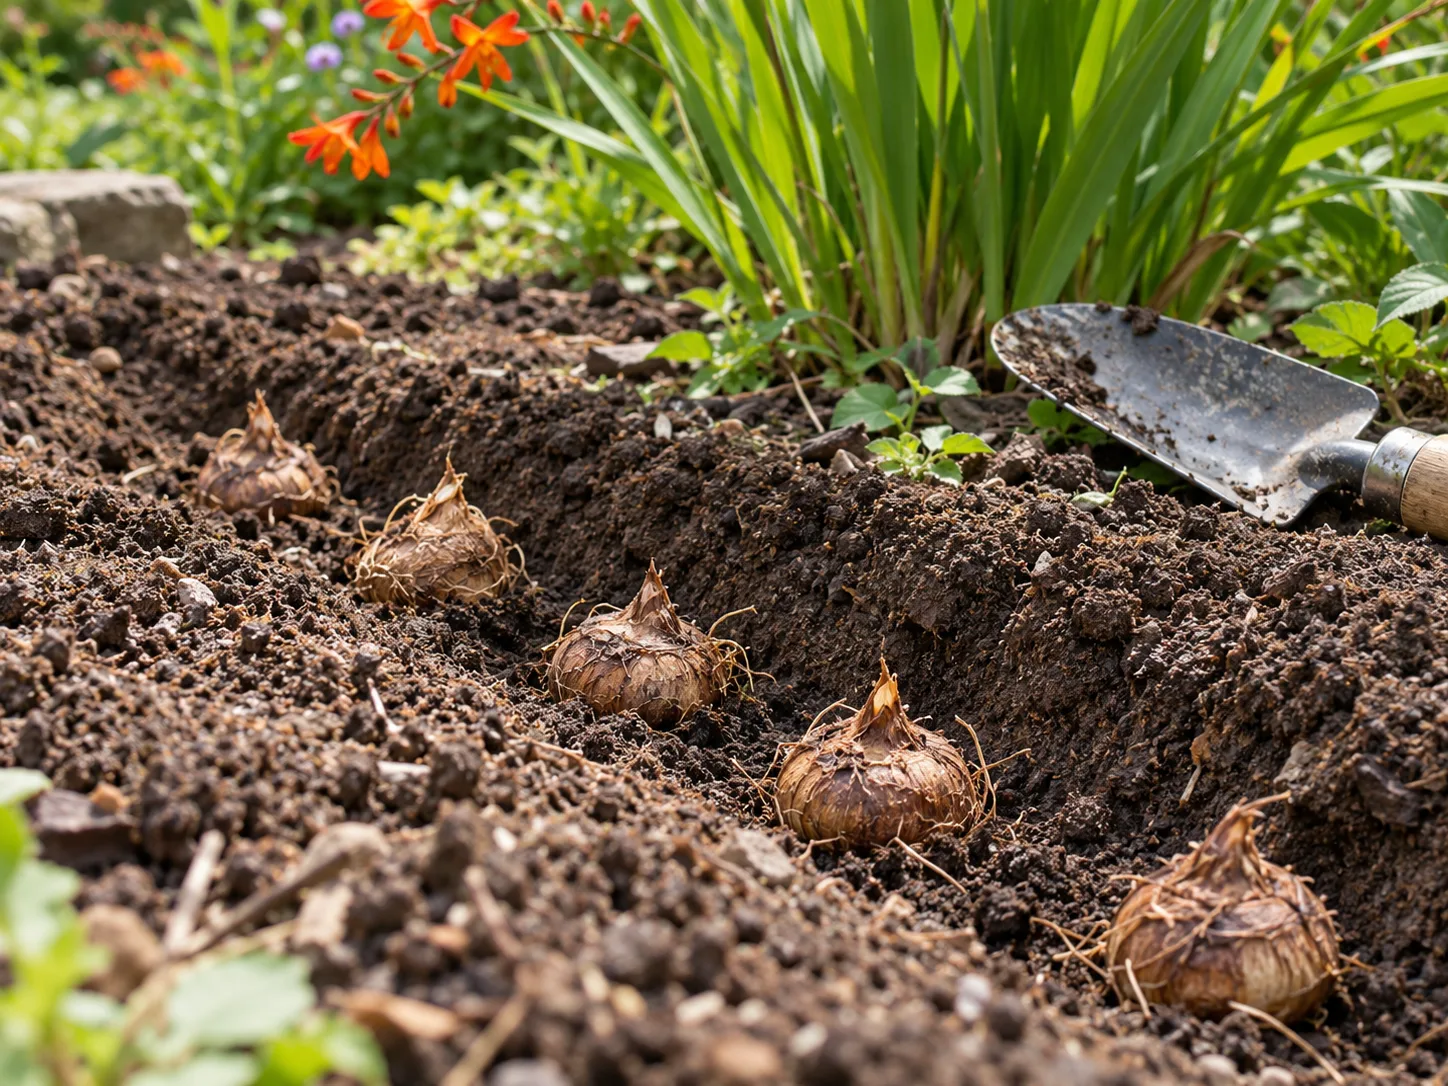
For a natural mass, plant a group rather than a single isolated corm, leaving the recommended spacing so the leaves have air around them and the clump has room to mature. Dig a broad planting area, loosen the soil, set each corm at the proper depth, cover gently, and water once to settle the soil. Mark the location; crocosmia can take time to emerge, and an empty-looking spot is easy to disturb with spring digging.
Do not place a corm directly into a wet pocket or pack the soil hard over it. If the soil is sandy and dries quickly, a thin layer of compost or mulch can help hold moisture once shoots appear. If you are planting potted crocosmia rather than dormant corms, set the root ball at the same level it was growing in the nursery pot and water it in thoroughly.
Water, feed, and mulch with the season
During the first growing season, water when the upper layer of soil begins to dry, then let excess drain away. The goal is even moisture while roots and leaves are growing, not constant saturation. Once an in-ground clump is established, it usually needs extra water only during a prolonged dry spell; a container dries faster and needs more frequent checks.
Crocosmia can tolerate ordinary garden fertility, so do not push it with repeated high-nitrogen fertilizer. Too much nitrogen can produce lots of soft foliage without a corresponding increase in flowers, and lush stems may flop. If the soil is poor, mix in a modest amount of finished compost before planting; if an established clump grows weakly, check crowding, light, and drainage before assuming fertilizer is missing.
A light organic mulch in spring can moderate moisture and reduce weeds, but keep it loose around emerging shoots and avoid piling a thick, wet layer directly against the plant crown. In cold, exposed gardens, a deeper protective mulch after the ground cools can help insulate corms, provided the site drains. The UF/IFAS fact sheet describes crocosmia as preferring even moisture and cautions against dry conditions, while the RHS advises watering newly planted plants until settled and during summer drought.
Grow crocosmia in a container
A pot is useful if your border is small, your soil stays wet, or you want a spreading selection contained. Choose a smaller cultivar and a stable container with several unobstructed drainage holes; a tall flower spike can make a lightweight pot top-heavy. Use a quality outdoor potting mix that drains freely but does not dry to dust in a day, and place the pot where it receives strong light.
Plant corms at the same proportional depth as in a bed, leaving enough space for offsets to form. A compact clump looks better than a single spindly stem, but do not crowd so many corms into a pot that they compete for water and roots have nowhere to expand. A 14- to 18-inch-wide pot is a reasonable starting size for a small group; increase the container if the cultivar is vigorous or you want to leave it undisturbed for multiple seasons.
Check moisture more often in summer because containers heat up and dry from the sides. Water thoroughly when the mix is beginning to dry, then empty any saucer so the corms are not left standing in water. The RHS recommends regular watering through active growth in pots and notes that a high-potassium liquid feed can support flowering; use the product label’s dilution and frequency rather than stacking feeds.
Encourage flowers and use them as cut blooms
Crocosmia usually flowers from mid-summer into fall, although the first bloom date shifts with cultivar, planting time, and climate. The tubular flowers open one after another along a branched stem, so a spike can look good for more than a few days as lower flowers fade and upper buds open. If your planting is young, do not judge it by the first few weeks after planting: a small or newly established corm may spend its first season building strength.
For more blooms, give the clump enough sun, keep soil from becoming bone-dry during active growth, and avoid excess nitrogen. Do not divide it too often; a mature clump can flower well, while a tightly congested clump may produce fewer stems and benefits from spring division. Support tall cultivars early in the season if the bed is windy, rather than trying to tie overgrown stems after they have already toppled.
For a vase, cut a stem when the lowest few flowers are opening, leaving foliage on the plant if you are not harvesting the whole stem. The UF/IFAS fact sheet recommends removing leaves from cut stems, recutting the base, and conditioning the flowers upright in tepid water in a cool, dark place; that extra step can help the flowers last longer indoors. After the last buds on a spike finish, remove the spent flower stem if you do not want seed capsules.
Overwinter crocosmia in your climate
Crocosmia’s winter survival depends on cultivar, local cold, exposure, and—especially—whether water drains away. In a mild or moderate winter climate with free-draining soil, leave the corms in place and let the foliage die back naturally. In colder or wind-exposed locations, a generous layer of dry leaf mold or compost over the clump after the ground cools can buffer temperature swings.
If winters are severe or the bed becomes waterlogged, grow crocosmia in a pot you can shelter, or lift the corms after the foliage has died and store them dry in a cool, frost-free place. Check them periodically and discard any soft or rotting corms. Avoid applying a universal USDA zone cutoff to all crocosmias: the UF/IFAS article gives broad guidance for commonly grown plants, but hardiness claims differ among species and named cultivars; use the supplier’s cultivar-specific information for your region.
Do not cut healthy leaves to the ground as soon as flowering ends. The foliage continues to photosynthesize and replenish the corms for next year’s flowers; cut it back only when it has yellowed or died down, or in early spring before new shoots emerge. The RHS also notes that faded foliage can be left through winter for sheltering wildlife, so tidy the bed only when the plant has finished its seasonal work.
Divide a crowded clump
A crocosmia clump is ready to divide when flowering drops, the center becomes congested, or the plant has grown past its allotted area. The RHS suggests dividing every three to five years as needed, in early spring just before new growth; there is no benefit to digging up a young, healthy clump on a fixed annual schedule. Division is the fastest way to make more plants that match the parent cultivar.
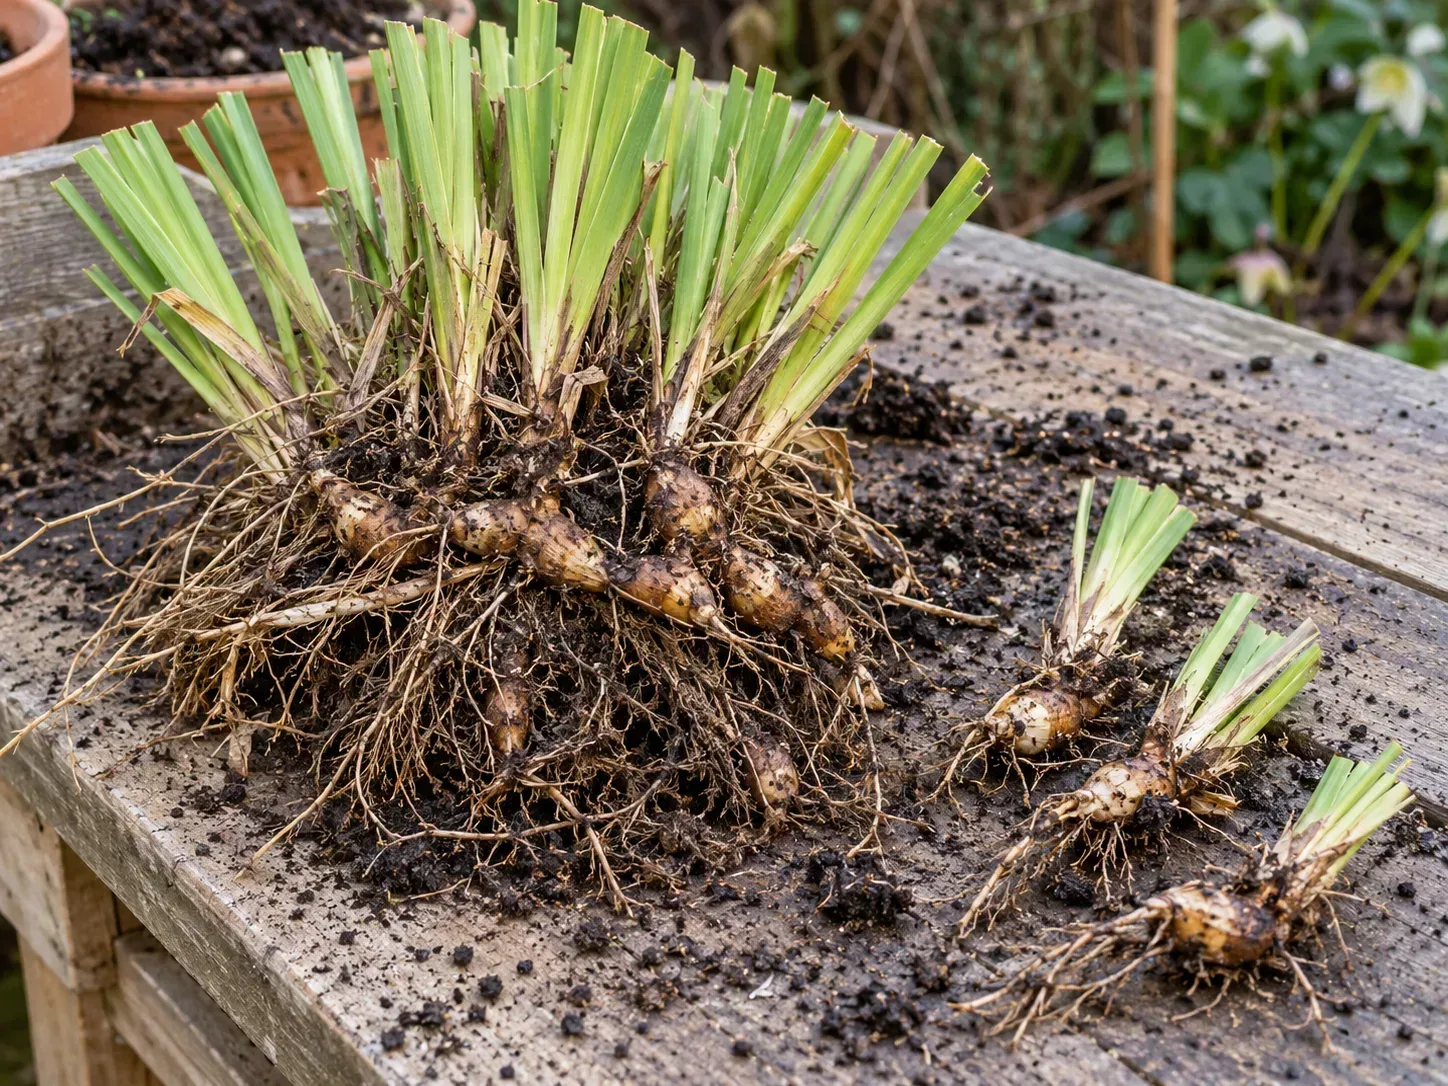
Water dry soil the day before if the clump is difficult to lift, then use a fork to loosen the root mass around its edges. Lift the clump intact, brush or wash enough soil away to see the corm chain, and gently pull offsets apart; use a clean knife only where parts are firmly joined. Keep the firm, well-formed corms and discard soft or damaged pieces.
Replant divisions promptly at the original depth and spacing, water to settle the soil, and label the cultivar if you are moving several types. The newest corms are often smaller and may take longer to bloom, while stronger mature corms are more likely to flower sooner. Gardeners’ Path also describes spring division and separating corm strings; the useful distinction is to preserve the healthy corms, not to split them into pieces too small to establish.
Grow crocosmia from seed
Seed is an option when you enjoy experimentation or want to raise many plants, but it is slower and less predictable than dividing corms. Crocosmia seedlings may take several years to reach flowering size, and named cultivars do not reliably come true from seed; the offspring can differ in height or flower color. For a garden that needs the same ‘Lucifer’ or ‘Emily McKenzie’ you bought, divide its corms instead.
If you do sow seed, let a few flower stems form mature dry capsules and collect them as they begin to split. Fresh seed is generally the best starting point; Gardeners’ Path describes sowing about half an inch deep in a seed-starting mix, keeping it lightly moist at roughly 60 to 70°F, and allowing a few weeks for germination. Move seedlings outdoors after they have several true leaves and the weather is settled, first acclimating them to outdoor conditions. The RHS propagation notes caution that seed-grown plants may take several years to flower and can differ from the parent, so label the seedlings and give them time before deciding which are worth keeping.
Keep spreading crocosmia contained
Many garden cultivars form gradually expanding clumps, but montbretia, often identified as Crocosmia × crocosmiiflora, can spread aggressively in favorable climates. The UF/IFAS fact sheet flags that hybrid and some other forms as more vigorous, while the RHS advises gardeners to control unwanted growth by digging out corms. In other words, the risk is not a reason to fear every crocosmia; it is a reason to identify the plant before letting it naturalize.
Before planting, check local invasive-plant guidance and choose a named cultivar with documented behavior in your region. If the plant has a history of escaping nearby gardens, keep it in a large pot or a contained bed and deadhead before seed capsules ripen. A root barrier alone may not stop a corm that grows over the edge or gets carried in soil.
When a clump spreads beyond its boundary, remove the whole underground mass rather than just pulling off leaves. Small corms can remain in soil and resprout, so dig a margin around the visible shoots, sift disturbed soil where practical, and inspect the site again the following growing season. Do not compost mature seed heads or unwanted corms if local guidance warns that they can spread from discarded plant material.
Troubleshoot weak growth and pests
Begin with the pattern: weak flowering in an otherwise green clump points to a different cause than yellow leaves and mushy corms. A healthy crocosmia can lose lower leaves as it matures or naturally fade in fall, but widespread yellowing during active growth calls for a check of moisture, drainage, and pests. Avoid cutting or feeding first; inspect the plant and soil so you do not treat the wrong problem.
Check the cause of poor flowering or flopping
If a clump grows leaves but few flowers, first count its hours of direct sun. Deep shade is a common reason for sparse bloom; a newly planted corm may also need time to mature, while a crowded older clump can benefit from division. If neither applies, review watering and fertilizer: prolonged drought can interrupt growth, while excess nitrogen may encourage lush leaves instead of flower stems.
For stems that bend, distinguish normal arching from collapse. Crocosmia flower spikes naturally curve, but a tall cultivar that falls flat may have too much shade, crowding, wind exposure, or soft growth after heavy feeding. Move the plant to brighter light when practical, thin nearby growth, and add a discreet support frame in spring; late emergency staking often catches stems only after they kink.
If leaves yellow rapidly while the soil is wet, inspect the corms rather than adding water or fertilizer. Soft, foul-smelling corms point to rot, so remove damaged material and improve drainage before replanting. If leaves show fine pale stippling, bronzing, or delicate webbing in hot, dry weather, inspect their undersides for mites.
Spot spider mites before damage spreads
Spider mites are most likely during hot, dry periods and often cause a fine stippled look before webbing becomes obvious. Turn over several leaves and look closely along the midrib; dust, drought stress, and natural leaf aging can resemble early mite damage, so confirm the pattern before using a treatment. A light infestation can often be reduced by rinsing leaf undersides with a firm spray of water and repeating after a few days.
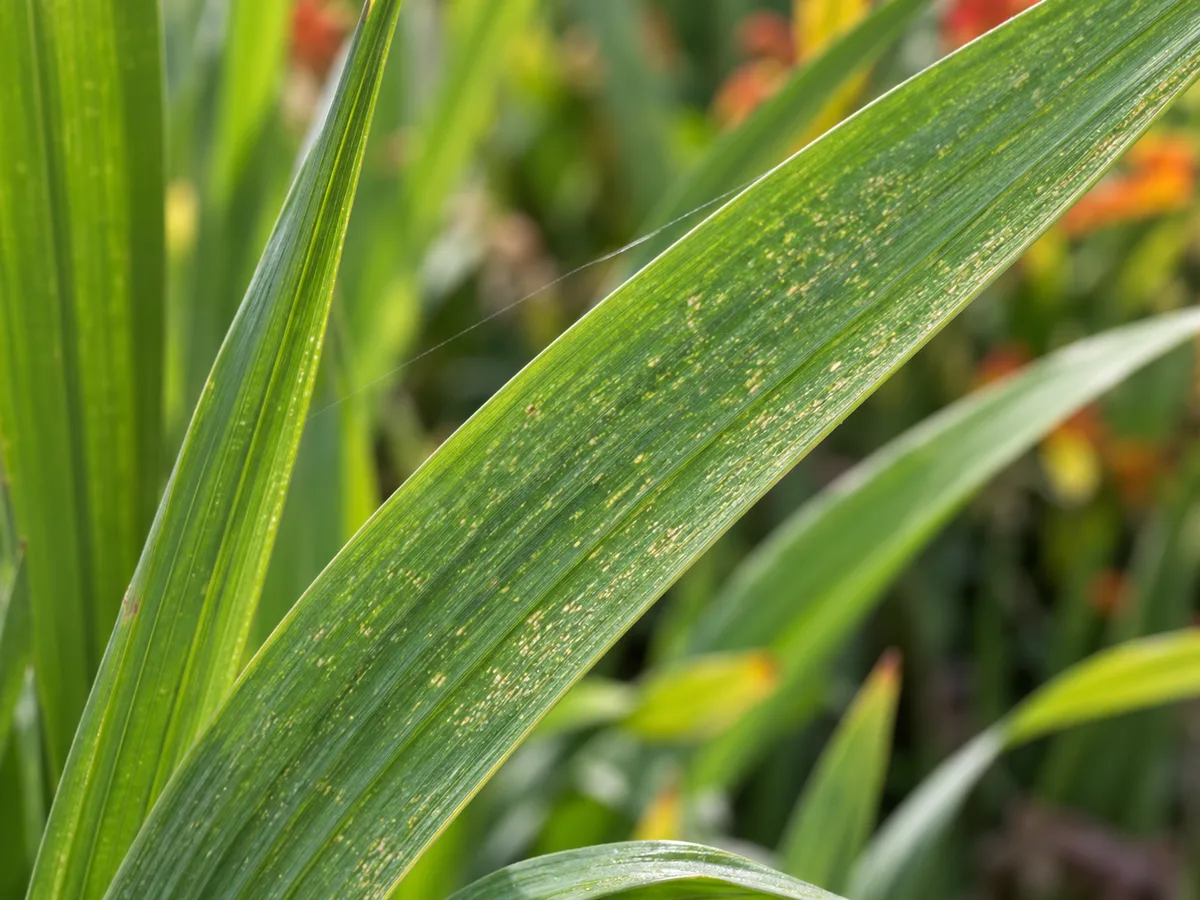
Fine stippling can have several causes; inspect leaf undersides to confirm mites before treating.
If the infestation persists, remove badly affected leaves and improve watering consistency without keeping the soil saturated. Use an insecticidal soap or another product only if the label permits that use, and follow its directions for coverage and repeat applications; do not spray open flowers while pollinators are visiting. NC State Extension notes spider mites as a possible issue and recommends washing foliage to dislodge them, while Epic Gardening’s crocosmia guide discusses the same hot-weather pest pattern.
Conclusion
Crocosmia is easiest to grow when you plan for the corm and the mature clump, not just the bright flowers. Plant firm corms in spring at a depth suited to their size, choose a sunny site with good drainage, keep new growth evenly watered, and let the leaves fade naturally after bloom. In pots, monitor moisture more closely and select a compact cultivar.
Then adapt the rest to your conditions: protect or lift corms where winter cold or wet soil threatens them, divide crowded clumps in early spring, and contain any form known to spread locally. With those choices made up front, crocosmia can supply reliable late-season color without becoming an untidy or unmanageable patch.



