Tomato Blight: Identify, Prevent, and Treat It
Learn how to tell early blight from late blight and Septoria, what to remove, when to use a labeled fungicide, and how to protect next year’s crop.
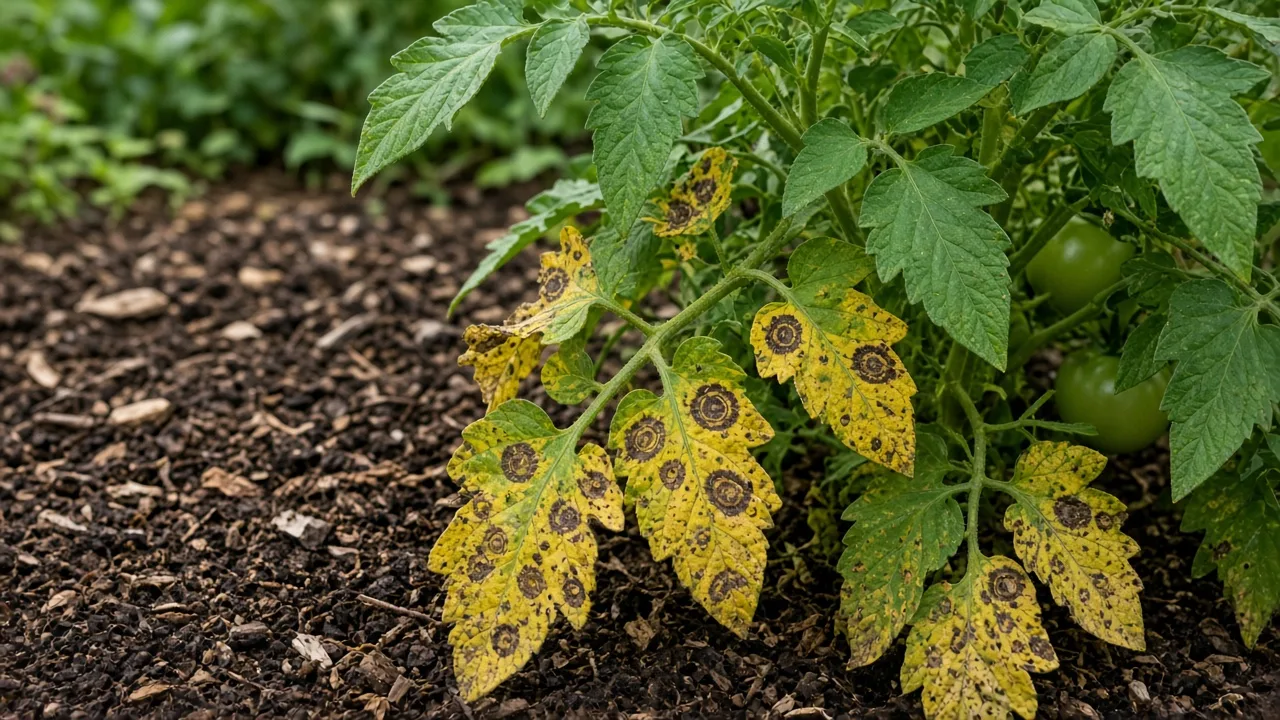
Tomato blight is not one disease. It is a catch-all phrase gardeners use for several serious problems that create leaf spots, stem lesions, defoliation, and fruit rot. The most useful first step is not reaching for a spray; it is deciding whether the pattern looks like early blight, late blight, Septoria leaf spot, or something else entirely.
That distinction changes the response. Early blight often starts low on an older plant and can be slowed by removing affected leaves and protecting new growth. Late blight can move through a crop with startling speed in cool, wet weather. Septoria usually produces many small spots and leaf drop, while insect damage, sunscald, herbicide injury, and nutrient stress can look similar from a distance.
The Fastest Way to Triage a Sick Tomato
Inspect the whole plant before touching it. Start at the lower leaves, then look at the newest growth, stems, fruit, and the soil around the base. Note whether the problem is advancing over days or appeared suddenly after a storm, transplanting, pruning, spraying, or a heat wave.
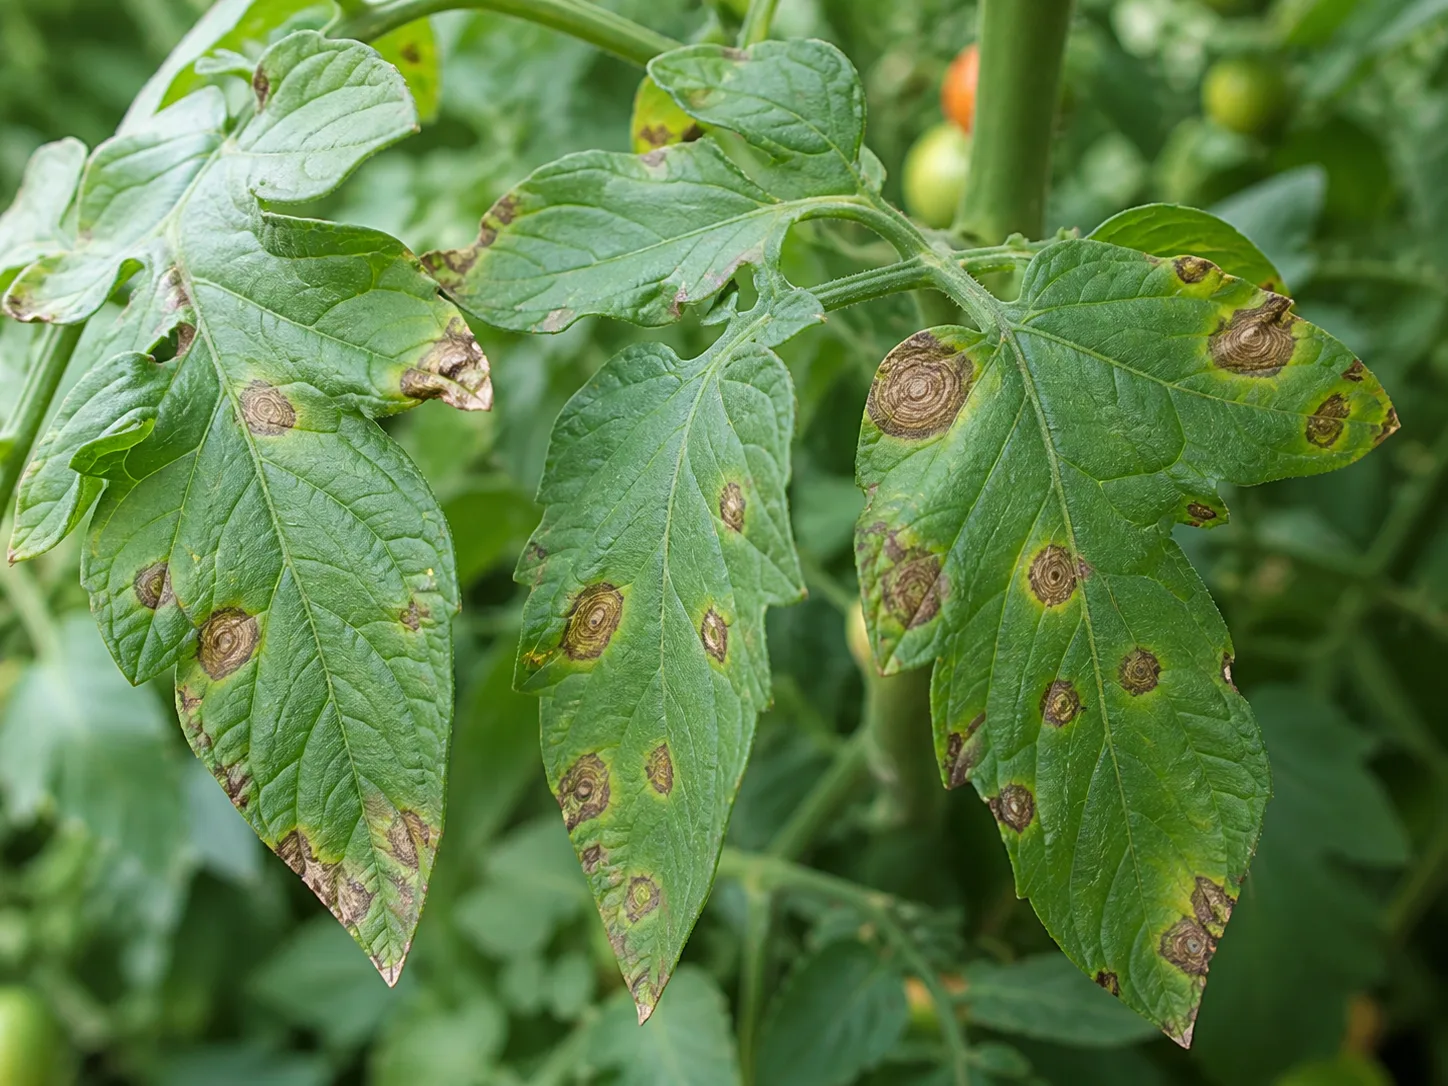
Use a hand lens or your phone camera and ask four questions: Are the spots round or irregular? Do they have concentric rings? Do they look water-soaked? Is there white growth on the underside during humid weather? Also check whether the mark is a true lesion or a surface deposit that wipes away.
If a plant is declining rapidly, isolate it while you investigate. Avoid brushing infected foliage against neighboring plants, and do not water overhead while leaves are wet. A quick photo of both leaf surfaces, the stem, and one fruit can help a local extension office or garden diagnostician confirm a disease when symptoms overlap.
What Gardeners Mean by “Tomato Blight”
Early blight
Early blight is primarily associated with Alternaria solani, with related Alternaria pathogens also reported on tomato. It favors warm conditions, humidity, and repeated wetting. The disease often begins on older, lower leaves after the plant has started setting fruit, especially when soil splashes onto foliage or the plant is stressed.
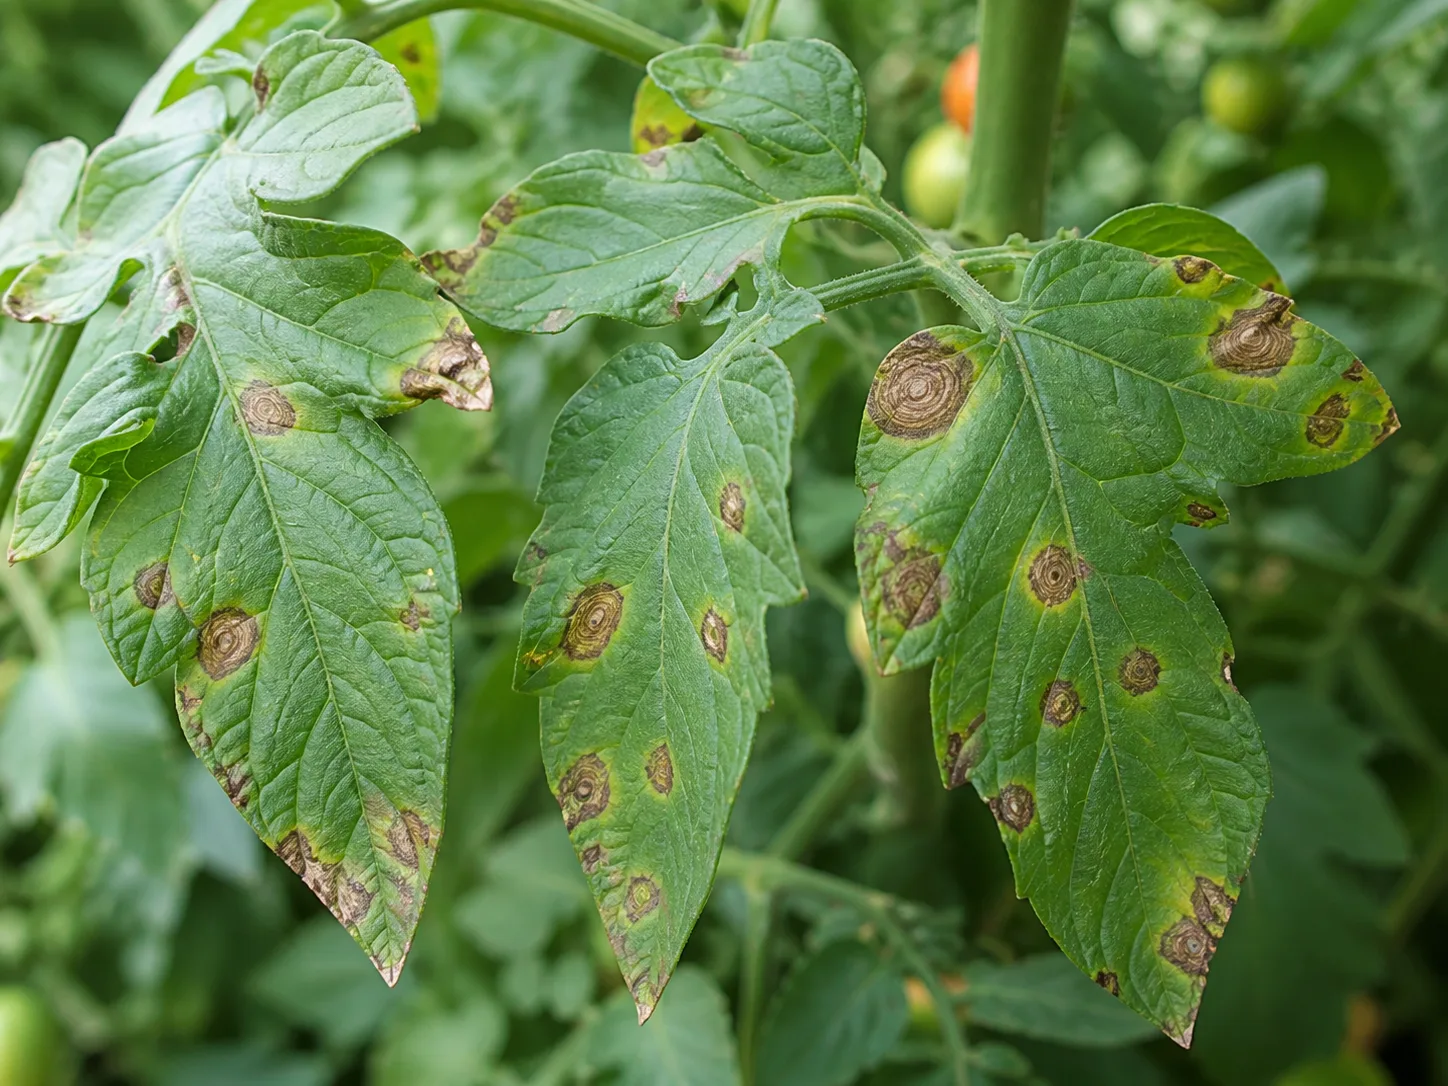
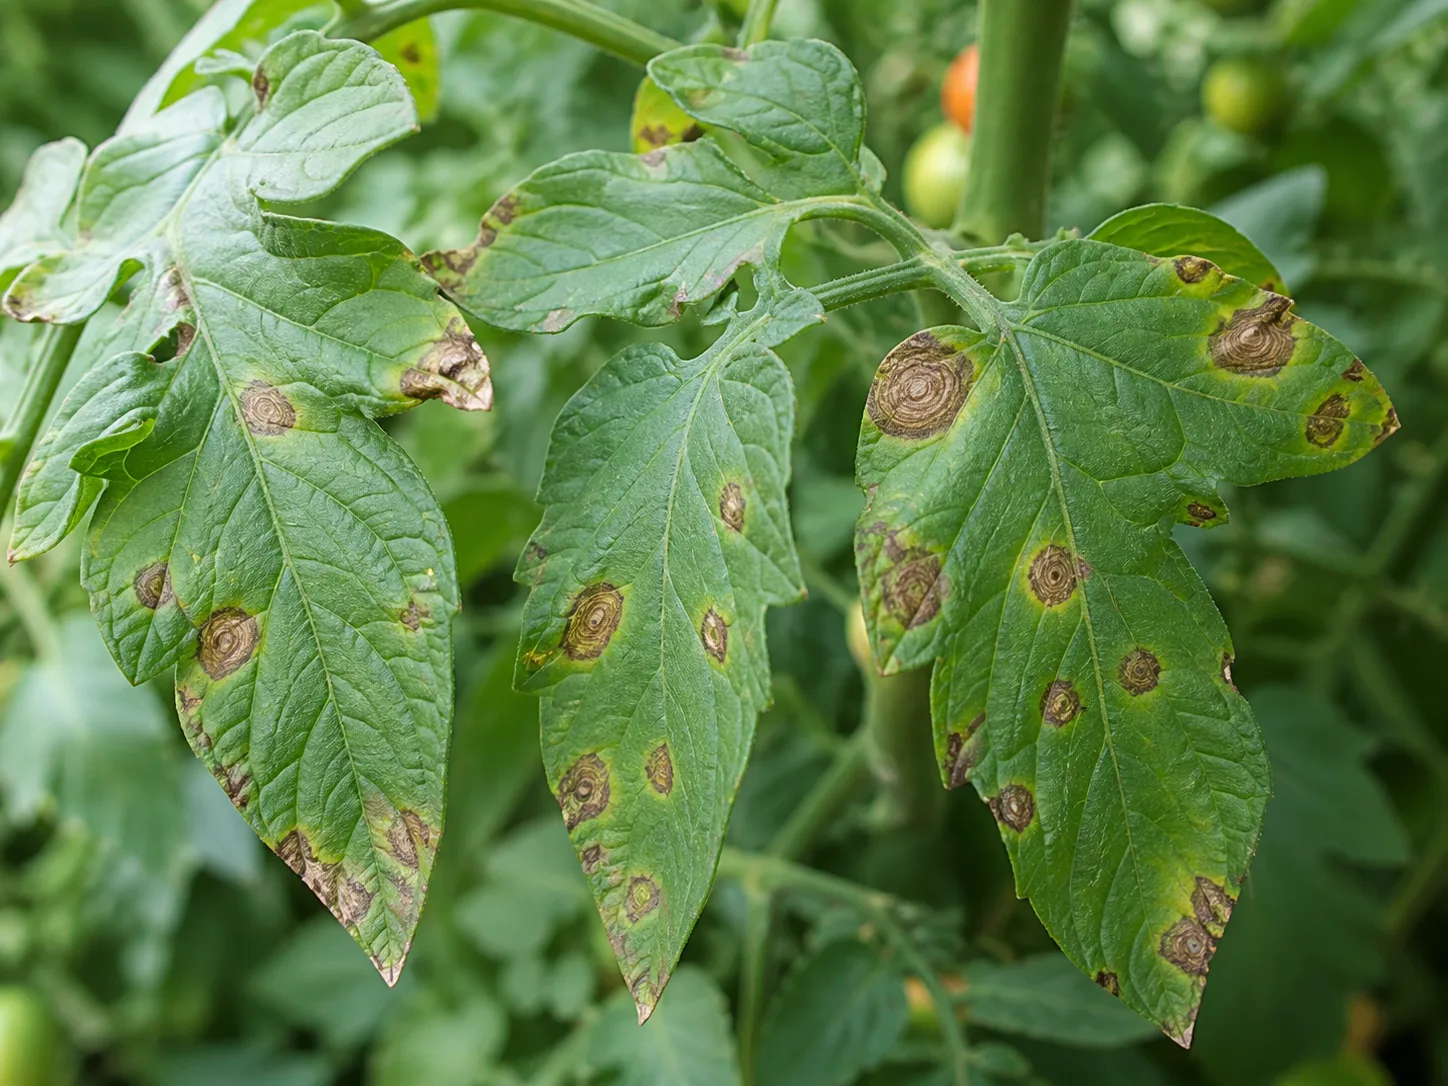
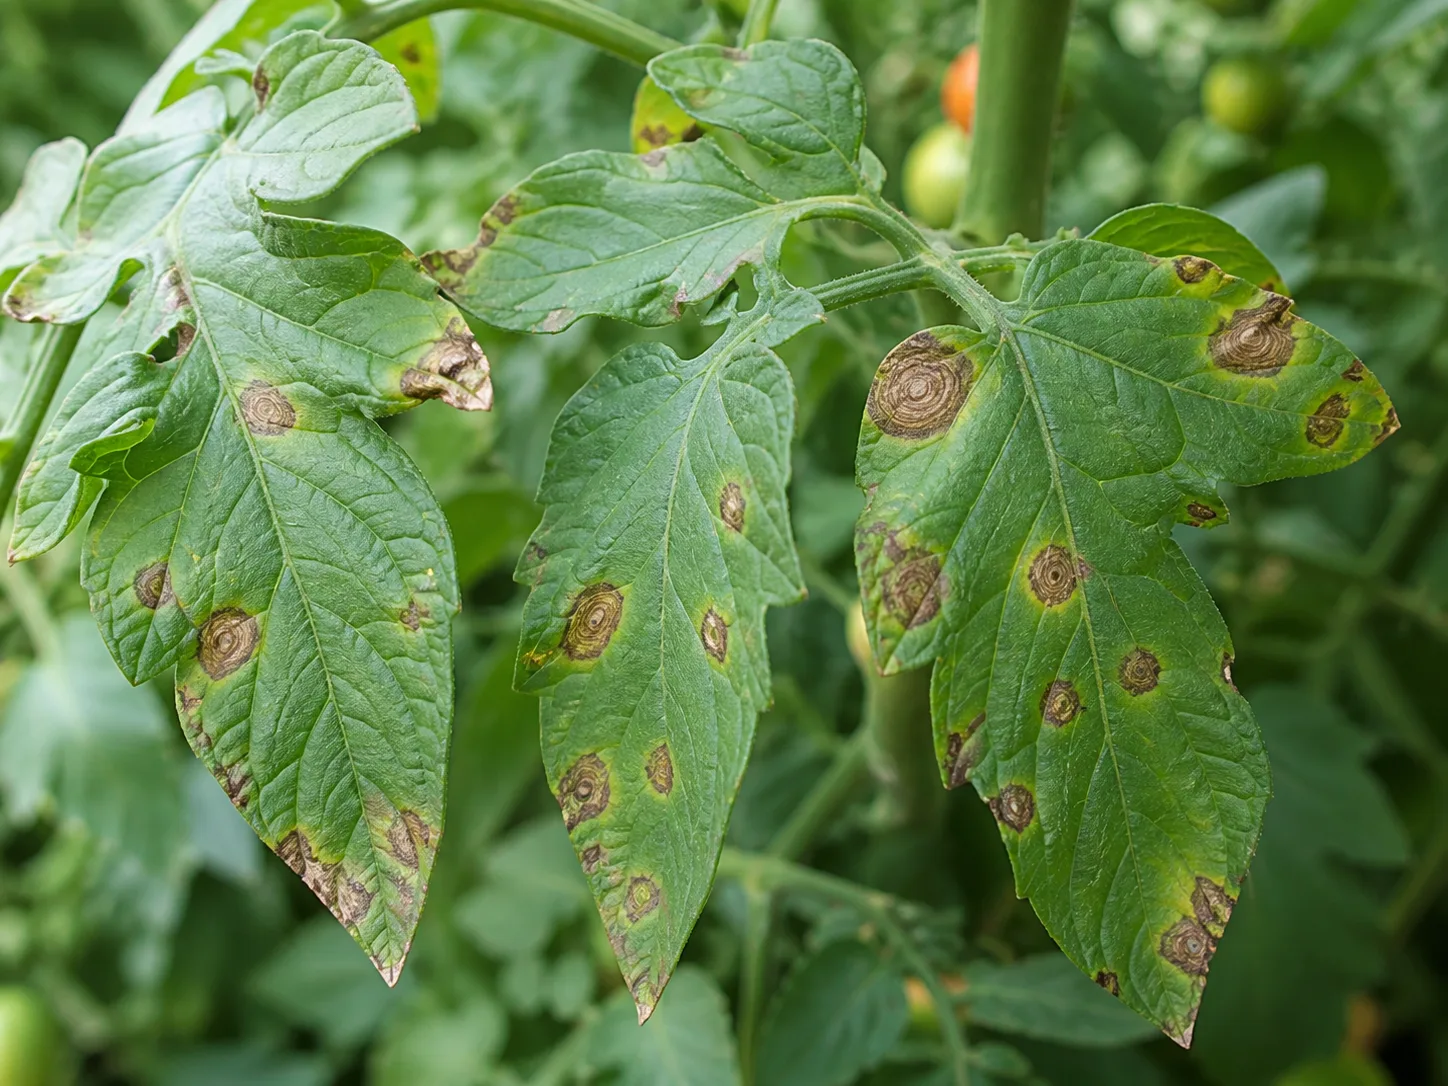
The classic clue is a brown to black lesion that enlarges into rings, sometimes described as a target or bull’s-eye. A yellow area may surround the spot, and multiple lesions can merge until the leaf yellows, dries, and falls. Dark, sunken, leathery lesions may also appear on stems or near the stem end of fruit.
The word “early” is misleading. It describes a disease name, not a guarantee that symptoms will appear early in the calendar. Early blight can show up midseason or later, and it can occur alongside Septoria or other leaf-spot diseases. University of Minnesota Extension’s early-blight guidance likewise treats plant stress, wet foliage, and sanitation as part of management rather than promising a cure.
Late blight
Late blight is caused by the fungus-like oomycete Phytophthora infestans, the same pathogen that affects potatoes. It favors cool, wet conditions and can spread quickly when leaf surfaces stay wet for hours. The University of Minnesota Extension and RHS both emphasize the speed and severity of this disease compared with ordinary leaf spotting.
Look for irregular, water-soaked pale green, brown, or purplish lesions that expand rapidly. Under humid conditions, a fine white growth may appear around the lesion edge or on the underside of a leaf. Lesions can move into petioles and stems, and fruit may develop firm, greasy-looking brown areas before the plant collapses.
Late blight is a crop-alert problem, not a wait-and-see cosmetic blemish. If several plants develop fast-moving water-soaked lesions after cool, wet weather, stop moving through the crop, photograph the symptoms, and contact your local extension service. Confirmation matters because late blight can resemble other diseases, yet the consequences of delaying action are much higher. The Royal Horticultural Society’s tomato-blight overview notes that prolonged leaf wetness is central to infection and that outdoor crops are especially exposed in wet summers.
Septoria leaf spot
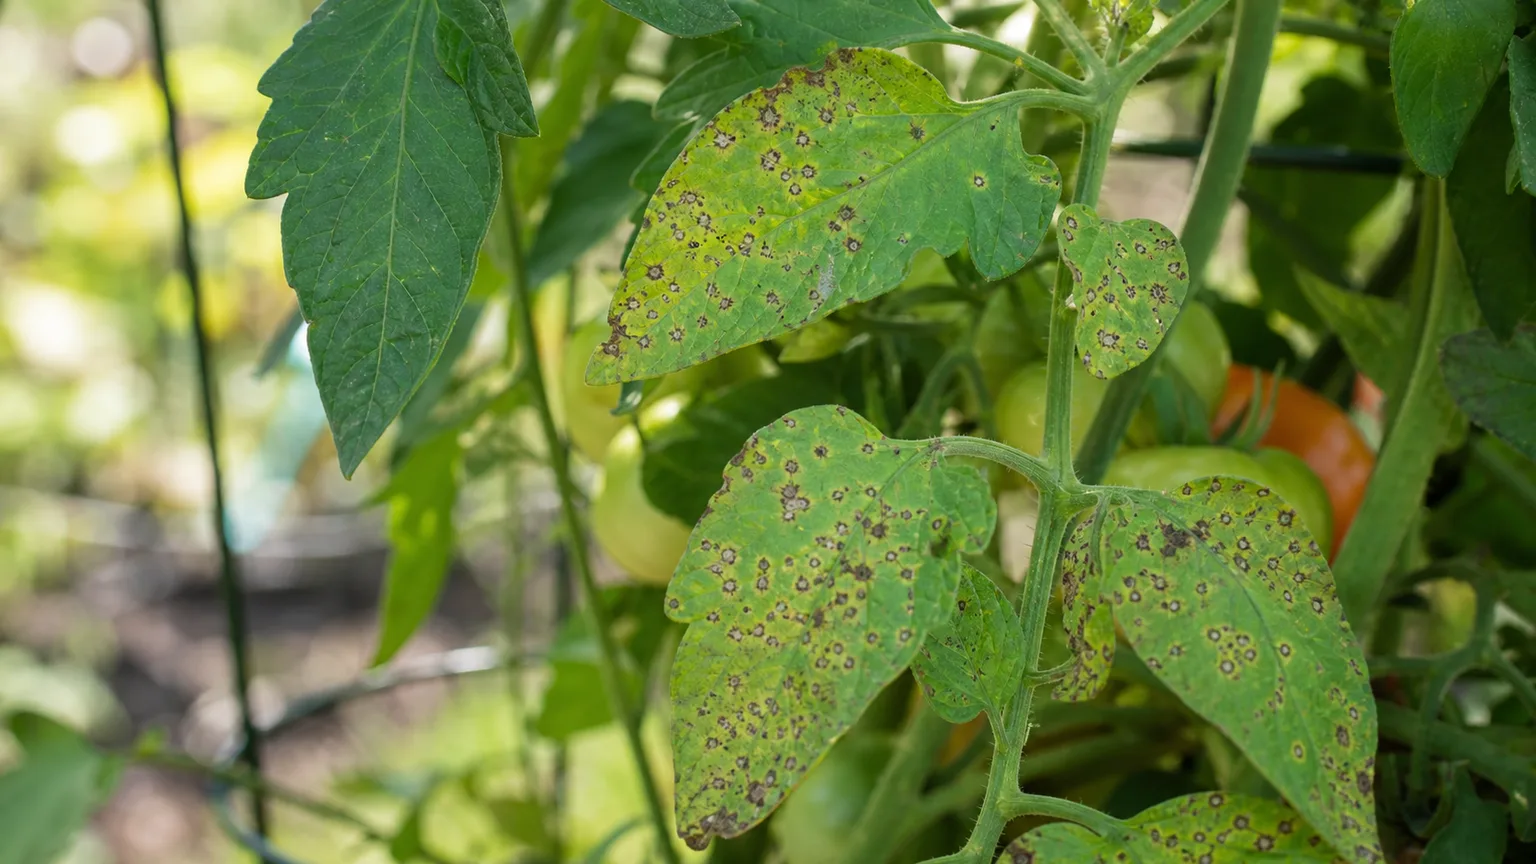
Septoria leaf spot, caused by Septoria lycopersici, often begins on lower leaves as numerous small circular spots. The centers may become tan or gray and develop tiny black specks, which are fruiting structures. Leaves yellow and drop progressively, but the spots are usually smaller and more numerous than early-blight lesions.
Septoria can strip a plant from the bottom upward without producing the large target-like rings associated with early blight. It is still important to manage because severe defoliation reduces the plant’s ability to shade fruit and make carbohydrates, even when the fruit itself is not directly infected.
Early Blight vs. Late Blight vs. Septoria
| Clue | Early blight | Late blight | Septoria leaf spot |
|---|---|---|---|
| Usual weather | Warm, humid, wet foliage | Cool, wet, humid weather | Wet, humid weather |
| First location | Older lower leaves | Any above-ground tissue, often young leaves too | Lower leaves |
| Lesion shape | Brown, often with concentric rings | Irregular, water-soaked, rapidly expanding | Small circular spots with pale centers |
| Underside clue | Usually no white growth | Fine white growth may appear in damp weather | Tiny dark specks in spot centers |
| Fruit symptom | Dark, sunken, leathery spots | Firm, greasy or water-soaked brown lesions | Fruit usually unaffected |
| Pace | Gradual to moderate | Often rapid | Gradual leaf loss |
| First priority | Remove lesions and reduce wetness | Isolate, confirm, and remove affected material promptly | Sanitation and protecting new growth |
|
No single symptom proves the diagnosis. Weather history, speed, where the first lesions appeared, and whether the underside shows sporulation are more reliable together than any one “bull’s-eye” description.
What to Do in the First 24 Hours
- Stop overhead watering. Use a hose at the soil line or a soaker/drip system, and water early enough for accidental splashes to dry.
- Mark the affected plant. A colored tie or garden label lets you track whether new leaves are clean without repeatedly handling the foliage.
- Remove only clearly diseased tissue. Do not strip half the canopy because one leaf has a questionable spot.
- Bag or contain the clippings. Carry them away from the bed; do not shake them across healthy plants.
- Clean tools and hands. Wipe pruners between plants and wash hands after working with suspect foliage.
- Photograph before spraying. A clear record helps compare progress and seek a diagnosis.
This sequence buys you time while reducing the two things that make many foliar diseases worse: moving contaminated material and extending leaf wetness. It also prevents an avoidable mistake—covering an uncertain diagnosis with a product that can burn foliage or obscure the next symptoms.
How to Remove Diseased Leaves Without Spreading Spores
Choose a dry morning after dew has evaporated. Start with the lowest, worst leaves and use clean pruners or pinch off leaves at the petiole. Do not work through the canopy when it is wet, and do not drag infected leaves across stems or neighboring plants.
For early blight or Septoria, selective pruning can preserve a plant that still has a strong growing tip and clean new foliage. A useful rule is to remove the leaves that are mostly diseased, leaving enough healthy canopy to protect fruit from sun and keep photosynthesis moving. If removing a leaf would expose a cluster to intense afternoon sun, wait for a less stressful day or provide temporary shade.
Never compost visibly infected tomato or potato debris in a small home pile unless you know the pile reaches and maintains a temperature sufficient to destroy the pathogen. Bagging for municipal disposal or following local guidance is safer. Do not burn plant material where local rules prohibit it or where smoke could harm people.
When a tomato plant can recover.
Recovery is possible when the disease is limited, the growing tip remains healthy, and the plant can keep producing clean leaves. “Recover” does not mean the old lesions will heal; dead tissue stays dead. It means the rate of new damage slows enough for the plant to keep growing and ripening fruit.
After pruning, watch the newest leaves for seven to ten days. Clean growth is encouraging. New lesions appearing steadily on the upper canopy, stem lesions that are lengthening, or fruit spots developing despite dry weather indicate that pruning alone is not containing the problem.
Support recovery with even soil moisture, adequate but not excessive nutrition, good staking, and open spacing. Avoid a heavy nitrogen application as a reflex: very lush, soft growth can create a dense canopy that dries slowly and may be more difficult to manage.
When to Remove the Entire Plant
Remove a plant when late-blight-like lesions are expanding rapidly, when the main stem is affected and the plant is collapsing, or when severe disease has left too little healthy tissue to justify keeping it. If multiple plants show the same fast pattern, isolate the bed and seek confirmation rather than assuming every brown spot is early blight.
Pull carefully on a dry day. Place the plant directly into a bag or covered container, and clean any stake, cage, twine, gloves, or tool that touched it. Inspect nearby potatoes and other susceptible nightshades because they can help sustain or spread some pathogens.
Do not automatically destroy every plant with one old lower-leaf spot. Over-removal can cost you a harvest and may expose fruit to sunscald. The decision should be based on pace, plant-wide spread, stem and fruit involvement, and the amount of healthy canopy left.
Watering, Mulch, and Airflow That Reduce Risk
Water the soil, not the foliage. A soaker hose or drip line is the easiest way to reduce splash, but a hand-held hose aimed at the base works too. Water deeply enough to reach the root zone, then allow the surface to dry somewhat rather than producing a constant wet film around the stem.
Mulch creates a physical buffer between soil and leaves. Apply a layer of clean straw, shredded leaves, or another suitable mulch after the soil has warmed, keeping it slightly away from the stem. Mulch will not cure existing disease, but it can reduce the upward splash that moves spores from soil and debris to lower leaves.
Give plants enough room for mature foliage, not just the size of a transplant. Stake or cage early so leaves do not sprawl on the ground, and prune only according to the cultivar and your climate. In a greenhouse, ventilation and morning watering matter even more because trapped humidity can keep foliage wet long after outdoor leaves would have dried.
Choosing Resistant Tomato Cultivars
Resistance is a head start, not immunity. Read the disease-resistance codes on the seed packet or catalog, and match them to the disease that has actually troubled your garden. A cultivar bred for resistance to one pathogen may still suffer from another, and resistance can be incomplete or weakened by severe weather and plant stress.
When comparing cultivars, consider the whole growing situation: determinate or indeterminate habit, days to maturity, fruit size, local disease pressure, and whether you can provide a dry, open canopy. A resistant cultivar that matures reliably in your climate may outperform a supposedly exceptional cultivar that ripens late into a wet season.
Keep a simple note each year: cultivar, planting date, first symptom date, weather pattern, and final performance. That is more useful than a generic “blight-resistant” label because it tells you which genetics and management practices work in your specific bed.
Do Fungicides Help Tomato Blight?
Fungicides are generally protective rather than curative. They may protect healthy or newly emerging tissue, but they do not turn a brown lesion green or reverse defoliation. They work best when the diagnosis is reasonably confident, the product is labeled for tomatoes and the target disease, and applications begin before disease is widespread.
Product availability and legal labels vary by country and state. Read the current label for the active ingredient, crop, disease, mixing directions, application interval, maximum number of applications, re-entry precautions, and preharvest interval. Do not copy a rate from a blog, use a product labeled only for ornamentals, or assume that “organic” means risk-free.
Copper products and other protectant fungicides may be options for some tomato diseases where the label permits them. Resistance management matters: repeating one chemistry can select for less-sensitive pathogen populations. If late blight is suspected, use local extension alerts and current recommendations because timing and product options are region-specific.
Why Homemade Sprays Are a Risky Shortcut
Baking soda, vinegar, hydrogen peroxide, dish soap, milk, and kitchen-oil mixtures are often promoted as universal blight cures. They are not interchangeable with a tested, labeled pesticide. Concentration, water quality, temperature, leaf age, and repeated exposure can change whether a mixture helps, does nothing, or burns the foliage.
Some homemade sprays may alter the leaf surface without controlling the pathogen inside infected tissue. Soap can damage the waxy surface of leaves, oils can increase heat injury, and alkaline salts can accumulate. If you experiment with any non-pesticidal material, test a small area first and do not apply it in heat, drought, or bright midday sun; but the safer choice for an edible crop is to follow extension guidance and the product label.
Can You Eat Tomatoes From an Affected Plant?
Do not eat fruit with visible late-blight lesions, soft rot, mold, foul odor, or significant decay. Cut-away advice is unreliable when the fruit is actively rotting because secondary organisms may have moved beyond what you can see. Discard questionable fruit rather than canning or preserving it.
Fruit that is firm, clean, and free of disease symptoms can often be harvested from a plant with leaf-only early blight or Septoria, then washed and used promptly. This is a food-quality judgment, not a guarantee that every situation is safe. If a fruit is cracked, leaking, smells fermented, or you are unsure whether the lesion is disease-related, throw it out.
Never save seed from suspicious fruit. Disease organisms and viruses can be carried on or in plant material, and saving seed adds an unnecessary route into next season’s seedlings.
Does Blight Stay in Soil or Compost?
Early-blight and Septoria pathogens can persist in infected plant debris and nearby soil, which is why sanitation and rotation are useful. They are not a magic reset, however: spores can move in wind, water splash, tools, transplants, and contaminated debris. Rotation reduces local carryover but cannot prevent every disease arriving from outside the garden.
Late blight behaves differently from debris-borne leaf spots. It usually requires living infected tissue to persist, and volunteer potatoes, cull piles, or infected transplants can be important sources. The University of Connecticut IPM guidance highlights the role of potato hosts and plant sanitation in managing this pathogen.
Do not dump diseased tomato vines into a bed, unfinished compost, or a volunteer pile. Remove volunteers, clean containers, and replace or sterilize reused potting media when a container-grown plant had a confirmed serious disease. In-ground soil cannot be made reliably “sterile” with a casual home treatment, so focus on removing inoculum and changing the next crop’s conditions.
A Four-Year Prevention Plan
After a confirmed or severe outbreak, rotate tomatoes, potatoes, peppers, and eggplants away from the affected bed for as long as practical. A four-year interval is a conservative target for reducing carryover of some soil- and debris-associated problems, although the exact value depends on the pathogen, climate, host weeds, and what was removed.
For next season, begin with clean seed and healthy transplants from a reputable source. Inspect the undersides of leaves and the lower stems before planting. Space plants for mature size, install support immediately, mulch after establishment, and make soil-level watering the default rather than a rescue measure.
If your season is routinely cool and wet, choose earlier-maturing or more resistant cultivars and consider a covered growing space with ventilation. If your season is hot and humid, prioritize air movement, morning irrigation, and avoiding dense overfertilized growth. The best prevention plan is climate-specific because leaf wetness, not the calendar alone, drives many outbreaks.
Common Diagnosis and Treatment Mistakes
Calling every spot early blight. Septoria, bacterial spot, nutrient injury, herbicide drift, sunscald, and insect damage can overlap visually. Use the pattern and progression, not one keyword.
Removing too much foliage. A bare plant can lose photosynthetic capacity and expose fruit to sunscald. Prune the worst tissue while preserving a functional canopy whenever the disease pace allows.
Watering at night. Evening irrigation can extend leaf wetness into the hours when many pathogens infect. Water at the base in the morning when possible.
Relying on resistance alone. Resistant cultivars can still show symptoms under prolonged favorable weather. Pair genetics with spacing, support, mulch, sanitation, and monitoring.
Spraying before identifying the problem. A fungicide will not fix a virus, herbicide injury, or bacterial disease, and a harsh homemade mix may create a second problem.
Putting sick vines in compost. If the pile does not reliably reach pathogen-killing temperatures, you may be preserving the source of next year’s outbreak.
A Simple Weekly Monitoring Routine
Once a week, walk the row with dry hands and inspect one lower, middle, and upper leaf on each plant. Look at the undersides, then check the stem near the soil line and the fruit shoulders. During extended rain or heavy dew, inspect more often because an outbreak can move faster than a weekly schedule suggests. For practical symptom comparisons and timing reminders, Gardening Know How’s tomato-blight guide is a useful secondary horticulture reference alongside extension diagnosis.
Record the first date you see symptoms and the weather during the previous week. Mark plants that need pruning, and photograph the same leaf position over time. If symptoms spread despite dry foliage and clean tools, or if the upper canopy and fruit become involved, escalate the diagnosis instead of repeating the same treatment.
The point of monitoring is not to achieve a spotless plant. It is to catch a manageable problem while enough healthy tissue remains, recognize a dangerous fast-moving pattern, and learn which combination of cultivar and garden practice gives you the most reliable harvest.
Conclusion: Act Early, But Diagnose First
Tomato blight is easiest to manage when you treat diagnosis as part of treatment. Early blight and Septoria often reward sanitation, soil-level watering, mulch, airflow, selective pruning, and protection of new growth. Late blight demands faster isolation and local confirmation because cool, wet conditions can turn a few lesions into a crop-wide problem.
Keep the response proportional: do not ignore rapid disease, but do not destroy a productive plant over one ambiguous spot. Remove contaminated material, keep leaves dry, choose cultivars with relevant resistance, follow only current tomato labels, and keep a seasonal record. Those habits will not make a garden disease-proof, but they will make your next decision quicker, safer, and more informed.



