How to Grow and Care for Ficus Shivereana
Get a practical Ficus Shivereana care routine for light, watering, humidity, soil, pruning, and propagation—without promising every leaf will look the same.

Ficus Shivereana is a variegated rubber plant grown for thick, glossy leaves splashed with cream, pale yellow, and green. It needs the same basic indoor conditions as other rubber plants—bright filtered light, a potting mix that drains, and watering based on how quickly the root ball dries. Its speckles are part of the cultivar’s identity, though; changing the light can support healthy growth and color contrast, but it cannot make every new leaf follow a predictable pattern.
The safest routine is simple: keep it near a bright window out of harsh afternoon sun, let the upper soil dry before watering thoroughly, and empty the saucer. Avoid moving it repeatedly, leaving roots in wet mix, or repotting on a calendar. Those decisions prevent more problems than a precise humidity number or a rigid weekly schedule.
What “Shivereana” means—and how the names vary
The plant commonly sold as Shivereana or Moonshine belongs to the rubber-plant species Ficus elastica. Retail names are not perfectly consistent. The Royal Horticultural Society’s Plant Finder lists Ficus elastica ‘Schrijveriana’ as an accepted name and gives F. elastica ‘Moonshine’ and F. shivereana ‘Moonshine’ as synonyms. Meanwhile, many plant shops and houseplant guides use F. elastica ‘Shivereana’. That naming variation is a reason to inspect the plant and seller’s description rather than assume every pot bearing one label is identical (RHS Plant Finder; North Carolina State Extension).
For practical care, Shivereana is a useful trade name for the speckled rubber plant discussed here. Its leaves are thick, leathery, and broadly oval, like other F. elastica cultivars. The pale pattern appears as irregular speckles, flecks, and splashes within green leaf tissue. That differs from the broad cream margins typical of the widely sold ‘Tineke’ form, though young leaves, growing conditions, and seller photos can make comparisons less tidy.
The RHS description is useful because it records how horticultural naming has been handled in a major plant database, but it does not certify the identity of every plant sold online. If you want this foliage, buy from a seller who shows the actual plant or recent stock photos. A generic listing image and a cultivar name alone cannot confirm exactly how a particular plant will pattern.
Ficus Shivereana care at a glance
| Care factor | Practical target | What to watch |
|---|---|---|
| Light | Bright, filtered or indirect light | Faded, stretched growth in dim rooms; scorch after abrupt hot sun |
| Water | Water when the top 1–2 inches of mix have dried | A heavy pot and wet mix mean wait; limp leaves alone do not prove thirst |
| Soil | Loose houseplant mix amended for air and drainage | Mix that stays soggy or shrinks away from pot walls |
| Pot | Drainage hole, only modestly larger than the root ball | A large pot can stay wet long after the surface looks dry |
| Temperature | Warm, steady indoor conditions; avoid cold drafts | Leaf drop after a cold window, vent, or sudden move |
| Humidity | Ordinary indoor humidity is often workable | A humidifier may help in persistently dry air; misting is brief |
| Feeding | Dilute balanced fertilizer during active spring and summer growth | Salt crust or browned tips after frequent or strong feeding |
North Carolina State Extension describes rubber plants as indoor trees with large, glossy, leathery leaves and lists bright indirect light or partial shade for indoor growing. Clemson Extension also emphasizes drainage, warm conditions, and avoiding overwatering. These species-level references are useful for Shivereana, but they do not establish a special weekly calendar for this cultivar (NC State Extension; Clemson Cooperative Extension).
What its speckled leaves can tell you
A healthy Shivereana can produce leaves with different proportions of green, cream, and yellow. Homes & Gardens describes the cultivar with yellow, cream, and green splashes and notes that emerging leaves can show a blush tone. The RHS profile for the similarly named ‘Schrijveriana’ describes dark green leaves marbled with gray and edged in creamy white. Those descriptions are not identical, which is another reason to treat the label as a horticultural convention rather than a promise of one exact pattern (Homes & Gardens; RHS Plant Finder).
Light affects how well the plant can support new growth. In a dim corner, a variegated rubber plant may grow more slowly, stretch toward a window, or show weaker contrast than it would in brighter filtered light. More sun is not automatically better: abrupt exposure to intense direct rays can bleach or scorch leaf tissue. Bright indirect light is a steady middle ground, not a switch that guarantees a certain number of pale speckles on each leaf.
Look at several leaves and the overall growth pattern before diagnosing a single less-variegated leaf. Newly unfurling foliage often looks different from mature foliage, and one leaf with fewer splashes does not by itself prove that the plant is reverting or mislabeled. If several successive leaves emerge mostly green and growth is lanky, improve the light gradually and check whether the plant has been stressed by low temperatures, root damage, or a recent move. Do not cut off healthy growth simply because one leaf differs from a product photo.
Give it bright, filtered light
Place the plant near a bright east or west window, or a little back from a strong south-facing window where a sheer curtain softens the sun. An unobstructed north-facing window may work in a bright room, but assess the actual light at the leaves: a window blocked by another building or a deep overhang can create dim conditions even when the room feels bright to you. Homes & Gardens recommends bright filtered light for Shivereana and cautions against prolonged exposure to intense afternoon sun (Homes & Gardens).
If the plant arrives from a greenhouse or a shop, let it adjust before placing it in several hours of direct sun. Move it closer to the window over a week or two, checking for dry, bleached patches on the window-facing leaves. Mild early-morning or late-afternoon sun can be tolerated after acclimation, but if the glass heats the leaves or casts a sharp, hot beam in summer, filter it.
Insufficient light usually reveals itself in new growth rather than by changing every old leaf. Longer gaps between leaves, leaning toward the window, and smaller or less strongly patterned new leaves suggest that the plant would benefit from a brighter position. Turn the pot a quarter-turn every week or two so one side does not reach toward the light, but keep the location stable; repeated room-to-room moves can trigger leaf drop.
Water by checking the root zone
Do not water Shivereana every seven days by default. The same pot can dry quickly beside a warm window in summer and stay damp for much longer in winter, especially in a heavy ceramic container or a dense mix. Push a finger into the mix about an inch or two below the surface. If it still feels cool and moist, wait and check again in a few days. If that depth is dry and the pot feels noticeably lighter, water thoroughly.
When it is time, pour slowly over the soil until water runs freely from the drainage hole. Let the pot finish draining, then empty the saucer or decorative cachepot. A small sip only wets the top and can leave part of the root ball dry; repeated small sips also make it harder to know whether the center of the pot is wet. Clemson Extension recommends thorough watering with drainage and letting the soil dry slightly between waterings, while Homes & Gardens suggests checking the upper couple of inches before watering (Clemson Cooperative Extension; Homes & Gardens).
If the mix has pulled away from the pot wall and water rushes straight through, the root ball may have dried unevenly. Give it a slow, complete soak, allow excess water to drain, then return to the same soil check. Do not leave the pot standing in a bowl of water to “bottom-water” for hours. Conversely, if water takes a long time to drain or the pot stays heavy for many days, check the drainage hole, mix, and pot size before adding more water.
In fall and winter, slower growth and lower light usually mean less frequent watering. The cue is still the soil, not the month: do not let the whole root ball bake dry, but wait longer if the upper mix remains damp. A moisture meter can help compare readings from week to week, but use it as a trend tool and confirm by feeling the mix and lifting the pot.
Use an airy mix and a draining pot
Choose a quality houseplant potting mix and amend it if it compacts or holds water for too long. A practical starting blend is two parts potting mix with one part perlite or fine orchid bark; if your room is cool and the mix dries slowly, add more coarse material or use a smaller pot. The aim is a root zone that stays lightly moist after watering but has air spaces and releases excess water freely. This is more reliable than putting gravel at the bottom of a pot, which does not correct a dense mix.
Use a container with at least one open drainage hole. A nursery pot inside a decorative cover pot is fine as long as you remove it to water and drain. Unglazed terracotta dries faster than plastic, while a large glazed pot can hold moisture longer. Choose the material based on how your home dries pots and your watering habits, not appearance alone.
Do not choose a container several sizes larger to “give it room.” Roots need access to soil, but unused wet mix around a small root ball can dry too slowly. That mismatch is especially risky if the plant is growing in lower light or cool conditions. Pot size and mix texture work together: a modest pot with an airy mix is easier to water predictably.
Keep temperatures steady; treat humidity as a bonus
Shivereana is a tropical houseplant, so keep it in a warm room away from cold drafts, exterior doors, air-conditioning outlets, and heating vents. Clemson Extension advises protecting rubber plants from temperatures below about 55°F and sudden drops; a cold windowsill can be a problem even if the rest of the room is comfortable (Clemson Cooperative Extension).
Average home humidity is often enough if watering and light are sound. If the air is persistently dry and leaf edges keep crisping despite an appropriate watering routine, a room humidifier can help raise humidity around the plant. Grouping plants may create a small local effect, but it cannot compensate for cold wet soil or root damage. Misting briefly wets the leaves and does little to change room humidity; frequent wet foliage can also leave marks on glossy leaves.
Feed only while it is actively growing
A newly purchased plant or one just moved into fresh potting mix may not need fertilizer right away. Once it is settled and producing growth, use a balanced liquid houseplant fertilizer at a diluted label rate during spring and summer. Start on the conservative side, such as half the label strength about once a month, and reduce or stop if growth slows or the plant is in low light. Follow the label for the specific product rather than combining multiple feeds.
Fertilizer is not a remedy for weak variegation, poor drainage, or yellowing roots. More feed can increase soluble salts and damage roots, particularly when the plant is not growing fast enough to use them. Pause through the darker, slower months unless the plant is under strong grow lights and continues steady growth. If a white crust forms on the soil or pot rim, stop feeding and flush the mix with plain water only if it drains freely.
Clean leaves and keep the plant stable
Dust settles on the broad, glossy leaves and can hide early signs of pests. Wipe each leaf gently with a damp, soft cloth, supporting it with your other hand so you do not crease the blade or snap the petiole. Avoid leaf-shine products, which can leave a coating and do not improve the plant’s growing conditions. Clean leaves also make it easier to compare new growth and spot changes in the pale pattern.
Give the plant enough room for its upright stem and broad leaves. If it leans, first check whether the light is coming strongly from one side; rotating the pot gradually often helps. A bamboo stake can support a top-heavy stem, but tie it loosely with soft plant ties and anchor it without crushing roots. Support is for stability, not a reason to keep an unstable plant in a dark corner.
Prune for height and shape
Prune when the plant is actively growing if it has outgrown the room, become top-heavy, or needs branching. Use clean, sharp pruners and make a cut just above a leaf node. Removing the growing tip can encourage dormant buds below the cut to produce side shoots, but a single-stemmed plant may respond slowly and branching is not guaranteed at a specific point. Make one considered cut and wait for new growth before removing more; heavy pruning at once adds stress.
You can remove a dead or badly damaged leaf at its base whenever needed. Wear gloves, protect nearby furniture and flooring, and keep the cut material away from children and pets. Rubber-plant stems release milky latex sap when cut. Clemson Extension notes that the sticky sap may irritate skin or the stomach if eaten, so wash any exposed skin with soap and water and avoid touching your face while pruning (Clemson Cooperative Extension).
Propagate from a node or air-layer a tall stem
Propagation is possible, but a bare leaf without a piece of stem usually cannot create a new growing shoot. Choose a healthy, actively growing stem and decide whether you want a shorter parent plant or a rooted top while keeping its height. Spring or early summer is a practical time because warmth and light support rooting. A cutting is the simpler method for a small branch; air layering lets a tall stem develop roots before you sever it.
Stem cuttings: include a node
Wear gloves and use a clean, sharp blade. Take a tip section that includes at least one node—the small joint where a leaf meets the stem—and ideally a couple of leaves. The node matters because that is where roots and new growth can form. Wipe away sap, then place the node in clean water or a lightly moist, airy propagation mix, keeping leaves above the surface.
Set the cutting in warm, bright indirect light. In water, refresh it when cloudy and keep the node submerged; in mix, use a small pot with drainage and keep the medium lightly moist rather than saturated. A loose clear cover can slow drying in a dry room, but open it periodically and remove it if condensation stays heavy. Roots can take weeks and may take longer in cool or dim conditions, so do not tug on the cutting to check progress.
Move a water-rooted cutting into potting mix when it has several firm roots long enough to hold the plant, then keep the mix evenly moist while it adjusts. A cutting rooted in mix can stay in that medium until new growth and gentle resistance suggest roots have formed. Do not pot a tiny cutting into an oversized container; a small root system needs a small volume of mix that can dry at a reasonable pace.
Air layering: root the stem before cutting
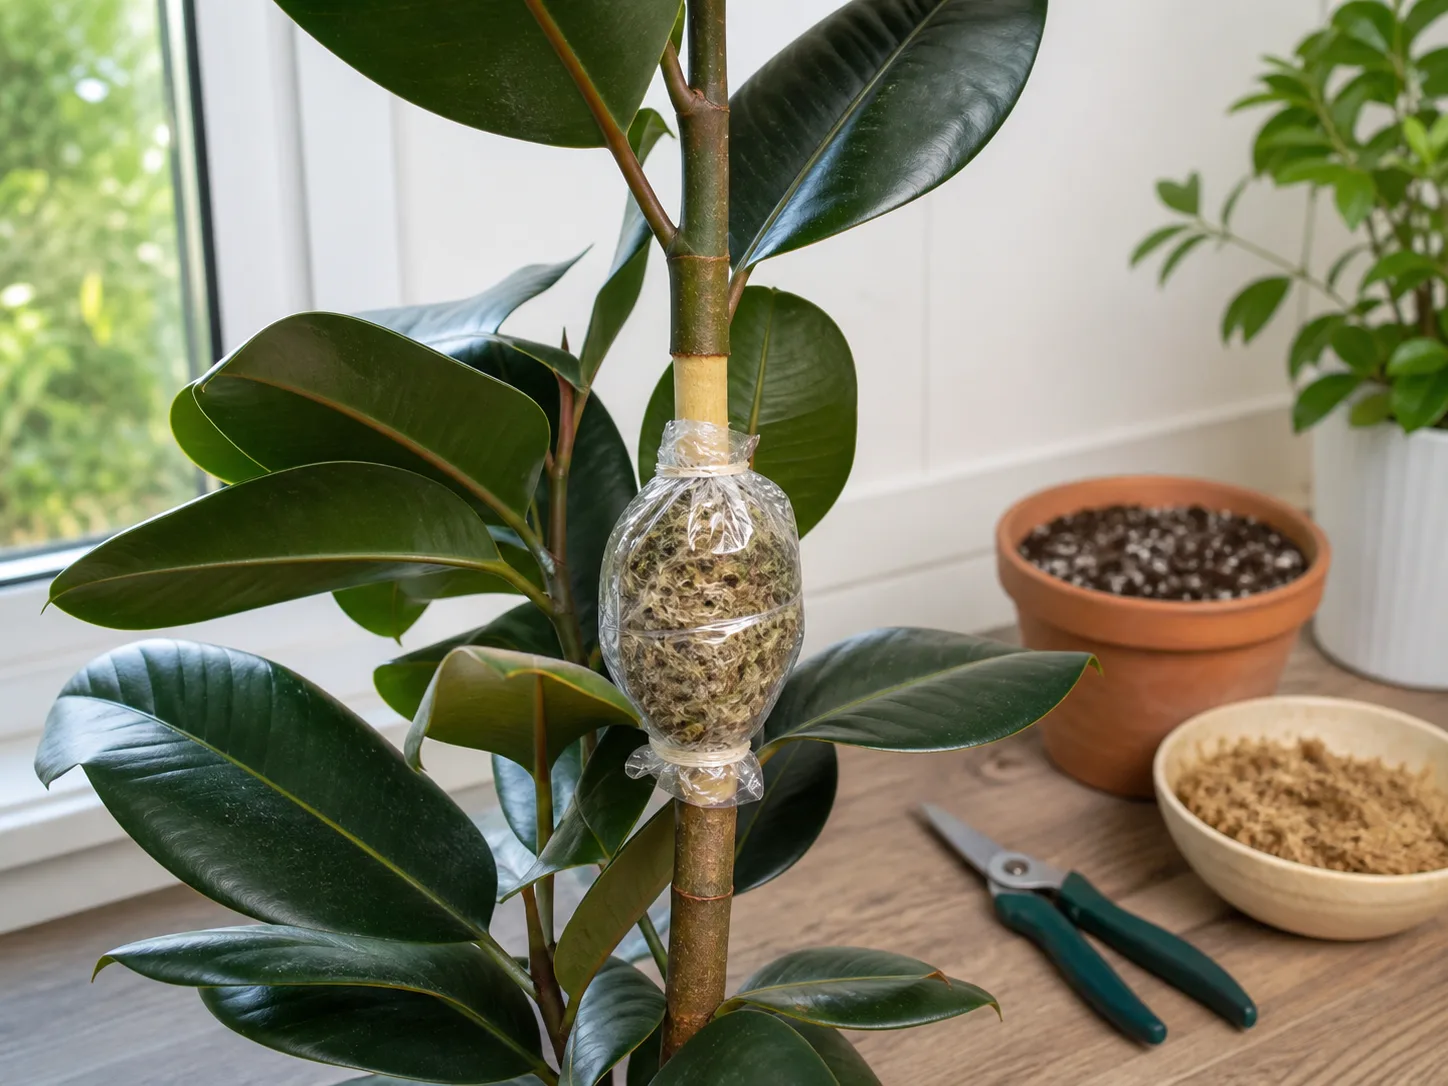
Air layering suits a tall or leafless-at-the-base rubber plant that you want to shorten without discarding the top. The Houseplant Guru’s rubber-tree example wraps a wounded section in damp sphagnum moss and plastic so roots can form while the top remains attached to the parent. That method takes longer than taking a tip cutting, but the new plant begins with a larger rooted section (The Houseplant Guru: Air Layering a Plant).
At a chosen stem point, make a small, careful upward cut through the bark and outer stem, keeping the stem mostly intact. Use gloves because latex sap can irritate some people. Keep the wound open with a clean toothpick, wrap it in damp—not dripping—sphagnum moss, then cover the moss with clear plastic and secure both ends loosely. Check the moss now and then; add a little water only if it dries. Once a visible root mass fills the moss, cut below it and pot the new plant in a snug container. If the stem is too thin or the plant is already weak, wait and stabilize it before attempting this more involved method.
Repot when roots and drying pace call for it
Do not repot every year just because the calendar says so. Slide the root ball out carefully when roots circle densely around the base, emerge from the drainage hole, or the plant repeatedly dries very quickly despite thorough watering and suitable light. A single root at a drainage hole is not proof that the pot is too small. If the plant is stable and the soil still drains and dries normally, leaving it alone avoids unnecessary root disturbance.
When repotting is warranted, choose a pot only one size wider than the root ball and use fresh, airy mix. Loosen only the roots that are tightly circling; do not strip all soil from healthy roots. Trim any clearly mushy or foul-smelling sections with clean pruners, then set the plant at its previous soil level. Water the new mix through and let it drain. Avoid fertilizing immediately after the move, and keep the plant in its usual bright indirect light while it settles. Repotting in spring or early summer gives the plant a longer active-growth period to recover.

If a large plant is difficult to lift, top-dressing can refresh the upper layer of mix without disturbing the root ball. Remove only the loose surface soil, add fresh mix, and keep the trunk base exposed. Top-dressing will not fix compacted, sour, waterlogged soil lower in the pot; if drainage has failed, a full repot may be necessary.
Troubleshoot leaves by checking the soil first
One symptom rarely identifies one cause by itself. Check the mix, pot weight, recent light or temperature changes, and the underside of the leaves before changing several parts of the routine at once.
| What you see | First checks | A sensible next step |
|---|---|---|
| One older lower leaf yellows | Is the rest of the plant firm and growing? | Remove the leaf if it is fully yellow; monitor rather than changing the whole routine. |
| Several yellow leaves and persistently wet soil | Does the pot drain? Is the mix compacted or oversized? | Stop watering until the upper mix dries; inspect roots if decline continues. |
| Leaves curl or droop | Is the root ball dry, wet, or unevenly moist? | Water thoroughly only if dry; if wet, improve drainage and wait. |
| Brown, pale, dry patches on the window side | Was the plant moved into stronger direct sun? | Filter the light and acclimate gradually; damaged patches will not turn green again. |
| New growth is stretched or has lower contrast | Is the room dim or the plant turned away from the window? | Move it gradually to brighter filtered light and assess several leaves over time. |
| Leaves fall after a move or cold night | Did light, temperature, or airflow change suddenly? | Stabilize its position and temperature, and avoid compensating with extra water. |
Clemson Extension notes that overwatering, temperature drops, and cold drafts can cause leaf loss in rubber plants. Homes & Gardens similarly advises checking moisture and adjusting watering as conditions change. If leaves continue to fall after the soil and location are stable, inspect the stem and leaf undersides for pests rather than assuming the plant needs more water (Clemson Cooperative Extension; Homes & Gardens).
Watch for pests and handle latex sap carefully
Inspect both sides of leaves, the stem joints, and the newest growth every week or two. Mealybugs look like small white cottony clusters; scale insects appear as fixed bumps on stems or leaf veins; spider mites can leave fine webbing and a stippled, dusty look. North Carolina State Extension lists mealybugs, scale insects, and spider mites among rubber-plant problems (NC State Extension).
If you find a pest, isolate the plant from nearby houseplants and identify the insect before treating. Wipe or rinse off a small infestation, then use a product labeled for that pest and plant if needed, following its label exactly. Repeat inspections because eggs or hidden insects can survive a first pass. Avoid applying oily or soapy treatments in hot, direct sun, and test a small area first if the label allows; tender or stressed leaves can be more sensitive.
Take sap precautions whenever a leaf or stem is cut or broken. The white latex can stain surfaces and irritate sensitive skin; gloves and a washable work surface make pruning and propagation easier. Keep the plant and cuttings where a pet or child cannot chew them. Clemson Extension advises keeping rubber plants away from pets and young children who tend to eat plants; if ingestion occurs, contact a veterinarian or a poison-control service for guidance rather than waiting for symptoms (Clemson Cooperative Extension).
Conclusion
Ficus Shivereana grows best with bright filtered light, a draining pot, and watering triggered by the condition of the mix. Steady conditions matter more than an exact schedule, and no light placement can guarantee that every leaf will carry the same amount of cream or yellow pattern. Start with a stable window spot, let the upper soil dry before a full watering, and repot only when the roots or drying pace show a real need. Handle its latex sap carefully, and use a node-bearing cutting or air layer when you want to propagate it.



