Should You Grow Mint in Pots or in the Ground?
Should mint grow in a pot or the ground? Learn the safest setup, how rhizomes escape, when a buried container works, and how to remove mint.
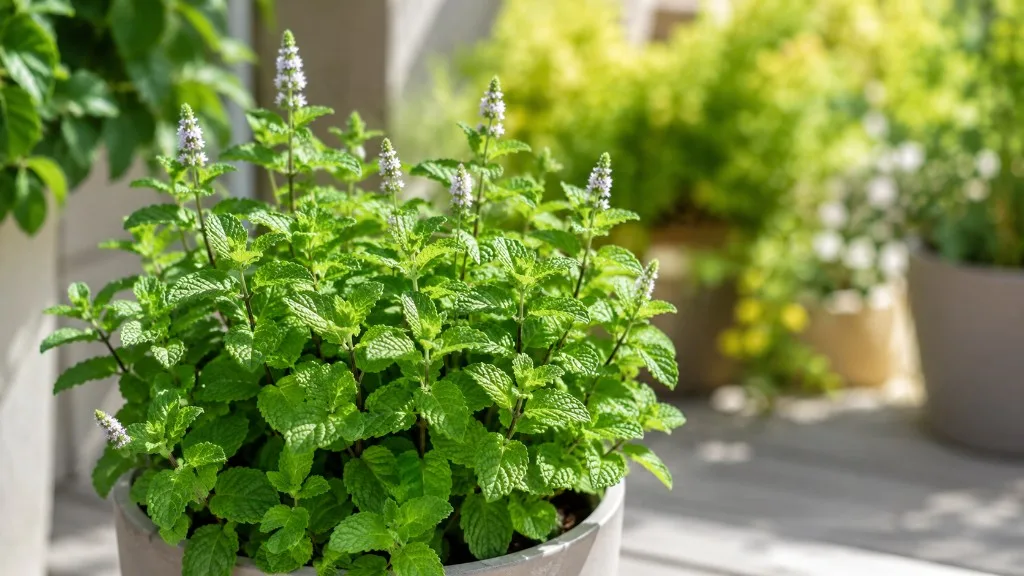
For most home gardeners, mint belongs in a pot. That is not because mint is delicate or difficult; it is because the plant is exceptionally good at making new growth beyond the spot where you put it. A container gives you the fresh leaves and strong growth you want without turning the surrounding bed into a long-term containment project.
Growing mint in the ground can still be reasonable if you deliberately want a spreading groundcover, have a separate bed where nearby plants will not be crowded, or are prepared to inspect the edges every season. The important distinction is between a plant that is easy to grow and a plant that is easy to confine. Mint is the first, but not always the second.
The short answer: a pot is the best default for most gardeners
Mint is a fast-growing herbaceous perennial that can thrive in full sun or partial shade and in a range of soils. Its vigorous growth is useful when you want frequent harvests, but the same vigor lets it move laterally through underground stems and, in some cases, through stems that touch soil and root at the nodes. NC State Extension describes spearmint as spreading by rhizomes and by stems that can root where they touch the ground, which is why it lists containers as the safest general choice (NC State Extension Plant Toolbox).
The practical answer is therefore simple: grow mint above ground in a pot unless you have a specific reason to let it spread. Put that pot on a patio, balcony, steps, or another hard surface. A pot sitting on soil can still send stems over the rim, and roots can find a way through drainage holes, so “potted” is a system to inspect, not a magic word that makes mint harmless.
Why mint escapes ordinary garden beds
Mint does not rely on one thick root ball alone. It builds a network of rhizomes, which are modified underground stems that can produce roots and shoots along their length. Some types also make above-ground runners or long stems that bend onto damp soil and root where they touch.
That biology explains two common surprises. A small piece left behind after digging can produce a new plant, and a healthy stem that flops over the edge of a pot can establish outside the pot without the original root ball moving at all. The problem is not that mint is “bad”; the plant is simply using the same propagation strategy that makes it so easy to multiply from cuttings and divisions.
Rhizomes and runners create new plants away from the crown
The crown is the central clump you see when you buy or transplant mint. Rhizomes extend from that crown through the soil, and new shoots can rise a short distance away. If the soil is loose, moist, and lightly shaded, those stems may travel farther than you expect before producing visible leaves.
Above ground, mint can also lean outward. Any stem that contacts moist soil may root at a node, effectively creating a second planting. This is why frequent harvesting is helpful but not sufficient: cutting the foliage makes the plant bushier, while physical separation is what stops the roots and stems from reaching neighboring soil.
Choose the growing place by the job you want mint to do
The right location depends less on whether mint can grow there and more on what you want the plant to become. Ask whether you want one manageable kitchen herb, a contained patch of several varieties, or a groundcover that can occupy space other plants do not need.
Pick a pot when you want reliable containment and easy harvests
Choose a pot if your mint will sit near a vegetable bed, lawn, path joints, compost area, or other place where an escaped shoot would be annoying. A container is also the best option if you rent, garden in a small space, want to move the plant for winter, or plan to grow different flavors separately.
Above-ground pots make inspection straightforward. You can lift the container, check the drain holes, trim stems that are touching the ground, and divide the plant without digging through an established bed. The trade-off is that containers dry faster than garden soil and roots fill them sooner, so you will need to water and repot more deliberately.
Pick the ground only when spread is acceptable and manageable
Ground planting can work in a deliberately isolated area with no nearby plants to crowd out and with an edge you are willing to patrol. NC State notes that spearmint can be useful as a groundcover in moist areas, while still warning that it spreads aggressively. That is a very different use case from tucking one plant into the middle of a mixed herb border.
Ground mint may also suit a dedicated bed beside a water garden, an unused bank, or a space that can be mowed or cut back without damaging valued plants. Even there, treat it as a managed colony. If you do not want to spend time looking for new shoots at the edge of the bed, use a container instead.
Set up a mint container that does not quietly seed the garden
Containment has three parts: a pot that drains, a placement that blocks contact with garden soil, and a routine that catches escapees early. Missing any one of those parts can turn a good container plan into a temporary delay.
Use drainage and a hard surface to block underground escape
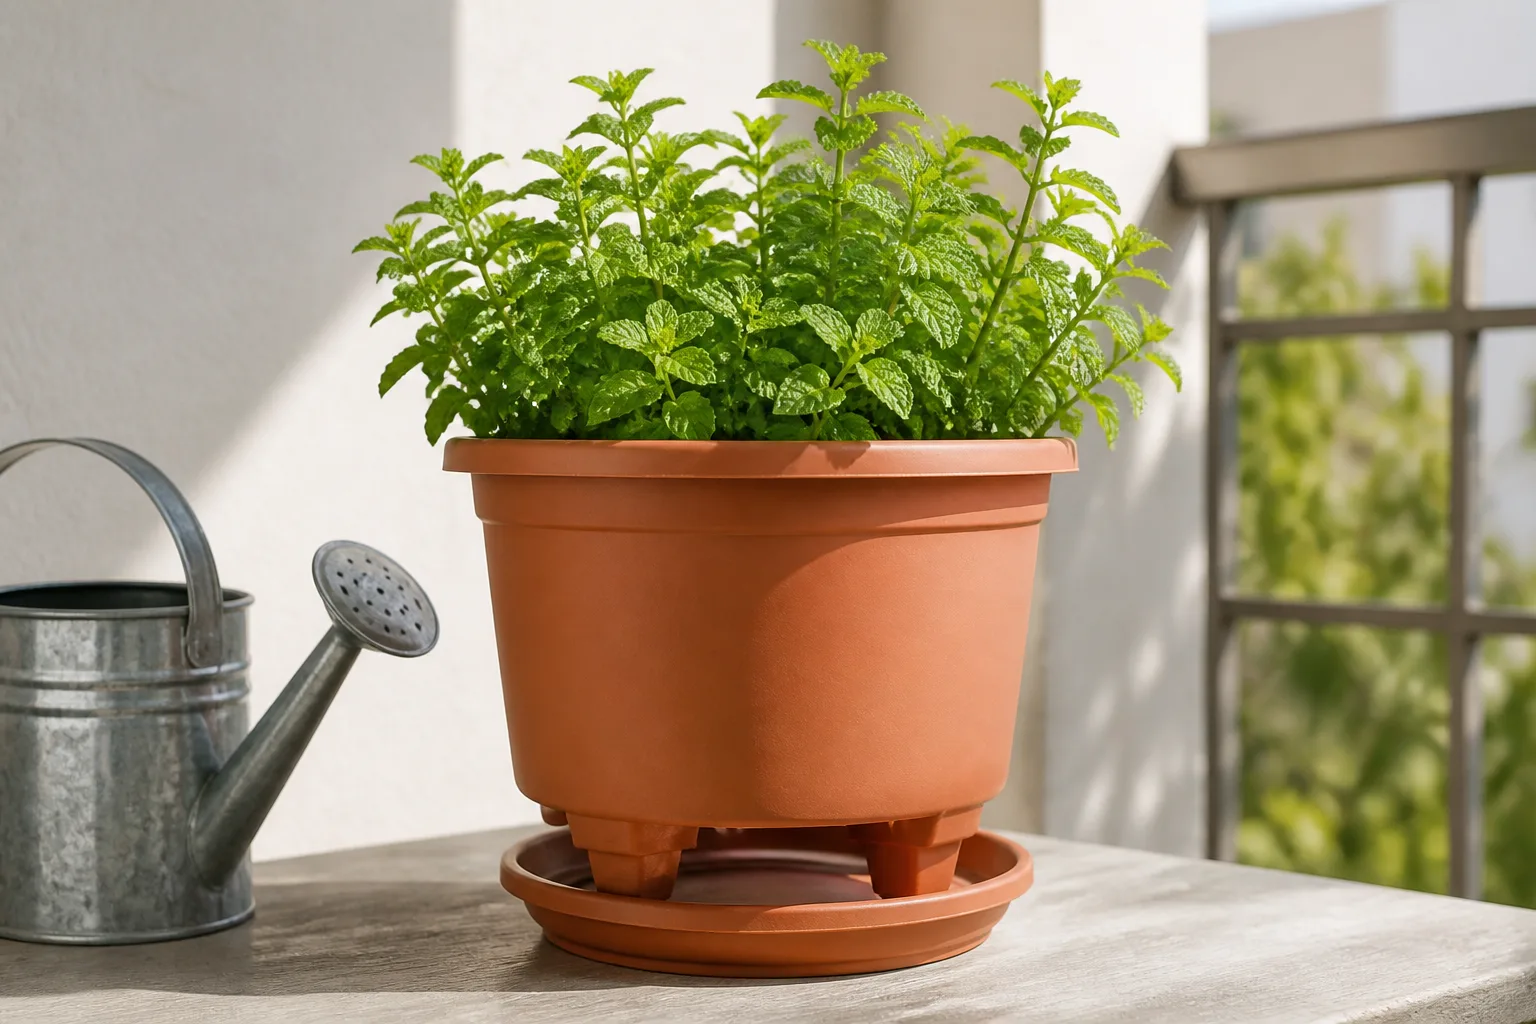
Start with a sturdy pot that has multiple drainage holes and enough volume for the plant to produce a useful harvest without immediately drying out. A roughly 12-inch pot is a practical starting point for one established mint, but the exact size depends on the plant, climate, and how often you can water. Choose a container with a broad base if the site is windy or the stems will trail.
Use a quality potting mix that holds some moisture but drains freely. Mint prefers evenly moist soil, not a permanently saturated root zone; UC IPM recommends well-drained soil and cautions against soggy conditions that encourage root and disease problems (UC Statewide Integrated Pest Management Program). Do not seal the drainage holes with a solid layer of gravel. If you need to keep mix from falling out, use a small piece of mesh or a pot shard that still lets water move.
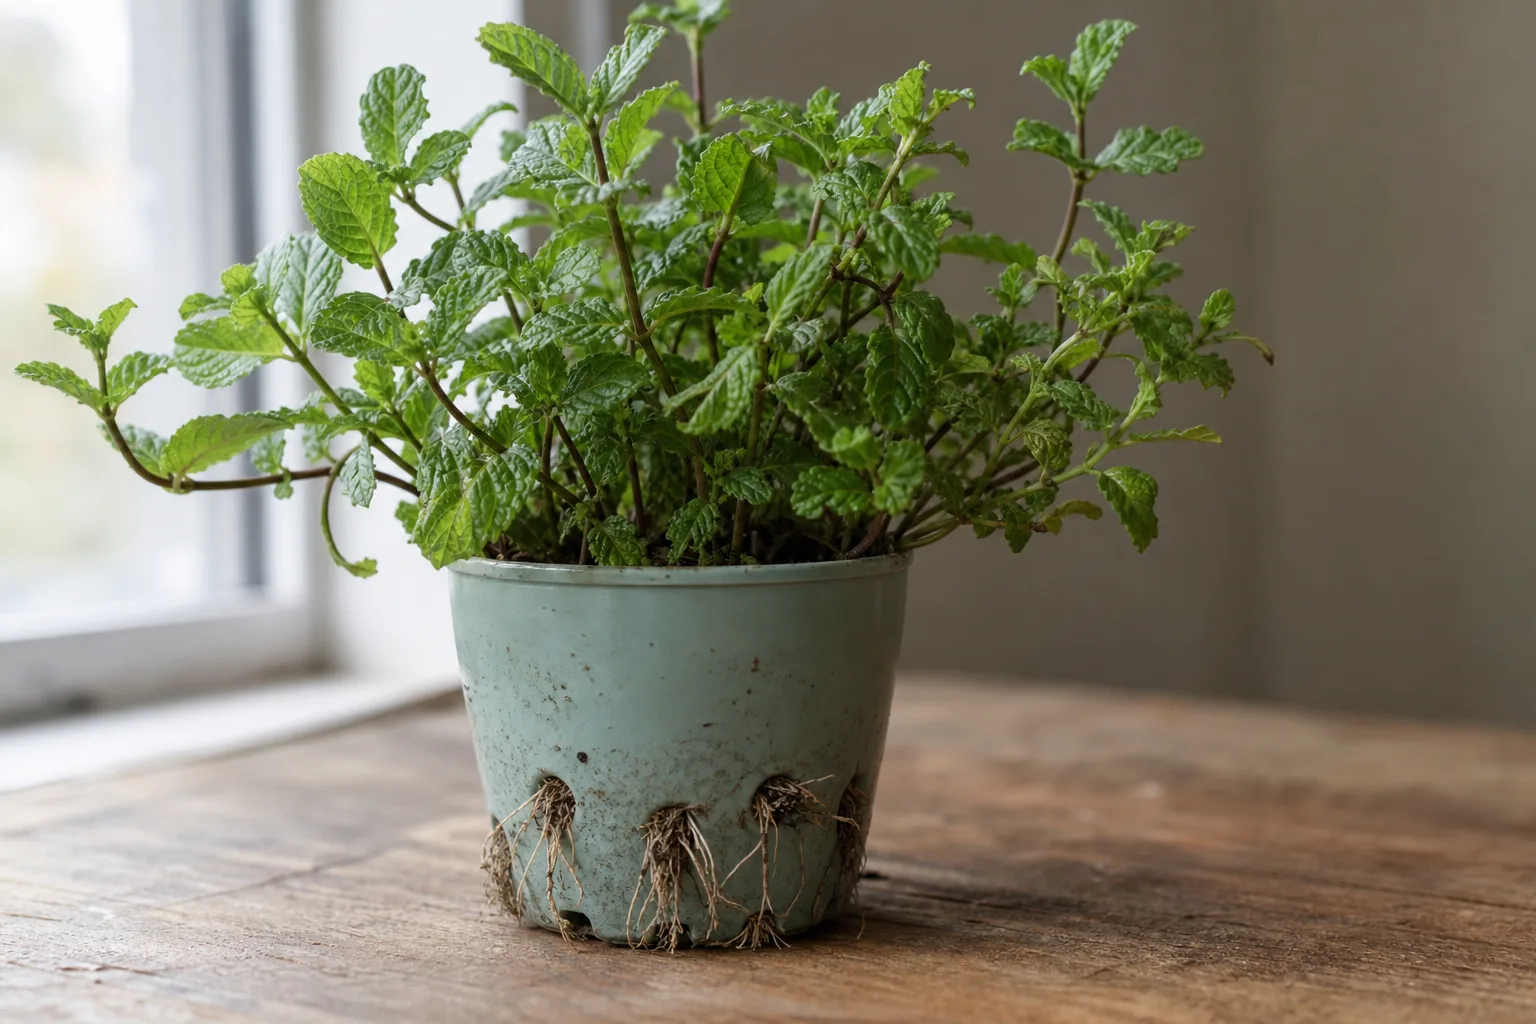
Set the pot on paving, a deck, a stand, or another surface with no soil directly underneath. Check the underside occasionally for rhizomes or roots emerging from the holes. If you find them, move the pot first, then trim or redirect the escape before it reaches the ground.
Use a sunk or bottomless container for a contained bed
A buried container is a compromise for gardeners who want mint at ground level but do not want an unrestricted patch. The RHS recommends a bottomless container, or a pot with large drainage holes, sunk into the soil with the rim left slightly above the surface so shoots cannot simply root over the top (RHS: Grow Your Own Mint).
This method works best when the container is treated as a root barrier rather than as an invisible pot. Leave the rim above the soil, keep the planting area clear enough to inspect, and prevent stems from leaning over the edge. A fully intact pot with a solid base can trap water in heavy soil; a bottomless container with open drainage gives the roots a route down while the walls restrict sideways travel.
No buried container is escape-proof forever. Rhizomes can exploit cracks, large holes, poor joins, or the space at the rim. Lift and divide the mint periodically, and look outside the container for new shoots every few weeks during active growth.
Care for mint in a pot without keeping it cramped
Potted mint is forgiving, but it is not maintenance-free. A container concentrates the plant’s roots, water demand, and growth, so small changes show up faster than they would in a bed.
Balance light, moisture, soil, and airflow
Give mint full sun or partial shade, adjusting for local heat. Four to six hours of direct light is a useful minimum for good growth, while stronger afternoon sun may increase watering demand or scorch tender, variegated foliage. NC State and UC IPM both describe mint as adaptable to full sun and partial shade, with moisture and drainage more important than chasing one universal light exposure.
Water when the upper layer of mix begins to dry, then water thoroughly until excess drains from the holes. In hot weather, a small pot may need water much more often than a larger bed. Do not leave the container standing in a saucer of water, and do not respond to every wilted leaf by adding fertilizer; heat, root crowding, or a dry root ball may be the real cause.
Use a light hand with feeding. Mint usually grows strongly in fertile mix, and overfertilizing can produce soft, excessive growth and increase disease pressure. If the potting mix is poor or the plant has been in the same container for a long time, follow the label on a balanced fertilizer rather than adding repeated doses by guesswork.
Harvest, cut back, and divide before the pot becomes crowded
Harvest the tender shoot tips regularly. Cutting just above a pair of leaves encourages branching and keeps the plant compact, while removing flower spikes before they dominate helps preserve a steady supply of leafy stems. Epic Gardening notes that regular cutting can limit flowering and that mint’s leaf oil content drops when the plant is allowed to flower (Epic Gardening’s mint growing guide).
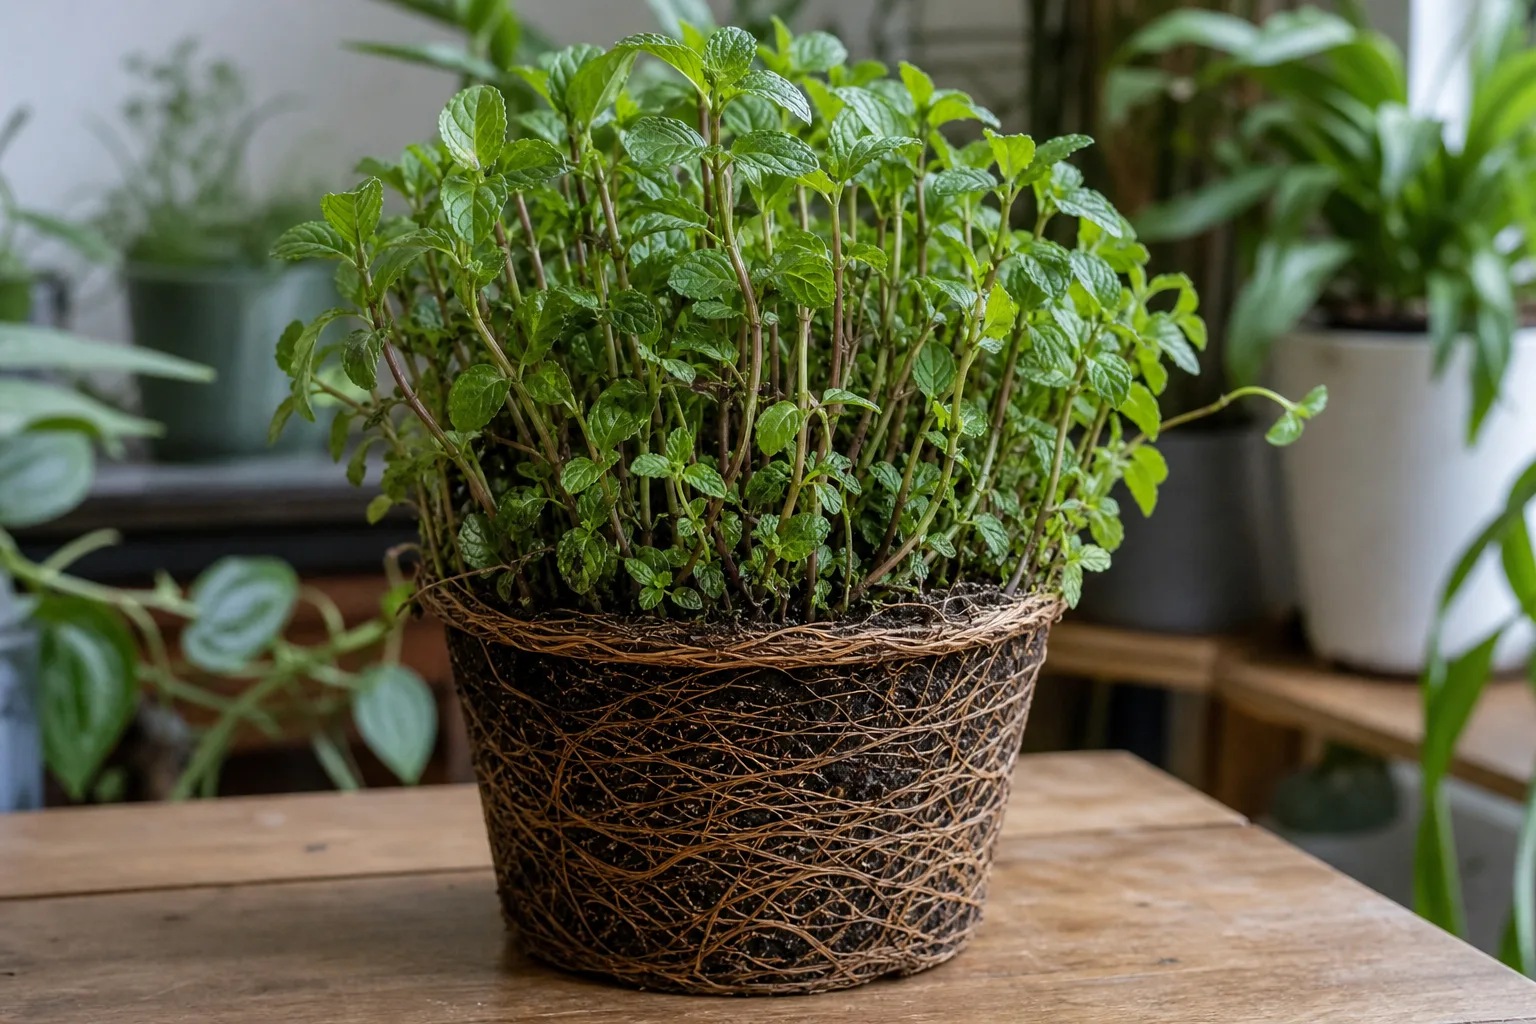
Pruning controls the top of the plant; it does not stop rhizomes from moving. If stems are trailing over the pot rim, cut or redirect them before they touch soil. If the root ball is packed with roots, water runs straight through, or new growth becomes weak despite good light and moisture, divide the plant rather than simply moving it into an enormous container.
Repot every few years, or sooner when the root mass has outgrown the container. Lift the plant, separate a healthy section, refresh the mix, and return one manageable clump to the pot. The extra divisions can go into separate containers, but do not put them in the ground unless you have already chosen a containment plan.
When growing mint in the ground can work
There is no horticultural rule that mint must never touch open soil. The better rule is to put it there only when you are comfortable with the consequences of spread. A dedicated bed can be successful if you keep the colony away from slow-growing perennials, vegetables, lawn edges, and cracks that lead to other planting areas.
If you use a root barrier, Utah State University Extension suggests a starting design in which the barrier extends about 10 to 15 inches below the soil surface and rises 3 to 4 inches above it. That guidance is a useful benchmark, not a guarantee: soil type, bed edges, variety, and the plant’s habit all affect whether a shoot finds an exit (Utah State University Extension). Overlap barrier seams securely, keep the top edge visible, and inspect for shoots outside the boundary.
The ground should also meet mint’s basic growing needs. Rich soil that stays lightly moist but drains well is easier to manage than a compacted, waterlogged patch. Full sun or partial shade can work, though intense sun in a hot, dry site increases irrigation needs. A raised bed may make drainage and inspection easier, but its sides alone are not a rhizome barrier unless they extend deep enough.
Remove mint that has already escaped
The sooner you act, the more likely you are to solve the problem in one focused session. Do not wait for a dense mat of stems to prove how far the plant has traveled. Mark the visible patch, trace the runners toward the original planting, and work when the soil is moist enough to release roots without breaking every rhizome.
Dig out the crown, rhizomes, and every visible fragment
Cut the foliage back so you can see the soil, then dig around the entire clump rather than pulling the stems one by one. Lift the crown and follow the pale, rope-like rhizomes outward. Shake or sift the loosened soil over a tarp so fragments are visible, and remove pieces from the bed rather than leaving them on the surface to reroot.
Do not put mint fragments in a casual compost pile unless you know the pile reaches conditions that destroy living plant material. Bag unwanted pieces or dispose of them according to local guidance. Wash soil from tools and footwear before working in another bed; this is a simple way to avoid carrying a viable fragment across the garden.
Digging may need more than one pass. RHS guidance warns that mint can regrow from small pieces left in the soil, so return to the area when new shoots appear and remove them while the patch is still small (RHS mint troubleshooting guidance). A new shoot is evidence that a fragment survived, not proof that the original removal was pointless.
Monitor the site and block light if regrowth continues
If digging cannot remove every rhizome under a shrub, paving edge, or dense planting, cut all visible growth at soil level and cover the area with opaque cardboard or a light-blocking material, then hold it down with a substantial mulch layer. Keep the cover in place long enough to deprive regrowth of light, and check around the edges where shoots often emerge first.
This approach is slower than digging a small patch, and it is not appropriate if valuable plants underneath need light and air. It is best used as a follow-up for a cleared area or as a way to exhaust a difficult remnant. Avoid spraying a culinary herb indiscriminately when the real problem is a few persistent rhizomes mixed with plants you want to keep.
Common containment mistakes to avoid
The most common mistake is burying a standard pot flush with the soil and assuming the job is finished. A pot rim at soil level gives stems an easy bridge, and a cracked container or crowded drainage hole can let roots escape unseen. Keep the rim visible, use a suitable bottomless setup for in-ground containment, and inspect the perimeter.
Another mistake is planting several mints together because they have different flavors. Mint varieties can cross-pollinate and can also compete for the same confined space. Separate varieties in their own pots if preserving a particular flavor matters, and label them so a later division does not turn into a mystery planting.
Finally, do not confuse a lush plant with a contained plant. Frequent harvesting, shearing, or removing flowers improves leaf production and reduces top growth, but none of those actions replaces a barrier. If you cannot accept a surprise mint shoot in the neighboring bed, move the plant onto a hard surface before the first runner touches soil.
Conclusion: grow mint freely only where you can accept its freedom
For a typical kitchen garden, grow mint in a pot with drainage, keep it on a hard surface, and inspect the rim and drain holes during the growing season. If you want a ground-level planting, use a visible root barrier or bottomless container, leave room to patrol the edges, and choose a location where spreading is an acceptable feature rather than a costly mistake.
Mint is easy to grow because it is determined to keep growing. Give that determination a boundary, and you get abundant leaves without handing the rest of your garden a problem that can take seasons to undo.



