How to Grow and Care for New Zealand Flax
Learn how to grow New Zealand flax in beds or pots, choose sun and soil, water well, divide clumps, prune safely, and protect it from winter cold.

New Zealand flax (Phormium tenax) is a bold, evergreen perennial with long, sword-shaped leaves that rise from a dense basal clump. It brings structure to a border or patio year-round, but the plant needs more space than its nursery pot suggests and can be badly injured by cold, wet winters. The most reliable plan is simple: choose a cultivar that fits the site, provide sun and free-draining soil, water more attentively while it establishes, and protect it if your winters are colder than its tolerance.
New Zealand flax is not the same plant as common flax (Linum usitatissimum) or flax lily (Dianella). The USDA Germplasm Resources Information Network records Phormium tenax as its own species. Before planting, read the botanical name and cultivar on the label; common names are used inconsistently, and varieties differ significantly in mature size and cold tolerance.
New Zealand flax care at a glance
| Care factor | Practical starting point |
|---|---|
| Light | Full sun is reliable; partial shade can help in hot climates |
| Soil | Any reasonable garden soil that drains freely; avoid waterlogged sites |
| Water | Keep a new planting evenly moist during establishment; water pots when the mix begins to dry |
| Feeding | Usually unnecessary in the ground; use a balanced liquid feed sparingly for containers |
| Pruning | Remove dead or badly damaged leaves and old flower stalks; do not shear the whole clump |
| Propagation | Divide rooted fans in spring; seed-grown plants may not match the parent |
| Cold | Check the named cultivar and local conditions; a container is easier to shelter |
That summary is a starting point, not a fixed calendar. A hot, windy patio dries a pot faster than a sheltered garden bed, while saturated winter soil can be more damaging than a short dry spell. The RHS growing guide for Phormium recommends protecting plants in colder areas and notes that established plants tolerate drought better than container-grown ones.
Identify the plant before you plan around it
The species commonly called New Zealand flax is native to New Zealand and is grown for its foliage and tall summer flower stalks. Its leaves are broad, leathery, and strap-like, emerging in fans from the base. Plants may have green, bronze, burgundy, or striped leaves depending on the cultivar. The RHS lists the species at roughly 2.5 to 4 meters tall at maturity, with a spread around 1.5 to 2.5 meters; those are mature estimates, not the size of a young plant.
Cultivars can be much smaller or more colorful than the straight species, but do not assume every label describes a compact plant. The RHS species profile lists full sun to partial shade and moist but well-drained or well-drained soil. North Carolina State Extension’s Plant Toolbox notes that cultivars vary in leaf color and that plants can reach up to 8 feet tall and 5 feet wide. Use the nursery label’s mature height and spread to set spacing and decide whether a pot is practical.
The tall flower spikes can rise well above the foliage and carry tubular red or bronze flowers. They may attract hummingbirds where those birds occur, but container plants often flower less often than established plants in the ground. If you leave flowers to mature, seed capsules may form; seedlings will not necessarily reproduce the leaf color or shape of a named cultivar.
Choose light and shelter for your climate
A sunny position gives New Zealand flax strong growth and keeps the clump from leaning toward light. Full sun is the simplest choice in mild coastal climates. In places with intense summer heat, partial shade—especially protection from the hottest afternoon sun—can reduce stress and help preserve colored or variegated foliage. Deep shade is usually a poor fit: growth may become looser, and the plant loses some of its architectural impact.
Balance light with wind and exposure. The plant is useful in coastal gardens and tolerates salt exposure, but a cold, drying wind can worsen winter injury. In a marginal climate, a sheltered location near a wall or fence may help, provided water does not collect at the base. Leave room around the clump for its leaves to arch without smothering neighboring plants or blocking a path.
Give roots a draining, stable home
Drainage matters more than finding a perfectly formulated soil. New Zealand flax grows in a range of garden soils as long as excess water can move away from the roots. The RHS profile lists loam and sand and accepts acidic, neutral, or alkaline conditions. North Carolina State Extension also describes average, well-drained soil as suitable. Heavy ground that remains saturated after rain is a greater concern than soil that is slightly outside an ideal pH range.
Check the site after rainfall. If water sits around the planting area or the ground stays sticky and wet for days, use a raised bed or a container rather than digging a small amended pocket in clay. A narrow pocket can hold water like a basin. Loosen a broad area instead, or choose another planting location where runoff can escape.
The plant’s leaves are large and can catch wind, so stability matters as the clump grows. Avoid loose, shallow pots for a tall cultivar. In the garden, allow the root ball to settle at grade and avoid burying the crown, where the leaf fans emerge. Deep planting traps moisture around the base and makes it harder to judge whether the plant is actually settling or declining.
Plant without burying the crown
Spring is a dependable planting time because the plant has a full growing season to establish before cold weather. In mild climates, early fall can also work if the roots have time to settle before winter. Avoid planting just before the coldest or wettest part of the year, especially in a site where the soil drains slowly.
Dig a hole slightly wider than the root ball but no deeper than it. Slide the plant from its pot, loosen only circling roots that can be separated without tearing the root mass apart, and set it at the same soil level it had in the nursery container. Backfill, firm gently, and water to settle the soil. Keep mulch a few inches away from the crown so the base is not kept constantly damp.
Spacing should follow the cultivar’s eventual spread, not the width of its current leaves. A small young plant may eventually form a broad clump. If the label gives a range, use the larger end when the site is sheltered and fertile; plants with comfortable air space are easier to tidy and less likely to crowd neighboring perennials.
Water by root-zone moisture, not calendar
Water newly planted flax thoroughly, then check the root zone during dry spells in its first growing season. The goal is steady establishment—not a permanently wet bed. Feel the soil several inches below the surface because a dry crust can hide moist soil underneath, and rain may wet the surface without reaching the root ball.
Once established, plants in the ground usually tolerate dry periods and may need supplemental water only during extended heat or drought. Containers dry faster because their limited mix is exposed on all sides. Water a pot when the upper layer has begun to dry and the mix below is approaching dry; then water thoroughly until excess drains from the holes. Do not let the pot sit in a saucer of standing water.
Adjust your checks for weather and container material. Wind, sun, heat, and a small pot shorten the time between waterings; cool weather and a large glazed pot lengthen it. If the leaves droop while the soil is wet, do not add more water by reflex. Check drainage and the crown first, since waterlogged roots can mimic thirst.
Grow New Zealand flax in a container
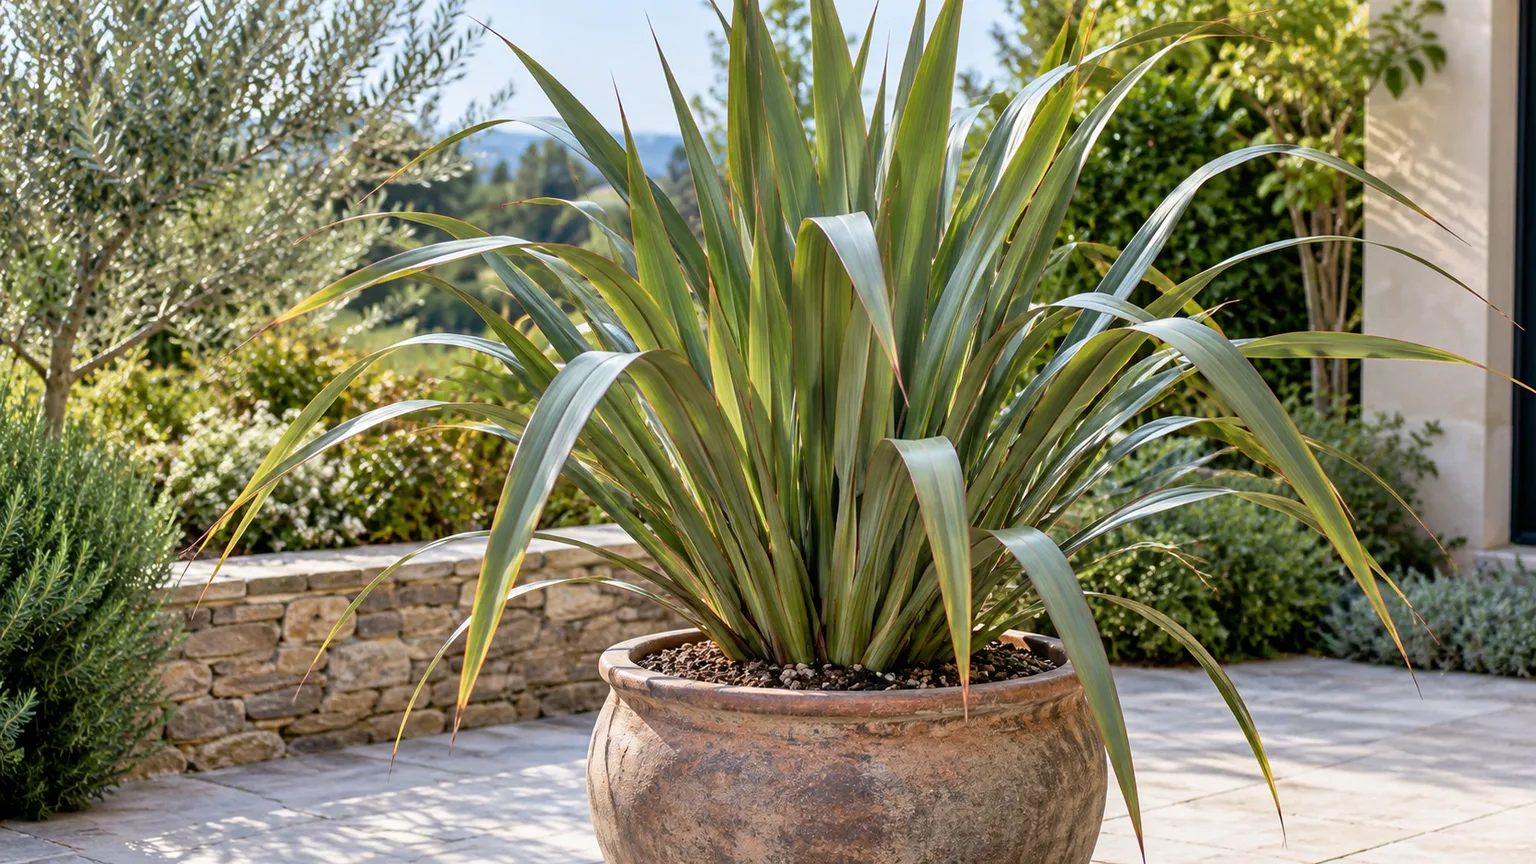
A container is useful when you need to move the plant for winter or want its architectural foliage on a patio. Choose a compact cultivar if space is limited, and use a heavy pot with drainage holes. As the plant grows, a light container can become top-heavy and tip in wind. A stable base and enough room for the root ball are more important than an oversized pot full of wet mix.
Use a quality, free-draining potting mix rather than dense garden soil. The RHS recommends increasing pot size gradually as the root ball fills its container, then using a final container large enough to support the cultivar’s height. Add grit or another drainage amendment only if appropriate for the potting mix; do not block drainage holes with a solid layer that keeps roots waterlogged.
Repot in spring when roots have filled the pot or the plant is unstable, not simply because a year has passed. Move it one pot size up, loosen a dense root mat lightly, and keep the crown at the same height. If the mature cultivar will ultimately be too large to move, plan now for a permanent in-ground position or choose a smaller variety.
Feed sparingly and mulch in cold areas
Plants growing in the ground generally do not need regular fertilizer when they are planted in reasonably fertile soil. Excess feed can encourage soft, lush foliage without solving problems caused by low light or poor drainage. If growth is weak, first check the site, moisture, root space, and cold exposure before reaching for fertilizer.
Container plants have a smaller supply of nutrients and can benefit from a balanced liquid fertilizer during active growth. The RHS suggests feeding container-grown Phormium from late spring to midsummer and following the product’s label for dose and frequency. Do not continue feeding into winter, when growth slows and the plant is less able to use nutrients.
In colder regions, a dry mulch over the root zone can reduce temperature swings. Keep it away from the crown and remove or thin it as spring growth resumes. Mulch does not make a tender cultivar reliably hardy; it is one layer of protection alongside a sheltered site and suitable cultivar choice.
Prune only damaged leaves and spent stalks
New Zealand flax does not need routine shaping. In spring, remove leaves that are dead, badly damaged, or entirely brown, cutting as close to the base as you safely can without cutting into the crown or nearby healthy fans. Use clean, sharp pruners and protect your hands: the edges of mature leaves can be firm and sharp.
Cut old flower stalks low enough to tidy the clump after flowering, taking care not to slice neighboring leaves. If the plant looks ragged after a cold winter, wait until new growth shows which fans are alive before removing large amounts of foliage. The RHS cautions against hard pruning because recovery can be slow. A severe haircut often removes healthy growth and leaves a plant that takes a long time to rebuild.
If a clump is too large for its site, divide it rather than shearing the whole plant down. If one side has died, remove only that damaged section and see whether healthy rooted fans can fill the opening. Do not cut green leaves halfway across; the blunt ends remain visible and may brown.
Divide crowded clumps in spring
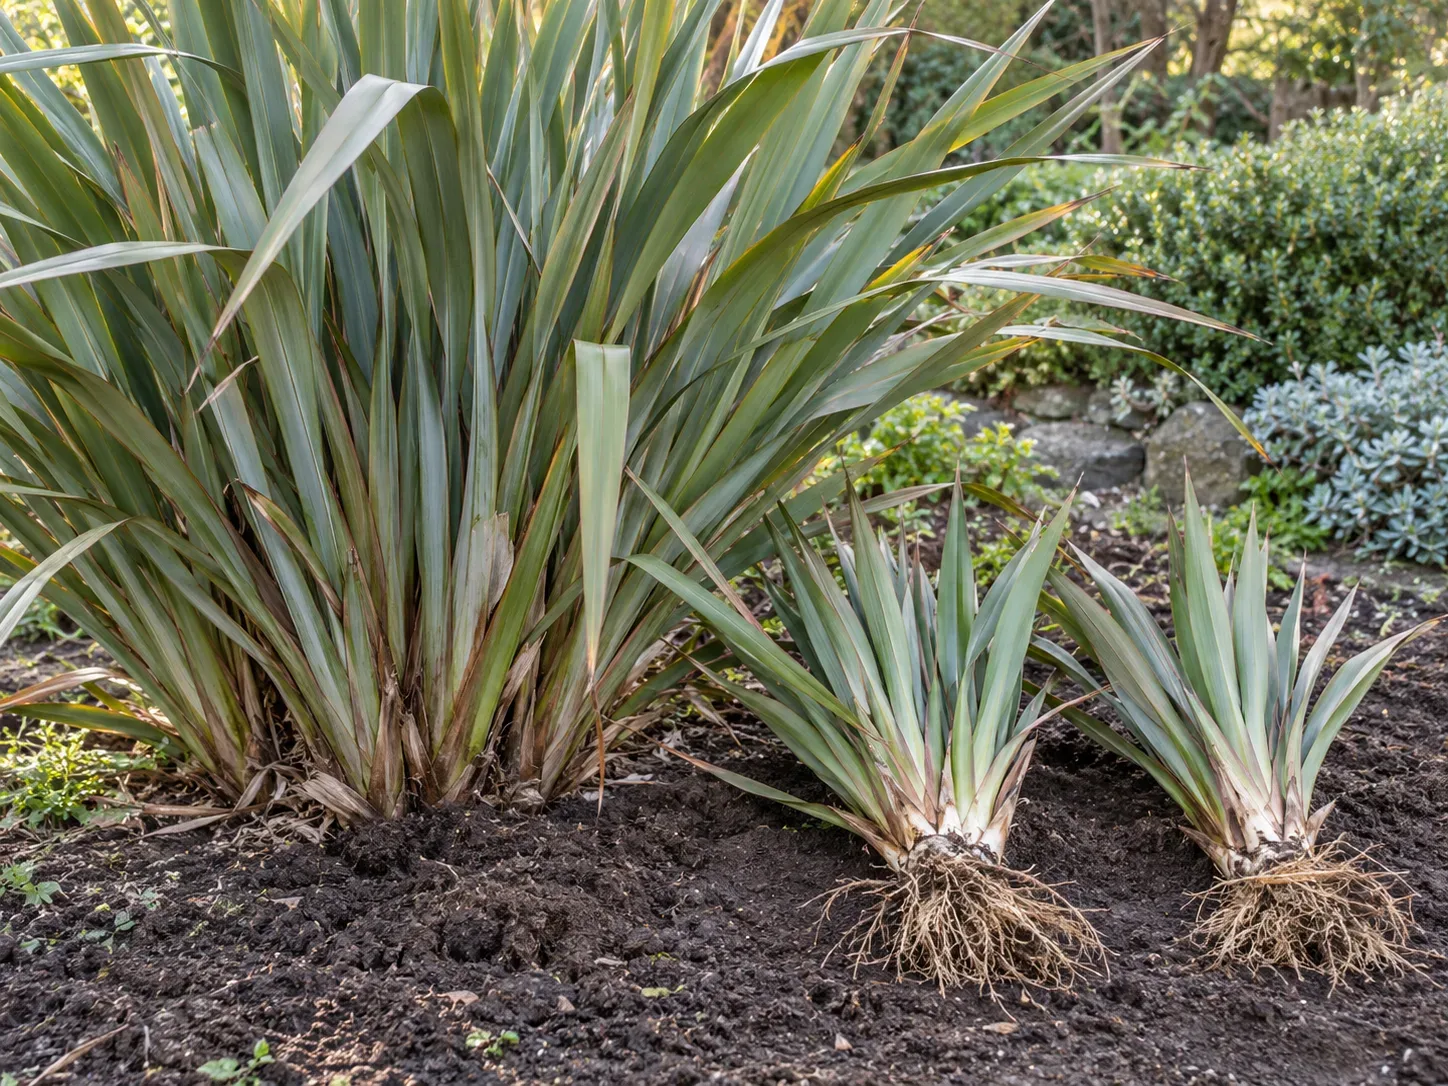
Spring division is the most dependable way to propagate a named New Zealand flax. Wait until the clump is large enough to lift or separate and has several healthy fans. Each division needs both a fan of leaves and a portion of roots; a loose leaf without a rooted base will not grow into a complete plant. The RHS propagation guidance recommends separating rooted fans in spring and potting them on or replanting larger sections.
Water the plant the day before if the soil is dry. Lift the clump with a spade or fork, keeping the root mass as intact as practical, then tease or cut it into sections with clean tools. Choose divisions that have firm crowns and healthy roots. Discard mushy, blackened tissue rather than planting it elsewhere.
Replant each section at its former depth in free-draining soil and water it in. Keep the soil lightly moist while roots reestablish, but do not keep the new division saturated. Small divisions may need a season in a pot or sheltered nursery bed before they are ready for a prominent position. Expect some temporary leaf stress after division; a rooted crown is a better measure of recovery than perfect-looking foliage in the first week.
Start seed for variation, not a clone
Seed is useful when you want to raise several plants and do not need each one to match a named cultivar. Collect mature seed capsules when they have dried and opened naturally, then sow fresh seed in a clean, free-draining seed mix. Keep it warm and evenly moist, not waterlogged. Germination can be slow and uneven, so label the tray and do not discard it too soon.
Seedlings may differ from the parent in foliage color, form, and eventual size. This is normal variation, not evidence that the parent plant was mislabeled. If you want a reliable copy of a specific cultivar, use a rooted division from that plant instead. Protect young seedlings from frost and harsh sun while they develop enough roots to handle outdoor conditions.
Protect the plant from winter cold
Hardiness varies among cultivars and with local exposure. North Carolina State Extension describes New Zealand flax as not reliably hardy below USDA Zone 9a. The RHS gives a UK hardiness rating for the species and notes that some cultivars are less tolerant than others; UK ratings and USDA zones use different systems, so do not convert one directly into the other. Check the specific plant label and local growing guidance before treating a number as a guarantee.
In a mild region, a sheltered, well-drained site may be all the protection an established clump needs. In a cold or wet winter, protect the root zone with dry mulch and shield the foliage from prolonged hard frost if local conditions call for it. Keep water from pooling around the crown. Cold plus saturated soil is a difficult combination for a plant that is only marginally hardy.
For colder climates, a container offers a more reliable escape route. Move it before a hard freeze to a bright, cool, frost-free space. Reduce watering while growth slows, but do not let the root ball dry out completely. Acclimate it back outdoors gradually in spring. If there is no suitable winter location, choose a genuinely hardy alternative rather than relying on a pot to solve a climate mismatch.
Spot pests and diagnose decline early
Check the base of the leaf fans as well as the leaf blades. The RHS identifies Phormium mealybug by white, fluffy deposits around fan bases and sometimes black sooty growth on leaves. North Carolina State Extension’s species profile also lists mealybugs, snails, and leaf spot among potential problems. Inspecting early helps distinguish an insect issue from ordinary cold or drought damage.
Remove dead leaves and plant debris where pests can hide, and avoid keeping the crown wet. If you find a pest, identify it before treating the plant. Follow the label on any product used, test it on a small area first where directed, and avoid spraying flowering plants when pollinators are active. A plant with brown tips or limp foliage may instead be reacting to cold, drought, salt, or root stress; check soil moisture and recent weather before assuming insects are responsible.
For a plant that suddenly collapses in wet soil, check whether the crown or roots have softened. Stop irrigation, improve drainage, and remove only clearly rotten tissue. If decay has reached the entire crown, recovery may not be possible. If the plant has only winter-browned leaves but the base is firm, wait for spring growth before deciding it is dead.
Choose a cultivar that fits your space
Look at the mature measurements and leaf habit on the label. Upright, large forms such as ‘Sundowner’ can anchor a spacious border, while lower or more compact cultivars are better suited to containers and smaller gardens. The RHS describes ‘Jester’ as a more arching form around 1.2 meters tall and notes that ‘Duet’ can be borderline hardy in cold UK conditions. North Carolina State Extension lists ‘Mat’s Merlot’ among cultivars with dark foliage. These examples show why cultivar identity matters; they are not a promise that every local nursery uses the same name consistently.
Color is only one part of the choice. Consider the leaf width and arch, eventual spread, winter tolerance, and whether you can move or shelter the plant. A striking large cultivar that outgrows its patio or cannot survive the local winter is a poor fit, even if its foliage is exactly what caught your eye.
What New Zealand flax adds to the garden
The plant earns its place through year-round form: upright leaves contrast with rounded shrubs, fine-textured grasses, and lower groundcovers. Use it as a specimen, a focal point at the end of a path, or a container accent where its size has room to show. It also has a long cultural relationship with Māori fiber work in New Zealand; North Carolina State Extension notes the use of its leaves to weave mats and other articles.
Its bold outline can dominate a small bed, so avoid squeezing it between plants that need the same space. Pair it with plants that can handle similar light and drainage, and leave a clear edge where leaves can arch without brushing a walkway. In an exposed coastal garden, its salt tolerance can be useful, but young plants still need enough water to establish and shelter from severe cold.
Conclusion
New Zealand flax is easiest to grow when you plan for its mature size and your winter conditions before planting. Give it sun or light shade, fast-draining soil, and room for a broad clump; water consistently while it establishes, then adjust to weather and soil rather than a weekly rule. For a container, choose a compact cultivar, a stable pot, and a realistic place to shelter it in winter. Prune conservatively, divide only rooted fans, and treat seed as a way to grow variable plants. If drainage and climate fit, Phormium tenax can provide striking foliage and dependable structure for years.