How to Grow and Care for Scaredy Cat Plant
Grow scaredy cat plant outdoors or in pots with advice on sun, drainage, watering, pinching, cuttings, and winter care—plus a reality check on repellent claims.
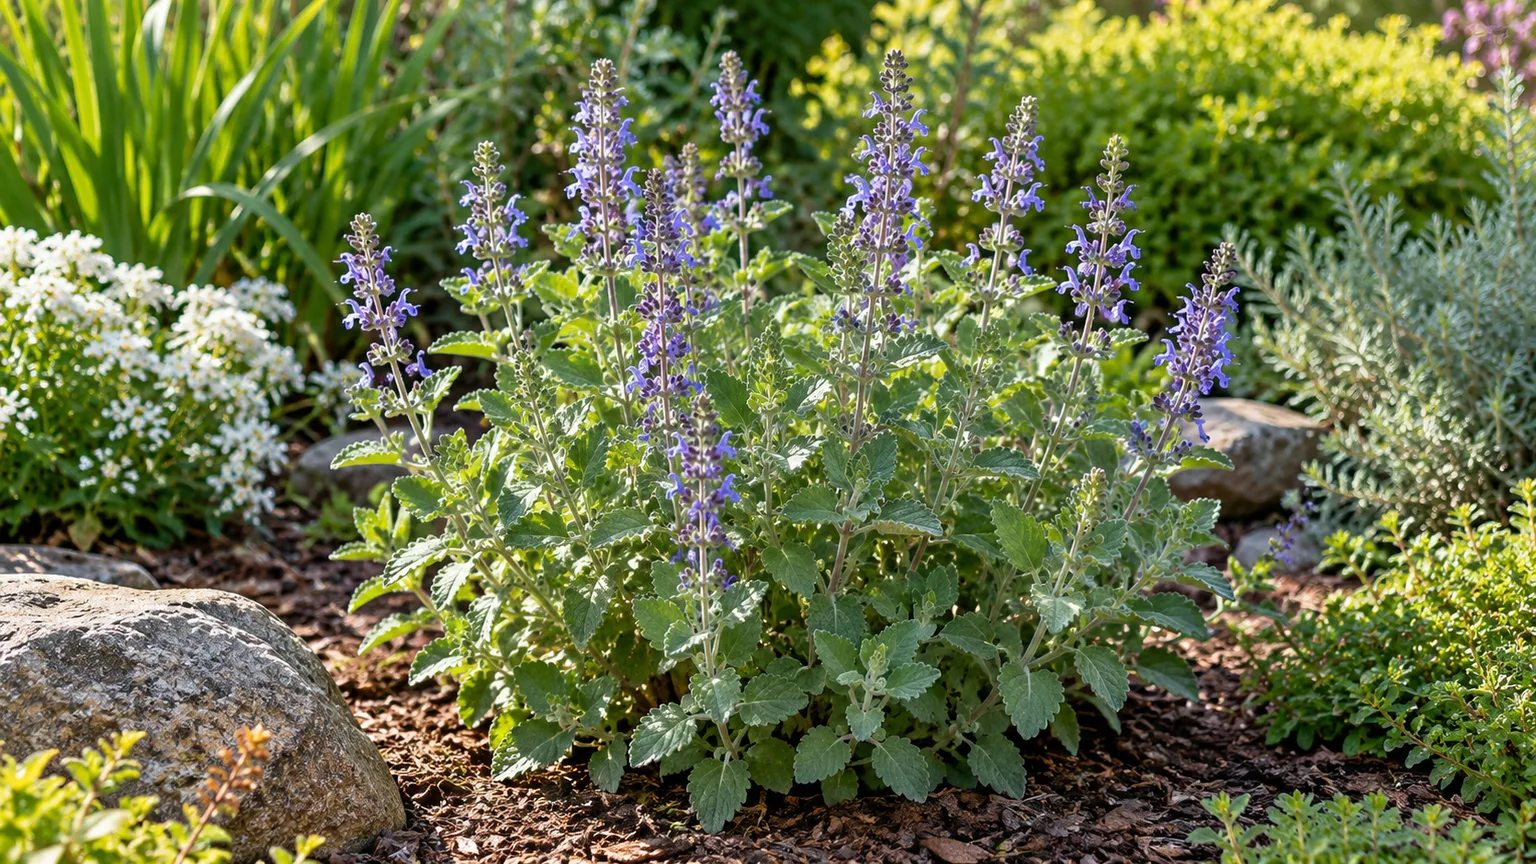
Scaredy cat plant is easy to grow when you give it a sunny, well-drained spot and protect it from frost. It earns its place in a garden for its rounded gray-green leaves and summer spikes of violet flowers, but its reputation as a cat deterrent is far less certain than its strong smell. Decide whether you want the plant for its looks and scent before putting it beside a path or buying it as pest control.
The name on the tag may read Coleus caninus or Plectranthus caninus. Both names are used for the same mint-family plant, so matching the botanical name matters more than the common name when you shop.
What exactly is scaredy cat plant?
This is a compact, branching herbaceous plant with slightly fleshy, rounded leaves that have scalloped edges. The leaves are gray-green rather than the brightly patterned colors associated with many bedding coleus, and summer brings upright spikes of small violet flowers. The Royal Horticultural Society lists it as a tender evergreen perennial, about 40 centimeters tall, with a bushy habit and a pungent odor when brushed. In frost-prone regions, gardeners generally treat it as a warm-season annual or grow it in a movable pot. (RHS)
The species grows naturally across parts of Africa and Asia, according to Kew’s Plants of the World Online. That broad native range helps explain why it can be grown outdoors in warm climates but should not be expected to tolerate a cold winter everywhere. The precise performance in your garden still depends on local frost, soil drainage, and exposure, not a name on a generic hardiness chart. (Kew)
Which botanical name should you use?
Kew accepts Coleus caninus and lists Plectranthus caninus as a synonym. The RHS plant profile still presents it under Plectranthus caninus, while the South African National Biodiversity Institute also records that name and lists Coleus caninus among its synonyms. Seeing either name on a label is not, by itself, evidence that you have bought a different plant. (Kew, SANBI)
A useful nursery check is the combination of a botanical name, rounded scalloped leaves, and violet flower spikes. Do not buy an unidentified “cat-repelling coleus” just because the common name sounds right; ordinary ornamental coleus is a different species with a different look. If a listing uses Plectranthus caninus or Coleus caninus, compare its foliage and flowers against a reliable plant profile before ordering.
What do its scent and repellent claims mean?
The leaves release a pungent odor when brushed or crushed. That is a real feature of the plant; the claim that the scent reliably keeps cats, dogs, rabbits, or other animals out of a garden is a separate claim. RHS says some people believe the aroma repels cats, while Gardening Know How describes the repellent reputation as anecdotal and says there is no proof that the plant alone keeps animals away. Treat it as an ornamental with an unusual smell, not as a dependable barrier. (RHS, Gardening Know How)
This distinction changes where the plant makes sense. If you like its foliage and flowers, put it in a border or container where people will not brush past it constantly. If you are trying to stop cats from digging in a bed, use a physical cover or rough-textured mulch instead; University of Maine Cooperative Extension lists ground-level barriers among practical options. (University of Maine Cooperative Extension)
Decide where it belongs before buying
Scaredy cat plant can fit in a mixed annual border, a sunny container, or a spot near a vegetable bed where its foliage can be appreciated without becoming a walkway nuisance. Its size is often described as roughly 1 to 2 feet tall and wide, although published plant profiles vary with conditions. Allow enough space for a rounded plant to branch rather than squeezing it into a narrow gap. Homes & Gardens recommends spacing plants about 2 feet apart and warns against placing them where passersby will regularly brush the leaves. (Homes & Gardens)
Use it in a border or portable container
Choose a border location that receives several hours of direct sun and drains after rain. Keep the plant back from a narrow garden path, a patio chair, or a doorway where brushing the leaves will release the smell over and over. It can be useful as a low mound of foliage and summer color, but avoid treating it as a perimeter fence: a scent may fade or go unnoticed, and there is no reliable line it creates that an animal cannot cross.
A container makes it easier to shift the plant as you learn how noticeable the smell is in your yard. Select a pot with open drainage holes, only modestly wider than the root ball, and a free-draining container mix; a huge pot holds more wet soil than a young plant can use. A moveable pot is also a practical choice if your winters are cold, though its exposed roots need protection before frost. Homes & Gardens notes that the plant can grow in beds or pots and that containers can be brought indoors in colder areas. (Homes & Gardens)
Give it sun and soil that drains well
Full sun or partial shade can work. A sunny site encourages compact growth and summer flowering; in a very hot climate, a little afternoon shade can reduce stress, while a dim location tends to produce longer, weaker stems. The RHS recommends full sun or partial shade and lists violet summer flowers, so use light as the first adjustment if your plant grows but stays sparse or flowers poorly. (RHS)
The soil can be sandy, loamy, chalky, or clay-based as long as excess water can escape. The RHS lists those soil types but emphasizes moist to well-drained conditions. That means “drought tolerant once established” is not the same as “plant in bone-dry soil and forget it”; a young root ball still needs water as it establishes, and a pot dries faster than an in-ground bed. (RHS)
Improve drainage in heavy ground
Check the planting site a day after a strong rain. If a puddle remains or the ground stays sticky and saturated around the root zone, the site is a poor fit until drainage improves. Move the plant to a raised bed or a container rather than adding a small amount of sand to a large area of clay; a thin amendment layer will not reliably fix a waterlogged planting hole.
For an ordinary bed, remove weeds, loosen the soil broadly, and set the plant with the top of its root ball level with the soil surface. Do not bury the stem base beneath a mound of compost. A light organic mulch can slow moisture loss, but leave a small gap around the stems so the crown is not kept wet. In pots, use a mix that drains freely and never leave the container standing in water inside a decorative cachepot.
Plant outside after frost has passed
Wait until your local risk of frost has passed before planting outdoors. The RHS classifies this plant as tender, so a calendar date from a different region is not a safe universal planting rule. If spring nights remain cold where you live, keep a nursery pot in a sheltered bright spot and move it outside after conditions settle rather than asking a new transplant to recover from cold and wet soil at once. (RHS)
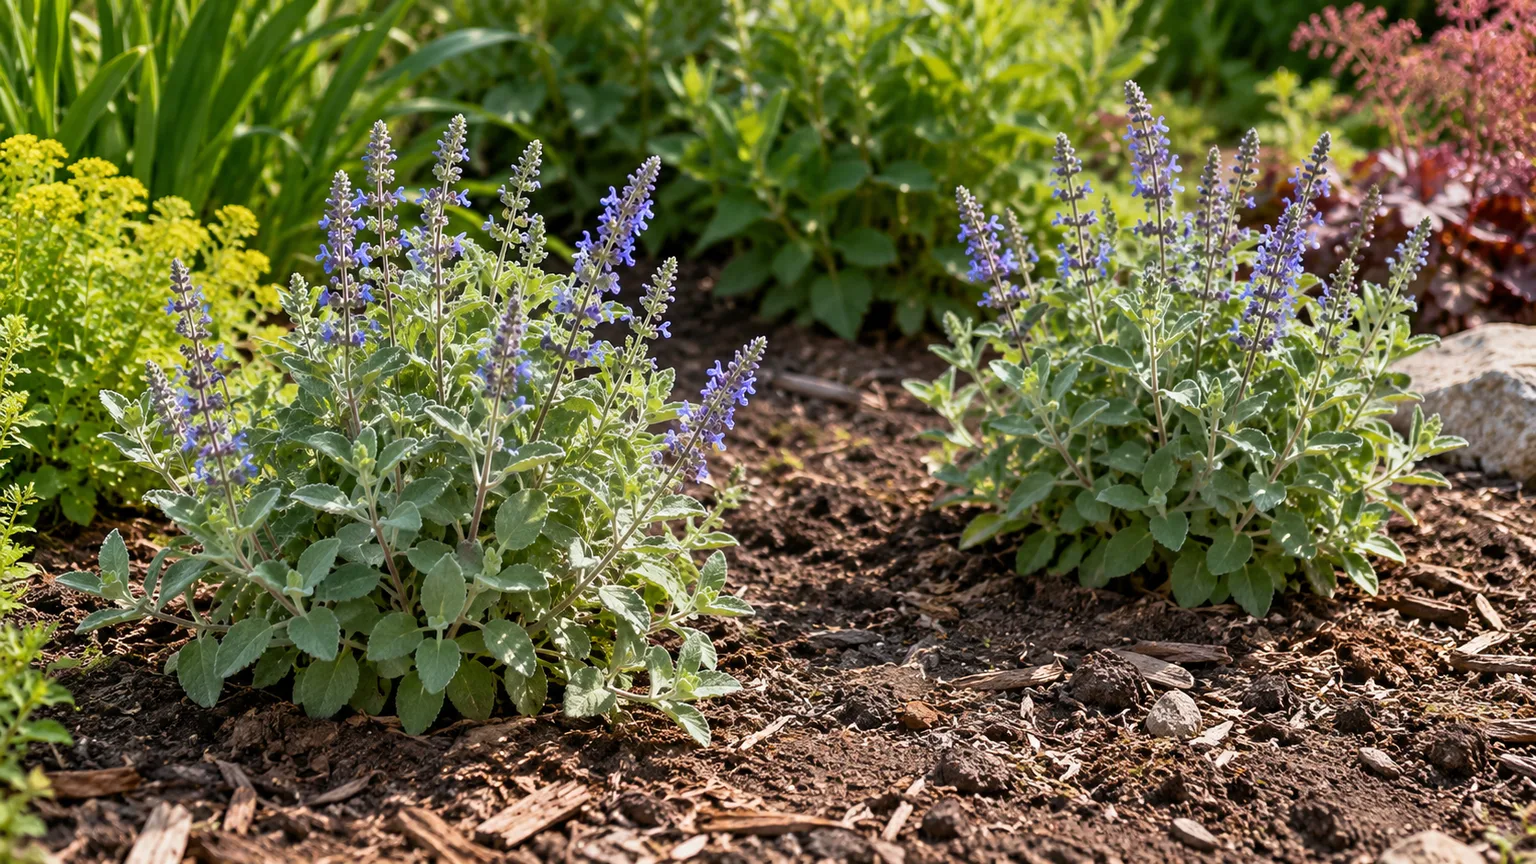
Transplant nursery starts
Water the nursery pot before planting so the root ball holds together. Set it at the same depth it grew in its pot, firm the surrounding soil gently, and water slowly at the base until the root zone is evenly moist. Space neighboring plants around 18 to 24 inches apart if you want separate mounds and airflow; closer planting will close a border sooner, but it also makes it harder to reach the center for pinching or cleanup.
Check the soil again the following day, then use weather and touch rather than a fixed daily watering schedule. A plant that has just been moved may need attention during a warm dry spell, but routine watering when the soil is already wet creates the very root conditions this plant dislikes. Once the roots begin growing into surrounding soil, gradually stretch the interval between deep waterings.
Start seeds with a warm indoor lead
Seeds are an option when you want several plants or cannot find nursery starts. Follow the seed packet’s timing for your area and use your local last-frost date as the anchor; there is no advantage to starting so early that the seedlings become long and weak before the garden is warm. Keep the seed-starting medium lightly moist rather than waterlogged and give young plants bright light so they grow sturdy enough to transplant.
If you collect seed from your own flowers, wait until the flower spikes dry and the seed has matured. Save it in a labeled paper envelope in a cool, dry place and sow a small test batch if you are unsure whether it stayed viable. For a single plant, a nursery start or stem cutting is usually simpler than raising a tray of seedlings. Exact germination and bloom timing can vary with seed freshness and temperature, so follow the packet rather than expecting every seed to sprout on the same schedule.
Water by checking the root zone
During establishment, water deeply enough to moisten the original root ball and the soil just around it. Then check before watering again: push a finger into the top inch of soil or use a small trowel to feel below the surface. If the top is drying and the deeper root zone is only slightly moist, water at the base; if the soil is still wet, wait. The RHS describes the plant as drought resistant once established, and Homes & Gardens similarly recommends regular water early, then less once roots are established. (RHS, Homes & Gardens)
A watering calendar often misleads because a small container on a sunny patio loses moisture much faster than a plant in open ground. Check pots more often during hot or windy weather, but do not respond to every soft leaf with another drink. Wilting can also happen when roots sit in soggy soil and cannot take up water properly. Make sure excess water runs through the drainage holes and empty any saucer after watering.
When an established plant faces a prolonged dry stretch, give it a thorough soak at the root zone and then let the soil begin to dry again. Frequent shallow sprinkles wet the surface without encouraging deeper roots. If you are away, group containers where they receive morning sun rather than harsh late-afternoon heat, or ask someone to check the actual soil instead of following a rigid timer.
Pinch, feed, and deadhead for a compact plant
Pinch the tips of young stems early in the growing season if you want a fuller mound. A light pinch encourages branching below the cut; wait until the plant has several established shoots before shaping it, and do not keep shearing it simply because the center looks untidy. The RHS specifically recommends pinching young shoots and growing tips to promote a bushier plant. (RHS)
Flowers are part of the plant’s summer display. If you want the violet spikes, let stems develop rather than pinching off every emerging flower stalk; remove spent spikes after bloom if you prefer a tidier plant or want to limit seed formation. Pinching early trades some immediate height and flowering for a more compact shape, so decide which matters more before cutting.
Use compost or a modest, label-rate balanced fertilizer only if the soil is poor or container growth slows. The plant does not need repeated heavy feeding to produce attractive foliage. If you see lots of soft leafy growth with few flowers, review the light and fertilizer together: improve the light if possible and stop adding high-nitrogen feed before applying more. For a pot, occasional feeding during active growth is reasonable, but reduce or stop it as the season cools and growth slows.
Propagate next season’s plants from stem cuttings
Stem cuttings are the straightforward way to carry a favorite plant into another season. Choose a healthy, nonflowering tip with at least two nodes, then use clean snips to take a cutting several inches long. Remove the leaves from the lower portion so they will not be buried, and insert the bare node into a small pot of clean, airy, lightly moist rooting medium. SANBI’s genus guidance recommends cuttings with at least two nodes, lower leaves removed, and a warm shaded place; it notes that rooting hormone is usually unnecessary. (SANBI PlantZAfrica)
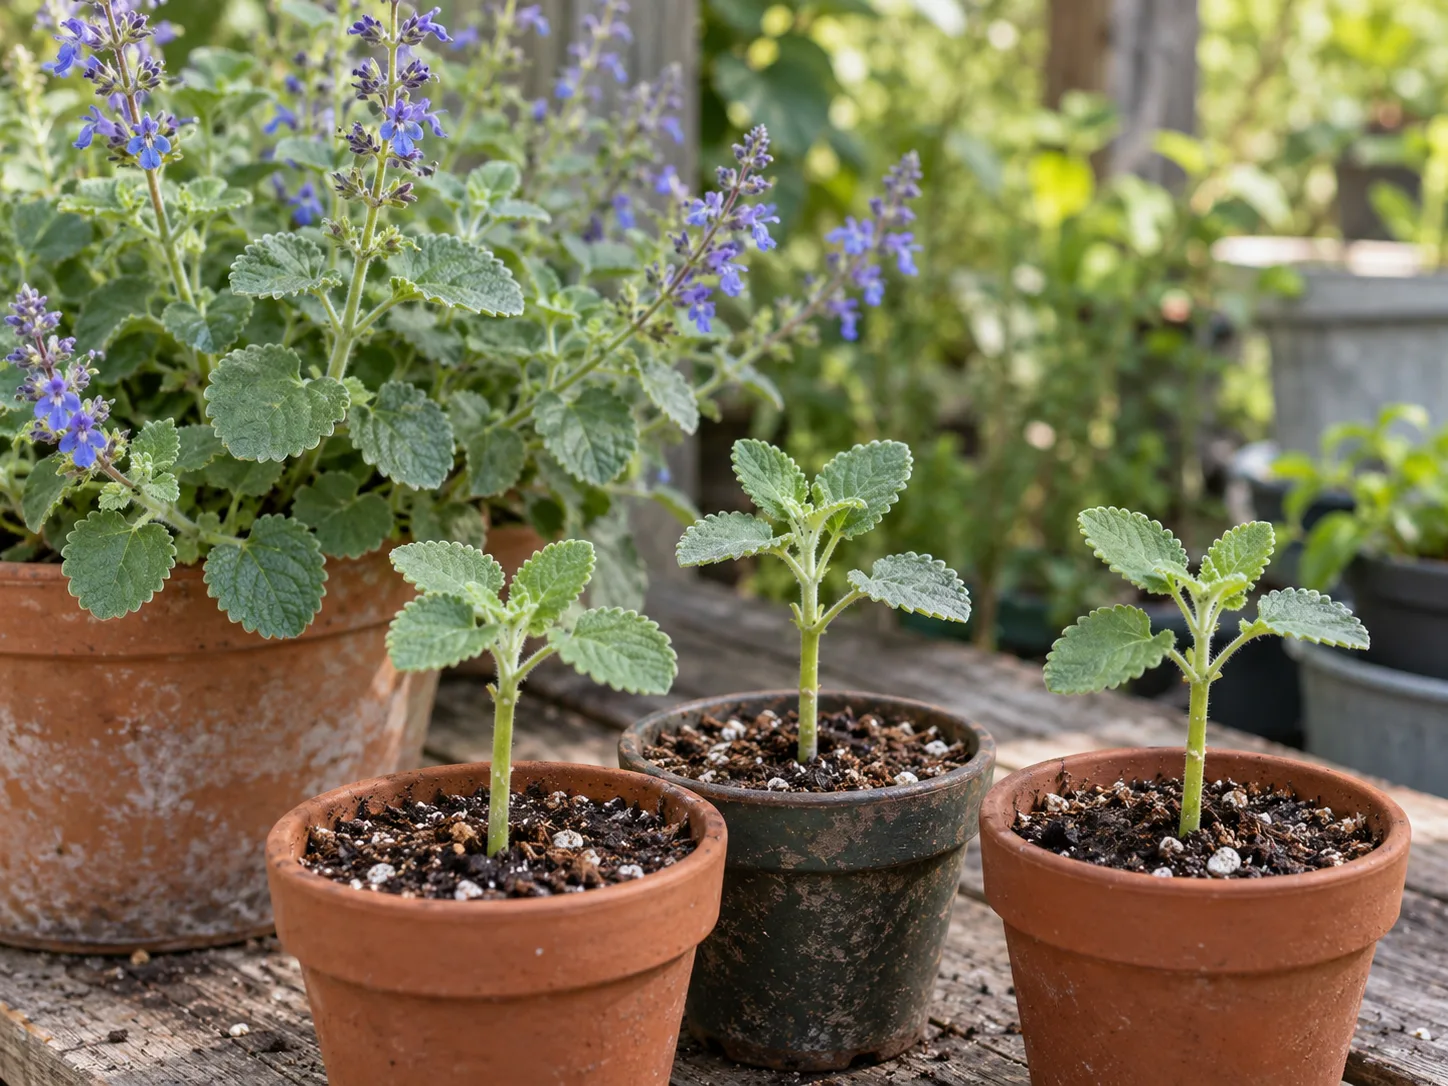
Keep the medium lightly moist, not saturated, and place the pot in bright indirect light or gentle shade while roots form. Strong sun can dry a small cutting quickly, while cold or waterlogged medium slows establishment and encourages decay. Do not tug on it every day; look for new growth and a stable stem, then check for resistance with one gentle pull after it has had time to root.
Once the cutting is rooted, pot it into a container with drainage or harden it off before planting outside after frost danger has passed. If you want to overwinter the parent plant, take a backup cutting before autumn instead of waiting until cold weather has already damaged the stems. Leaf pieces are less predictable than a stem cutting with nodes, so use a node-bearing stem when you need a reliable replacement.
Overwinter it only where frost allows
The RHS rates Plectranthus caninus H2 and calls it a tender evergreen perennial. In climates with winter frost, it is safer to think of an outdoor bed planting as an annual: enjoy it through the warm season, take a cutting if you want another plant, and replace it after cold weather. In a frost-free or reliably mild climate, it may persist as a perennial, but local exposure and soil drainage still matter. (RHS)
A container can be moved to a bright, frost-free place before the first cold nights. Check for insects, remove dead or damaged growth, and water less as light and temperatures drop. Keep the soil only lightly moist between waterings; growth slows indoors, so a pot that stayed evenly wet all summer may now remain damp for too long. Choose a room where the plant’s smell will not bother people when the foliage is brushed.
If you do not want the odor indoors or lack a bright sheltered location, overwinter a cutting instead of a large plant. Small cuttings occupy less space and are easier to monitor than a mature plant brought in with garden soil or pests. If both parent and cutting fail, start with a fresh nursery plant after your local frost season; there is no need to force an unhappy specimen through winter.
Troubleshoot leggy growth and root trouble
Long bare stems usually point first to insufficient light, crowded growth, or repeated heavy feeding. Move a container gradually into brighter conditions, rather than taking a shaded plant straight into intense afternoon sun. In a bed, remove nearby obstructions if practical, pinch the longest stems once the plant is actively growing, and space neighboring plants so light can reach the center.
Wet, collapsing stems or a sour-smelling potting mix suggest the root zone is staying too wet. Confirm the pot has drainage holes, empty standing water, and let the mix dry partly before watering again. If the roots are dark and soft, trim away rot with clean snips and repot into fresh, free-draining mix; a badly rotted plant may not recover, so take healthy cuttings before discarding it.
The RHS describes the plant as generally pest- and disease-free, which means a routine spray is not a useful first step. Inspect the leaves and stems before treating anything. If pests are actually present, identify them and choose a response that fits the pest and the label; do not apply an insecticide simply because growth looks weak. (RHS)
If it wilts, check soil before adding water
Feel the root zone before you reach for the hose. Dry soil with limp foliage points toward water stress; water thoroughly and give the plant time to recover rather than pouring small amounts repeatedly. If the soil is wet, adding more water makes the likely problem worse, so pause irrigation and check drainage, recent rain, and whether a container is standing in a full saucer.
A plant that wilts repeatedly despite moist soil may have damaged roots, a pot that heats up in afternoon sun, or cold stress after an early transplant. Move a pot out of extreme heat, protect it from cold nights, or inspect the root ball if the decline continues. Make one change at a time and watch new growth; older damaged leaves may not recover even after the underlying issue is fixed.
Conclusion
Grow scaredy cat plant for its distinctive scent, gray-green foliage, and violet summer flowers—not as a guaranteed way to keep animals out. Give it light, well-drained soil, frost-aware planting, and water based on what the root zone feels like; then pinch for shape, propagate a healthy stem cutting, and overwinter only where conditions allow. If you want a dependable boundary around a garden bed, use a physical barrier and let this plant be an ornamental.



