How to Care for Hosta Plants in Fall: The Timing Rule
Prepare hostas for winter with a foliage-based fall checklist covering pruning, division, watering, mulch depth, containers, and common mistakes.
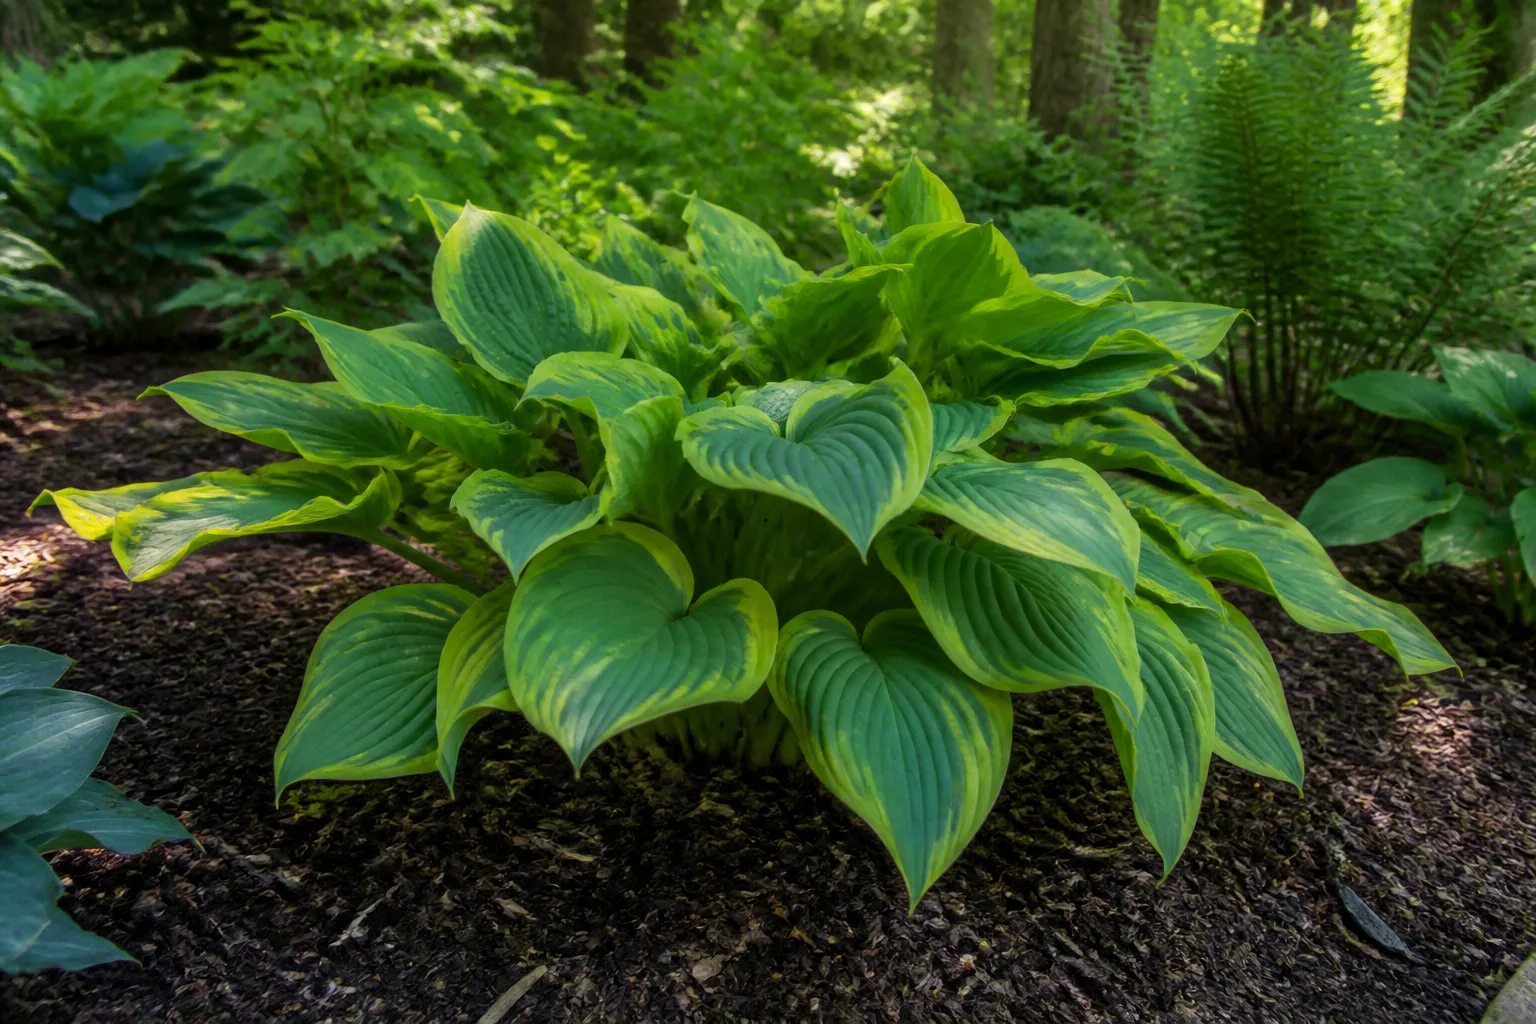
The best fall hosta routine is simple: let the leaves tell you when the plant is ready, clean up only what needs cleaning, keep the root zone evenly moist until the ground freezes, and protect the crown without burying it. You do not need to cut every green leaf on a particular date, divide every clump, or wrap an established garden hosta like a tender plant.
Hostas are herbaceous perennials. Their leaves disappear for winter, but the crown and underground rhizome system remain alive and dormant, ready to send up new shoots in spring. NC State Extension lists hostas as deciduous perennials suited to a wide range of light conditions from deep shade to partial shade and hardiness zones 3a through 9b, while noting that cultivars vary in size, leaf color, and texture (NC State Extension Plant Toolbox). That range is why a weather-and-foliage plan works better than a one-size-fits-all date.
What Fall Care Is Really For
Fall care has four jobs: preserve the energy still being made by green leaves, remove material that is diseased or likely to become a wet pest shelter, help new divisions establish before severe cold, and reduce damaging swings between frozen and thawed soil. It is not a beauty contest for the bed, and it is not a rescue treatment for every brown or chewed leaf.
Think of the hosta crown as the part you are protecting. Leaves and leaf stalks emerge from this low central structure, and the crown contains the growing points that will produce next year’s foliage. A clean cut above the soil is harmless when the plant is dormant; a blind cut into the crown can remove next year’s buds. The goal is tidy and well-drained, not shaved down at any cost.
The correct order matters. First assess the foliage and the soil. Then remove problem leaves or divide only if the timing is still favorable. Water newly moved plants and dry established beds as needed. Finish with a loose mulch layer after cleanup, not a dense pile pressed against the crown.
When to Start Fall Hosta Care
There is no universal “hosta day.” A clump under a tree canopy may stay green longer than one exposed to wind, and a thick blue-leaved cultivar may remain upright after a thin-leaved cultivar has collapsed. Your local first-frost date can help you plan, but the plant’s condition should make the final call.
Use the Foliage as Your Timer
If most of the foliage is green, leave the whole clump intact. Green leaves are still photosynthesizing and contributing carbohydrates to the crown, even if they look a little ragged after summer. You can remove an individual leaf that is fully dead, broken, or clearly diseased, but do not cut down a living plant just because September has arrived.
The full cleanup window begins when the leaves have naturally turned yellow or brown, become limp, or collapsed around the crown. A few green leaves mixed into a mostly dormant clump are not a reason to panic. Remove the dead material first and return later for the last living leaves, or leave them until a harder freeze finishes the process.
This distinction is especially useful after a hot, dry summer. A wilted hosta may still have living leaves and recover after deep watering and improved shade. Cutting it to the ground can hide the real problem and removes the plant’s remaining ability to make energy. The RHS identifies dry soil and excessive sun as common reasons for brown or scorched hosta foliage and recommends correcting the growing conditions rather than treating every symptom as a pruning signal (RHS hosta growing guide).
Tell a Light Frost From a Killing Freeze
One chilly night is not always the finish line. A light frost can mark leaf edges while the clump remains firm and partly green. A harder freeze usually leaves the foliage water-soaked, limp, and folded down. Look at the whole plant the next morning instead of reacting to the first white frost on the lawn.
If a hard freeze arrives early, do not worry about a few imperfect leaves. Wait until the remaining foliage has finished collapsing unless a disease problem, heavy wet mat, or urgent access issue makes earlier removal worthwhile. The plant is already moving into dormancy, and established hostas are resilient. The bigger mistake is repeatedly removing healthy green foliage weeks before natural dieback.
The Fall Hosta Checklist
Use this sequence when the plant is still in the garden:
- Inspect before cutting. Decide whether the damage is natural senescence, drought, sun, browsing, slugs, disease, or crown trouble.
- Remove spent flower stalks. Once flowering is over, cut old scapes near their base if you want a cleaner bed; this is separate from cutting living leaves.
- Wait for dormancy for a full cutback. When the clump is mostly yellow, brown, limp, or flattened, remove the dead foliage.
- Divide only a genuinely crowded or misplaced plant. Do not dig a healthy clump merely because division is a fall tradition.
- Water before the soil freezes when the root zone is dry. Newly planted divisions need more attention than established plants in naturally wet soil.
- Mulch the root zone lightly and evenly. Keep the crown visible or only lightly covered; never build a wet volcano around it.
- Mark container plants for a separate plan. An exposed pot experiences colder, faster temperature changes than roots in the ground.
If you can do only one thing this weekend, inspect the bed and correct moisture. If the leaves are still green, wait on the haircut. If they are fully collapsed and the bed has a history of slugs or foliar disease, cleanup becomes the higher priority.
How to Cut Back Hostas Safely
Once the foliage is dormant, cut leaf stalks and spent flower stems about 1 to 2 inches above the soil line. That short stub gives you a useful marker in spring and keeps the blade away from a crown you cannot always see beneath the clump. Work in small handfuls rather than swinging a hedge trimmer blindly across the bed.
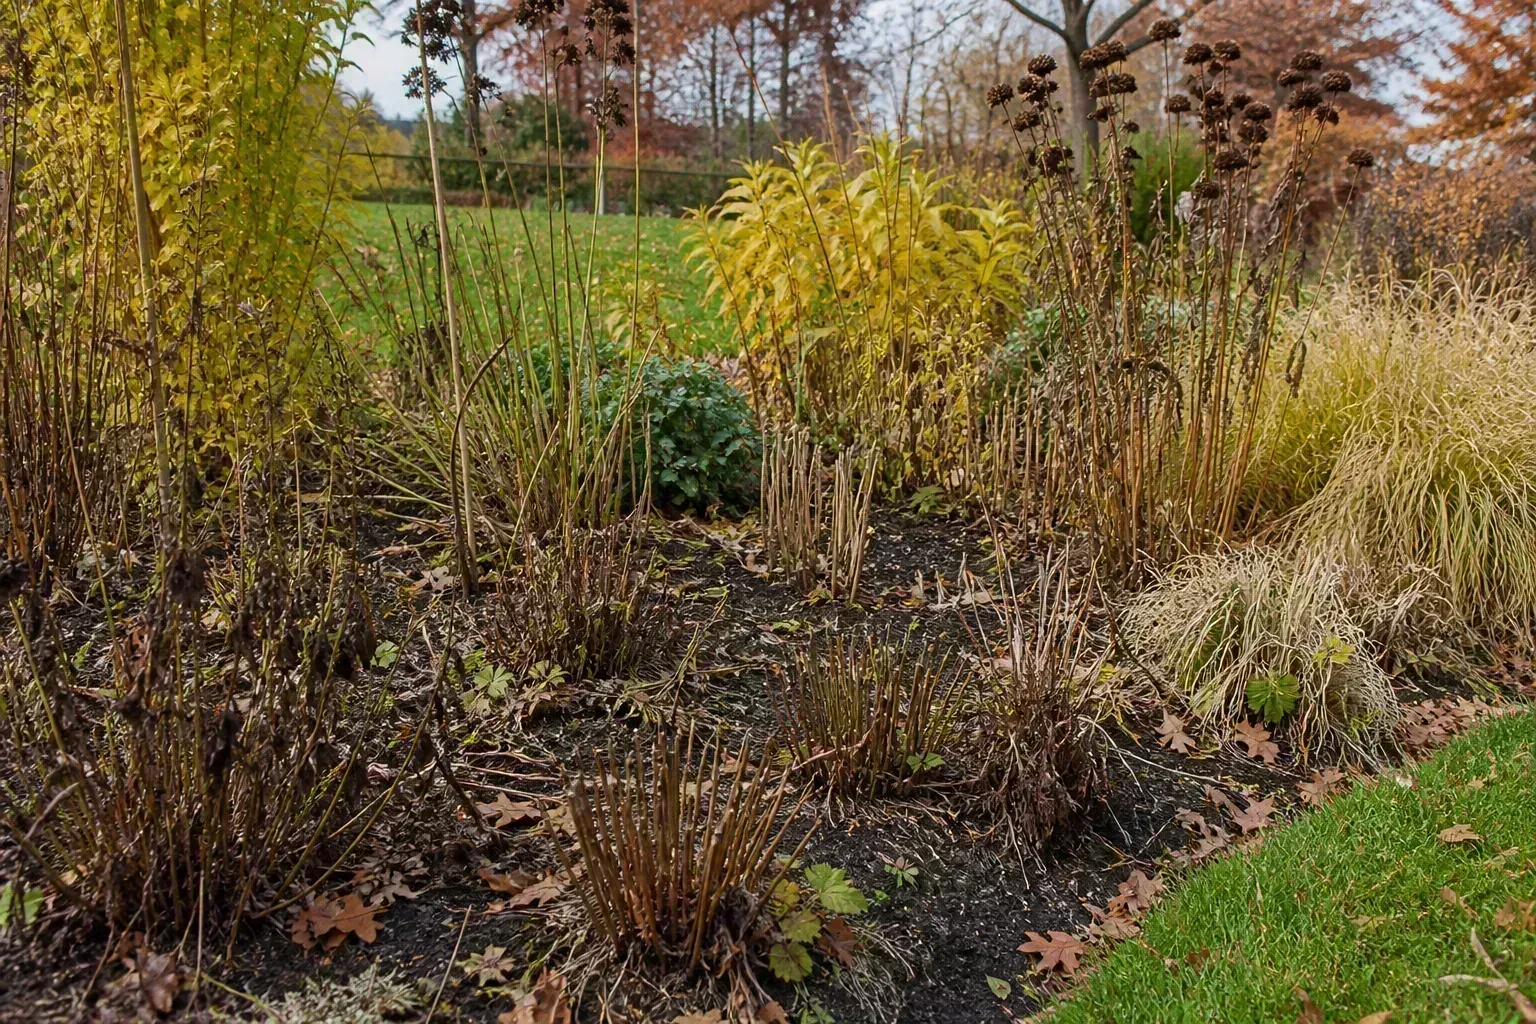
Cut dormant foliage for sanitation and access, not because every green leaf needs removing.
Clean Tools, Find the Crown, and Make Controlled Cuts
Use sharp bypass pruners for a small clump or hand shears for a larger bed. Clean blades make controlled cuts and reduce the chance of moving a pathogen from one plant to another. Before moving to the next clump, brush off soil and wipe the blades with an alcohol wipe or another suitable disinfectant, especially if the first plant had unusual mottling, puckering, spreading spots, or a soft base.
Do not yank stubborn stalks from the crown. Dead leaves that are fully loose can be pulled gently, but a partly attached stem is safer to snip. Tearing can lift crown tissue or expose a wound at soil level. Gather the cut material rather than leaving a thick layer to mat over the plant.
Healthy, dry leaves can go into an active compost system if they are free from serious disease. Bag or dispose of suspect diseased material according to local guidance instead of assuming a cool backyard pile will eliminate every pathogen. Fall cleanup reduces hiding places and improves visibility, but it does not disinfect the soil or guarantee that slugs will disappear.
Should You Clean Up Hostas in Fall or Spring?
Both seasons can work. Choose fall cleanup when the foliage is diseased, the bed stays wet, pests are a recurring problem, or you will not reliably get back to the garden before new shoots emerge. Choose spring cleanup when the foliage was healthy, the bed is well-drained, winter cover matters to you, and you can remove the debris before the pointed shoots push through.
Fall cleanup gives you a clear crown, makes winter mulch easier to place, and removes a soggy layer that can shelter slugs and small animals. It also lets you see weeds, vole runways, and drainage problems while the bed is accessible. The limit is that removing healthy green leaves early wastes photosynthetic tissue, and removing all dry cover can reduce habitat value in a wildlife-friendly garden.
Spring cleanup preserves winter structure and allows some dead leaves to break down in place. The price is scheduling: old leaves can flatten into a dense mat, hide emerging buds, and make a wet crown harder to inspect. If you choose spring, lift the loose material gently and finish before new shoots are tall enough to snap. If the clump had a known foliar disease, sanitation is usually more important than leaving the leaves in place.
How to Divide Overgrown Hostas
Hostas do not need annual division. Divide when a clump has outgrown its space, is crowding neighbors, needs to be moved, or has stopped performing after years of healthy growth. Division can also produce useful new plants, but it creates temporary root disturbance, so it is a project rather than a routine fall chore.
Decide Whether Division and Replanting Make Sense
Early fall is the safer part of the autumn window because the soil is often cool and workable while roots still have time to settle. The exact deadline depends on your climate and the coming weather. A practical rule is to divide only when you can give the new sections several mild weeks to root before the ground freezes solid; if a hard freeze is imminent, postpone the job until spring.
To divide, water the plant a day ahead if the soil is dry, cut back dormant or nearly dormant foliage, and dig around the outer edge of the clump. Lift with a spade or garden fork, keeping as much of the root mass together as possible. Shake or rinse away enough soil to see the crown, then separate the clump into sections with several shoots or buds and a healthy amount of attached root.
Hosta roots are forgiving, so a few sliced roots are not a disaster. The important points are not to make tiny, unsupported fragments, not to let the divisions dry in the sun, and not to leave them on a potting bench while you decide where they belong. Replant at the same depth, spread the roots into the hole, firm the soil, and water thoroughly.
Do not fertilize a late division aggressively. Fresh fertilizer can encourage tender top growth when the plant should be settling into dormancy. Prepare the soil with organic matter if it is poor, and save routine feeding for spring when new leaves emerge and the plant can use it. Practical fall division guidance from Epic Gardening likewise treats division as optional, recommends sections with attached roots, and emphasizes a winter-protected site for new transplants (Epic Gardening).
How Much to Water Hostas Before Winter
Hostas prefer evenly moist soil during active growth, but fall watering is not a fixed schedule. Check the soil several inches down and consider recent rain, canopy interception from trees, drainage, and whether the plant was recently moved. A dry established bed may need a deep soaking; a heavy clay site after several wet days needs air, not more water.
Water at soil level in the morning so the foliage and surface can dry. Soak slowly enough that moisture reaches the root zone instead of running off compacted soil. Continue checking until the ground begins to freeze, with extra attention to new divisions and container plants. Once the hosta is fully dormant and the soil is frozen or consistently saturated, stop treating it like a summer plant.
The goal is not to keep the bed soggy through winter. Saturated soil can deprive roots of oxygen and increase the risk of crown or root problems. Good drainage matters as much as moisture, particularly under downspouts or in low beds where a thick mulch layer can hold water against the crown.
How to Mulch Hostas for Winter
Mulch is most useful as a buffer against rapid temperature changes and frost heave, especially for a recent division or a hosta in an exposed bed. Spread a loose layer of shredded leaves, pine straw, straw, or fine bark over the surrounding root zone after the bed is cleaned and the soil has cooled. A layer around 2 to 3 inches is a practical starting point; newly moved plants or very exposed gardens may benefit from a little more, but depth is not automatically better.
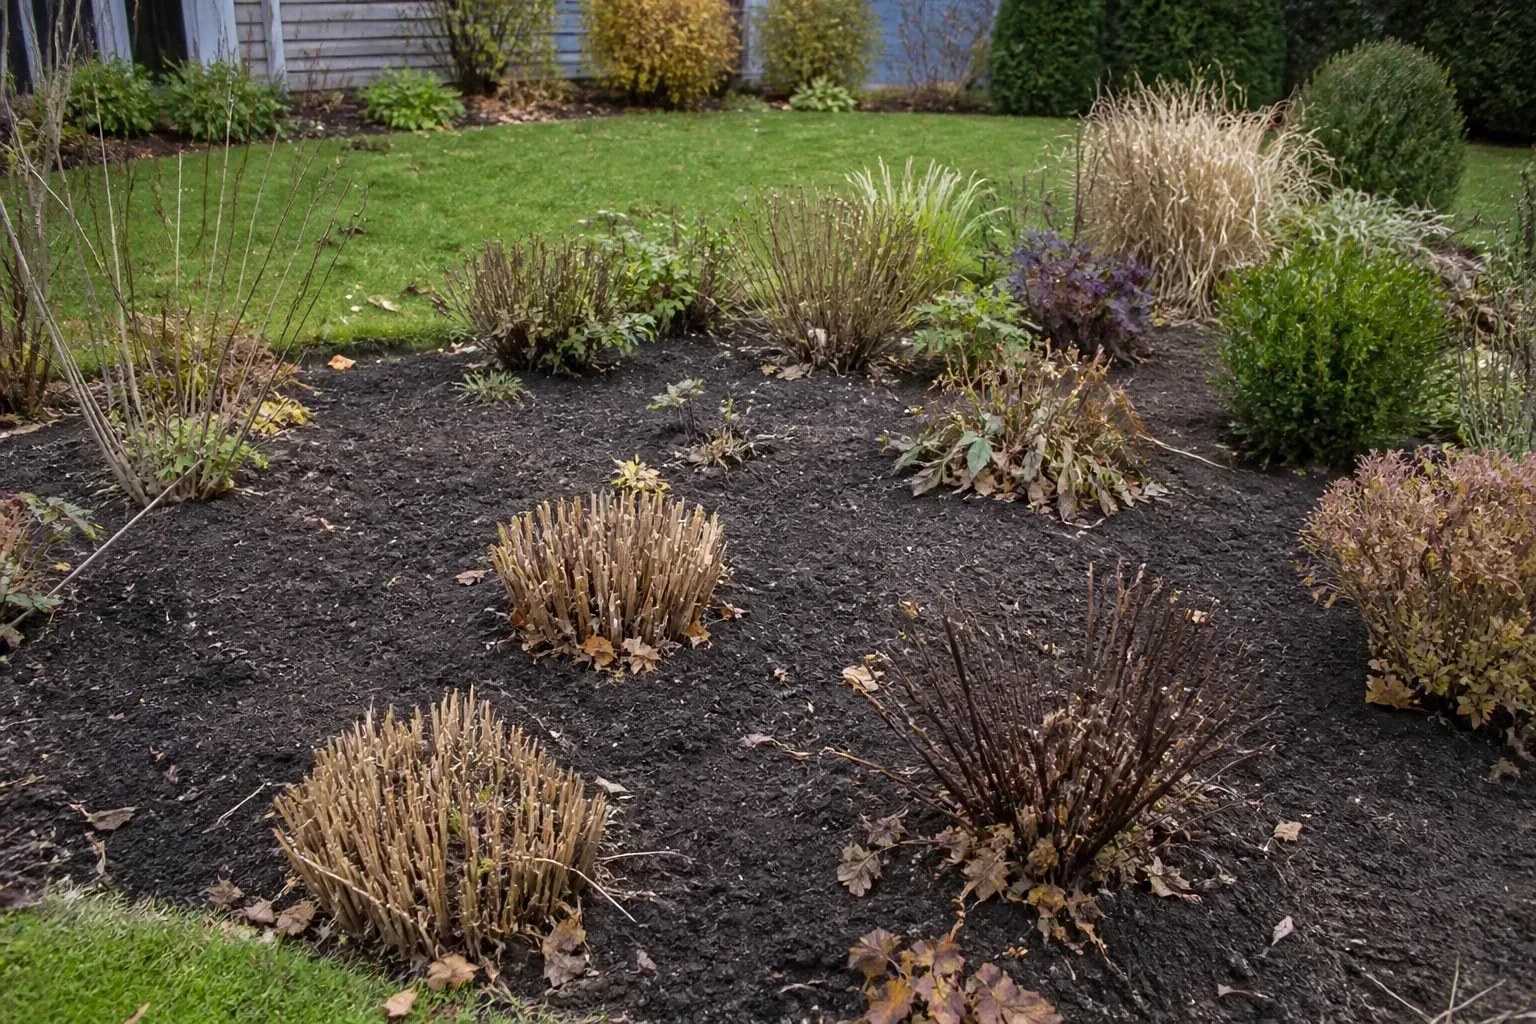
Winter mulch belongs on the surrounding soil, with space left around each crown.
Keep mulch away from direct contact with the crown. A donut-shaped layer around the plant is safer than a mound pressed over the center. Dense, wet material touching the crown can hold moisture where you want air movement, hide rot, and make spring inspection harder. Mulch should insulate the soil, not smother the growing point.
Do not apply a thick blanket while the soil is still warm and the hosta is putting out late tender growth. In most gardens, wait until after natural dieback and after the weather has turned consistently cold. Remove or pull back mulch in spring as new shoots emerge, especially if it has settled into a wet mat. Epic Gardening’s practical fall-care guidance gives a broader 3- to 4-inch range for biodegradable mulch, while thinner layers are often adequate in sheltered beds; the right depth depends on exposure, material, and drainage (Epic Gardening).
Container-Grown Hostas Need a Different Winter Plan
A hosta planted in the ground benefits from the insulating mass of surrounding soil. A pot above ground is exposed on every side, so its roots can experience faster and more extreme temperature changes. The plant may be hardy in your zone while the containerized root ball is still vulnerable, particularly in a small pot, a windy location, or a region with repeated freeze-and-thaw cycles.
In a mild climate, move the pot beside a building or into a sheltered outdoor corner, keep drainage holes clear, and protect it with a loose layer of mulch around the pot rather than sealing the pot in plastic. In a colder climate, sink the nursery pot into the ground or a mulch bed, surround it with insulating leaves, or place it in an unheated garage or shed where it can remain dormant.
Do not bring a hardy hosta into a heated living room and try to keep it growing all winter. Dormancy is part of its normal cycle, and warm indoor conditions with weak light can produce pale, stressed growth. If you use a garage or shed, check the pot occasionally and add a small amount of water only when the mix is dry and temperatures are safely above freezing. The mix should be slightly moist, never waterlogged.
If the hosta is in an expensive decorative pot, consider growing it in a lighter nursery container set inside the decorative one. You can remove the inner pot for winter protection and avoid cracking a ceramic container as wet soil freezes and expands. Bring the plant back out in spring after the harshest freeze risk has passed, and acclimate it to its usual light rather than placing a dormant pot immediately in strong sun.
Diagnose Leaf Damage Before You Cut
Fall can make every hosta look untidy, but not every damaged leaf means the same thing. Natural yellowing across the whole clump is a seasonal signal. A pattern of holes, trails, missing edges, stippling, irregular spots, or a soft crown points to a separate issue that deserves a targeted response.
Slugs, Snails, Deer, Rabbits, and Voles
Slugs and snails leave irregular holes and often a silvery trail, especially in cool, damp beds. Deer can remove large sections of leaf tissue and leave ragged edges; rabbits may clip low foliage and stems. Voles work below the canopy and may tunnel through mulch or feed on roots, causing a plant to loosen, wilt, or disappear even when the leaves initially look normal. The Missouri Botanical Garden’s hosta problem guide is useful for comparing these damage patterns with scorch, nematodes, and disease rather than lumping every hole under “pests” (Missouri Botanical Garden: Hosta Problems).
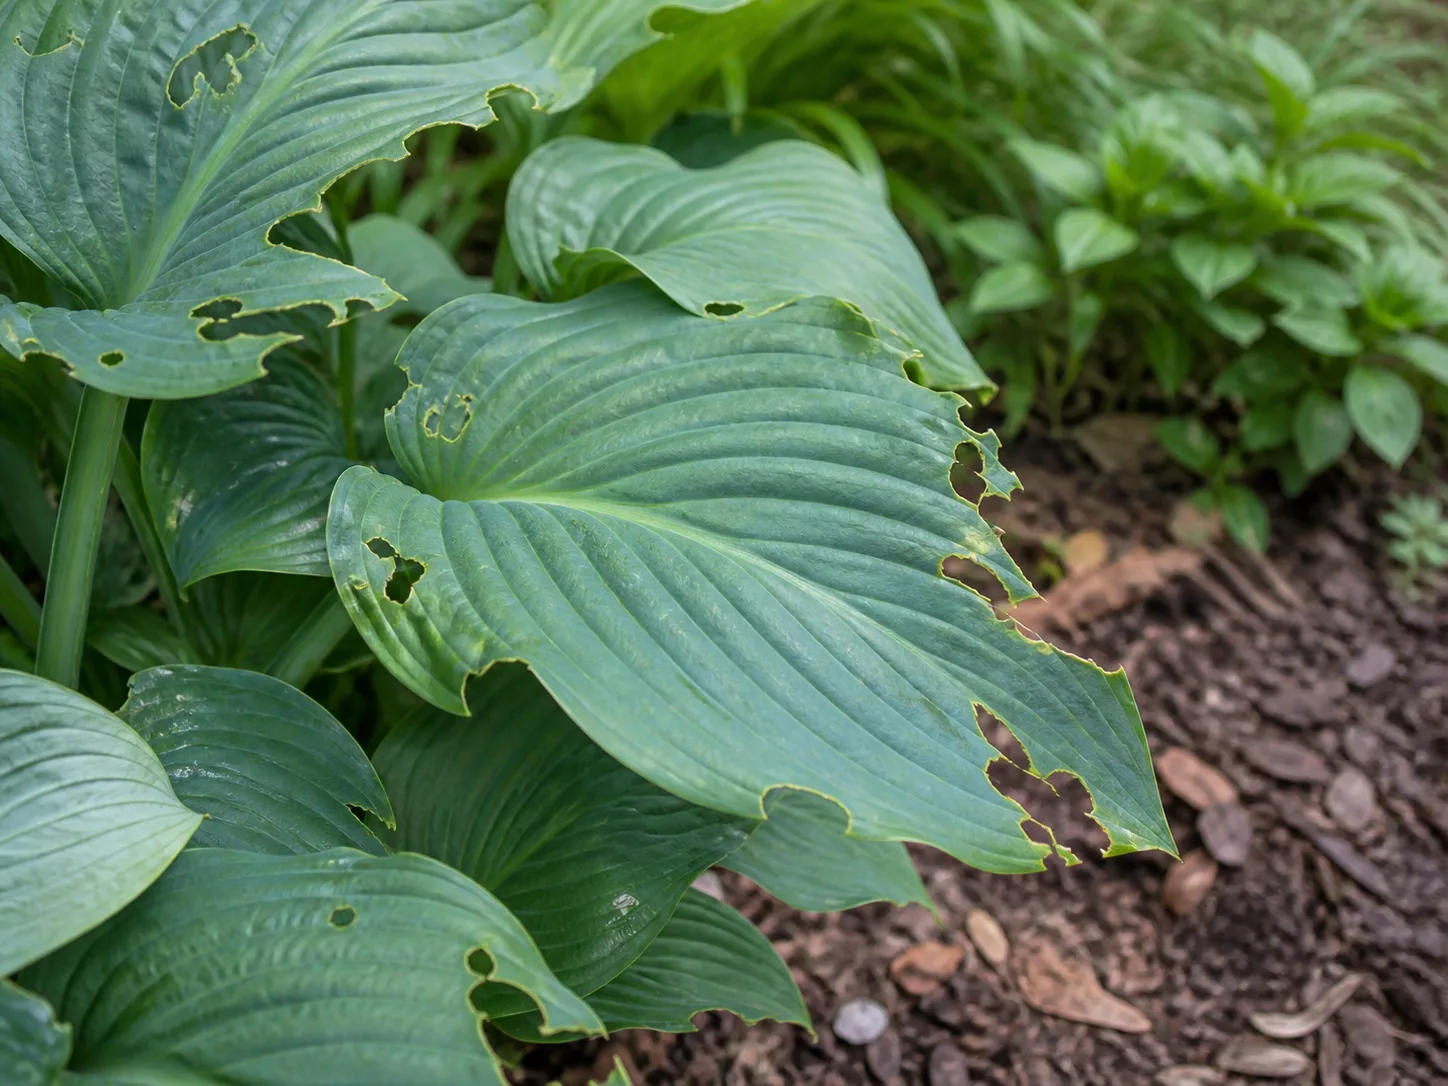
Holes and ragged edges are clues to investigate before you decide what to remove.
Removing collapsed foliage can reduce shelter and make signs easier to find, but it is not a complete pest-control plan. Rake away thick wet debris, inspect beneath boards and dense mulch, and look for runways or disturbed soil if voles are suspected. For deer and rabbits, a properly installed barrier is usually more reliable than repeatedly cutting damaged leaves. For slugs and snails, reduce hiding places and use only products labeled for the site and pest, following the label exactly.
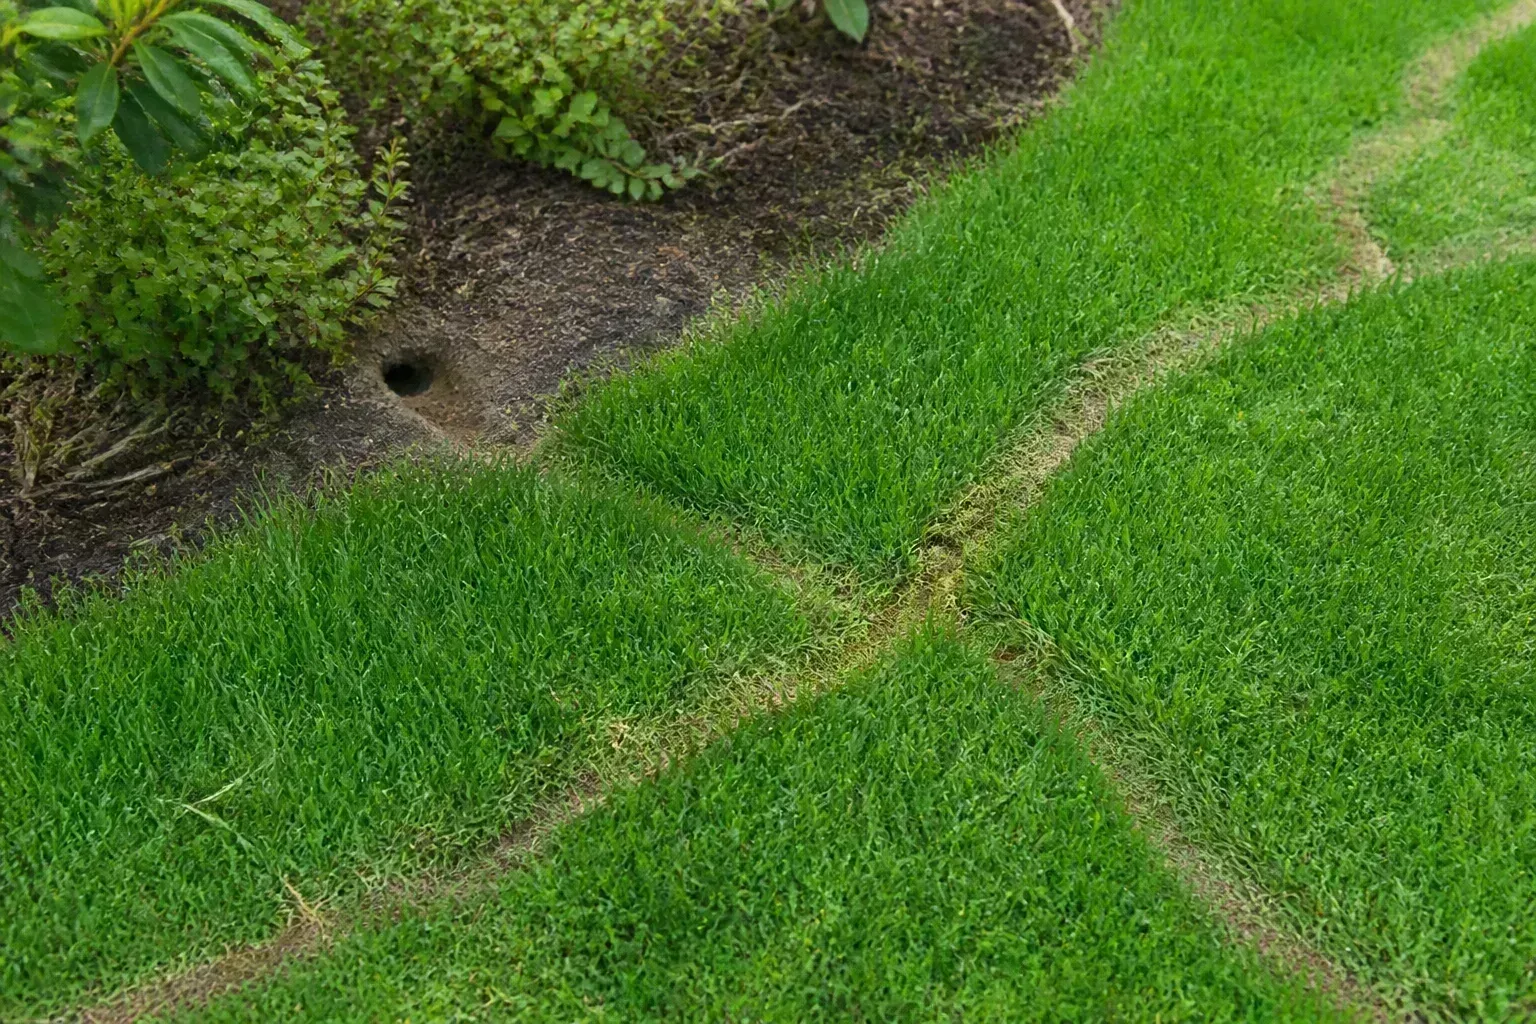
Vole signs appear at soil level, so inspect beneath mulch as well as on the leaves.
Disease, Rot, and Non-Pest Stress
Brown margins can come from drought, sun, wind, or salt rather than a contagious disease. The RHS recommends moist but well-drained soil and shade suited to the cultivar; moving a hosta out of harsh afternoon sun can be more useful than pruning it repeatedly. If the same plant browns every summer, record its light and watering conditions before you decide that fall cleanup solved the problem.
Be more cautious with unusual mottling, puckering, distorted new growth, expanding leaf spots, or a soft, collapsing crown. Clean pruners between plants, remove suspect debris, and do not divide or share a clump with unexplained symptoms until you have a reliable diagnosis. Cutting off bad leaves may improve appearance, but it cannot cure a virus, fix poor drainage, or remove a soil-dwelling pest.
The crown is a key checkpoint after cleanup. It should feel firm rather than mushy, and the surrounding soil should drain after watering. If the crown is soft, foul-smelling, or repeatedly declining, stop adding fertilizer or mulch and seek advice from a local extension service. A diagnosis is more valuable than another round of general-purpose treatment.
Common Fall Hosta-Care Mistakes
Cutting all the green leaves too early is the most common mistake. A hosta that looks tired may still be feeding its crown. Wait for natural dieback, while removing only leaves that are clearly dead, diseased, or broken.
Treating the first frost as an automatic haircut signal is another. A light frost may not have ended the growing season for the whole clump. Use leaf texture and color, then return after a harder freeze if needed.
Dividing too late creates avoidable risk. A late division can survive, but if the ground is about to freeze, the roots have little time to establish. Keep the plant intact and divide in spring instead.
Piling mulch over the crown can be as damaging as leaving the bed bare. Spread mulch over the root zone, keep it loose, and leave a small air gap around the center. Pull it back in spring before new shoots are trapped underneath.
Watering by calendar instead of soil condition leads to both drought stress and rot. Check the root zone, account for rainfall, and water deeply only when the soil needs it.
Using a hedge trimmer where you cannot see the crown risks cutting neighboring plants and next year’s growing points. Hand tools are slower but more precise, especially in a mixed shade border.
Assuming cleanup fixes wildlife or disease leaves the underlying problem in place. Match holes and symptoms to the likely cause, sanitize tools, improve drainage, add a barrier, or ask for an extension diagnosis when the pattern does not fit a simple seasonal decline.
Conclusion
To care for hosta plants in the fall, start with the leaves rather than the calendar. Keep green foliage working, wait for natural dieback or a hard freeze before a full cutback, and choose fall cleanup when sanitation, pests, or spring scheduling make it worthwhile. Divide only healthy, overgrown clumps early enough for roots to settle, then water dry beds and new transplants before the ground freezes.
Finish with a loose mulch layer over the root zone, not a wet mound over the crown. Give potted hostas extra insulation because their roots are exposed to faster temperature changes, and diagnose unusual damage before pruning or propagating. Done in that order, fall care becomes a short, weather-aware routine that protects the crown and makes spring emergence easier to manage.



