How to Get Rid of Cucumber Beetles
Identify cucumber beetles, protect young cucumbers and squash, and stop repeat outbreaks with an integrated garden-by-garden control plan.
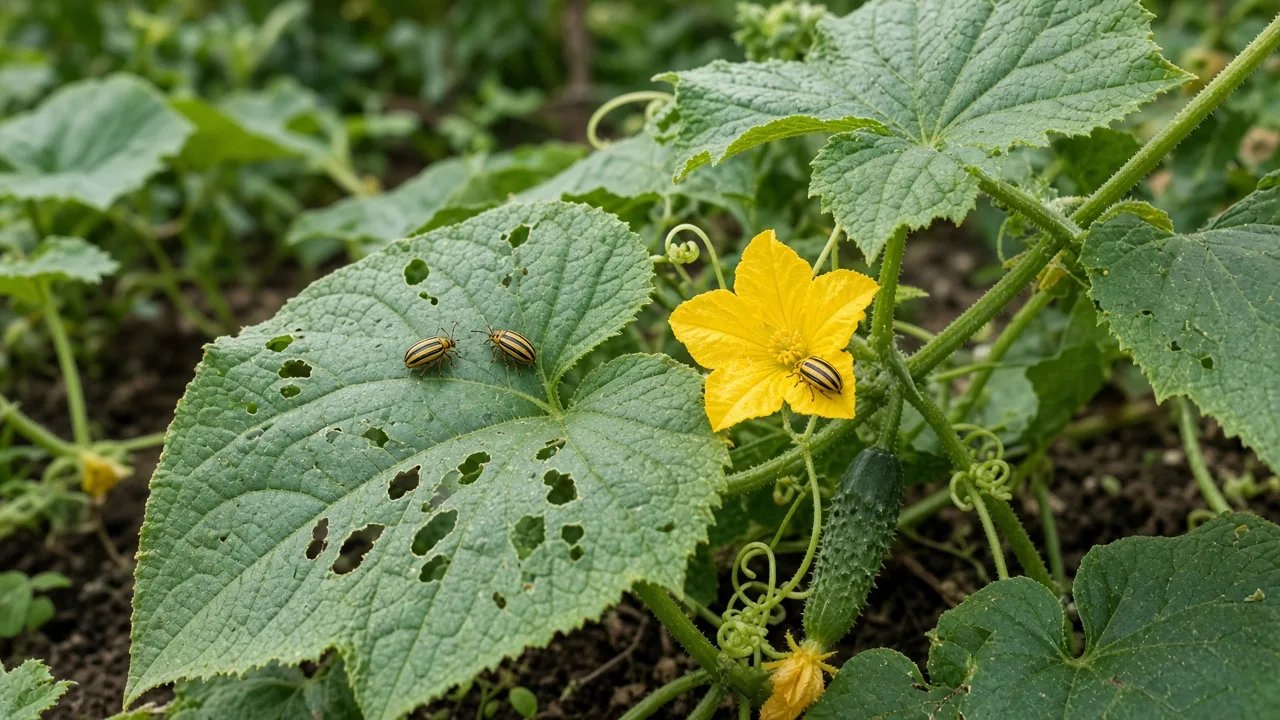
The most effective answer to how to get rid of cucumber beetles is not one magic spray. It is a sequence: confirm the insect, protect young plants immediately, remove the adults you can reach, and use a barrier before the next wave arrives. That matters because cucumber beetles can damage leaves and flowers, scar fruit, and sometimes transmit bacterial wilt or mosaic viruses while the feeding marks still look minor.
For a home garden, aim for protected plants and low disease risk, not a perfectly empty garden. Older, vigorous vines can often tolerate a few beetles; seedlings and freshly transplanted cucumbers, melons, squash, pumpkins, and related crops cannot. The right tactic therefore depends on the plant’s age, whether it is flowering, and whether you are seeing chewing damage or a true wilt disease.
Start with the beetle, not the spray bottle
Adult cucumber beetles are small, usually about 1/4 to 3/8 inch long, with a yellow-green body. Striped species have three dark stripes running lengthwise over the wing covers; spotted species have a row of dark spots. They are quick flyers, often hide under leaves, and may drop when disturbed. UC IPM describes the common western species and their soil-based larval stage.
The name is confusing because several related beetles attack cucurbits. Striped cucumber beetles include Acalymma vittatum and Acalymma trivittatum, while spotted cucumber beetles belong to Diabrotica species. They are not the same insect as a squash bug: squash bugs are larger, flatter, and gray-brown, and their nymphs cluster around stems. A striped cucumber beetle can also be mistaken for a small lady beetle, but cucumber beetles have longer, threadlike antennae.
The markings that separate cucumber beetles from look-alikes
Check several plants rather than identifying one blurry speck. Look on the undersides of leaves, inside open flowers, along tender stems, and around the crown of a young plant. If the insects are yellow-green with black stripes or spots and they scatter when you approach, cucumber beetles are a strong possibility.
The damage also offers clues, but it is not proof by itself. Irregular holes and scraped patches can come from many chewing insects. Cucumber beetles often leave small holes, shallow pits, and scars on leaves, flowers, stems, and young fruit; larvae feed below ground, so you will not necessarily see the whole life cycle above the soil.
Why young cucurbits are the priority
Seedlings have little leaf area and few growing points. A handful of beetles can remove a meaningful share of that plant’s photosynthetic surface in a day, chew through a stem, or repeatedly feed at the crown. Older vines have more reserves and can replace some damaged foliage, which is why extension recommendations focus on early protection instead of treating every late-season beetle as an emergency.
There is a second reason to act early: disease transmission is not proportional to the number of holes you see. Bacterial wilt can move from an infected plant to a healthy one when a beetle feeds, and symptoms may appear later as daytime wilting that initially recovers overnight. University of Minnesota Extension explains that striped cucumber beetles can carry the bacteria that cause bacterial wilt.

Feeding damage and disease transmission are separate problems
Do not assume every wilted cucumber has bacterial wilt. Heat, drought, root injury, stem damage, and saturated soil can all cause drooping. Conversely, a plant may already be infected before its leaves collapse, so killing the visible beetles does not reverse the infection.
If one vine wilts in the heat and recovers in the evening, inspect the whole plant and its soil moisture before pulling it. If the wilt progresses, stems become affected, or a cut stem releases a milky bacterial ooze when tested with clean tools and water, treat the plant as suspicious. Remove a confirmed diseased plant promptly, bag it, and do not compost it; disinfect pruners and avoid saving seed from it.
The 10-minute cucumber beetle triage plan
When you find beetles, do these four things in order:
- Count them on the youngest plants. Inspect five to ten plants, including undersides and flowers. One beetle on a tiny seedling deserves more attention than several on a large, established vine.
- Remove the adults you can see. Hold a cup of soapy water beneath the leaf and tap or brush the beetles into it. A small hand vacuum can work too, provided you empty it away from the garden.
- Cover unflowered plants. Use a floating row cover with the edges sealed against the soil. A cover that has gaps at the corners is an invitation, not a barrier.
- Choose one preventive layer. For a small bed, kaolin clay or a row cover is usually more dependable than scattering several homemade sprays. For a larger planting, combine monitoring, crop rotation, and a labeled treatment only if damage justifies it.
If the plants are already flowering, you must decide whether the cover can remain while you hand-pollinate, or whether it should come off during bloom to let bees reach the flowers. That timing decision is more important than adding a second low-impact spray.
Nine control methods that work best in combination
1. Hand-pick adults into soapy water
For a backyard plot, hand-picking is often the fastest way to reduce the immediate adult population. Go in the morning when beetles are cooler and less active. Move slowly, place a container under the leaf, and touch the insect from the far side so it falls toward the container rather than into the mulch.
This method works best when repeated daily for several days and when you are protecting a small number of young plants. It does not reach eggs or larvae in soil, and it will not stop beetles flying in from a neighboring field. Think of it as removing today’s breeding and feeding adults while the barrier handles tomorrow’s arrivals.
2. Cover seedlings with a floating row cover
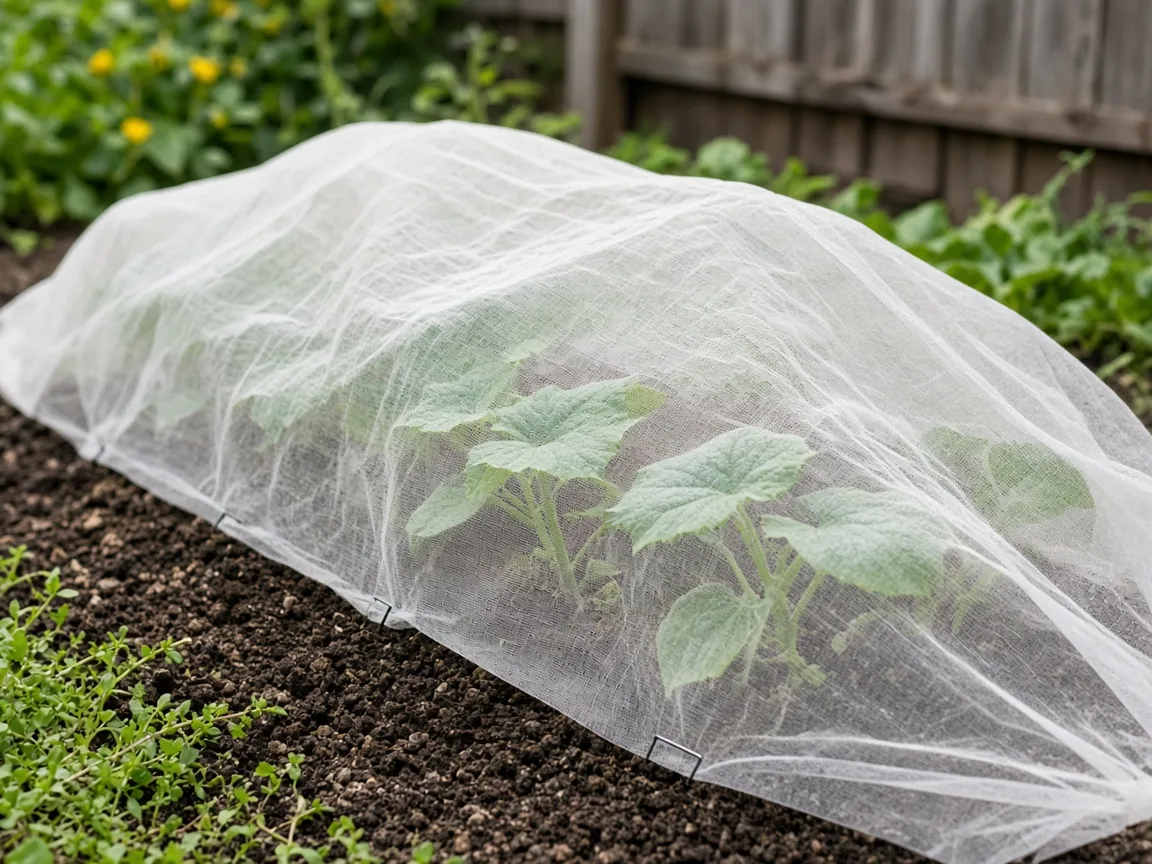
A floating row cover is the strongest first-line tool for vulnerable cucurbits. Install it immediately after sowing or transplanting, use hoops if leaves would press against the fabric, and bury or pin every edge. The barrier must go on before beetles are feeding; covering an infested plant simply traps pests inside.
Remove the cover when flowers need pollination, or keep it in place and hand-pollinate if the crop and weather make that practical. Penn State Extension notes that row covers, rotation, and perimeter trap cropping work best as an integrated system, not as a single permanent fix. Its guidance also highlights the tradeoff between cover timing and pollination.
3. Use yellow traps as monitors, not a whole-garden solution
Yellow sticky cards can tell you when adults are arriving and whether pressure is rising. Place them near, but not directly against, the crop and inspect them regularly. They are useful for timing a closer plant inspection, especially in a raised bed or greenhouse.
Do not treat a few trapped beetles as proof that the crop is protected. A card catches only the insects that contact its adhesive, and bright yellow traps can also catch beneficial insects. Remove them when monitoring is no longer useful, and never use them as a substitute for a sealed row cover or plant inspection.
4. Apply kaolin clay before beetles settle in
Kaolin clay is a particle-film barrier. Mixed with water and sprayed according to the product label, it leaves a pale coating that makes foliage and stems less recognizable and less comfortable for feeding insects. It is a deterrent, not a poison, so coverage matters: include new growth and reapply after heavy rain or rapid growth.
Timing is critical. Cornell’s striped cucumber beetle fact sheet describes kaolin clay as a colonization deterrent that should be applied before beetles arrive. If beetles are already numerous, knock down the adults first and then coat clean foliage. Expect a ghostly white appearance and wash edible produce before eating, following the label.
5. Try a perimeter trap crop carefully
Some squash types, especially Blue Hubbard, can be more attractive to cucumber beetles than the crop you are trying to protect. A perimeter planting can concentrate beetles where you can monitor them, but it can also create a larger local food source if you plant it and then ignore it.
Use a trap crop only when you can inspect it frequently and manage the beetles on it. Planting a single attractive squash beside a small cucumber bed without a removal plan may increase pressure rather than reduce it. Keep the trap crop outside the main row, and do not let its vines form an unmanaged bridge into the protected crop.
6. Use mulch and reflective film as supporting barriers
Clean straw or another suitable mulch can make the soil surface less exposed and reduce splash, but ordinary mulch is not a force field. Reflective silver mulch can disrupt host-finding for some beetles, particularly early in the season, yet it has installation, heat, and disposal tradeoffs.
Use mulch to support row covers and good watering, not to replace them. Keep organic mulch a few inches from the crown, because constantly damp plant bases create their own problems. Do not use shiny material that overheats roots, sheds plastic, or prevents you from checking the soil.
7. Encourage natural enemies without expecting miracles
Predators and parasitoids are part of a healthy garden, but they rarely eliminate a cucumber beetle outbreak on their own. The tachinid fly Celatoria diabroticae attacks cucumber beetles, and generalist predators may take adults or eggs. Broad-spectrum spraying can remove those allies along with the pest.
Grow nectar plants nearby, keep some habitat undisturbed, and identify insects before killing them. Flowering plants do not repel cucumber beetles in a guaranteed way; their value is supporting the wider food web and pollination. If seedlings are being stripped, use a physical barrier while natural enemies build.
8. Consider beneficial nematodes for the soil stage
Entomopathogenic nematodes can target some soil-dwelling larvae, but results vary with species, soil moisture, temperature, application quality, and the beetle species present. They are not an instant cure for adults already chewing leaves.
If you try them, buy a product labeled for the pest and crop situation, apply at the recommended time, keep the soil moist as directed, and do not expect the same result in every bed. Cornell lists nematodes as one possible tool for the larval stage, while extension guidance generally treats them as one part of an integrated plan.
9. Use soap, oil, or an approved insecticide only when justified
Insecticidal soap and horticultural oil can kill exposed adult beetles on contact, but they have little residual action and must thoroughly contact the insect. Neem products vary by formulation and label; neem is not a universal cure, and spraying flowering plants can expose pollinators. Apply only when the label permits the crop, follow the stated dilution, test a small area if heat is high, and spray when bees are not foraging.
For a severe outbreak on valuable young plants, a crop-labeled insecticide may be appropriate. Read the entire label for the active ingredient, edible-crop interval, protective equipment, re-entry rules, and pollinator precautions. Product availability and legal directions change, so an old blog recipe is not a substitute for the current label. UC IPM cautions that pesticide information can change and that treatment should be directed at adult beetles.
Avoid homemade dish-soap mixtures, vinegar, bleach, and essential-oil cocktails. They can burn leaves, harm soil organisms, or injure beneficial insects without giving dependable control. More product is not more effective; it is often just more plant stress.
How to prevent the next generation
Rotate cucurbits and remove hiding places
Do not plant cucumbers, squash, melons, and pumpkins in the same bed year after year when you have room to rotate. Move cucurbits as far as practical from last year’s planting, especially if beetles were abundant. Rotation is not perfect because adults can fly in and spotted cucumber beetle larvae may use non-cucurbit hosts, but distance can delay the first wave.
Remove volunteer squash and diseased vines promptly after harvest. Clear dense debris that gives overwintering adults shelter, but do not turn the garden into bare soil or destroy every habitat plant. The practical target is old cucurbit residue and abandoned host plants, not a sterile yard.
Start new plants in a clean bed, inspect nursery transplants before planting, and cover them from day one. Keep a simple note of the first beetle date, crop stage, weather, and damage. That record will tell you when to install covers next year far more reliably than a generic calendar date.
When wilting means more than beetle damage
Beetle holes alone do not diagnose bacterial wilt. The warning pattern is a plant that wilts repeatedly, especially during the day, then fails to recover as temperatures ease. One leaf can go first, followed by additional leaves and stems. The plant may still look green while the vascular infection advances.
Compare affected and unaffected vines. Check soil moisture at root depth, inspect the stem for chewing, and look for squash bugs or root injury. If the evidence points to bacterial wilt, remove the plant rather than nursing it with extra water or fertilizer. There is no home spray that cures an infected vascular system, and leaving the plant in place gives beetles more opportunity to move the pathogen.
A seven-day rescue schedule
Day 1: Identify the beetle and count adults on five to ten plants. Hand-pick visible adults, remove severely wilted or clearly diseased plants, and cover healthy seedlings.
Day 2: Inspect the bed edges, flowers, undersides, and nearby volunteer cucurbits. Seal row-cover gaps. If you are using kaolin clay, coat clean foliage according to the label.
Days 3–4: Check in the morning and repeat hand-picking. Look at sticky cards as monitoring tools, not as the treatment. Recheck moisture and wilt symptoms separately from chewing damage.
Days 5–6: Reapply a washed-off particle film if the label calls for it. Decide whether flowering plants need uncovered pollination, hand-pollination, or a different barrier plan. Do not spray just because beetles are present; spray only when crop stage and damage justify it.
Day 7: Compare the number of beetles and new damaged leaves with Day 1. If seedlings are growing faster than they are being damaged, continue the barrier and monitoring routine. If damage is accelerating, consult your local extension service and the current crop label for a targeted next step.
Common mistakes that make outbreaks worse
The first mistake is waiting for dramatic damage. By the time a seedling is full of holes, it may have already lost the growing advantage that lets it outgrow the beetles. Inspect when plants emerge, not when the leaves look shredded.
The second is covering an infested bed without checking underneath. Remove or treat the beetles first, then seal the cover. The third is leaving a trap crop unmanaged; an attractive plant is useful only if it concentrates pests where you can act.
Another mistake is removing row covers at the first flower without a pollination plan. You may trade beetle protection for poor fruit set. Finally, do not confuse “organic” with “harmless.” Neem, soap, pyrethrins, oils, dusts, and other permitted products can injure pollinators or you if used carelessly.
Conclusion: protect the vulnerable window
You do not need to wage war on every cucumber beetle in the neighborhood. Protect the crop when it is small, inspect consistently, remove adults early, and use a sealed row cover or correctly timed kaolin clay before pressure peaks. Add rotation, cleanup of host residue, and a thoughtful pollination plan so the same bed is less attractive and less vulnerable next season.
The practical goal is simple: fewer beetles feeding on young plants, fewer opportunities for disease transmission, and healthy vines that can tolerate the occasional visitor. Start with the youngest plant in the bed today; that is where one good decision can save the harvest.



